Table of Contents
Advertisement
Owners Manual and Service Record
Quingo Flyte
This manual must remain with the product throughout
its life so please keep it in a safe place.
Complete all the information within this document and if any items
are not clear contact your service provider immediately.
NOTICE
This product was supplied by.
Product Model Number...............................................................
Serial Number...........................................................................
Date of Purchase......................................................................
This product is manufactured by: AVC LTD,
Sovereign Court, 230 Upper Fifth Street, Central Milton Keynes, Bucks MK9 2HR
Advertisement
Table of Contents

Summary of Contents for Quingo Flyte
- Page 1 Owners Manual and Service Record Quingo Flyte This manual must remain with the product throughout its life so please keep it in a safe place. Complete all the information within this document and if any items are not clear contact your service provider immediately.
-
Page 2: Table Of Contents
Technical Information Regarding EMI Guarantee & Warranty Technical Specification Technical Specification Important Notes Part 2: Quingo Docking Station How to ‘Load’ the Quingo Flyte 37-47 How to ‘Unload’ the Quingo Flyte 48-57 How to Install the Quingo Docking Station 58-68... -
Page 3: Part 1: Quingo Flyte
Quingo Flyte. The photographs in this document depict the Quingo Flyte. ALWAYS MAINTAIN THE VEHICLE CORRECTLY AND ENSURE ONLY A QUINGO TRAINED TECHNICIAN SERVICES IT REGULARLY. Warning:- Any modifications made to the Quingo Flyte or Docking Station will invalidate the warranty. Safety Notices Within this manual there are important safety notices. -
Page 4: Intended Use Of The Vehicle, Intended User
Intended Use of Scooter & Intended User Intended Use of the Vehicle Designed solely for use by a disabled person (up to the maximum recommended weight) who requires a mobility scooter with maximum versatility, a safe, comfortable seating position and good manoeuvrability. This unit can be transported in the rear of the vehicle secured to the docking station. -
Page 5: Emi Information & Life Expectancy Of The Product
EMI Information & Life Expectancy of the Product. Information regarding Electromagnetic Interference (EMI) This section contains information on the possible effects of electromagnetic interference to your vehicle. EMI refers to the effects electromagnetic energy might have on the control system of your vehicle. -
Page 6: Overview Of Product
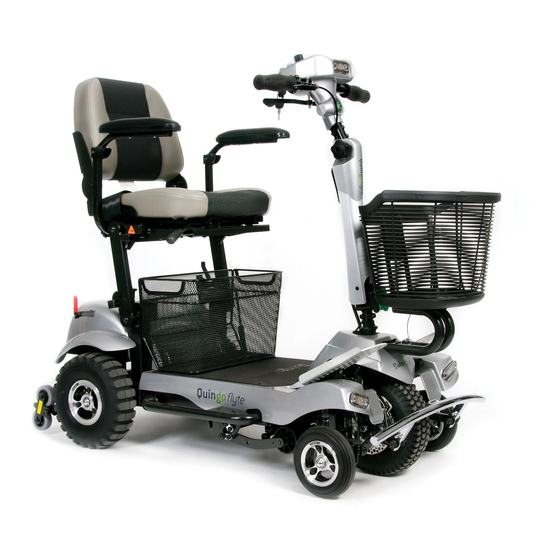
Overview of Quingo Flyte The Quingo Flyte has many features. It is important that you understand all the functions and parts of the product before you get started. The diagram below shows the main features of the scooter and their location on the vehicle. - Page 7 Overview of Quingo Docking Station The Quingo Docking Station has many parts. It is important that you understand the location of the parts for reference throughout the handbook and DVD. The diagram below shows the main parts of the docking station.
-
Page 8: Display And Controls
Display & Controls Your Quingo has many features that other scooters do not have. It is important that you understand all the functions. The multi-feature digital dash/ LCD display: Insert the ignition key and turn the switch to the right, the display will light up. The only information you need to know for now is the... -
Page 9: Speed Control
Display & Controls When various buttons are pressed they will be indicated on the display. Let’s look at the function of the main switches and how they are displayed. Other additional features we will explain later. Additional Notes on Switches Notice that you have 2 horn buttons accommodating both left and right handed people. -
Page 10: Display And Controls
Display & Controls WARNING NOTICE!! The lever mechanism as shown in the diagram below should be treated with care as it could become damaged if misused. Do not push or pull both levers in at once. This will damage the mechanism. Carry out the following recommended checks:- 1. -
Page 11: Emergency Brake
Emergency Brake A Brief Explanation of How The Brakes Work On Your Scooter. Your scooter has 3 braking systems:- 1. The First is the emergency brake. This is situated on the tiller (see image below). This is a hand operated brake to be used in an emergency only. 2. -
Page 12: Free Wheel Device
2. NEVER RELEASE THE BRAKE ON A SLOPE. ONLY ON FLAT GROUND 3. ALWAYS REMOVE THE IGNITION KEY 4. NEVER RELEASE THE FREEWHEEL LEVER WHEN THE FLYTE IS ON THE DOCKING STATION. When you have finished moving the scooter push the freewheel lever... -
Page 13: Safety Display Warning
Safety Display Warning If you forget to lock the freewheel device and try to use the scooter you will see this indication (as circled) on the display: The spanner means there is a fault and the number 5 means the freewheel is not locked and the scooter will not drive, To clear the fault: 1. -
Page 14: Day Time Running Lamps
Day Time Running Lamps For your safety the Quingo Flyte is equipped with Daytime Running Lamps. The 2 lower front lamps situated near the outer front wheels (Arrowed) remain permanently ‘ON’ when the ignition is switched on. These lamps cannot be switched off. -
Page 15: Anti-Tip Device
Anti-tip Devices The Flyte is fitted with Kerb Master- “Powered Anti Tip” a patented feature that engages the 2 wheels when descending a slope or kerb. Should the anti-tip wheels come to rest on a kerb there is a possibility that the machine will become “Beached”, this means the kerb is higher than the distance between the anti-tip... -
Page 16: Seat Adjustments
IMPORTANT INFORMATION: When you are preparing to ‘Load’ the Flyte into your car and before starting the seat folding process you need to make sure the seat is in the rear position (furthest from the tiller) to ensure the Flyte folds down to it’s most compact position. -
Page 17: Footplates & Seat Belt Adjustments
Footplates and Safety Belts Footplate Adjustment The footplates can be adjusted for legroom. It is recommended that a service engineer carry this out. If you need to adjust them back or forward, loosen the lock, move into position and lock (you will need a 5mm hex key for this adjustment). Some vehicles are fitted with a lock nut. -
Page 18: Transporting The Scooter
The following process shows how to fold your Quingo Flyte, this can be in a confined storage location or ready to load into your car:- To ensure the Flyte is folded to a compact position, make sure the seat is in the rear position (furthest from the tiller) Remove both Armrests Remove Front Basket and Centre Basket. -
Page 19: Transporting The Scooter
The Remote control is located in the rear lockable box. This should only be used when transporting the Flyte on the docking station. Caution: Do not leave the remote control out in the rain or allow it to get wet. -
Page 20: Front & Centre Baskets
To fit the basket simply line up the magnets, the basket should be attached by magnets Maximum Weight The maximum load weight of the centre basket is 10kg Caution: Please make sure both front and centre baskets are removed before folding the Flyte for transporting. -
Page 21: Battery Charging, General Care
Battery Charging Connection Instructions When your new Flyte is delivered the installed batteries will be partially charged. Fully charge before use. 1. Place your scooter in an area that is dry and well ventilated. Make sure a power point is nearby. - Page 22 Charging your Batteries. 1. Always use Gel/AGM type batteries as replacements. NEVER use car lead acid batteries. If in doubt ask your Quingo Service Provider. 2. Always use the correct charger. Never use a lead acid (Car type) charger. If the fully charged light does not come on (normally green, varies with charger type) you may have a battery or charger problem.
-
Page 23: Daily Check List & Safety Information
Daily Check List & Safety Information Items you should check on a daily/ weekly basis: Your Daily Check list 1. Visually check the machine for damage, If your tyres are pneumatic, check the tyre pressures (30psi/ 2.1bar) IMPORTANT POINT: Inflation of your tyres is very important. If they are below the recommended pressure it will affect the tyre wear, steering and range of the vehicle. -
Page 24: Important Notes When Driving Your Vehicle
Important Notes when Driving your Vehicle Driving your vehicle Whether or not this is your first mobility vehicle, read these guidelines as all vehicles differ. Failure to do this may cause damage to you, a third party or the vehicle. Check the weather. -
Page 25: Storage & Cleaning
Storage & Cleaning Read this before driving the vehicle! Storage and Corrosion Prevention Always keep your vehicle in a dry area. Do not leave outside in the elements. If you do not have an area to store the vehicle, cover it with a fully waterproof cover. Cleaning the vehicle Only use a damp cloth and gentle detergent Do not use any abrasive or scouring liquids... -
Page 26: Troubleshooting Guide
– Switch into freewheel and the vehicle should move easily (if not contact the service provider). VEHICLE WILL NOT CLIMB OR The Flyte is fitted with bespoke DESCEND THE DOCKING tyres, these may need replacing. STATION. Only fit ‘Quingo Flyte ultra-grip Check: Are the wheels slipping? rear tyres’. -
Page 27: Scooter Fault Indicators
Scooter Fault Indicators There are 3 stages when reporting a fault. Remember that the Service Provider is there to help you. They will ask you specific questions that need to be answered honestly. This will allow the service engineer to be equipped with the correct part when visiting you. -
Page 28: Common Question
Can I fit weatherproofing such as a canopy? No, as the Flyte is transportable and is required to be folded to transport, a fixed canopy cannot be fitted. How long will my batteries last and what range can I expect? This is a very difficult question and not one that has a straight answer. -
Page 29: Reporting A Fault And Servicing Information
Reporting a fault and Servicing Information Breakdown (UK) – Phone 01582 430900 If your vehicle breaks down please do not instruct a 3 party (a dealer, garage or friend) to fix the problem. Phone the Service Department immediately as failure to do so will invalidate your warranty. -
Page 30: Service Check List Quingo Service Engineer Only
Service Check List (for the Quingo Engineer) (Please Tick Box) Check page 27 for fault codes Initial diagnostic road test Wheel bearings wear and lubricate Wheel alignment (3 front wheels), must be a negative toe in 1 to 5 degrees Steering and tilting mechanism. -
Page 31: Service Log Quingo Service Engineer Only
Service Log (For the Quingo Engineer) service Engineers Name Engineers Signature service Engineers Name Engineers Signature service Engineers Name Engineers Signature service Engineers Name Engineers Signature service Engineers Name Engineers Signature Staple additional pages as required. This page must be filled in. Add additional repairs. -
Page 32: Technical Information Regarding Emi
Technical Information Regarding EMI Important Technical Information regarding Electromagnetic Interference (EMI) The intensity of interference from electromagnetic energy is measured in volts per metre (v/m), which refers to the strength of the electrical source (voltage) as it relates to the distance away from the object being considered (in metres). -
Page 33: Guarantee & Warranty
5. To apply the warranty conditions should your vehicle require attention, under these arrangements, notify Quingo’s UK Authorised service provider Forever Active immediately, giving full information about the nature of the defect. Forever Active will arrange for work under the warranty conditions to be carried out by an authorised Forever Active engineer. -
Page 34: Technical Specification
Quingo Flyte & Docking Station Technical Specification Flyte Class Type Classified according to EN12184 as class B mobility unit Speed 6kph (4mph) Length (without basket) 110cm (43.3”) Length (with basket) 126cm (49.6”) Width 59cm (23.2”) Height (ground to top of seat) 101cm (39.8”) -
Page 35: Technical Specification Important Notes
Quingo Flyte & Docking Station Technical Specification Range: Up to 23 miles (37km) with standard battery configuration. The range can be increased up to 34 miles (54km) with the optional 2 x 22Ah batteries which can be fitted into the rear lockable box. -
Page 36: Part 2: Quingo Docking Station
Part 2 Quingo Docking Station. -
Page 37: How To 'Load The Quingo Flyte
How to ‘load the Quingo Flyte The Quingo Flyte and Docking Station is a unique product to the mobility market. It is essential to have a full understanding of how the product works, with its ease of use and that no lifting of heavy scooter parts are required. - Page 38 Step 2- Slide out the docking station ramps. a) Fully lift your tailgate. The Docking Station will be fully assembled and secured in position by your engineer, you should still carry out a few safety checks yourself on a daily basis to ensure the Docking Station is still secure.
- Page 39 Step 2- (c) Photograph to show the ramps being lowered using the assisting Cane. Check that the ramp maximum angle indicator is showing green only and is not in the red (which indicates the angle is too steep)
- Page 40 Step 3- Position and prepare the Flyte for loading. a) Position the Flyte to the centre ramp using the front bumper alignment arrowsand stop the Flyte before making contact with the ramp. STOP The 2 Yellow Arrow stickers can be seen from your seated position.
- Page 41 Step 3. b) Ensure that the seat is pushed back to its furthest position (the Flyte will become more compact and provide more clearance when being transported) c) Remove the key from the ignition. d) Remove the front basket by releasing the locking pin.
- Page 42 Step 4- The Flyte folding sequence. A Useful Tip - Try and let the product do the work; do not force any parts throughout the folding process.
- Page 43 Release the Tiller locking lever and lower the tiller onto the seat’s velcro fastening. The Flyte is now fully folded. A Useful Tip - Practise folding and unfolding the Flyte numerous times to get familiar with the above steps.
- Page 44 For the following step, you may choose to use the ‘Assisting Cane’ to avoid unnecessary bending if you require. a) The rear green lever must be set to Flyte mode. Push down on the lever, the rear and front lights will now flash rapidly - Rapid flashing means another step is necessary.
- Page 45 Next pull the side lever up to the red ‘Flyte Mode’ position; the lights should now flash once a second - the Flyte is now ready to load. If the lights flash at a high speed you have 1 further operation, repeat step 5.
- Page 46 Press the silver ‘UP’ button continuously until the Flyte is fully inside the car where it will automatically power down. e) Replace the remote into the lockable box.
- Page 47 Note: The ramps should not pull outwards when locked. c) Check the ramps are secure and close the tailgate. Note: The ramps should not pull outwards when locked. Do not activate the guide roller levers once the Flyte has been loaded onto the Docking Station.
-
Page 48: How To 'Unload' The Quingo Flyte
How to ‘Unload’ the Quingo Flyte The Quingo Flyte and Docking Station is a unique product to the mobility market. It is essential to have a full understanding of how the product works, with its ease of use and that no lifting of heavy scooter parts is required. - Page 49 Step 2. a) Fully lift your tailgate. The Docking Station will be fully assembled and secured in position by your engineer, you should still carry out a few safety checks yourself on a daily basis to ensure the Docking Station is still secure.
- Page 50 Step 2. d) Check that the ramp maximum angle indicator is showing green only and is not in the red (which indicates the angle is too steep) Step 3. a) Use the ignition key to unlock the remote from the rear lockable box.
- Page 51 For your safety, never stand directly behind the vehicle. It is very important to stand to one side of the ramps before loading. d) Press the silver ‘DOWN’ button continuously until the Flyte is fully clear of the ramps. Allow 1 meter of space between the Flyte and the ramps.
- Page 52 Step 3. e) Replace the remote into the lockable box. The lights on the scooter should be flashing with a 1 second interval, this is normal. Step 4- Return the ramps to the docking station. For the following step, you may choose to use the ‘Assisting Cane’ to avoid unnecessary bending.
- Page 53 Slowly walk the ramps towards the car until the locking latch engages. Check the ramps are secure. Step 5- The Flyte Unfolding Sequence. a) Release the Tiller from the velcro fastening and lift the Tiller until it locks into position.
- Page 54 Step 5. b) Now lift the seat assembly upwards keeping the seat base level until it locks into place. You MUST check the seat is fully located and locked into position. (You may wish to use the Assisting Cane to avoid bending when lifting the seat) c) Lift the back support into driving position.
- Page 55 Step 6- Disengage the ‘Flyte mode’ levers. For the following step, you may choose to use the ‘Assisting Cane’ to avoid unnecessary bending. a) The rear green lever must be set to ‘Drive’ mode. Pull the lever up, the rear and front lights will now flash rapidly - Rapid flashing means another step is necessary.
- Page 56 Next push the side lever forward to the green ‘Drive’ position; the lights should now go out. WITHOUT ‘ASSISTING CANE’ WITH ‘ASSISTING CANE’ Step 7- Prepare Flyte for ‘Drive mode’ Step 7- Prepare Flyte for ‘Drive mode’ a) Attach the front basket with the a) Attach the centre basket to its locking pin.
- Page 57 Step 7. b) Attach the armrests and tighten them using the thumb screws. c) Return assisting cane to the car and close the tailgate. d) Return the key to the ignition switch and your Quingo Flyte is now ready to drive.
-
Page 58: How To Install The Quingo Docking Station
How to Install the Quingo Docking Station Lifting Caution Heavy Components: We advise you to seek assistance when lifting Docking Station components. It is highly recommended that the accompanying DVD is viewed prior to fitting. It is essential the Docking Station is fitted safely. - Page 59 Step 2- Positioning the Frame Within the Car. a) Position the Docking Station frame into the back of the car. The rear stop bar should be located against the car’s boot lip and should be centred left and right. Step 3- Engage the leg support suction clamps. a) Place the 4 base plates under each of the suction clamps, making sure the complete suction clamps are on the plate.
- Page 60 Step 4- Adjusting the lateral support arms. a) Attach and activate the two remaining base plates to the lateral support arms, making sure the complete suction clamps are on the plate. Loosen the thumb screws on each of the support arms and manoeuvre them into position so that they are pressed against the base plate, and then tighten the thumb screw.
- Page 61 Step 5 - Adjusting the Front Seat Support Arms. a) Tilt the cars backrests forward. Do not move the forward/ rear adjustment once this is set. b) Attach each of the front seat-support arms to the Docking Station frame and secure with the locking pins.
- Page 62 c) Loosen the thumbscrews and adjust the angle of the arms so the plates locate under the base of the front seats. Re-tighten the thumb screws. The angle set should allow the seat- back to return to a normal driving position. It is very important the support arms are adjusted correctly and fully secured into position.
- Page 63 Step 6- Fitting the Left & Right Ramp Assemblies. (Caution: When lifting ramp assemblies always carry them horizontally to avoid the ramps from sliding out unexpectedly) - Read the Warning Label a) Identify the left ramp assembly which has the box section as circled below. Slide this ramp assembly onto the Docking Station frame and under the locating discs so that the yellow arrows are aligned.
- Page 64 Step 6. b) Loosen the 2 left hand thumbscrews and twist the holding brackets through 90 degrees. Tighten the thumbscrews to secure. c) Next, slide the right ramp assembly onto the Docking Station frame and under the locating discs and again so that the yellow arrows are aligned. Loosen the 2 left hand thumbscrews and twist the holding brackets through 90 degrees.
- Page 65 b) Pick up the guide roller assembly (a) and with the arrow facing towards the car position the roller assembly between the left and right ramp assembly. c) Next insert the guide support bar (b) with the holes facing up, through all 3 components (guide roller assembly and the left and right hand ramps) until all are held together.
- Page 66 d) Ensure all 4 locating holes line-up and insert the 4 locating pins to secure the ramps into position. e) Next insert the central ramp (c) between the 2 sets of white rollers so that the end of the ramp is 2.5cm (1”) past the second set.
- Page 67 f) Pull the left and right ramps out to meet the centre ramp (c) and locate the double pins into their respective holes (as circled).
- Page 68 g) Tighten the mini thumbscrews, fully; ensuring the body of the thumbscrew locates through the bracket. h) Finally check that the Docking Station ramps operate correctly. It is important that the small thumb screws are fully fastened into the bracket on each side (this includes the shoulder of the thumb screw).
-
Page 69: How To Remove The Quingo Docking Station
How to Remove the Quingo Docking Station Lifting caution: We advise you to seek assistance when lifting Docking Station components. Step 1- Removing the Centre Ramp Assembly. a) Pull the ramps out of the Docking Station halfway b) Remove the mini thumbscrews from the end of the ramps... - Page 70 c) Pull the left and right ramps outwards to slide out the centre ramp. d) Pull the ramps away from the vehicle further so the centre bar can slide out freely.
- Page 71 e) Release the guide roller assembly locating pins. and slide out the guide roller bar. f) Slide out the guide roller bar. Step 2- Remove the Left/ Right Ramp Assemblies. a) Push the ramps back fully into the Docking Station as photograph below.
- Page 72 Step 2 - continued b) Loosen the ramps thumb screws and twist the holding brackets through 90 degrees to release both the ramp assemblies. c) Slide the left and right ramp assemblies away from the Docking Station frame. Caution: Ramp extending during fitting/ removal. When fitting or removing the ramps to and from the base frame use extreme caution at all times.
- Page 73 Step 3- Remove the Front Seat Support Arms. a) Tilt the cars backrests forward. b) Loosen the thumb screws to release the front seat support arms, remove the locking pins and detach the arms from the Docking Station frame. LOCATING PIN THUMB SCREW Step 4-Loosen the lateral support arms.
- Page 74 Step 5- Release the Leg Support Suction Clamps. a) Release each of the suction clamps on the 4 leg supports. You may optionally remove the base plates or leave them fixed to the car for next time. Step 6- Remove the Frame from Within the Car. a) Carefully lift and remove the Docking Station frame from the car.
- Page 75 Step 7- Pack and Store the Docking Station. a) Store all Docking Station components in a dry dust free environment. If you are unsure of any of the procedures in this handbook or on the DVD please contact your service provider.
-
Page 76: Additional Information- Noise Reduction Wedges
Additional Information for the Noise reduction wedges. The Quingo Docking Station is supplied with some noise reduction wedges. You can place 4 off wedges in the docking station, as indicated below, which will reduce the noise when travelling. 2 off wedges are to be placed at the boot end of the Docking station between the ramps. - Page 78 Quingo Flyte & Docking Station USER GUI E V For Customer Services call: 01582 430900...
Need help?
Do you have a question about the Flyte and is the answer not in the manual?
Questions and answers
How many batteries does my Quingo Flyte need. Serial number 11273
The Quingo Flyte comes with four ultra-slim batteries as standard. There is also an option to increase the battery capacity with two additional 22Ah batteries, bringing the total to six.
This answer is automatically generated