
Summary of Contents for Tuson RV Brakes DirecLink
- Page 1 DirecLink Trailer Brake Controller Base Model Installation and Users Guide Tuson RV Brakes, LLC 475 Bunker Court Vernon Hills, IL 60061 www.tusonrvbrakes.com www.direclink.com August 2017...
-
Page 2: Table Of Contents
11.1 When Faults Are Detected........11.2 Fault Codes and Descriptions........11.3 Fault Viewer Screens..........11.4 Select the Controller Fault Screen......11.5 Descriptions of Major Faults and Resolutions.... 12 DirecLink Menu Navigation Overview........ 12.1 Menu Structure Overview - Menu Levels....Limited Lifetime Warranty.......... -
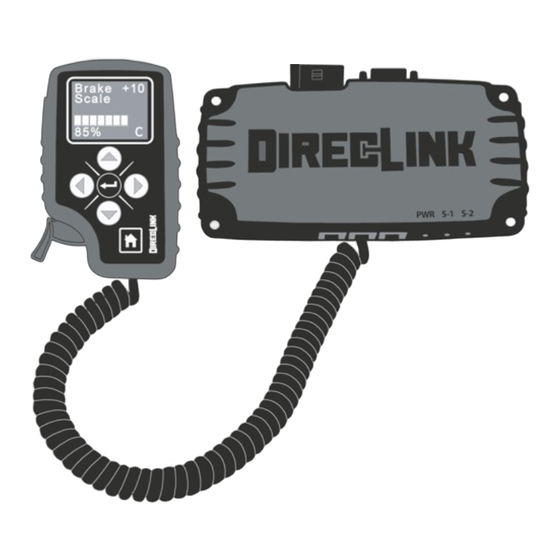
Page 3: Direclink Components
DirecLink Components... -
Page 4: Quick Start
Ÿ Improper installation and operation could cause serious or fatal injuries and/or property damage. Please Note: The DirecLink trailer brake controller works with 2 - 8 electric drum brakes and electric-hydraulic trailer brake actuators. It automatically detects which type you have and configures itself accordingly. -
Page 5: Initial Connection And Test
2 with 5. If your vehicle is not equipped with a harness that plugs directly into the DirecLink’s Delphi connector, than you must use the Delphi 4 wire harness included in your package. The diagram above shows the functions of the four wires of the Delphi harness. -
Page 6: First Time Power-Up
It is not necessary to press any buttons since the following configuration process is fully automated. If all electrical connections are correct the display will turn on with a blue background and white text reading “DirecLink” as shown in (#1) below: 3.4.2... -
Page 7: Final Installation Of Modules And Cables
Select the location to mount the command module. There are two different styles of dash mounts that are included with the DirecLink; flush mount and swivel mount. Both use a peel-off adhesive back for mounting. It is very important to clean the selected mounting surface with an alcohol wipe (included) and let the surface dry before attaching the mount. -
Page 8: Final Installation Sequence (Continued)
Final Installation of Modules and Cables 4.2 Final Installation Sequence When the DirecLink is properly mounted, the only parts visible are the command module, spiral cable and possibly the OBDII connector (depending on the location of the connector in the vehicle). -
Page 9: Setting Brake Scale - Initial Operation
Setting Brake Scale - Initial Operation 5.1 Brake Scale (Home Screen) The HOME screen for the DirecLink is the Brake Scale screen. This is the first screen in the main menu and it appears upon completion of a successful power-up or when the HOME button is pressed. -
Page 10: Road Test And Fine Tuning Brake Scale
Brake Scale or readjust as needed. 5.5 DirecLink Sleep Mode Once the vehicle's engine is turned off, the DirecLink will go into "sleep mode" after 5 minutes causing the Command Module screen to turn off. Once the DirecLink enters "sleep mode"... -
Page 11: Manual Braking
Manual Braking 6.1 Manual Braking The DirecLink is equipped with a “trigger” that provides the driver the ability to manually apply the trailer brakes from 0 to 100% braking force. As the trigger is pulled a bar appears from left to right on the display with a numerical percentage corresponding to the amount of manual braking being applied. -
Page 12: 7.0 Screen And Button Functions
Name viewing. This moving bar indicates the level of trailer braking signal being sent from the DirecLink to the trailer from 0 to 100%. When 2- Trailer Brake using the manual trigger, the bar is white in color; under normal Level Bar braking using the vehicle brake pedal, the bar is yellow in color;... -
Page 13: Screen And Button Functions
C = the Controller (DirecLink) K = the Keypad (DirecLink) The trailer connection status indicates the DirecLink's communication status with the trailer braking components 9 - Trailer Connection located on the trailer. The two designations are:... -
Page 14: Main Menu Navigation And Settings
Main Menu Navigation and Settings 8.1 Main Menu Screens There are three (3) screens that comprise the main menu of the DirecLink, they are: 8.2 Brake Scale (Home Screen) This screen is covered in section 5 of this manual. 8.3 Low Speed Brake... -
Page 15: Trans Temp
The Trans Temp screen will only appear on certain Ford and General Motor vehicles where DirecLink can access the transmission data on the tow vehicle network. On vehicles where DirecLink cannot access the transmission data, the Trans Temp screen will not appear or will display N/A if not available. In these cases the only operational main menu screens will be the Brake Scale and Low Speed Brake screens. -
Page 16: Configure Option Menu
Pressing the up or down arrows will switch between these screens. 9.3 Controller Config Menu Options The purpose of the Controller Config menu is to enable additional DirecLink features that could assist in achieving the best brake controller performance for their specific tow vehicle-trailer configuration. -
Page 17: Trailer Size
The level can be set from 5% to 30%. When activated, the DirecLink adjusts the trailer brakes up to the setting when tow vehicle-trailer velocity is zero. This feature is helpful when stopping on steep grades or on slippery boat ramps. -
Page 18: Max Brake Limit
75% controller output, the Max. Brake Limit can be set to 70% and that will limit the automatic braking level of the DirecLink to 70%. All other brake scaling features operate as normal with the maximum auto braking limiting at 70%. -
Page 19: Controller Reset
The Controller Reset screen is where the driver can return all DirecLink controller settings to the original manufacturer’s defaults. This is helpful if the driver wants to reset and re-adjust the setting from the defaults that were in place when the DirecLink was first installed into the vehicle. -
Page 20: Screen Brightness Adjustment
Configure Option Menu 9.9 Screen Brightness Adjustment The Scrn Bright screen is used to adjust the brightness of the color display of the command module. There are three (3) settings which can be selected: 1) Hi, 2) Med, 3) Lo. Under various lighting conditions, you may wish to adjust the brightness of the display. -
Page 21: Monitor Options Menu
DirecLink has successfully established and connected to your vehicle’s network. If the screen displays Vehicle Search and a number is counting from 0 to 5, that indicates that the DirecLink has not established a network connection with the vehicle and therefore is not operational. -
Page 22: Mph, Kph, Engine Rpm
The only time engine RPM is displayed is when velocity is zero. As soon as velocity is detected the engine RPM value disappears and only MPH and KPH are displayed. This screen is also used to indicate successful network communication between the DirecLink and the tow vehicle. -
Page 23: Faults Codes And Trouble Shooting
11.1 When Faults Are Detected The DirecLink automatically monitors many critical operational parameters. When a fault is detected, a RED screen will appear with a description of the fault and the module containing the fault. A “C” for Controller and a “K” for a Keypad fault will be displayed in the center of the bottom line of the screen. -
Page 24: Fault Viewer Screens
3 seconds. When the faults are corrected, they will not appear in the fault cycle. The DirecLink continually monitors for the presence of faults so that when a fault is corrected, the DirecLink removes it from the list. This means that the driver can have... -
Page 25: Descriptions Of Major Faults And Resolutions
The DirecLink screen is dark/not functioning. There are three potential causes: 1) The vehicle is turned off and the DirecLink is asleep. Press the brake pedal to wake it up. 2) The spiral cable (cable #5 as outlined... -
Page 26: Direclink Menu Navigation Overview
This is the “Home Screen”. Whenever you press Scale the Home button on the Command Module, you will return to this screen. There are four (4) menu levels of the DirecLink. If turned “ON” The Top Level: If available Max. -
Page 27: Limited Lifetime Warranty
DirecLink Warranty Tuson RV Brakes, LLC (hereafter referred to as Tuson) warrants the DirecLink trailer brake controller to be free of defects in material and workmanship, under normal use, for a period of TWO (2) years from the original consumer purchase date. At Tuson’s sole option, Tuson will repair or replace the defective product with a like product.
Need help?
Do you have a question about the DirecLink and is the answer not in the manual?
Questions and answers