Table of Contents
Advertisement
Quick Links
ATTENTION – SAFETY REQUIREMENTS
-The correct installation and use of this cycle carrier is the sole responsibility of the user.
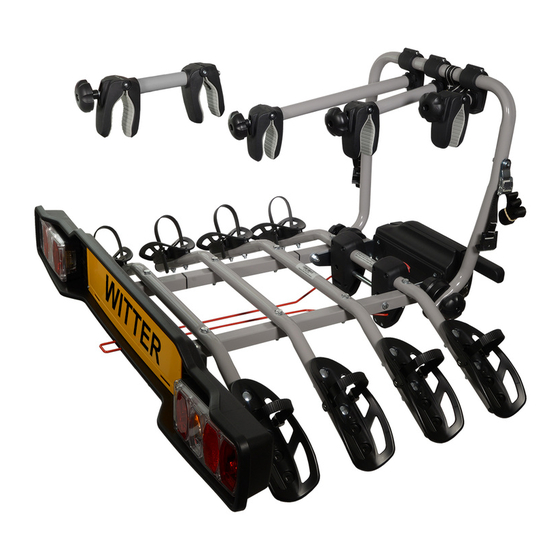
-Weight and maximum capacity of "ZX404" bike racks:
Cycle carrier weight 19.6kg (excluding base plate) MAX cycle weight 20 kg
- 4 bikes, max. total capacity 65 kg
-Never exceed the vehicle manufacturer's static nose weight.
-Never use an automatic car wash system when the carrier is mounted.
-The combined weight of the bike rack and the load must never exceed the permitted capacity.
-Remove from the transported bikes children's seats, transport baskets, rain covers or other
elements that could get lost or increase the air resistance.
-The bike rack is only suitable for transporting bicycles.
-Before leaving, check that the rear lights of the vehicle and carrier function correctly.
-Ensure that the bike rack is fitted correctly on the cycle carrier base plate and that the bikes are
secured as instructed.
-When on the road, respect the highway code speed limits and pay attention to
the road conditions to prevent jolts.
-Be aware that the loaded bike rack may change the driving characteristics of the car while
braking, during windy conditions and whilst cornering.
-To avoid damage, if the boot lid is equipped with an automatic opening function,
use this function with care.
-Check all the bike rack fixing elements after a short while, then at regular intervals whilst on
your journey.
-Take care when reversing and parking because of the greater length of the car.
-Check the distance between the bike rack, the bikes and the exhaust pipe(s) to avoid heat
damage.
-To increase road safety and to reduce fuel consumption, remove the bike rack when not in use.
-Modifications to the bike rack and its components are not permitted.
-Immediately replace any worn or damaged parts using only original spare parts.
-The bike rack can be cleaned using warm water and/or car shampoo.
-Store the bike rack in dry conditions at moderate temperatures.
-The manufacturer is not responsible for damage caused by improper use of this product, nor for
any objection made by the competent authorities with regard to the highway code.
-The manufacturer shall only be responsible for manufacturing defects in the bike rack and
accessory components.
CYCLE CARRIER SYSTEMS
ASSEMBLY AND USER INSTRUCTIONS v2
ZX404 Cycle Carrier
Rear cycle carrier
for mounting onto
a ange type towbar.
GB
ASSEMBLY AND USER INSTRUCTIONS v2
Whenever this product is used the following information must be taken into
consideration:
The cycle carrier is a safe product IF used correctly, whereas if it is used incorrectly
it can cause damage to you, your vehicle and anyone driving behind you.
110
km/h
Tools required for initial assembly:
24mm x 1
Torque Range 0-220 Nm
4x
x 2
Supplied.
+
24 mm
Advertisement
Table of Contents

Summary of Contents for Witter ZX404
- Page 1 CYCLE CARRIER SYSTEMS -The correct installation and use of this cycle carrier is the sole responsibility of the user. -Weight and maximum capacity of “ZX404” bike racks: Cycle carrier weight 19.6kg (excluding base plate) MAX cycle weight 20 kg ASSEMBLY AND USER INSTRUCTIONS v2 - 4 bikes, max.
- Page 2 Tilt Latch play adjustment. The cycle carrier has been designed with an adjustment feature to minimise any play within the tilt mechanism. These adjusters are set at the factory. Platform However over time, it maybe necessary to re-adjust to Adjustment ensure continued optimum performance from your screws cycle carrier.
- Page 3 How to release cycle clamp arms with ratchet levers: Check towbar nose weight limit ( S - Vertical Static Mass ) - ? KG Never exceed this limit, the sum of the carrier and bikes must be less weight than this limit.
- Page 4 How to operate ratchet straps and ratchet cycle arm clamps: To gain su cient clearance to open the tail-gate whilst the carrier is tilted, lower the carrier by using the upper holes in the base plate. Secure wheels into the wheel locators by feeding the strap into the buckle and pulling down until tight.
- Page 5 Cycle Support Frame. 214Nm bike 1 bike 2 IMPORTANT! ENSURE THE M16 NUTS ARE TIGHTENED FULLY (214Nm). bike 3 Note: Discard removed bolts,washers and nuts from electrical socket. bike 4 Use the new longer bolts and Nyloc nuts provided. bikes 3 & 4 bike 1 Note: Ensure that the cable to the socket is...
- Page 6 Attach the 13 pin plug into the vehicle 13 pin electrical socket. If your vehicle is tted with a 7 pin socket, use a 13 to 7 pin adaptor (supplied) to convert the cycle carrier 13 pin plug. Slot groove onto pin whilst hooking over rear of base plate to hold carrier in position.
- Page 7 Push the plastic end caps into the cycle rails . Mount the lighting board to the carrier using bolts Slide 2 bolts into the “T” channel to the positions shown. Secure the lightboard to the carrier with bolts “B” placing a washer at the top and bottom.
- Page 8 Attach the protective rubber to the clamp arms as shown. Ensure the rubber Position the 8 wheel locators appropriate to the cycle sizes to be tted. does not impede the safe operation of the ratchet system. Outward position for adult (medium/large) cycles. Inward facing position for very small cycles.
Need help?
Do you have a question about the ZX404 and is the answer not in the manual?
Questions and answers