Pioneer S-DV515 Operating Instructions Manual
Dvd/cd receiver, speaker system and wireless speaker system
Hide thumbs
Also See for S-DV515:
- Operating instructions manual (96 pages) ,
- Operating instructions manual (96 pages)

Related Manuals for Pioneer S-DV515


Summary of Contents for Pioneer S-DV515
- Page 1 DVD/CD Receiver XV-DV515 Speaker System S-DV515 Wireless Speaker System XW-DV515 Operating Instructions...
- Page 2 CONGRATULATIONS ON YOUR PURCHASE OF THIS FINE PIONEER PRODUCT. Pioneer is on the leading edge of DVD research for consumer products and this unit incorporates the latest technological developments. We are sure you will be fully satisfied with this system.
- Page 3 VENTILATION: European, UK, Australian, New Zealand, Hong Kong and Taiwanese models: When installing this unit, make sure to leave space around the unit for ventilation to improve heat radiation (at least 10 cm at top, 10 cm at rear, and 10 cm at each side). All other models: When installing this unit, make sure to leave space around the unit for ventilation...
-
Page 4: Table Of Contents
Thank you for buying this Pioneer product. Please read through these operating instructions so that you will know how to operate your model properly. After you have finished reading the instructions, put them in a safe place for future reference. - Page 5 Switching the DVD audio language ..46 Switching VR format DVD-RW audio channel ..... 46 Switching the Video CD/Super VCD audio channel .
- Page 6 Proper installation and maintenance of this system ..... . 78 Hints on installation....78 Cleaning the pickup lens .
-
Page 7: Before You Start
Before you start Chapter 1 Before you start Features 24-bit/96kHz compatible DAC This system is fully compatible with high sampling-rate discs, capable of delivering better-than-CD sound quality in terms of dynamic range, low-level resolution and high- frequency detail. Excellent audio performance with Dolby Digital, Dolby Pro Logic, Dolby Pro Logic II and DTS... -
Page 8: Introduction To Home Theater
Before you start Introduction to home theater You are probably used to using stereo equipment to listen to music, but may not be used to home theater systems that give you many more options (such as surround sound) when listening to soundtracks. Home theater refers to the use of multiple audio tracks to create a surround sound effect, making you feel like you're in the... -
Page 9: Cd-R/Rw Compatibility
Before you start DVD-R/RW and CD-R/RW discs (Audio CDs and Video CD/Super VCDs) recorded using a DVD recorder, CD recorder or personal computer may not be playable on this system. This may be caused by a number of possibilities, including but not limited to: the type of disc used;... -
Page 10: Compressed Audio Compatibility
Before you start Compressed audio compatibility • This unit will play CD-ROM, CD-R, and CD-RW discs containing files saved in the MPEG-1 Audio Layer 3 (MP3) or Windows Media Audio (WMA) format with a sampling rate of 32, 44.1 or 48kHz (except 32 kHz WMA files encoded at 20 kbps). -
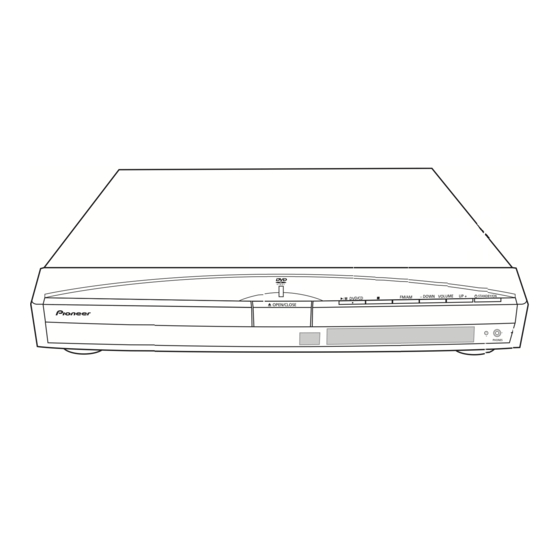
Page 11: Controls And Displays
Controls and displays Chapter 2 Controls and displays Front panel OPEN/CLOSE Press to open/close the disc tray. Operation indicator DVD/CD Press to switch to the DVD/CD function. Also press to start/pause/resume playback. Press to stop playback. FM/AM Press to switch to the tuner function, then to toggle between the FM and AM bands. -
Page 12: Display
Controls and displays Display MIDNIGHT QUIET WIRELESS Tuner indicators European model only Lights when in one of the RDS display or search modes. Lights when a broadcast is being received. Lights when a stereo FM broadcast is being received in auto stereo mode. Lights when FM mono reception is selected. - Page 13 Controls and displays 13 Speaker indicators These show which speakers are being used to output the current source. The illustrations below show some example displays. 5.1 channel surround sound Stereo (2.1 channel) sound 3.1 channel sound with Dialogue enhancement on the center channel 5.1 channel surround sound with Virtual Surround Back mode active...
-
Page 14: Remote Control
Controls and displays Remote control STANDBY/ON FM/AM TUNER DISPLAY DVD MENU TUNE+ ST– ENTER TUNE– MUTE MASTER VOLUME TV CONTROL INPUT BASS MODE DIALOGUE AUTO SURROUND PROGRAM REPEAT AUDIO SUBTITLE ZOOM TOP MENU SYSTEM TEST TONE SETUP QUIET/ DIMMER MIDNIGHT FOLDER–... - Page 15 Controls and displays ST +/– Use to select station presets when listening to the radio. MUTE Press to mute all sound from the speakers and headphones (press again to cancel) (page 36). MASTER VOLUME Use to adjust the volume. 10 TV CONTROL (page 21) Press to switch the TV on or into standby.
- Page 16 Controls and displays HOME MENU Press to display (or exit) the on-screen menu for Initial Settings, Play Mode functions, etc. 18 SYSTEM SETUP Use to make various system and surround sound settings (page 57). TEST TONE Use to output the test tone (for speaker setup) (page 59).
-
Page 17: Wireless Speaker System
Controls and displays Wireless speaker system CHANNEL CHANNEL Transmitter CHANNEL indicator Lights to indicate the selected channel. CHANNEL button Press to select a frequency channel. The frequency channel changes sequentially each time the button is pressed: CH 1 CH 2 CH 3 Antenna Transmits signals to the XW-DV515 wireless... - Page 18 Controls and displays 10 STEREO MODE VOLUME knob Turn to adjust the speaker volume when WIRELESS MODE is set to STEREO (W.Stereo). 11 Power cord Connect to an AC outlet. • The STEREO MODE VOLUME knob has no effect when WIRELESS MODE is set to SURROUND.
-
Page 19: Getting Started
After you’re finished reading the welcome screen, press ENTER to move on. Welcome to Pioneer DVD! Thank you for purchasing this Pioneer DVD player. Before using, please take a little time to setup your DVD player Put the batteries into the remote control... -
Page 20: Setting The Clock
Getting started Use the (cursor left/right) buttons to select either ‘Wide screen (16:9)’ or ‘Standard size screen (4:3)’ according to the kind of TV you have, then press ENTER. See also Screen sizes and disc formats on page 84 if you’re not sure which one to choose. -
Page 21: Setting Up The Remote To Control
Switches the TV’s input between the built in TV tuner and an external video source. • The default setting is for a Pioneer TV. Using the Room Setup Before using your system to enjoy surround sound playback, we recommend you spend a few minutes using the Room Setup. -
Page 22: Using The On-Screen Displays
Getting started If the system isn’t already on, press STANDBY/ON to switch it on. Press ROOM SETUP. • If you have previously set up the room type and seating position, the display will show the current room settings. Press ENTER. Use the (cursor up/down) buttons to select a room type then press... -
Page 23: Playing Discs
Getting started DISPLAY OPEN CLOSE ¡ RETURN DVD MENU ENTER MUTE SOUND MASTER VOLUME TV CONTROL INPUT BASS MODE DIALOGUE VIRTUAL SB AUTO SURROUND ADVANCED PROGRAM REPEAT RANDOM AUDIO SUBTITLE ANGLE HOME ZOOM TOP MENU MENU SYSTEM SETUP TEST TONE CH LEVEL QUIET/ TIMER/... -
Page 24: Basic Playback Controls
Getting started If you’re playing an WMA/MP3 disc, it may take a few seconds before playback starts, depending on the complexity of the file structure on the disc. If you loaded a CD/CD-R/RW containing JPEGs, a slideshow will start. See Viewing JPEG discs on page 50 for more on playing these discs. -
Page 25: Resume And Last Memory
Getting started Button What it does Pauses a disc that’s playing, or restarts a paused disc. Stops playback. DVD and Video CD/Super VCD: The display shows Resume. Press again if you want to cancel the resume function. (See also Resume and Last Memory below.) Press to start fast reverse scanning. -
Page 26: Dvd-Video Disc Menus
Getting started • The Last Memory function doesn’t work with VR format DVD-RW discs. • After I load a DVD disc, it ejects automatically after a few seconds! Most likely, the disc is the wrong region for your system. The region number should be printed on the disc;... -
Page 27: Video Cd/Super Vcd Pbc Menus
Getting started Button What it does TOP MENU Displays the ‘top menu’ of a DVD disc—this varies with the disc. Displays a DVD disc menu—this varies with the disc and may be MENU the same as the ‘top menu’. Moves the cursor around the screen. -
Page 28: Listening To The Radio
Getting started Button What it does Numbers Selects a numbered menu option. Displays the previous menu page (if there is one). Displays the next menu page (if there is one). ENTER Press to select highlighted menu option. Listening to the radio The tuner can receive both FM and AM broadcasts, and lets you memorize your favorite stations so you don’t have to manually... -
Page 29: Improving Poor Fm Reception
Getting started • If you’re using the front panel controls, the TUNER button switches between FM, AM and station presets (see Memorizing stations below). Tune to a frequency. There are three tuning modes—manual, auto, and high-speed: • Manual tuning: Press TUNE +/– repeatedly to change the displayed frequency. -
Page 30: Listening To Station Presets
Getting started Press SYSTEM SETUP. Use the (cursor left/right) buttons to choose ‘St. Memory?’ then press ENTER. Use the (cursor up/down) buttons to select the station preset you want. There are 30 preset locations; each can store one station preset. Press ENTER to save the station preset. -
Page 31: Home Theater Sound
Home theater sound Chapter 4 Home theater sound Using this system you can enjoy listening to sources, analog or digital, in either stereo or surround sound. Auto listening mode The Auto listening mode is the simplest way to listen to any source as it was mastered: the output from the speakers mirrors the channels in the source material. -
Page 32: Dolby Pro Logic Ii Music Settings
Home theater sound • Stereo – See Listening in stereo below • See also Using the Advanced Surround effects below, for further stereo and surround playback options. • You can’t use the Surround modes with high sampling rate 88.2 / 96 kHz sources. •... -
Page 33: Using The Advanced Surround Effects
Home theater sound When you connect a pair of headphones, the listening mode automatically changes to Stereo. When you disconnect them it reverts to the previous mode. • With headphones connected, press ADVANCED to select ‘Phones Surround’ or SURROUND to select ‘Stereo’. Using the Advanced Surround effects Advanced Surround effects can be used with... -
Page 34: Enhancing Dialogue
Home theater sound Press ENTER to confirm. Enhancing dialogue • Default setting: Dialog. Off (European model) / Dialog. Mid (All other models) The Dialogue Enhancement feature is designed to make the dialog stand out from other background sounds in a TV or movie soundtrack. -
Page 35: Adjusting The Bass And Treble
Home theater sound The Midnight listening feature allows you to hear effective surround sound of movies at low volume levels. The effect automatically adjusts according to the volume at which you’re listening. BASS MODE DIALOGUE VIRTUAL SB AUTO SURROUND ADVANCED PROGRAM REPEAT RANDOM... -
Page 36: Muting The Sound
Home theater sound Muting the sound Use the MUTE button if you need to momentarily turn off all sound from the speakers. TUNE+ ST– ENTER TUNE– MUTE MUTE • Press MUTE to mute the volume. To cancel, adjust the volume or press MUTE again. -
Page 37: Playing Discs
Playing discs Chapter 5 Playing discs Introduction Most of the features described in this chapter make use of on-screen displays. For an expla- nation of how to navigate these, see Using the on-screen displays on page 22. Many of the functions covered in this chapter apply to DVD discs, Video CD/Super VCDs, CDs and WMA/MP3/JPEG discs, although the exact operation of some varies slightly... -
Page 38: Scanning Discs
Playing discs • Not all VR format DVD-RW discs have a Playlist. Disc Navigator Title(1-03) DVD-RW 01. 3/31 FIRST LEAGUE Original 02. 4/28 SECOND LEAGUE Play List 03. 4/29 FINAL ROUND The screen for CDs and Video CD/Super VCDs shows a list of tracks. Disc Navigator Track 1-10 Track 01... -
Page 39: Frame Advance/Frame Reverse
Playing discs During playback, press Press and hold slow motion playback starts. • The slow motion speed is shown on- screen. • There is no sound during slow motion playback. Press repeatedly to change the slow motion speed. • The slow motion speed is displayed on- screen. -
Page 40: Using Repeat Play
Playing discs Press ENTER on ‘A(Start Point)’ to set the loop start point. Play Mode A-B Repeat A(Start Point) Repeat B(End Point) Random Program Search Mode Press ENTER on ‘B(End Point)’ to set the loop end point. Play Mode A-B Repeat A(Start Point) Repeat B(End Point) -
Page 41: Using The Front Panel Display
Playing discs For WMA/MP3 discs, select Disc Repeat, Folder Repeat or Track Repeat (or Repeat Off). Play Mode A-B Repeat Disc Repeat Repeat Folder Repeat Random Track Repeat Program Repeat Off Search Mode Using the front panel display • During playback, press REPEAT to select a repeat play option. -
Page 42: Creating A Program List
Playing discs For WMA/MP3 discs, select Random All (all folders) or Random Track (current folder only), (or Random Off). Play Mode A-B Repeat Random All Repeat Random Track Random Random Off Program Search Mode • You can also use the RANDOM button on the remote to select a random play mode. - Page 43 Playing discs Select a title, chapter, folder or track for the current step in the program list. For a DVD disc, you can add a whole title, or a chapter within a title to the program list. • To add a title, select the title. Program Program Step Title 1~38...
-
Page 44: Using The Front Panel Display
Playing discs • During program play, press the next program step. • Press CLR during playback to switch off program play. Press while stopped to erase the program list. Editing a program list using the OSD After creating a program list, you can add, delete and change steps. -
Page 45: Clearing The Program List
Playing discs Press PROGRAM. You’re prompted to enter a track or folder for the first step in the program list. P 0 - 0 0 0 0 (cursor up/down) to select a track or a folder, then press ENTER. • For WMA/MP3 discs only: To select an individual track within a folder, use the (cursor up/down) buttons to select the folder, then press... -
Page 46: Switching Subtitles
Playing discs example, press 4, 5, 0, 0 to have playback start from 45 minutes into the disc. For 1 hour, 20 minutes and 30 seconds, press 8, 0, 3, 0. Press ENTER to start playback. • The disc must be playing in order to use time search. -
Page 47: Zooming The Screen
Playing discs Zooming the screen Using the zoom feature you can magnify a part of the screen by a factor of 2 or 4, while watching a DVD or Video CD/Super VCD. During playback, use the ZOOM button to select the zoom factor. •... -
Page 48: Front Panel Display Information
Playing discs • DVD displays Play Current / Total Elapsed Title 11/38 2.05 French Audio Dolby Digital 3/2.1CH Subtitle Play Current / Total Elapsed Chapter 11/38 2.05 Tr. Rate • VR format DVD-RW displays Play DVD-RW Original Current / Total Elapsed Title 1/32... - Page 49 Playing discs • JPEG disc displays File name T I G E R _ 0 1 Folder name Z O O _ T R I P...
-
Page 50: Viewing Jpeg Discs
Viewing JPEG discs Chapter 6 Viewing JPEG discs Playing a JPEG slideshow After loading a CD/CD-R/RW containing JPEG pictures, press from the first folder/picture on the disc. The player displays the pictures in each folder in alphabetical order. Pictures are automatically adjusted so that they fill as much of the screen as possible (if the aspect ratio of the picture is different to your TV screen you may notice black bars at... -
Page 51: Zooming The Screen
Viewing JPEG discs • When a folder is highlighted you can press ENTER to open the Photo Browser screen for that folder. See below for more on using the Photo Browser. To resume the slideshow from the highlighted file, press ENTER. Using the Photo Browser The Photo Browser displays nine thumbnail images at a time from the current folder. -
Page 52: More Tuner Features: Rds
More tuner features: RDS Chapter 7: More tuner features: RDS European model only An introduction to RDS Radio Data System, or RDS as it’s usually known, is a system used by FM radio stations to provide listeners with various kinds of information—the name of the station and the kind of show they’re broadcasting, for example. -
Page 53: Displaying Rds Information
More tuner features: RDS Folk M – Folk music Document – Documentaries In addition, there are three other program types, TEST, Alarm!, and None. Alarm! and TEST are used for emergency announcements. You can’t search for these, but the tuner will switch automatically to this RDS broadcast signal. -
Page 54: Using The Timer
Using the timer Chapter 8 Using the timer Setting the wake-up timer Use the wake-up timer to set the system to switch on at any time and start playing whatever source you want. • The clock must be set to the correct time for the wake-up timer to work properly (see Setting the clock on page 20). -
Page 55: Turning The Wake-Up Timer On/Off
Using the timer • You can check the timer settings in standby by pressing TIMER/CLOCK twice. (Press TIMER/CLOCK once to display the current time.) Turning the wake-up timer on/off If the wake-up timer is on, it will switch on the system everyday at the time you have set. - Page 56 Using the timer Press TIMER/CLOCK twice to reach the timer menu. Use the (cursor left/right) buttons to select ‘Sleep?’ then press ENTER. Use the (cursor up/down) buttons to select a switch-off time then press ENTER. Choose between the following options: •...
-
Page 57: Surround Sound Setup
Surround sound setup Chapter 9 Surround sound setup Setting up surround sound The Room Setup feature (page 21) is designed to give you a basic surround sound setup, however you can make the more detailed settings that may improve the surround sound in your listening room. - Page 58 Surround sound setup • Center 0.3 m ~ Center 9 m – Distance can be set in increments of 0.3 m. The default is 3 m. Surround speakers distance setting Specifies the distance from your listening position to the front speakers: •...
-
Page 59: Setting The Channel Levels
Surround sound setup Setting the channel levels You can set the relative channel levels from your main listening position for each listening mode, including all the Surround and Advanced Surround modes. If you used the Room Setup feature (page 21), the channel levels for each listening mode will already be set. -
Page 60: Video Adjust Menu
Video Adjust menu Chapter 10 Video Adjust menu Video Adjust • Default setting: Standard From the Video Adjust screen you can select the standard video presentation or define presets of your own. Press HOME MENU and select ‘Video Adjust’ from the on-screen display. HOME MENU Play Mode Initial Settings... - Page 61 Video Adjust menu You can adjust any or all of the following picture quality settings: • Contrast – Adjusts the contrast between light and dark. • Brightness – Adjusts the overall bright- ness. • Chroma Level – Adjusts how saturated colors appear.
-
Page 62: Initial Settings Menu
Initial Settings menu Chapter 11 Initial Settings menu Using the Initial Settings menu The Initial Settings menu gives you complete control in setting up your DVD system, including video output settings and parental lock settings, among others. If an option is grayed out it means that it cannot be changed at the current time. -
Page 63: Component Out (Not Applicable To The European Model)
Initial Settings menu • Default setting: Video • If you make a setting here that is incom- patible with your TV, the TV may not display any picture at all. If this happens switch everything off and reconnect to the TV using the supplied audio/video cable. -
Page 64: S-Video Out (Not Applicable To The European Model)
QUESTIONS REGARDING OUR TV SET COMPATIBILITY WITH THIS MODEL 525p DVD PLAYER, PLEASE CONTACT OUR CUSTOMER SERVICE CENTER. This system is compatible with the following Pioneer displays and monitors: PDP-503HDG, PDP-433HDG progressive scan-compatible TVs. S-Video Out Not Applicable to the European model... -
Page 65: Subtitle Language
Initial Settings menu • You can switch between the languages recorded on a DVD disc during playback using the AUDIO button. (This does not affect this setting.) See Switching the DVD audio language on page 46. • Some DVD discs set the audio language automatically when loaded, overriding the Audio Language setting. -
Page 66: Subtitle Display
Initial Settings menu Subtitle Display • Default setting: On Initial Settings Video Output Audio Language Language Subtitle Language Display DVD Menu Lang. Options Subtitle Display When set to On, the player displays subtitles according to the Subtitle Language setting. Set to Off to switch subtitles off altogether. Display settings OSD Language •... - Page 67 Initial Settings menu • Not all discs that you may consider inappropriate for your children use the Parental Lock feature. These discs will always play without requiring the password first. • If you forget your password, you’ll need to reset the system to its factory settings (see Resetting the system on page 76), then register a new password.
- Page 68 Initial Settings menu Press ENTER to register the new password and return to the Options menu screen. Setting/changing the Parental Lock level Select ‘Level Change’. Initial Settings Video Output Parental Lock Language PhotoViewer Display Options Use number buttons to enter your password, then press ENTER.
-
Page 69: Photoviewer
Initial Settings menu • Select by code number: Press right) then use the number buttons to enter the 4-digit Country code (you can find the Country code list on page 85.) Initial Settings Parental Lock: Country Code Video Output Language Password Display Options... -
Page 70: Other Connections
Other connections Chapter 12 Other connections Connecting the wireless speaker system Connect the WIRELESS (IN) jack on the transmitter to the WIRELESS (OUT) jack on the rear panel of the receiver using a 2-pin RCA cable, then connect to a power outlet using the supplied AC adaptor. -
Page 71: Connecting Auxiliary Components
Other connections All other models 75Ω coaxial cable LOOP ANTENNA UNBAL 75Ω ANTENNA Connecting auxiliary components This system has both stereo analog inputs and outputs, as well as a optical digital input. Use these to connect external components, such as your VCR, MD or CD-R recorder. AUDIO OUTPUT FRONT... -
Page 72: Reducing The Tv And Line Signal Levels
Other connections • Connect the LINE 2 (OPTICAL IN) jack on the rear panel to the optical digital output of an external playback component. These include digital components such as an MD player, digital satellite, or a game system. Connect using a optical digital cable (not supplied). -
Page 73: Connecting Using The Component Video Output (Not Applicable To The European Model)
Other connections • Use an S-video cable (not supplied) to connect the S-VIDEO OUT to an S-video input on your TV. Line up the small triangle above the jack with the same mark on the plug before plugging OPTICAL IN AUDIO LINE 2 ANTENNA... -
Page 74: Switching The Tv Audio Input From
Other connections • Use a commercially available SCART cable to connect the AV CONNECTOR to your TV. FRONT CENTER SURROUND AUDIO LINE 1 WIRELESS AC IN WOOFER XV-DV515 • SCART cables are available in several configurations. Make sure that the one you get will work with this system and your TV/monitor. -
Page 75: Additional Information
Additional information Chapter 13 Additional information Switching off the demo • Default setting: Demo On This system has an automatic demo feature that starts when the system is plugged in for the first time. Switch the system into standby. Press SYSTEM SETUP. Use the (cursor left/right) buttons to select ‘Demo Mode?’, then... -
Page 76: Watching Ntsc On A Pal Tv (Mod. Pal)
Additional information Switch the system into standby. Press SYSTEM SETUP. Use the (cursor left/right) buttons to select ‘TV System?’, then press ENTER. Use the (cursor up/down) buttons to select Auto, PAL or NTSC, then press ENTER to confirm. Disc Player setting Type Format NTSC NTSC... -
Page 77: Dvd Video Regions
Additional information CDs and Video CDs are divided into tracks. Track 1 Track 2 Track 3 Track 4 Track 5 CD-ROMs contain folders and files. MP3 and WMA files are referred to as tracks. Folders may contain further folders. Folder A Folder B Folder C Track 1 Track 2... -
Page 78: Discs To Avoid
This unit is designed for use with conventional, fully circular discs only. Use of shaped discs is not recommended for this product. Pioneer disclaims all liability arising in connection with the use of shaped discs. Proper installation and maintenance of this system... -
Page 79: Problems With Condensation
A damaged power cord can cause a fire or give you an electrical shock. Check the power cord once in a while. When you find it damaged, ask your nearest Pioneer authorized service center or your dealer for a replacement. -
Page 80: Troubleshooting
If the trouble cannot be rectified even after exercising the checks listed below, ask your nearest Pioneer authorized service center or your dealer to carry out repair work. • If the system does not operate normally due to external effects such as static electricity disconnect the power plug from the outlet and insert again to return to normal operating conditions. -
Page 81: Dvd/Cd/Video Cd Player
• Check that the speakers are connected correctly. • Make sure the voltage of the mains power source is correct for the model. • If the problem persists, take it to your nearest Pioneer authorized service center or your dealer for servicing. DVD/CD/Video CD player... -
Page 82: Wma/Mp3/Jpeg Discs
Additional information Problem Picture disturbance during playback or dark. Noticeable difference in DVD and CD volume. WMA/MP3/JPEG discs Problem CD-ROM disc is not recognized by the system. Files don’t show up in the Disc Navigator/ Photo Browser. Can play JPEG files, but not WMA/MP3 files on the same disc (or vice versa). -
Page 83: Tuner
Additional information Tuner Problem Remedy Considerable noise in • Tune into the correct frequency. radio broadcasts. • Connect the antenna (refer to the Setup Guide). • Fully extend the FM wire antenna, position for best reception, and secure to a wall. •... -
Page 84: Screen Sizes And Disc Formats
Additional information Screen sizes and disc formats DVD-Video discs come in several different screen aspects, ranging from TV programs, which are generally 4:3, to CinemaScope widescreen movies, with an aspect ratio of up to about 7:3. Televisions also come in different aspect ratios;... -
Page 85: Language Code List
Additional information Language code list Language (Language code letter), Language code Japanese (ja), 1001 Basque (eu), 0521 English (en), 0514 Persian (fa), 0601 French (fr), 0618 Finnish (fi), 0609 German (de), 0405 Fiji (fj), 0610 Italian (it), 0920 Faroese (fo), 0615 Spanish (es), 0519 Frisian (fy), 0625 Dutch (nl), 1412... -
Page 86: Preset Code List
Additional information Preset code list Please note that there are cases where only certain functions may be controllable after assigning the proper preset code, or the codes for the manufacturer in the list will not work for the model that you are using. MANUFACTURER Code(s) ACURA 644 ADMIRAL 631... - Page 87 WATT RADIO 632, 642, 621, 653 TOWADA 642 WHITE ULTRAVOX 632, 642, 649 WESTINGHOUSE 607 UNIVERSUM 631, 607, YOKO 607, 642, 646 ZENITH 603, 620 638, 642, 645, 646, 654, 655 VESTEL 607 PIONEER 600, 631, 632, VICTOR 613 607, 636, 642, 651...
-
Page 88: Glossary
Additional information Glossary Analog audio An electrical signal that directly represents sound. Compare this to digital audio which can be an electrical signal, but is an indirect representation of sound. See also Digital audio. Aspect ratio The width of a TV screen relative to its height. Conventional TVs are 4:3 (in other words, the screen is almost square);... - Page 89 Additional information File extension A tag added to the end of a filename to indi- cate the type of file. For example, “.mp3” indi- cates an MP3 file. Interlaced video A method of displaying a picture in which odd-numbered lines are updated in one pass, then even-numbered lines are updated in the next.
- Page 90 Additional information WMA is short for Windows Media Audio and refers to an audio compression technology developed by Microsoft Corporation. WMA data can be encoded by using Windows Media Player version 8 or Windows Media Player for Windows XP. Files are recognized by their file extension “.wma”...
-
Page 91: Specifications
Additional information Specifications Amplifier section Continuous Power Output (RMS): Front, Center, Surround ..75 W per channel (1 kHz, 10 % T.H.D., 6 Ω) Subwoofer ..75 W (100 Hz, 10 % T.H.D., 6 Ω) Continuous Power Output : Front, Center, Surround . -
Page 92: Digital Wireless Speaker System
Additional information Subwoofer Enclosure ... . . Bass-reflex floor type System ....16 cm 1-way system Speaker . - Page 93 Additional information This product includes FontAvenue® fonts licenced by NEC corporation. FontAvenue is a registered trademark of NEC Corporation. This product incorporates copyright protection technology that is protected by method claims of certain U.S. patents and other intellectual property rights owned by Macrovision Corporation and other rights owners.
- Page 94 Additional information...
- Page 95 Additional information...
- Page 96 253 Alexandra Road, #04-01, Singapore 159936 TEL: 656-472-1111 PIONEER ELECTRONICS AUSTRALIA PTY. LTD. 178-184 Boundary Road, Braeside, Victoria 3195, Australia, TEL: (03) 9586-6300 PIONEER ELECTRONICS DE MEXICO S.A. DE C.V. Blvd.Manuel Avila Camacho 138 10 piso Col.Lomas de Chapultepec, Mexico,D.F. 11000 TEL: 55-9178-4270 <TCLZZ/03C00001>...