Table of Contents
Advertisement
Advertisement
Table of Contents

Related Manuals for Huawei EchoLife HG620


Summary of Contents for Huawei EchoLife HG620
-
Page 1: User Guide
EchoLife HG620 Home Gateway User Guide HUAWEI TECHNOLOGIES CO., LTD. - Page 2 User Guide Issue Date 2009-08-10 Part Number 202179 Huawei Technologies Co., Ltd. provides customers with comprehensive technical support and service. Please feel free to contact our local office or company headquarters. Huawei Technologies Co., Ltd. Address: Huawei Industrial Base Bantian, Longgang...
- Page 3 Thus the descriptions herein may not exactly match the product or its accessories you purchase. Huawei Technologies Co., Ltd reserves the right to change or modify any information or specifications contained in this manual without prior notice or obligation.
-
Page 4: Table Of Contents
Contents 1 Safety Precautions..................1 2 Connecting the Cables and Getting Started..........6 2.1 Simple Connection ..................6 2.2 Connecting One Telephone ................7 2.3 Connecting Multiple Telephones ..............8 2.4 Getting Started .....................8 3 Setting the Network-Access Parameters ..........9 3.1 Accessing the Network Through the Embedded PPP Dial-Up Software on the HG620 ......................9 3.2 Accessing the Network Through the PPP Dial-Up Software on Your Computer ......................10... - Page 5 6 FAQs......................15 7 Appendix....................18 7.1 Indicators....................18 7.2 Interfaces and Buttons................20 7.3 Default Settings..................20 7.4 Technical Specifications................21...
-
Page 6: Safety Precautions
1 Safety Precautions Thank you for purchasing the EchoLife HG620 Home Gateway (hereinafter referred to as the HG620). For safety purposes, carefully read through these safety precautions and observe them during operation. Basic Requirements Keep the device dry during storage, transportation, and operation of the device. - Page 7 Use the accessories such as the power adaptor provided or authorized only by the manufacturer. Make sure that the device does not get wet. If water gets into the device, disconnect the power supply immediately and unplug all the cables connected to the device. The power supply of the device must meet the requirements of the input voltage of the device.
- Page 8 Wireless Product Usage Requirements Keep the device away from magnetic storage devices (e.g., a magnetic card or a floppy disk), to prevent loss of the stored information. Stop using the device or disconnect the power supply in situations where wireless device is prohibited or using of a wireless device leads to interference or danger.
-
Page 9: Fcc Statement
The antenna(s) used for this transmitter must be installed to provide a separation distance of at least 20cm from all persons. Hereby, Huawei Technologies Co., Ltd., declares that this device is in compliance with the essential requirements and other relevant provisions of Directive 1999/5/EC. The declaration of conformity may be consulted at www.huaweidevice.com/certification. - Page 10 The equipment must not be co-located or operating in conjunction with any other antenna or transmitter. Changes or modifications made to this equipment not expressly approved by Huawei Technologies Co.,Ltd. may void the FCC authorization to operate this equipment.
-
Page 11: Connecting The Cables And Getting Started
2 Connecting the Cables and Getting Started 2.1 Simple Connection If your telephone line is used for the broadband network access only and if you do not need to use a telephone, take the following figure as a reference for connecting the cables. -
Page 12: Connecting One Telephone
2.2 Connecting One Telephone If your telephone line is used for both the broadband network access and a telephone connection, take the following figure as a reference for connecting the cables. LINE VDSL LAN4 LAN3 LAN2 LAN1 RESET POWER PHONE MODEM 1. -
Page 13: Connecting Multiple Telephones
2.3 Connecting Multiple Telephones If your telephone line is used for the broadband network access, telephone connections, and fax connections, take the following figure as a reference for connecting the cables. LINE VDSL LAN4 LAN3 LAN2 LAN1 RESET POWER PHONE MODEM 1. -
Page 14: Setting The Network-Access Parameters
After you power on the HG620, the ADSL indicator blinks (for less than three minutes), which indicates that the HG620 is being activated. Later, the ADSL indicator turns solid on. The POWER indicator is also solid on, which indicates that the HG620 is working properly. -
Page 15: Accessing The Network Through The Ppp Dial-Up Software On Your
Note: The name of this PVC should begin with atm. The DSL link type of this ATM PVC should be EoA. 3. Select Enable for WAN connection. 4. Select a service from the Service list drop-down list box. 5. Set Port binding to LAN1 or LAN2. 6. -
Page 16: Configuring The Wireless Network Connection
1. Choose Start > All Programs > Accessories > Communications > Network Connections. 2. Click Create a new connection in Network Tasks to display the New Connection Wizard window, and then click Next. 3. Select Connect to the Internet, and then click Next. 4. -
Page 17: Configuring The Hg620
3. Select the Enable WLAN option. 4. Enter a wireless network name in the SSID text box. 5. Select WPA-PSK from the Security drop-down combo box. 6. Enter an access password in the WPA pre-shared key text box. 7. Select TKIP from the WPA encryption drop-down combo box. 8. -
Page 18: Enabling Or Disabling The Wireless Network Function
Step 4 Enter the old password and the new password. Then enter the new password again in the Confirm password text box for confirmation. Step 5 Click Submit to save the settings. After you change the password successfully, the current page jumps to the page for logging in to the Web-based configuration utility. -
Page 19: Changing The Ip Address Used For Logging In To The Web-Based
Step 2 In the navigation tree on the left, choose Basic > LAN. Step 3 Select the WLAN page. Step 4 Enter the new wireless network name in the SSID text box. Step 5 Select WPA-PSK from the Security drop-down combo box. Step 6 Enter the new access password in the WPA pre-shared key text b Step 7... -
Page 20: Faqs
After the preceding operations, the current page jumps to the login page. You can log in to the Web-based configuration utility by entering the default user name and password that are admin. 6 FAQs How can I quickly enable or disable the wireless network function? Press and hold the WLAN button for over one second, and then release the button to enable or disable the wireless network function. - Page 21 network operator. Step 3 Check whether the LAN indicator of the terminal is on. If the LAN indicator is off, perform further checks as follows: 1. Ensure that the network adapter of the computer is enabled. 2. Ensure that the network cable between the terminal and the computer is properly connected.
- Page 22 3. In the Internet Options dialog box, click the Connections tab. 4. In the Local Area Network (LAN) settings group box, click LAN Settings. 5. In the Proxy server group box of the Local Area Network (LAN) Settings dialog box, ensure that the Use a proxy server for your LAN (These settings will not apply to dial-up or VPN connections).
-
Page 23: Appendix
Step 4 Place your terminal and computer in another direction. Step 5 Do not use your terminal to access the WLAN during thunderstorms. After a broadband terminal is installed, does Internet access degrade call quality or do telephone calls lower the Internet access rate? No. - Page 24 Indicator Status Description WLAN Blinking The wireless network function is enabled. Data is being transmitted through the WLAN. Solid on The wireless network function is enabled. No data is being transmitted through the WLAN. The wireless network function is disabled. Blinking This indicator has three blinking modes that indicate three states.
-
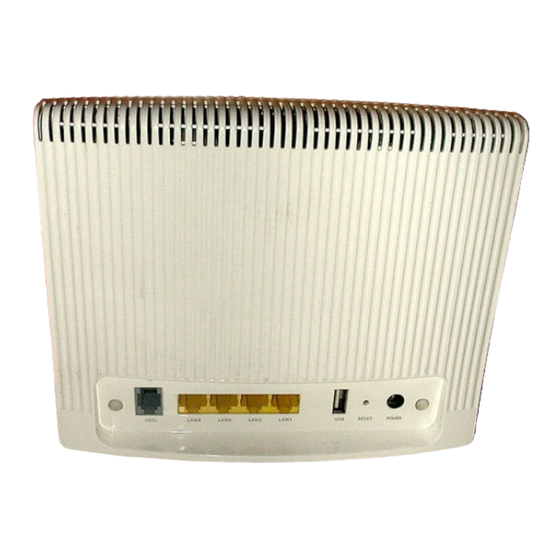
Page 25: Interfaces And Buttons
7.2 Interfaces and Buttons Interface or Description Button VDSL It is used to connect to the MODEM interface on the splitter. LAN1–LAN4 It is used to connect to the Ethernet interface on the computer. It is used to connect a USB storage device, such as a USB disk. RESET You can press and hold the RESET button for over six seconds to restore the default settings of the HG620. -
Page 26: Technical Specifications
7.4 Technical Specifications Item Specification Power supply for the 12 V DC, 1.5 A HG620 Power consumption < 18 W Ambient temperature for 0°C to 40°C operation Ambient humidity 5% to 95%, non-condensing operation Dimensions (L × W × H) 190 mm ×... - Page 27 HUAWEI TECHNOLOGIES CO., LTD. Huawei Industrial Base Bantian, Longgang Shenzhen 518129 People's Republic of China www.huawei.com Part Number: 202179-...