Advertisement
Table of Contents
- 1 Panel Descriptions
- 2 Getting Ready to Use the Rubix
- 3 Connecting to a Computer
- 4 About the USB Driver
- 5 Settings for the Rubix
- 6 Using the Rubix
- 7 Adjusting the Input Level
- 8 Using the Compressor/Limiter
- 9 Troubleshooting
- 10 Block Diagram
- 11 Specifications
- 12 Declaration of Conformity
- Download this manual
Advertisement
Table of Contents

Related Manuals for Roland rubix 22


Summary of Contents for Roland rubix 22
- Page 1 Reference Manual © 2017 Roland Corporation...
-
Page 2: Panel Descriptions
Panel Descriptions 5 When connecting a guitar or bass, use the INPUT 1L Rubix22 jack. The sound level will be very low if you connect directly to the INPUT 2R jack. [Hi-Z] button Front Panel Determines the impedance of the INPUT 1L jack. You can select high impedance (Hi-Z) or low impedance (Lo-Z) as appropriate for the connected equipment. - Page 3 Panel Descriptions Rear Panel [DIRECT MONITOR] switch Determines whether the audio signals input via the INPUT (1L, 2R) are output directly. Switch Explanation position MONO Monitor in mono. STEREO Monitor in stereo. Select when monitoring using the DAW software. Only audio input via the Rubix22’s USB port can be monitored.
- Page 4 Panel Descriptions 5 Set the [Hi-Z] button (p. 4) and [48V] button (p. 4) as Rubix24 appropriate for the audio device that is connected. 5 Use a microphone with an XLR connector. The sound level will be very low if you use a Front Panel microphone with a phone type plug.
- Page 5 Panel Descriptions Power indicator Indicates the status of the connection with a USB device. Power Status indicator Connected to a computer or iPad. Unlit Not connected to a computer or iPad. [OUTPUT] knob Reduction indicator Adjusts the output level of the audio signal. MEMO If the [COMP/LIMIT] button is turned on, this indicator is lit red when the audio input signal exceeds the level specified by the...
- Page 6 Panel Descriptions Rear Panel OUTPUT (1L, 2R, 3L, 4R) jacks (balanced TRS type) Output the analog audio signal. 5V DC connector MEMO 5 Pin assignment of OUTPUT jack Connect this to a commercially available USB AC adaptor. GND (SLEEVE) About the USB AC adaptor HOT (TIP) “Using the Unit Safely”...
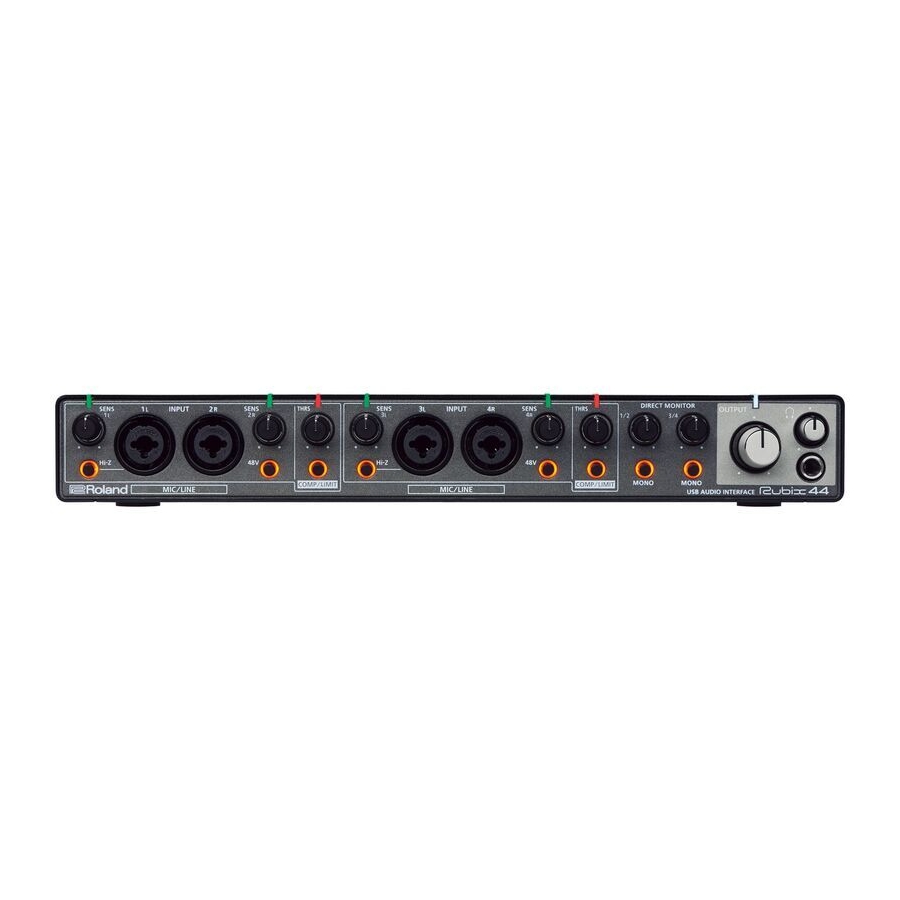
- Page 7 Panel Descriptions 5 Set the [Hi-Z] button (p. 7) and [48V] button (p. 7) as Rubix44 appropriate for the audio device that is connected. 5 Use a microphone with an XLR connector. The sound level will be very low if you use a Front Panel microphone with a phone type plug.
- Page 8 Panel Descriptions Power indicator Indicates the status of the connection with a USB device. Power Status indicator Connected to a computer or iPad. Unlit Not connected to a computer or iPad. Rapid The power will soon be turned off automatically blinking by the auto power off function.
- Page 9 If you are unsure of the connection method, contact the nearest Roland Service Center, or an [GROUND LIFT] switch “Information”...
-
Page 10: Getting Ready To Use The Rubix
Installing the USB Driver (Before Using the Product for the First Time) With the Rubix22 / Rubix24 / Rubix44 not connected, start up your computer. Download the USB driver from the Roland website, and begin the installation as directed below. Roland Website http://roland.cm/rubix/ 1. -
Page 11: Connecting To A Computer
Getting Ready to Use the Rubix Connecting to a Computer Connecting to a Mac After you have finished installing the USB driver in your computer, * To prevent malfunction and equipment failure, always turn connect the product to your computer as follows. down the volume, and turn off all the units before making any * To prevent malfunction and equipment failure, always turn connections. - Page 12 “Roland USB Audio Driver for Rubix Series,” “Uninstall.” and then click “Roland USB Audio Driver for Rubix Series” If you don’t see the list, the driver is not installed on your computer. If a user account control dialog box appears, click [Yes].
- Page 13 Getting Ready to Use the Rubix Follow the directions in the screen to uninstall the USB driver. If any other message appears, proceed as directed by the message.
-
Page 14: About The Usb Driver
About the USB Driver 5 In some cases, performance might be unsatisfactory if the Rubix Windows Operating Requirements is used simultaneously with a USB-connected hard disk. Don’t use a USB-connected hard disk as the save-destination for playback or recording. Supported Operating Systems Mac OS Operating Requirements Microsoft®... -
Page 15: Settings For The Rubix
DAW application. Amplified speakers Headphone Computer Audio Driver Audio Input Device / Audio Output Device IN (Roland Rubix22) / OUT (Roland Rubix22) MME, WDM/KS (*1) ASIO Roland Rubix (*1) Select the model of Rubix that you’re using. - Page 16 Settings for the Rubix Access the control panel as follows. Setting the Size of the Audio Buffer (Windows Only) Use the control panel to set the size of the audio buffer. How audio buffer size is related to latency [Start] 1.
- Page 17 Settings for the Rubix “USB Streaming Mode,” select the most appropriate setting. Select the setting with the shortest delay that still allows stable audio playback. Setting Stability Latency Short (fast) High Long (slow) MEMO “How audio buffer size is related to latency” Refer to (p.
-
Page 18: Using The Rubix
Using the Rubix Playing Back Recording Connect the Rubix to a computer or iPad using the USB cable. Audio signals from the INPUT jacks can be sent to your DAW software and recorded. By connecting headphones or amplified speakers as shown in the illustration, you can monitor playback from your DAW software or * To prevent malfunction and equipment failure, always turn the sound from an instrument or audio device connected to the... -
Page 19: Using The Compressor/Limiter
Rubix24 Using the Compressor/Limiter Rubix44 The Rubix24 and Rubix44 let you use a compressor or limiter. Compressor/Limiter Settings Using a compressor makes the volume more consistent. Turning the [THRS] knob toward the right applies the compressor more strongly, and simultaneously raises the makeup gain (boosts the output level). -
Page 20: Troubleshooting
Troubleshooting Problems When Installing the USB Driver (Windows Users) Problem Items to check Action Can’t download the driver because If you have a different computer that is able to connect to the internet, you can save the downloaded there’s no internet connection driver on a USB flash drive and use that to install. - Page 21 Troubleshooting Problem Items to check Action If you can hear sound through headphones connected to the PHONES jack, check that you have correctly connected your audio playback system (external monitors), Can you hear sound by connecting and adjust the volume of your equipment. headphones? If the sound in your headphones is inaudible or too soft, check the other troubleshooting items.
- Page 22 Troubleshooting Problem Items to check Action Are multiple programs running? Exit programs that are not in use. If the software allows you to adjust the audio buffer size, change the buffer size. Did you adjust the software’s audio buffer size? Refer to the documentation for your software.
- Page 23 Troubleshooting Problem Items to check Action Use the following procedure to disable the monitoring function of Windows. Open the “Control Panel,” click the [Hardware and Sound] icon, and then click the [Sound] icon. If you have selected Icon view, click the [Sound]. Windows In the “Recording”...
- Page 24 Troubleshooting Problem Items to check Action Could the volume of the application Raise the volume in the application. you’re using be turned down? Use the following procedure to adjust system volume. “Control Panel” “Category.” Open the and set the display mode to Windows [Hardware and Sound] [Adjust system volume]...
- Page 25 Troubleshooting [ I ] [H] Using your mouse, drag and connect the Mac OS X MIDI Settings buttons (which represent the input/output ports of [Rubix22] each device) of the existing and the newly Here’s how to configure the MIDI settings for Mac OS X. added [Rubix] so that they are connected as shown...
-
Page 26: Block Diagram
Block Diagram BLOCK DIAGRAM PHONES +48V DIRECT MONITOR PHONES MONO/ STEREO OUTPUT 1L PEAK/SIG Hi-Z/ INPUT 1L SENS AUDIO Lo-Z OUTPUT IN 1/2 OUT 1/2 OUTPUT 2R INPUT 2R SENS NOR/LIFT PEAK/SIG MIDI MIDI IN MIDI OUT Hi-SPEED USB BLOCK DIAGRAM PHONES SELECT PHONES... -
Page 27: Specifications
Specifications Roland Rubix22: USB Audio Interface [System] [Characteristics] Number of Audio INPUT (1L, 2R) connectors (XLR type): -60– -12 Record: 2 channels Record/Playback Nominal Input Playback: 2 channels Channels Level INPUT (1L, 2R) jacks (1/4-inch TRS phone type): -44–+4 dBu... - Page 28 Specifications Roland Rubix24: USB Audio Interface [System] [Characteristics] Number of Audio INPUT (1L, 2R) connectors (XLR type): -60– -12 Record: 2 channels Record/Playback Nominal Input Playback: 4 channels Channels Level INPUT (1L, 2R) jacks (1/4-inch TRS phone type): -44–+4 dBu...
- Page 29 Specifications Roland Rubix44: USB Audio Interface [System] [Characteristics] Number of Audio INPUT (1L, 2R, 3L, 4R) connectors (XLR type): -60– Record: 4 channels Record/Playback -12 dBu Nominal Input Playback: 4 channels Channels Level INPUT (1L, 2R, 3L, 4R) jacks (1/4-inch TRS phone type): -44–+4 dBu...
-
Page 30: Declaration Of Conformity
For the USA DECLARATION OF CONFORMITY Compliance Information Statement Model Name : Rubix22, Rubix24, Rubix44 Type of Equipment : USB Audio Interface Responsible Party : Roland Corporation U.S. Address : 5100 S. Eastern Avenue Los Angeles, CA 90040-2938 (323) 890-3700 Telephone :... - Page 31 For EU Countries For C.A. US ( Proposition 65 ) WARNING This product contains chemicals known to cause cancer, birth defects and other reproductive harm, including lead.
Need help?
Do you have a question about the rubix 22 and is the answer not in the manual?
Questions and answers
When I connect the usb cable to my Sonnettech 20 super dock the white light does not stay on but flashes on and off. To fix it I have to connect directly to my McBook Pro. This defeats the purpose of the high powered all-sing-dancing super dock. Anyy ideas?