Table of Contents
Advertisement
Quick Links
Kits
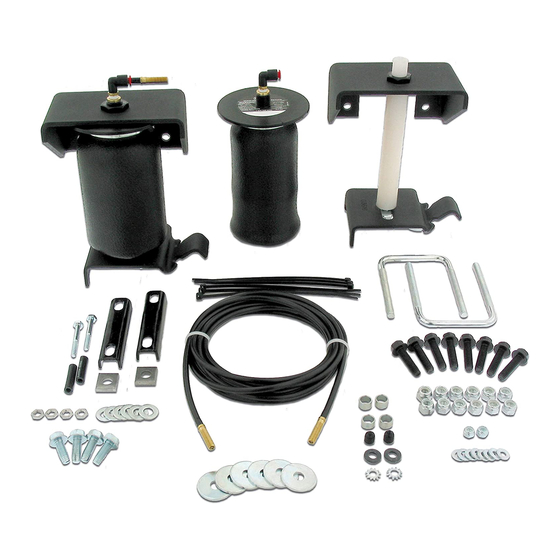
59544/59568
Ford F-150 Pickup &
Lincoln Mark LT
Cover illustration
Cover illustration
may not depict
may not depict
actual kit.
actual kit.
INSTALLATION GUIDE
For maximum effectiveness and safety,
please read these instructions completely
before proceeding with installation .
Failure to read these instructions can result in an
incorrect installation.
Advertisement
Table of Contents

Related Manuals for Air Lift RideControl 59544


Summary of Contents for Air Lift RideControl 59544
-
Page 1: Installation Guide
Kits 59544/59568 Ford F-150 Pickup & Lincoln Mark LT Cover illustration Cover illustration may not depict may not depict actual kit. actual kit. INSTALLATION GUIDE For maximum effectiveness and safety, please read these instructions completely before proceeding with installation . Failure to read these instructions can result in an incorrect installation. - Page 2 We’re delighted to be a part of your air suspension solution. Air Lift Company is dedicated to ensuring that you have the best possible experience with our products . If you have any questions, concerns or even a suggestion, please feel free to contact us .
-
Page 3: Table Of Contents
TABLE OF CONTENTS Introduction . . . . . . . . . . . . . . . . . . . . . . . . . . . . . . . . . . . . . . . 2 Important Safety Notice . -
Page 4: Introduction
. Air Lift Company reserves the right to make changes and improvements to its products and publications at any time. For the latest version of this manual, contact Air Lift Company at (800) 248-0892 or visit our website at www.airliftcompany.com. -
Page 5: Installation Diagram
RideControl Installation Diagram Driver Side Shown NOTE: Torque the nut to no more than 10 ft/lbs evenly on NOTE: The jounce both sides. bumper attaches the bracket to the frame. F or G Flange on NOTE: Some late model this side jounce bumpers have alignment pins that will need to be removed. -
Page 6: Hardware List
18422 3/8” Serrated flange nut ..... .4 Missing or damaged parts? Call Air Lift customer STOP! service at (800) 248-0892 for a replacement part. - Page 7 RideControl (G) and M10 lock washer (H). NOTE The upper brackets are left- and right-side specific, designated by a “L” and “R” label. 4. Insert the curved part of the J-bolts (k) into the existing slots in the frame. Be sure the J-bolts lock onto the frame securely (fig.
-
Page 8: Installing The Air Lines
RideControl INSTALLING ThE AIR LINES 1. Choose a convenient location for mounting the inflation valves. Popular locations for the inflation valve are: a. The wheel well flanges. b . License plate recess in bumper . c. Under the gas cap access door. d . -
Page 9: Checking For Leaks
RideControl 6. Route the air line along the frame to the air fitting on the air spring (fig. 5). keep AT LEAST 6” of clearance between the air line and heat sources, such as the exhaust pipes, muffler, or catalytic converter. Avoid sharp bends and edges. Use the plastic tie straps (BB) to secure the air line to fixed, non-moving points along the chassis. -
Page 10: The Addition Of Limiting Straps
DO NOT CUT THE AIR LINE COMPLETELY OFF AS THIS WILL NICk THE BARB AND CAUTION RENDER THE FITTING USELESS. 3 . If the preceding steps have not resolved the problem, call Air Lift customer service at (800) 248-0892 for assistance. ThE ADDITION OF LIMITING STRAPS... -
Page 11: Before Operating
If a heat shield was included in the kit, install it. If there is no heat shield, but one is required, call Air Lift customer service at (800) 248-0892. Fastener test — Recheck all bolts for proper torque. -
Page 12: Maintenance And Servicing
If the preceding steps do not solve the problem, it is most likely caused by a failed air spring — either a factory defect or an operating problem. Please call Air Lift at (800) 248-0892 for assistance or a replacement air spring . -
Page 13: Product Use
No. Adding air springs will not change the weight ratings (GAWR, GCWR and/or GVWR) of a vehicle. Exceeding the GWVR is dangerous and voids the Air Lift warranty. Q . Is it necessary to keep air in the air springs at all times and how much pressure will they need? The minimum air pressure should be maintained at all times . -
Page 14: Guidelines For Adding Air
RideControl GUIDELINES FOR ADDING AIR 1 . Start with the vehicle level or slightly above . 2 . When in doubt, always add air . 3. For motorhomes, start with 50-100 PSI in the rear because it can be safely assumed that it is heavily loaded . -
Page 15: Warranty And Returns Policy
Air Lift 1000 ....Lifetime Limited LoadController/Dual ..2 Year Limited RideControl . -
Page 16: Replacement Information
Contact your dealer and order by part number. Download a detailed list at www.airliftcompany.com/downloads.html. Step 2 If your dealer does not have the part in stock, call Air Lift directly and we can ship you the part you need, the same day, in the U.S. or Canada. Missing or damaged item? - Page 20 Thank you for purchasing Air Lift products — the professional installer’s choice! Air Lift Company • 2727 Snow Road • Lansing, MI 48917 or PO Box 80167 • Lansing, MI 48908-0167 Toll Free (800) 248-0892 • Local (517) 322-2144 • Fax (517) 322-0240 • www.airliftcompany.com...
Need help?
Do you have a question about the RideControl 59544 and is the answer not in the manual?
Questions and answers