Table of Contents

Summary of Contents for Genvex GES Energy S
- Page 1 GES ENERGY M PASSIVE VENTILATION WITH WIRING DIAGRAM FOR OPTIMA 100 AND OPTI MA 250 INSTALLATION MANUAL UK / Version 30.04.2014 Genvex A/S • Sverigesvej 6 • DK-6100 Haderslev • Tel.: +45 73 53 27 00 • salg@genvex.dk • genvex.dk...
-
Page 2: Table Of Contents
Table of contents GES Energy - Installation ..........4 Mounting .................5 Duct connection ..............6 Condensate drain ............6 Duct system ..............7 Insulation of ducts in cold loft spaces ......7 Insulation of ducts in warm spaces.........8 Reheating of supply air ...........8 Electrical connection............9 Inspection and commissioning of the appliance .....9 Optimum commissioning of the appliance ......9 Maintenance of the appliance........10... - Page 3 This instruction must be followed. If the condensate drain 5) Pour 1 liter water into the drip tray of the unit to verify that is not made according to this instruction, GENVEX A/S can it is drained properly. Before each heating season make not be made responsible for any additional damages, which sure that the drain is filled with water.
-
Page 4: Ges Energy - Installation
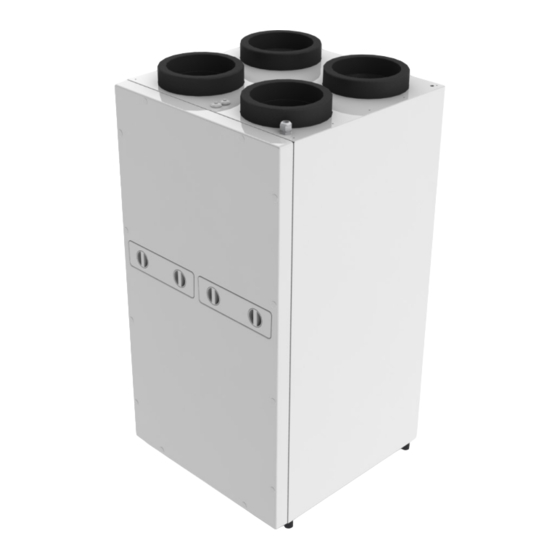
GES Energy 1 - Installation The GES Energy 1 is supplied in a vertical version (as shown) or a horizontal version. The vertical version cannot be used as a horizontal version and vice versa. One of the reasons being that the condensate water would not reach the condensate drain if the unit would be turned around. -
Page 5: Mounting
Mounting unvisible wall mounts GES Energy is supplied with an universal wall mount ing kit. Wall mounting (vertical) GES Energy can be mounted directly on the wall with visible or unvisible wall mounts. Visible wall mounts Closet mounting (vertical) GES Energy is created to fit into a closet with (60 x 60 cm) as shown. -
Page 6: Duct Connection
Duct connection All duct connections are with a yellow sticker indicating the exhaust air type of ventilation pipe to be connected. supply air Connect the supply air fresh air Duct system from the unit to the supply outlet in the living area. -
Page 7: Duct System
Insulation of ducts in cold loft spaces In order to exploit the unit’s high recovery potential (efficiency), it is necessary to insulate the ducts correctly. Genvex recommends as follows: Supply and extract ducts: To minimise heat losses from the duct system in cold loft spaces, the supply and extract ducts must be insulated with a minimum of 100 mm insulation. -
Page 8: Insulation Of Ducts In Warm Spaces
Insulation of ducts in heated spaces Genvex recommends as follows: Supply and extract ducts: In warm loft spaces the supply and extract channels must be insulated with 50 mm insulation. Supply and extract air ducts led through heated spaces in dwellings do not require insulation. -
Page 9: Electrical Connection
To start up the unit before adjustment, do as follows: Before starting up the unit: 1: Check that the Genvex unit is correctly mounted and that all ducts are insulated as required. 2: Check that hatches can be opened so that service and maintenance on the unit can be carried out. -
Page 10: Maintenance Of The Appliance
Maintenance of plant Turn off the electricity for the unit before opening it Filters: When the filter timer reaches the set value for filter change, “Alarm!” will show in the screen saver and ”Chg. filter” will flash. This means that it is time to clean/change G4 = Standard filter (Coarse filter class G4) the filters. - Page 11 Service If you are unable to maintain your unit yourself, you can sign a service agreement with the Genvex service department. If any faults arise in the unit, contact the Genvex service department.
-
Page 12: Fault Finding
The installer from whom you have bought the system or As an additional security there is a built-in thermal cut-out, the Genvex service department (+45 7353 2765). which disengages if the temperature exceeds 110 °C. Re- engaging must be done manually. -
Page 13: Pcb And Wiring Diagrams
PCB ES960 for Optima 250 Design Q3=0.5A Q4=0.5A ES960C Q1= H8,H16,H17 Q2= H6,H7,H9 Q3= L1-L17 Q4= L1-L17 Q=Fuse L1 =Humidistat H1 =Mains connection 230 VAC L2 =Display H2 = (R2) Electric Reheater 230VAC L3 =Sensors T1,T3,T4,T7 H3 = (R3) Electric Preheater 230VAC L4 =Humidity sensor P1 H2,H3 =Max. - Page 14 Wiring Diagram Optima 250 Design with ES960 PCB Genvex Potential-free Humidistat contact must be used Mains connection OPTIMA DESIGN 1x230VAC, L-N-PE Max: 13A +10V Electric Reheater H2 and H3 Max. Sensor, supply air load total 1800W Sensor, fresh air Electric Preheater...
- Page 15 PCB ES951 and Wiring Diagram for Optima 100 Design ES951 Genvex Mains Hygrostat 1x230VAC, 50Hz Potentialfree MAX Fuse 10A Contact Must be connected to earth Must be used Sensor Exhaust air Sensor Heater/Preheater 230V 90° C manu Electrical Heater/Preheater Yell/Green...
-
Page 16: Eu-Declaration Of Conformity
Subject to Technical Modifications of GES Energy Small and GES Energy Medium... - Page 17 Advanced controls ensure that as little energy as possible is used for simplest installation. reaching an optimum level of comfort. Genvex A/S • Sverigesvej 6 • DK-6100 Haderslev • Tel.: +45 73 53 27 00 • salg@genvex.dk • genvex.dk...
Need help?
Do you have a question about the GES Energy S and is the answer not in the manual?
Questions and answers