Robustel R2000 User Manual
Industrial dual sim cellular
Hide thumbs
Also See for R2000:
- User manual (121 pages) ,
- Installation and configuration quick manual (24 pages) ,
- Installation and configuration manual (18 pages)

Related Manuals for Robustel R2000


Summary of Contents for Robustel R2000
- Page 1 User Guide User Guide R2000 Industrial Dual SIM Cellular VPN Router 2 Eth + 2 SIM Guangzhou Robustel Technologies Co., Ltd. www.robustel.com Guangzhou Robustel Technologies Co., Ltd. www.robustel.com...
- Page 2 The contents of this document are subject to change without notice due to continued progress in methodology, design and manufacturing. Robustel shall have no liability for any error or damage of any kind resulting from the use of this document.
- Page 3 Robustel accepts no responsibility for damages of any kind resulting from delays or errors in data transmitted or received using the router, or for failure of the router to transmit or receive such data.
- Page 4 Robustel R2000 User Guide Protecting Your Router To ensure error-free usage, please install and operate your router with care. Do remember the following: Do not expose the router to extreme conditions such as high humidity / rain, high temperature, direct sunlight, ...
- Page 5 Robustel R2000 User Guide Regulatory and Type Approval Information Table 1: Directives 2011/65/EC Directive 2011/65/EU of the European Parliament and of the Council of 8 June 2011 on the restriction of the use of certain hazardous substances in electrical and...
- Page 6 Robustel R2000 User Guide Document History Updates between document versions are cumulative. Therefore, the latest document version contains all updates made to previous versions. Date Firmware Version Doc Version Change Description Aug. 24, 2016 1.2.2 V2.0.0 Initial Release. Modified the frequency range of FDD LTE and TDD LTE Aug.
-
Page 7: Table Of Contents
Robustel R2000 User Guide Contents Chapter 1 Product Overview ........................... 9 Key Features ............................... 9 Package Contents ............................. 10 Specifications ............................12 Dimensions ............................... 14 Ordering Information ..........................14 Chapter 2 Hardware Installation ........................15 PIN Assignment ............................15 LED Indicators ............................15 Reset Button ............................. - Page 8 Robustel R2000 User Guide 3.25 Services > Advanced ..........................91 3.26 System > Debug ............................92 3.27 System > Update ............................93 3.28 System > App Center ..........................94 3.29 System > Tools ............................95 3.30 System > Profile ............................97 3.31...
-
Page 9: Chapter 1 Product Overview
Chapter 1 Product Overview 1.1 Key Features The Robustel Industrial Dual SIM Cellular VPN Router (R2000) is a rugged cellular router offering state-of-the-art mobile connectivity for machine to machine (M2M) applications. R2000 is a powerful router developed from RobustOS, a Robustel self-developed and Linux-based operating system which is designed to be used in Robustel devices. -
Page 10: Package Contents
1 x 3-pin 3.5 mm male terminal block for power supply 1 x Quick Start Guide with download link of other documents or tools *If any of the above items is missing or damaged, please contact your Robustel sales representative. Optional Accessories (sold separately): ... - Page 11 Robustel R2000 User Guide RP-SMA WiFi antenna (stubby/magnet optional) Stubby antenna Magnet antenna Wall mounting kit 35 mm DIN rail mounting kit Ethernet cable AC/DC power adapter (12V DC, 1.5 A; EU/US/UK/AU plug optional) RT_UG_R2000_v.3.0.0...
-
Page 12: Specifications
Robustel R2000 User Guide 1.3 Specifications Cellular Interface Number of antennas: 2 (MAIN + AUX) Connector: SMA, female SIM: 2 (3.0 V & 1.8 V) Standards: GSM/GPRS/EDGE/WCDMA/HSDPA/HSUPA/HSPA+/DC-HSPA+/TD-SCDMA/CDMA (CDMA 1X/EVDO)/FDD LTE/TDD LTE GSM: max DL/UL = 9.6/2.7 Kbps GPRS: max DL/UL = 86 Kbps EDGE: max DL/UL = 236.8 Kbps... - Page 13 App Center (Available Apps for RobustOS) Apps: L2TP, PPTP, DMVPN, RobustVPN, DDNS, VRRP, QoS, Captive Protal, WLAN Multi AP, SNMP, Language, RobustLink *Request on demand. For more Apps please visit www.robustel.com. Power Supply and Consumption Connector: 3-pin 3.5 mm female socket ...
-
Page 14: Dimensions
-25 to +70 °C -25 to +70 °C Environment 5 to 95% RH 5 to 95% RH *For more information about 4G frequency bands in different countries, please contact your Robustel sales representative. RT_UG_R2000_v.3.0.0 July 24, 2017 14 / 124... -
Page 15: Chapter 2 Hardware Installation
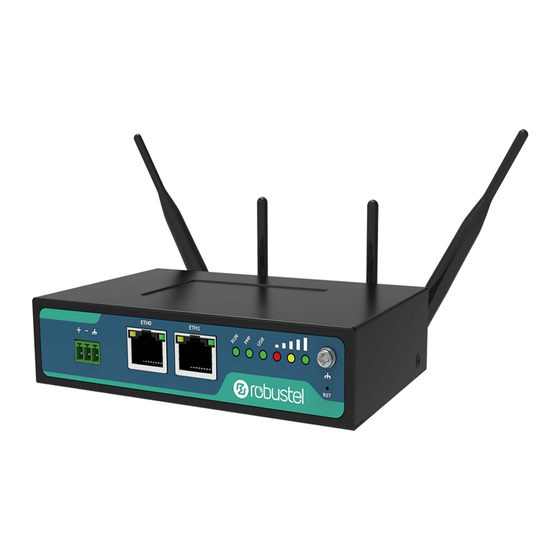
Chapter 2 Hardware Installation 2.1 PIN Assignment Polarity Positive Negative 2.2 LED Indicators The R2000 Router has been designed to be placed on a desktop. Below is the bottom view of the R2000. Name Color Status Description Green On, fast blinking... -
Page 16: Reset Button
Robustel R2000 User Guide than standard Network is not joined or joining USR-OpenVPN Green On, solid OpenVPN connection is established OpenVPN connection is not established USR-IPsec Green On, solid IPsec connection is established IPsec connection is not established USR-WiFi Green... -
Page 17: Ethernet Port
2.4 Ethernet Port There are two Ethernet ports on R2000 Router, including ETH0 and ETH1. The ETH0 on the router can be configured as either a WAN port or LAN port, also can be assigned as a PoE port, while ETH1 can only be configured as a LAN port. -
Page 18: Attach External Antenna (Sma Type)
Robustel R2000 User Guide card slot. To insert SIM card, press the card with finger until you hear a click and then tighten the screws associated with the cover by using a screwdriver. To put back the cover and tighten the screws associated with the cover by using a screwdriver. -
Page 19: Mount The Router
Robustel R2000 User Guide 2.7 Mount the Router The router can be placed on a desktop or mounted to a wall or a 35 mm DIN rail. Two methods for mounting the router Wall mounting (measured in mm) Use 4 pcs of M2.5*4 flat head Phillips screws to fix the wall mounting kit to the router, and then use 2 pcs of M3 drywall screws to mount the router associated with the wall mounting kit on the wall. -
Page 20: Ground The Router
Robustel R2000 User Guide 2.8 Ground the Router Router grounding helps prevent the noise effect due to electromagnetic interference (EMI). Connect the router to the site ground wire by the ground screw before powering on. Note: This product is appropriate to be mounted on a sound grounded device surface, such as a metal panel. -
Page 21: Power Supply
2.11 PD Connection (Optional) If you would like to power the R2000 Router through the Ethernet port, please refer to the following topology to connect the R2000 to a PSE (Power Sourcing Equipment). The range of PoE power voltage is 48~57V DC. -
Page 22: Chapter 3 Initial Configuration
Robustel R2000 User Guide Chapter 3 Initial Configuration The router can be configured through your web browser that including IE 8.0 or above, Chrome and Firefox, etc. A web browser is included as a standard application in the following operating systems: Linux, Mac OS, Windows 98/NT/2000/XP/Me/Vista/7/8, etc. - Page 23 Robustel R2000 User Guide Click Properties in the window of Local Area Connection Status. Choose Internet Protocol Version 4 (TCP/IPv4) and click Properties. RT_UG_R2000_v.3.0.0 July 24, 2017 23 / 124 Confidential...
- Page 24 Robustel R2000 User Guide Two ways for configuring the IP address of PC. Obtain an IP address automatically: Use the following IP address: (Configured a static IP address manually within the same subnet of the router) Click OK to finish the configuration.
-
Page 25: Factory Default Settings
Robustel R2000 User Guide 3.2 Factory Default Settings Before configuring your router, you need to know the following default settings. Item Description Username admin Password admin ETH0 192.168.0.1/255.255.255.0, LAN mode ETH1 192.168.0.1/255.255.255.0, LAN mode DHCP Server Enabled 3.3 Log in the Router To log in to the management page and view the configuration status of your router, please follow the steps below. -
Page 26: Control Panel
Robustel R2000 User Guide 3.4 Control Panel After logging in, the home page of the R2000 Router’s web interface is displayed, for example. Using the original password to log in the router, the page will pop up the following tab It is strongly recommended for security purposes that you change the default username and/or password. -
Page 27: Status
Robustel R2000 User Guide Submit Click to save the modification on current configuration page. Cancel Click to cancel the modification on current configuration page. Note: The steps of how to modify configuration are as bellow: Modify in one page; Click under this page;... -
Page 28: Internet Status
Robustel R2000 User Guide Firmware Version Show the firmware version running on the router. Hardware Version Show the current hardware version. Kernel Version Show the current kernel version. Serial Number Show the serial number of your device. Internet Status Internet Status... -
Page 29: Interface > Link Manager
Warm Backup: The inactive link is online on standby Load Balancing: Use two links simultaneously Note: R2000 do not support warm backup and load balancing in the situation of two WWAN links. Revert Interval Specify the number of minutes that elapses before the primary link is checked if a backup link is being used in cold backup mode. - Page 30 Robustel R2000 User Guide Link Settings allows you to configure the parameters of link connection, including WWAN1/WWAN2, WAN and WLAN. It is recommended to enable Ping detection to keep the router always online. The Ping detection increases the reliability and also costs the data traffic.
- Page 31 Robustel R2000 User Guide The window is displayed as below when disabling the “Automatic APN Selection” option. Link Settings (WWAN) Item Description Default General Settings Index Indicate the ordinal of the list. Type Show the type of the link. WWAN1 Description Enter a description for this link.
- Page 32 Robustel R2000 User Guide Link Settings (WWAN) Item Description Default Automatic APN Click the toggle button to enable/disable the “Automatic APN Selection” Selection option. After enabling, the device will recognize the access point name automatically. Alternatively, you can disable this option and manually add the access point name.
- Page 33 Robustel R2000 User Guide Link Settings (WWAN) Item Description Default Overrided Secondary Override secondary DNS will override the automatically obtained DNS. Null Debug Enable Click the toggle button to enable/disable this option. Enable for debugging information output. Verbose Debug Enable Click the toggle button to enable/disable this option.
- Page 34 Robustel R2000 User Guide Link Settings (WAN) Item Description Default General Settings Index Indicate the ordinal of the list. Type Show the type of the link. Description Enter a description for this link. Null RT_UG_R2000_v.3.0.0 July 24, 2017 34 / 124...
- Page 35 Robustel R2000 User Guide Connection Type Select from “DHCP”, “Static” or “PPPoE”. DHCP Static Address Settings IP Address Set the IP address with Netmask which can access the Internet. Null IP address with Netmask, e.g. 192.168.1.1/24 Gateway Set the gateway of the IP address in WAN port.
- Page 36 Router will obtain IP automatically from the WLAN AP if choosing “DHCP” as the connection type. The specific parameter configuration of SSID is shown as below. The window is displayed as below when choosing “Static” as the connection type. R2000 Router does not support the PPPoE WLAN Connection Type. RT_UG_R2000_v.3.0.0 July 24, 2017...
- Page 37 Robustel R2000 User Guide Link Settings (WLAN) Item Description Default General Settings Index Indicate the ordinal of the list. Type Show the type of the link. WLAN Description Enter a description for this link. Null Connection Type Select from “DHCP” or “Static”.
- Page 38 Robustel R2000 User Guide Secondary DNS Set the secondary DNS. Null Ping Detection Settings Enable Click the toggle button to enable/disable the ping detection mechanism, a keepalive policy of the router. Primary Server Router will ping this primary address/domain name to check that if the 8.8.8.8...
-
Page 39: Interface > Lan
3.7 Interface > LAN This section allows you to set the related parameters for LAN port. There are two LAN ports on R2000 Router, including ETH0 and ETH1. The ETH0 and ETH1 can freely choose from lan0 and lan1, but at least one LAN port must be assigned as lan0. - Page 40 Robustel R2000 User Guide Note: Lan0 cannot be deleted. You may click to add a new LAN port, or click to delete the current LAN port. Now, click to edit the configuration of the LAN port. The maximum count is 2.
- Page 41 Robustel R2000 User Guide The window is displayed as below when choosing “Relay” as the mode. Item Description Default DHCP Settings Enable Click the toggle button to enable/disable the DHCP function. Mode Select from “Server” or “Relay”. Server Server: Lease IP address to DHCP clients which have been connected to LAN port ...
- Page 42 Robustel R2000 User Guide Item Description Default Primary DNS Define the primary DNS server assigned by the DHCP server to the Null clients. Secondary DNS Define the secondary DNS server assigned by the DHCP server to the Null clients. WINS Server...
- Page 43 Robustel R2000 User Guide VLAN Trunk Click to add a VLAN. The maximum count is 8. VLAN Settings Item Description Default Index Indicate the ordinal of the list. Enable Click the toggle button to enable/disable this VLAN. Enable to make router can encapsulate and de-encapsulate the VLAN tag.
- Page 44 Robustel R2000 User Guide Status This section allows you to view the status of LAN connection. Click the row of status, the details status information will be display under the row. Please refer to the screenshot below. RT_UG_R2000_v.3.0.0 July 24, 2017...
-
Page 45: Interface > Ethernet
3.8 Interface > Ethernet This section allows you to set the related parameters for Ethernet. There are two Ethernet ports on R2000 Router, including ETH0 and ETH1. The ETH0 on the router can be configured as either a WAN port or LAN port, while ETH1 can only be configured as a LAN port. -
Page 46: Interface > Cellular
3.9 Interface > Cellular This section allows you to set the related parameters of Cellular. The R2000 Router has two SIM card slots, but do not support two SIM cards online simultaneously due to its single-module design. If insert single SIM card at the first time, SIM1 slot and SIM2 slots are available. - Page 47 Robustel R2000 User Guide The window is displayed as below when choosing “Specify” as the band select type. Cellular Item Description Default General Settings Index Indicate the ordinal of the list. SIM Card Show the currently editing SIM card. SIM1 Phone Number Enter the phone number of the SIM card.
- Page 48 Robustel R2000 User Guide Cellular Item Description Default Cellular Network Settings Network Type Select from “Auto”, “3G Only” and “4G Only”. Auto Auto: Connect to the best signal network automatically 3G Only: Only the 3G network is connected ...
- Page 49 Robustel R2000 User Guide Status Item Description Index Indicate the ordinal of the list. Modem Status Show the status of the radio module. Modem Model Show the model of the radio module. Current SIM Show the SIM card that your router is using.
-
Page 50: Interface > Wifi (Optional)
Robustel R2000 User Guide 3.10 Interface > WiFi (Optional) This section allows you to configure the parameters of two WiFi modes. Router supports either WiFi AP mode or Client mode, and default as AP mode. WiFi AP Configure Router as WiFi AP Click Interface >... - Page 51 Robustel R2000 User Guide The window is displayed as below when setting “WPA-Personal” as the security mode. The window is displayed as below when setting “WPA-Enterprise” as the security mode. The window is displayed as below when setting “WEP” as the security mode.
- Page 52 Robustel R2000 User Guide General Settings @ Access Point Item Description Default Enable Click the toggle button to enable/disable the WiFi access point option. Wireless Mode Select from “11bgn Mixed”, “11b Only”, “11g Only” or “11n 11bgn Mixed Only”. ...
- Page 53 Robustel R2000 User Guide General Settings @ Access Point Item Description Default Security Mode Select from “Disabled”, “WPA-Personal”, “WPA-Enterprise” or Disabled “WEP”. Disabled: User can access the WiFi without password Note: It is strongly recommended for security purposes that you do not choose this kind of mode.
- Page 54 Robustel R2000 User Guide General Settings @ Access Point Item Description Default WEP Key Enter the WEP key. The key length should be 10 or 26 Null hexadecimal digits depending on which WEP key is used, 64 digits or 128 digits.
- Page 55 Robustel R2000 User Guide Advanced Settings Item Description Default Note: 40 MHz channel width provides higher available data rate, twice as many as 20 MHz channel width. Enable WMM Click the toggle button to enable/disable the WMM option. Enable Short GI Click the toggle button to enable/disable the Short Guard Interval option.
-
Page 56: Wifi Client
Robustel R2000 User Guide Item Description Default Index Indicate the ordinal of the list. Description Enter a description for this access control list. Null MAC Address Add a MAC address here. Null This section allows you to view the status of AP. - Page 57 Robustel R2000 User Guide Click Interface > Link Manager > Link Settings, and click the edit button of WLAN, then configure its related parameters. Click Interface > WLAN to configure the parameters of WiFi Client after setting the mode as Client. Please remember to click Save &...
-
Page 58: Network > Route
Robustel R2000 User Guide This window allows you to scan for all available SSIDs in your area and connect to one of those shown on the “Scan Results” list. 3.11 Network > Route This section allows you to set the static route. Static route is a form of routing that occurs when a router uses a manually-configured routing entry, rather than information from a dynamic routing traffic. - Page 59 Robustel R2000 User Guide Static Route Item Description Default Destination Enter the IP address of destination host or destination network. Null Netmask Enter the Netmask of destination host or destination network. Null Gateway Define the gateway of the destination. Null Interface Choose the corresponding port of the link that you want to configure.
-
Page 60: Network > Firewall
Robustel R2000 User Guide 3.12 Network > Firewall This section allows you to set the firewall and its related parameters, including Filtering, Port Mapping and DMZ. Filtering The filtering rules can be used to either accept or block certain users or ports from accessing your router. - Page 61 Robustel R2000 User Guide Filtering Item Description Default Enable Remote Telnet Access Click the toggle button to enable/disable this option. When enabled, the Internet user can access the router remotely via Telnet. Enable Local Telnet Access Click the toggle button to enable/disable this option. When enabled, the LAN user can access the router locally via Telnet.
-
Page 62: Port Mapping
Robustel R2000 User Guide The window is displayed as below when choosing “TCP”, “UDP” or “TCP-UDP” as the protocol. Here take “TCP” as an example. Filtering Rules Item Description Default Index Indicate the ordinal of the list. Description Enter a description for this filtering rule. - Page 63 Robustel R2000 User Guide Click to add port mapping rules. The maximum rule count is 40. Port Mapping Rules Item Description Default Index Indicate the ordinal of the list. Description Enter a description for this port mapping. Null Remote IP Specify the host or network which can access the local IP address.
-
Page 64: Network > Ip Passthrough
Robustel R2000 User Guide 3.13 Network > IP Passthrough Click Network > IP Passthrough > IP Passthrough to enable or disable the IP Pass-through option. If router enables the IP Pass-through, the terminal device (such as PC) will enable the DHCP Client mode and connect to LAN port of the router;... - Page 65 Robustel R2000 User Guide Click to add tunnel settings. The maximum count is 3. General Settings @ Tunnel Item Description Default Index Indicate the ordinal of the list. Enable Click the toggle button to enable/disable this IPsec tunnel. Description Enter a description for this IPsec tunnel.
- Page 66 Robustel R2000 User Guide The window is displayed as below when choosing “PSK” as the authentication type. The window is displayed as below when choosing “CA” as the authentication type. The window is displayed as below when choosing “xAuth PSK” as the authentication type.
- Page 67 Robustel R2000 User Guide The window is displayed as below when choosing “xAuth CA” as the authentication type. IKE Settings Item Description Default Negotiation Mode Select from “Main” and “Aggressive” for the IKE negotiation mode in phase 1. Main If the IP address of one end of an IPsec tunnel is obtained dynamically, the IKE negotiation mode must be aggressive.
- Page 68 Robustel R2000 User Guide IKE Settings Item Description Default Remote ID Type Select from “Default”, “FQDN” and “User FQDN” for IKE negotiation. Default Default: Use an IP address as the ID in IKE negotiation FQDN: Use an FQDN type as the ID in IKE negotiation. If this option is selected, type a name without any at sign (@) for the local security gateway, e.g., test.robustel.com.
- Page 69 Robustel R2000 User Guide If choose AH as protocol, the window of SA Settings is displayed as below. SA Settings Item Description Default Encrypt Algorithm Select from “3DES”, “AES128” or “AES256” when you select “ESP” in 3DES “Protocol”. Higher security means more complex implementation and lower speed.
- Page 70 Robustel R2000 User Guide SA Settings Item Description Default no DPD acknowledgment within the DPD packet retransmission interval, it retransmits the DPD hello. If the local end still receives no DPD acknowledgment after having made the maximum number of retransmission attempts, it considers the peer already dead, and clears the IKE SA and the IPsec SAs based on the IKE SA.
-
Page 71: Vpn > Openvpn
Robustel R2000 User Guide x509 Item Description Default @crl.pem Certificate Files Index Indicate the ordinal of the list. Filename Show the imported certificate’s name. Null File Size Show the size of the certificate file. Null Last Modification Show the timestamp of that the last time to modify the certificate file. - Page 72 Robustel R2000 User Guide The window is displayed as below when choosing “P2P” as the mode. RT_UG_R2000_v.3.0.0 July 24, 2017 72 / 124 Confidential...
- Page 73 Robustel R2000 User Guide The window is displayed as below when choosing “None” as the authentication type. RT_UG_R2000_v.3.0.0 July 24, 2017 73 / 124 Confidential...
- Page 74 Robustel R2000 User Guide The window is displayed as below when choosing “Preshared” as the authentication type. RT_UG_R2000_v.3.0.0 July 24, 2017 74 / 124 Confidential...
- Page 75 Robustel R2000 User Guide The window is displayed as below when choosing “Password” as the authentication type. RT_UG_R2000_v.3.0.0 July 24, 2017 75 / 124 Confidential...
- Page 76 Robustel R2000 User Guide The window is displayed as below when choosing “X509CA” as the authentication type. RT_UG_R2000_v.3.0.0 July 24, 2017 76 / 124 Confidential...
- Page 77 Robustel R2000 User Guide The window is displayed as below when choosing “X509CA Password” as the authentication type. General Settings @ OpenVPN Item Description Default Index Indicate the ordinal of the list. Enable Click the toggle button to enable/disable this OpenVPN tunnel.
- Page 78 Robustel R2000 User Guide General Settings @ OpenVPN Item Description Default Authentication Type Select from “None”, “Preshared”, “Password”, “X509CA” and “X509CA None Password”. Note: “None” and “Preshared” authentication type are only working with P2P mode. Username Enter the username used for “Password” or “X509CA Password”...
- Page 79 Robustel R2000 User Guide Advanced Settings @ OpenVPN Item Description Default Enable HMAC Firewall Click the toggle button to enable/disable this option. Add an additional layer of HMAC authentication on top of the TLS control channel to protect against DoS attacks.
-
Page 80: Vpn > Gre
Robustel R2000 User Guide Certificate Files Click on “Choose File” to locate the certificate file from your computer, and Null then import this file into your router. The correct file format is displayed as follows: @ca.crt @remote.crt @local.crt @private.key @crl.pem @client.p12... -
Page 81: Services > Syslog
Robustel R2000 User Guide Tunnel Settings @ GRE Item Description Default Index Indicate the ordinal of the list. Enable Click the toggle button to enable/disable this GRE tunnel. Description Enter a description for this GRE tunnel. Null Remote IP Address Set the remote real IP address of the GRE tunnel. -
Page 82: Services > Event
Robustel R2000 User Guide The window is displayed as below when enabling the “Log to Remote” option. Syslog Settings Item Description Default Enable Click the toggle button to enable/disable the Syslog settings option. Syslog Level Select from “Debug”, “Info”, “Notice”, “Warning” or “Error”, which from low to Debug high. - Page 83 Robustel R2000 User Guide Click button to add an Event parameters. RT_UG_R2000_v.3.0.0 July 24, 2017 83 / 124 Confidential...
- Page 84 Robustel R2000 User Guide General Settings @ Notification Item Description Default Index Indicate the ordinal of the list. Description Enter a description for this group. Null Sent SMS Click the toggle button to enable/disable this option. When enabled, the router will send notification to the specified phone numbers via SMS if event occurs.
-
Page 85: Services > Ntp
Robustel R2000 User Guide Save Position Select the events’ save position from “RAM” or “NVM”. RAM: Random-access memory NVM: Non-Volatile Memory Filter Message Enter the filtering message based on the keywords set by users. Click the “Refresh” Null button, the filtered event will be displayed in the follow box. -
Page 86: Services > Sms
Robustel R2000 User Guide This window allows you to view the current time of router and also synchronize the router time. Click button to synchronize the router time with the PC’s. 3.20 Services > SMS This section allows you to set SMS parameters. Router supports SMS management, and user can control and configure their routers by sending SMS. -
Page 87: Services > Email
Robustel R2000 User Guide User can test the current SMS service whether it is available in this section. SMS Testing Item Description Default Phone Number Enter the specified phone number which can receive the SMS from router. Null Message Enter the message that router will send it to the specified phone number. -
Page 88: Services > Ddns
Robustel R2000 User Guide Email Settings Item Description Default Outgoing server Enter the SMTP server IP Address or domain name. Null Server port Enter the SMTP server port. Timeout Set the max time for sending email to SMTP server. When the server doesn’t receive the email over this time, it will try to resend. -
Page 89: Services > Ssh
Robustel R2000 User Guide Corresponding service provider. Hostname Enter the hostname provided by the DDNS server. Null Username Enter the username provided by the DDNS server. Null Password Enter the password provided by the DDNS server. Null Enter the URL customized by user. -
Page 90: Services > Web Server
Robustel R2000 User Guide Import Authorized Keys Item Description Authorized Keys Click on “Choose File” to locate an authorized key from your computer, and then click “Import” to import this key into your router. Note: This option is valid when enabling the password logins option. -
Page 91: Services > Advanced
Robustel R2000 User Guide Import Certificate Item Description Default CA: a digital certificate issued by CA center Private Key: a private key file HTTPS Certificate Click on “Choose File” to locate the certificate file from your computer, and then click “Import”... -
Page 92: System > Debug
Robustel R2000 User Guide Periodic Reboot Settings Item Description Default Periodic Reboot Set the reboot period of the router. 0 means disable. Daily Reboot Time Set the daily reboot time of the router. You should follow the format as HH: Null MM, in 24h time frame, otherwise the data will be invalid. -
Page 93: System > Update
Robustel R2000 User Guide Filtering Enter the filtering message based on the keywords. Use “&” to separate more Null than one filter message, such as “keyword1&keyword2”. Refresh Select from “Manual Refresh”, “5 Seconds”, “10 Seconds”, “20 Seconds” or “30 Manual Seconds”. -
Page 94: System > App Center
File Click on “Choose File” to locate the App file from your computer, and then click to import this file into your router. Note: File format should be xxx.rpk, e.g. R2000-robustlink-1.0.0.rpk. Installed Apps Index Indicate the ordinal of the list. -
Page 95: System > Tools
Robustel R2000 User Guide 3.29 System > Tools This section provides users three tools: Ping, Traceroute and Sniffer. Ping Item Description Default IP address Enter the ping’s destination IP address or destination domain. Null Number of Requests Specify the number of ping requests. - Page 96 Robustel R2000 User Guide Traceroute Item Description Default Trace Address Enter the trace’s destination IP address or destination domain. Null Trace Hops Specify the max trace hops. Router will stop tracing if the trace hops has met max value no matter the destination has been reached or not.
-
Page 97: System > Profile
Robustel R2000 User Guide Sniffer Item Description Default Interface Choose the interface according to your Ethernet configuration. Host Filter the packet that contain the specify IP address. Null Packets Request Set the packet number that the router can sniffer at a time. - Page 98 Robustel R2000 User Guide XML Configuration File Click on to locate the XML configuration file from your computer, and then click to import this file into your router. Export Configuration File Ignore Disabled Features Click the toggle button as “OFF” to ignore the disabled features.
-
Page 99: System > User Management
Robustel R2000 User Guide 3.31 System > User Management This section allows you to change your username and password, and create or manage user accounts. One router has only one super user who has the highest authority to modify, add and manage other common users. - Page 100 Robustel R2000 User Guide Visitor: Users only can view the configuration of router under this level Editor: Users can view and set the configuration of router under this level Username Set the Username; valid characters are a-z, A-Z, 0-9, @, ., -, #, $, and *.
-
Page 101: Chapter 4 Configuration Examples
Robustel R2000 User Guide Chapter 4 Configuration Examples 4.1 Cellular 4.1.1 Cellular Dial-Up This section shows you how to configure the primary and backup SIM card for Cellular Dial-up. Connect the router correctly and insert two SIM, then open the configuration page. Under the homepage menu, click Interface > Link Manager >... - Page 102 Robustel R2000 User Guide When finished, click Submit > Save & Apply for the configuration to take effect. The window is displayed below by clicking Interface > Cellular > Advanced Cellular Settings. RT_UG_R2000_v.3.0.0 July 24, 2017 102 / 124 Confidential...
-
Page 103: Sms Remote Control
4.1.2 SMS Remote Control R2000 supports remote control via SMS. You can use following commands to get the status of the router, and set all the parameters of the router. There are three authentication types for SMS control. You can select from “Password”, “Phonenum”... - Page 104 Robustel R2000 User Guide XML command: <lan > <network max_entry_num="2" > <id > 1</id > <interface > lan0</interface > <ip > 172.16.10.67</ip > <netmask > 255.255.0.0</netmask > <mtu > 1500</mtu > SMS cmd: set lan network 1 interface lan0 set lan network 1 ip 172.16.10.67 set lan network 1 netmask 255.255.0.0...
-
Page 105: Network
Robustel R2000 User Guide admin:admin;reboot In this command, username is “admin”, password is “admin”, and the command is to reboot the Router. SMS received: admin:admin;set firewall remote_ssh_access false;set firewall remote_telnet_access false In this command, username is “admin”, password is “admin”, and the command is to disable the remote_ssh and remote_telnet access. - Page 106 Robustel R2000 User Guide IPsec VPN_Server: Cisco 2811: RT_UG_R2000_v.3.0.0 July 24, 2017 106 / 124 Confidential...
- Page 107 Robustel R2000 User Guide IPsec VPN_Client: The window is displayed as below by clicking VPN > IPsec > Tunnel. Click button and set the parameters of IPsec Client as below. RT_UG_R2000_v.3.0.0 July 24, 2017 107 / 124 Confidential...
- Page 108 Robustel R2000 User Guide When finished, click Submit > Save & Apply for the configuration to take effect. The comparison between server and client is as below. RT_UG_R2000_v.3.0.0 July 24, 2017 108 / 124 Confidential...
-
Page 109: Openvpn
Robustel R2000 User Guide 4.2.2 OpenVPN OpenVPN supports two modes, including Client and P2P. Here takes Client as an example. OpenVPN_Server: Generate relevant OpenVPN certificate on the server side firstly, and refer to the following commands to configuration the Server: local 202.96.1.100... - Page 110 Robustel R2000 User Guide verb 3 Note: For more configuration details, please contact your technical support engineer. OpenVPN_Client: Click VPN > OpenVPN > OpenVPN as below. Click to configure the Client01 as below. When finished, click Submit > Save & Apply for the configuration to take effect.
-
Page 111: Gre Vpn
Robustel R2000 User Guide 4.2.3 GRE VPN The configuration of two points is as follows. The window is displayed as below by clicking VPN > GRE > GRE. GRE-1 : Click button and set the parameters of GRE-1 as below. - Page 112 Robustel R2000 User Guide GRE-2: Click button and set the parameters of GRE-1 as below. When finished, click Submit > Save & Apply for the configuration to take effect. The comparison between GRE-1 and GRE-2 is as below. RT_UG_R2000_v.3.0.0 July 24, 2017...
-
Page 113: Chapter 5 Introductions For Cli
Robustel R2000 User Guide Chapter 5 Introductions for CLI 5.1 What Is CLI Command-line interface (CLI) is a software interface providing another way to set the parameters of equipment from the SSH or through a telnet network connection. Route login:... -
Page 114: How To Configure The Cli
Example 2: Update firmware via tftp # tftpupdate (space+?) firmware New firmware # tftpupdate firmware (space+?) String Firmware name # tftpupdate firmware R2000-firmware-sysupgrade-unknown.bin host 192.168.100.99 //enter a new firmware name Downloading R2000-firmware-s 100% |*******************************| 5018k 0:00:00 ETA RT_UG_R2000_v.3.0.0 July 24, 2017... - Page 115 Robustel R2000 User Guide Flashing Checking 100% Decrypting 100% Flashing 100% Verifying 100% Verfify Success upgrade success //update success # config save_and_apply // save and apply current configuration, make you configuration effect Example 3: Set link-manager # set # set...
- Page 116 Robustel R2000 User Guide # set link_manager primary_link wwan1 //select “wwan1” as primary_link //setting succeed # set link_manager link 1 type Type desc Description connection_type Connection Type wwan WWAN Settings static_addr Static Address Settings pppoe PPPoE Settings ping Ping Settings...
- Page 117 Robustel R2000 User Guide mtu = 1500 dhcp { enable = true mode = server relay_server = "" pool_start = 192.168.0.2 pool_end = 192.168.0.100 netmask = 255.255.255.0 gateway = "" primary_dns = "" secondary_dns = "" wins_server = "" lease_time = 120 expert_options = ""...
- Page 118 Robustel R2000 User Guide Example 5: CLI for setting Cellular # show cellular all sim { id = 1 card = sim1 phone_number = "" extra_at_cmd = "" network_type = auto band_select_type = all band_gsm_850 = false band_gsm_900 = false...
- Page 119 Robustel R2000 User Guide band_wcdma_1900 = false band_wcdma_2100 = false band_lte_800 = false band_lte_850 = false band_lte_900 = false band_lte_1800 = false band_lte_1900 = false band_lte_2100 = false band_lte_2600 = false band_lte_1700 = false band_lte_700 = false band_tdd_lte_2600 = false...
-
Page 120: Commands Reference
Robustel R2000 User Guide band_lte_1900 LTE 1900 (band 2) band_lte_2100 LTE 2100 (band 1) band_lte_2600 LTE 2600 (band 7) band_lte_1700 LTE 1700 (band 4) band_lte_700 LTE 700 (band 17) band_tdd_lte_2600 TDD LTE 2600 (band 38) band_tdd_lte_1900 TDD LTE 1900 (band 39) -
Page 121: Glossary
Robustel R2000 User Guide Glossary Abbr. Description Alternating Current Access Point Name ASCII American Standard Code for Information Interchange Conformité Européene (European Conformity) CHAP Challenge Handshake Authentication Protocol Command Line Interface for batch scripting Circuit Switched Data Clear to Send... - Page 122 Robustel R2000 User Guide Abbr. Description local area network Light Emitting Diode Machine to Machine Maximum Minimum Mobile Originated Mobile Station Mobile Terminated OpenVPN Open Virtual Private Network Password Authentication Protocol Personal Computer Personal Communications Network, also referred to as DCS 1800...
- Page 123 Robustel R2000 User Guide Abbr. Description VSWR Voltage Stationary Wave Ratio Wide Area Network RT_UG_R2000_v.3.0.0 July 24, 2017 123 / 124 Confidential...
- Page 124 Robustel R2000 User Guide Guangzhou Robustel Technologies Co., Ltd. Add: 3rd Floor, Building F, Kehui Park, No.95 Daguan Road, Guangzhou, China 510660 Tel: 86-20-29019902 Email: info@robustel.com Web: www.robustel.com RT_UG_R2000_v.3.0.0 July 24, 2017 124 / 124 Confidential...
Need help?
Do you have a question about the R2000 and is the answer not in the manual?
Questions and answers