
Related Manuals for Nostalgia Electrics KPM200CART


Summary of Contents for Nostalgia Electrics KPM200CART
- Page 1 All products are trademarks of Nostalgia Products Group, LLC. Worldwide design & utility patented or patents pending. © 2012 Nostalgia Products Group, LLC. 2013 www.nostalgia electrics.com (rev. 09/11/13)
- Page 2 Popcorn Cart Instructions and Recipes...
-
Page 4: Table Of Contents
Make every day a party! Visit www.nostalgiaelectrics.com for more fun products. CONTENTS IMPORTANT PRECAUTIONS ......3 IMPORTANT SAFEGUARDS . -
Page 5: Important Precautions
IMPORTANT PRECAUTIONS NEVER immerse in water. NEVER use near water. NEVER use an abrasive sponge or cloth on the appliance. NEVER use a scouring pad on the appliance. NEVER leave appliance unattended while in use. NEVER force Kettle in or out of the brackets as this may cause gears to become misaligned and appliance will not operate properly. -
Page 6: Introduction
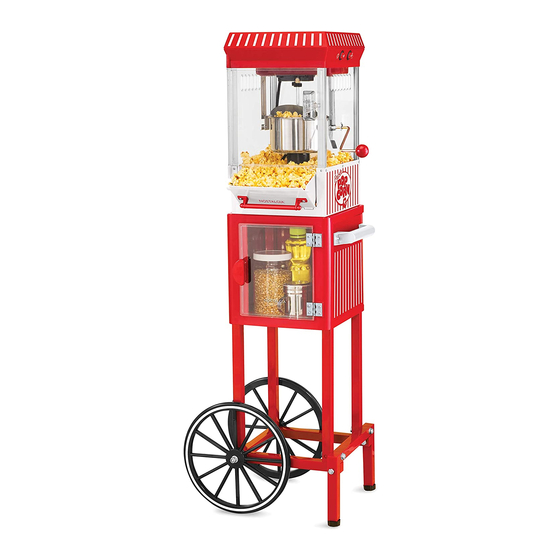
SAVE THESE INSTRUCTIONS! INTRODUCTION Thank you for purchasing the POPCORN CART by Nostalgia Electrics™. This 48" tall vendor- style popcorn cart will be the hit of every party. Enjoy up to ten cups of hot, fresh, kettle cooked popcorn per batch. It features a large, stainless steel kettle with a built-in stirring system. -
Page 7: Parts & Assembly
PARTS & ASSEMBLY Hardware... - Page 8 Parts (A) Main Unit (B) Top Cover (C) Push Handle (D) Bottom Plate (G) Storage (F) Door (E) Wheel (2) (H1) Kernel Measuring Compartment Cup (2-oz.) (H2) Oil Measuring (I) Support Bar A (J) Support Bar B (K1) Wrench Spoon (1 Tbsp.) (L) Left Cross Bar (K2) Wrench (M) Right Cross Bar...
- Page 9 Assembly of Base Support & Wheels 1. Use 18 #4 screws to assemble Top Cover (B), Bottom Plate (D) and Storage Compartment (G) together. 2. Attach Push Handle (C) and Storage Compartment (G) using two #3 screws, two #11 locking washers and two #9 nuts 3.
- Page 10 5. Use one #4 screw to attach Support Bar A (I) to what was assembled in Step 4. 6. Use one #2 bolt, one #5 flat washer, one #6 flat washer, one #7 locking washer and one #10 nut cap to attach the second Wheel (E) to the Left Bar (L). 7.
- Page 11 Assembly of Base Support & Wheels (continued) 9. Attach the Adjustable Feet (P) to the Legs (N). 10. Use two #1 bolts and two #8 nut caps to what was assembled in steps 8 and 9. 11. Use two #1 bolts and two #8 nut caps to attach the Support Bar (I) and the Support Bar B (J) to what was assembled in Step 10.
- Page 12 Assembly of Main Unit ON / OFF / LIGHT Switch Stainless Steel Kettle Crank Handle Place Main Unit (A) onto the top of the Storage Compartment (B). Ensure that the two inserting pins at the bottom of the Main Unit (A) line up correctly so that Main Unit (A) can be locked under the beam of the Storage Compartment (C).
-
Page 13: How To Operate
HOW TO OPERATE Before first use, clean the inside of the unit by wiping with a moist, non-abrasive sponge, towel or cloth and then wipe with a non-abrasive dry towel. Wipe down the inside of the Kettle and be sure it is properly placed in the brackets before starting. First, find a flat surface near an electrical outlet before starting. -
Page 14: Helpful Tips
HELPFUL TIPS NEVER leave the unit unattended while operating. SMOKING If your POPCORN CART begins to smoke during cooking, it may be due to grease build up. In order to reduce smoking, make sure that you clean the inside of the Kettle between uses. POPCORN For best results, use an all natural soft-shelled popping corn. -
Page 15: Recipes
RECIPES The POPCORN CART makes hot, fresh, theater style popcorn anytime! Enjoy your freshly popped corn in a variety of ways: • Regular theater style popcorn – add butter and salt. • Add a pinch of sugar and salt to popcorn for a sweet kettle corn taste. •... - Page 16 CHUNKY MONKEY • ½ Cup Popcorn Pop corn kernels using the POPCORN (16 gallon popped) MAKER as directed on page 6. • 1 (12-oz.) Bag Melt chocolate chips and peanut butter morsels Semi-Sweet over stove, as packaging recommends. Chocolate Chips Line cookie sheet with wax paper.
-
Page 17: Returns & Warranty
SHOULD YOUR UNIT NOT WORK OR IF DAMAGED WHEN YOU FIRST TAKE IT OUT OF THE BOX, PLEASE RETURN IT TO THE PLACE OF PURCHASE IMMEDIATELY. RETRO POPCORN CART / KPM200CART Should you have any questions, please contact us via email or at the customer service number listed below between the hours of 8:00 AM and 5:00 PM, Monday through Friday, Central Standard Time.
Need help?
Do you have a question about the KPM200CART and is the answer not in the manual?
Questions and answers