Advertisement
Table of Contents
- 1 Steam Generator Blue Print
- 2 Electrical Requirements
- 3 Wiring Diagram 208V (3PH)
- 4 Installation of the Top Light
- 5 Controller Maintenance
- 6 Temperature Sensor Installation
- 7 Time Setting
- 8 Temperature Setting
- 9 Light Function
- 10 Power On/Off
- 11 Using the Steam Function
- 12 Warning System
- 13 Common Trouble Shooting Methods
- 14 Technical Parameter
- Download this manual
Advertisement
Table of Contents

Summary of Contents for STEAMCORE SPA II
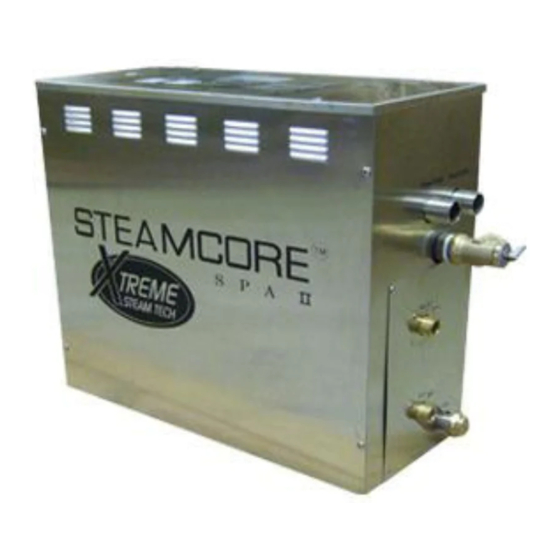
- Page 1 S T E A M G E N E R AT O R S T E A M G E N E R AT O R Auto Drain Equipped - Whisper Quiet - Quick Start - Continous Steam aobsessed with qualiy... aquality of life...
- Page 2 SAUNACORE PHONE: 905-951-6662 www.saunacore.com...
- Page 3 4. Saunacore will not be responsible for any damage or malfuntion due to the product by improper installation. 5. Steamcore SpaII Series are pre-tested and inspected prior to packaging, please inspect package when received to assure all is in proper condition. If you find any damage to the package, immediately put in a claim with the delivering (courier) company for a claim of compensation.
- Page 4 User Manual 7. The steam generator should be securely mounted. Make adequate care that the generator is stable and level, horizontally. The steam generator has hanging holes in the back side for mounting onto a wall. 8. The steam generator requires a minimum of 12 inch clearance of space on both sides, top and front. 9.
- Page 5 User Manual Installation of pipeline The installation of all the pipes should be done by a qualified Warning: licensed plumber. DO NOT HEAT AUTO FILL / DRAIN VALVES WITH TORCH DURING INSTALLATION. This will cause damage to the plastic solenoid valve which will cause malfuction or leakage. WATER SUPPLY LINE (1/2"...
- Page 6 User Manual Important: 1. Please consult your distributors of building materials like acrylic, fiber glass or other anti-heat sheet about the installation position of steam nozzle. It is suggested that MS- 103412 anti-heat material can be used. 2. In the entire steam room, it is required that steam must not leak out. The pipes, its accessories and the holes in the wall should be airproof by applying silicone so that no steam will enter the holes in the wall.
-
Page 7: Steam Generator Blue Print
User Manual Steam generator blue print. 395mm 130mm 304mm 35mm Steam outlet 209mm Safety valve Water inlet Water drainage Fuse for wire power supply C o n t r o l l e r w i r e Power wire hole and light wire hole (metal conduit connector required) -
Page 8: Electrical Requirements
User Manual 510mm 435mm 300mm 205mm Steam outlet Safety valve Water inlet Water drainage Fuse for wire power supply C o n t r o l l e r w i r e Power wire hole and light wire hole (metal conduit connector required) Fuse for wire... - Page 9 User Manual Ampere Meter The total connected load should not be more then 80% of the rating of the overcurrent devices. E l e c t r i c i t y E l e c t r i c Applicable space of Type supply...
- Page 10 Red(Short Pin) Black(Long Pin) Yellow(Middle Pin) Terminal Block Yellow/Green Black Black auto reset manual hi-limit reset Blue Optional hi-limit Black Light Brown Steamcore Spa ** 6kW / 7.5kW / 9kW (240V - 1PH) European Connection ( L2 = N "Neutral")
- Page 11 ( L2 = N "Neutral") Supply Water Level Sensor To Control Panal Red(Short Pin) Terminal Block Black(Long Pin) Yellow(Middle Pin) Yellow/Green Black Black auto reset manual reset hi-limit Optional Blue hi-limit Black Light Brown Steamcore Spa ** 10.5kW / 18kW (240V - 1PH)
-
Page 12: Wiring Diagram 208V (3Ph)
Red(Short Pin) Terminal Block Black(Long Pin) Yellow(Middle Pin) Yellow/Green Black Black auto reset hi-limit manual reset Blue Optional hi-limit Black Light Brown Steamcore Spa ** 10.5kW / 12kW / 13.5kW (208V - 3PH) European Connection ( L2 = N "Neutral") - Page 13 User Manual Sizing steam generator Measure the length, width and height (feet) of the current steam shower or bathtub area that has a ceramic wall finish. Example; L:7xW:5xH:8 = 280 Cubic Feet x 25% for Ceramic Wall Finish = 61.25 (61.25+280) = 341 Total. You would need a 9000 watt (9KW) steam generator.
-
Page 14: Installation Of The Top Light
User Manual Installation of the top light CAUTION: The rating of the light should not surpass 3 Watts (rated power) to prevent damage to the transformer. The LED light should be installed on top of the steam room ceiling or in a place not accessible to children. Take some moisture proof measures in the process of installation. - Page 15 User Manual Configuration of steam generator DO NOT HEAT DURING INSTALLATION. (heating with torch will cause damage to plastic solenoid valve) Subsidiary water tank Fuse Enclosure Circuit board Main water tank Fuse Steam Outlet Heating Element Ground wire connector Pressure Safety Valve Relay Heat Hi-limit Transformer...
-
Page 16: Controller Maintenance
User Manual Controller Maintenance 1. Use soft cloth with a mild soap/water to clean controller 2. Do NOT use harsh chemicals or cleaning products. 3. Do NOT mount controller directly over the steam nozzles. 4. If controller is readout is not stable or damaged, turn main power off and call a service electrician to replace it. - Page 17 User Manual Control panel (both SSI and SSII) dimension SSI and SSII Control panel may be switched for Spa II 160mm 70mm 23mm S S I 25mm 113mm 75mm S S I I...
- Page 18 User Manual Installation instruction of controller Before installing the controller, make sure the steam generator is shut off Important: otherwise the controller may be damaged. STEP 1 Determine the installation location of the controller. The controller is designed to be installed in the steam room. 1.
-
Page 19: Temperature Sensor Installation
User Manual STEP FIVE Remove the paper on the back side of the controller. To expose the 3m adhesive tape. To achieve good adhesion to the wall finish make sure it is clean and dry. STEP SIX Control Panel SS I Control Panel SS II Locate the display screen in the direction of 12 o'clock, and press the controller firmly to the wall finish. - Page 20 User Manual Illustration of the controller panel (SS I Control Panel IN/OUT SHOWER USE LED SCREEN Power ON/OFF Steam Time Adjust Key--LOW Power Indicator LED Steam Temperature Adjust Key--LOW Steam Time Adjust Key--HIGH Steam Temperature Adjust Key--HIGH Mood Light Indicator LED Mood Light ON/OFF Steam ON/OFF Operation instruction (SS I...
- Page 21 User Manual Mood Light When system is activated, press and release button to turn on the mood light. Indicator LED on the right of the button should be lit. Press and release button again to shut down mood light. Steam ON/OFF When unit is powered on, press and release button, water input steam boil tank automatically, press and release...
- Page 22 Time/temperature decrease button Time/temperature increase button Light function button Temperature set button Digital display screen Steamcore The front decorative panel Temperature sensor Operation instruction (SSII & SQII Control Panel) The controller is digital temperature control system which can start, stop or pause in the preset time to keep the temperature in the set number.
-
Page 23: Time Setting
User Manual When the actual temperature is smaller than or equal to 32 , the digital tube will display 32 . When the actual temperature is smaller than or equal to 110 F , the digital tube will display . The last digit displays as the unit of Fahrenheit 110 F temperature. -
Page 24: Light Function
User Manual Light function When the machine is started, press button repeatedly to turn on/off light function. When the light is turned on, the digital tube will temporarily display (as is shown in Fig.6). When the light is turned off, the digital tube will temporarily display (as is shown in Fig.7). - Page 25 Steamcore IntelliSteam Operating Instructions Congratulations on your new Saunacore steam unit with the advanced IntelliSteam controller! This booklet will help you get the most enjoyment out of your device’s many capabilities and features.
-
Page 26: Power On/Off
NOTE 1: controller keys are touch-sensitive, and do not require physical pressure. NOTE 2: The power button, located on the upper front of the unit, performs several different functions, depending if it’s touched momentarily, or “held” for several seconds. It also is an LED indicator which glows: RED- System in standby mode GREEN- (Display indicator flashing) Keypad is locked, keys are disabled. - Page 27 5.Ozoner (opt) With the system on, touch the O3 key to initialize the ozone function (if unit so equipped). To turn off, touch the O3 key again. 6.Fan (opt) With the system on, touch the Fan key to turn it on. The display will indicate fan operation. 7.Light (opt) The Light key will operate the lights in several ways, as follows: With the system on, touching the Light key once turns on the background light (display shows L1).
-
Page 28: Warning System
10. MP3 Feature Turn on the system, and plug your flash drive into the provided USB slot. Touch the USB key, and your music will play automatically. The screen will display the current music title, remaining time, etc. Press the Up key to jump to the next track (s), or the Down key for the previous track(s). - Page 29 This set of instruction pages is to be used in combination with the Steamcore Steam Bath installation manual provided with each steam bath generator.
-
Page 30: Common Trouble Shooting Methods
User Manual Common trouble shooting methods To facilitate your use and maintenance of sauna room, the following common trouble shooting methods are listed for reference. Causes of troubles Troubles Trouble-shooting methods 1.The fuse is burned. 1.Change the fuse (on the shell 0.8A/ 2.The wire connection terminal The machine 250V) -
Page 31: Technical Parameter
User Manual Consult a licensed electrician for service. Important: Technical parameter TYPE Steamcore Spa II 240V 240V 240V 240V 240V 208V 240V 240V 208V 208V 208V 208V (1PH) (1PH) (1PH) (1PH) (1PH) (3PH) (1PH) (1PH) (3PH) (3PH) (3PH) (3PH) Current(A) 12.5A 18.75A... - Page 32 Steambath Generator Limited Warranty STEAMCORE Spa II Series Steambath Generator Limited Warranty Saunacore warrants these products to be free from defects in material and workmanship and agrees to remedy any such defect. This warranty does not apply outside the boundaries of the United States, Canada or any product which in our sole opinion has been improperly installed, or subject to willful abuse, misuse, alteration, and shipping damages during the period of coverage.
Need help?
Do you have a question about the SPA II and is the answer not in the manual?
Questions and answers
Help with control wiring
The control wiring setup for the STEAMCORE SPA II includes a terminal block with designated connections for the control panel, water fill valve, and drain valve. The wiring diagram indicates color-coded connections, including Red, Black, Yellow/Green, and Blue wires. The water level sensor has specific pin assignments: Red (Short Pin), Black (Long Pin), and Yellow (Middle Pin). The system supports both 240V single-phase and 208V three-phase configurations. The installation caution advises not to run the controller wire in the same conduit as high-voltage wires and to ensure the steam generator power is off before installation.
This answer is automatically generated
Can you call me at 512 750-1529 I have questions on a couple of external control wires