Table of Contents
Advertisement
Quick Links
Advertisement
Table of Contents
Troubleshooting

Summary of Contents for MGI JETVARNISH 3DS
- Page 1 User Manual JETVARNISH 3DS Original instructions Version 6.0 06/06/2017...
- Page 2 MGI®, the MGI logo and all MGI products mentioned in this document are trademarks of MGI Digital Technology, in France (FR) and/or other countries. All brand names and products mentioned are trademarks of their respective holders and are hereby acknowledged.
-
Page 3: Table Of Contents
Safety and warning items location ......................10 Emergency stop buttons location ........................ 12 Before doing service work apply security rules when using the JETVARNISH 3DS ........13 JETVARNISH 3DS Safety Instructions ....................... 14 3 Machine specifications and configurations ...................... 16 Machine specifications .......................... - Page 4 Supervision menu ............................90 Settings menu ............................. 94 Information and Cost Calculator ........................95 How to use the MGI Spot Varnish Editor ....................97 9.10 Login Management ............................ 102 9.11 Remote access ............................103 9.12 Automatic cleaning of the print heads ....................... 104 10 MGI ARC system ..............................
- Page 5 JETVARNISH 3DS 11 Working method with the JETVARNISH 3DS ....................126 12 Troubleshooting ..............................138 12.1 Error codes ..............................138 12.2 Jam procedure ............................142 12.3 Emergency stop procedure ........................148 12.4 Power failure procedure ..........................150 12.5 Paper feeding issue ........................... 151 12.6 File troubleshooting ...........................
-
Page 6: Revision History
JETVARNISH 3DS REVISION HISTORY The following changes have been made from the original version. Version Date Comments Version 4.0 12/05/2015 Updates Version 5.0 02/11/2016 Certified version Version 5.1 26/01/2017 Mark and safety symbol changes Version 6.0 06/06/2017 Wording changes and better descriptions Varnish thicknesses &... -
Page 7: Security And Safety Rules
Because of possible hazards to an inexperienced person servicing this product as well as the risk of damage to the product, MGI Digital Technology (hereafter called MGI) oblige that only an operator trained by MGI or its distributors can use the machine. - Page 8 JETVARNISH 3DS 2. Security and Safety Rules 2.4.2 Descriptions for safety and important warning items When residual risks are present, symbols for safety and important warning items are used as follow: High Voltage Caution to be taken against high voltage. Electrification may cause fatal or serious injury.
- Page 9 JETVARNISH 3DS 2. Security and Safety Rules Skin & Hand Protection Avoid skin contact. Wear impermeable gloves and suitable protective clothing. Barrier creams may help to protect the exposed areas of the skin, they should however not be applied once exposure has occurred.
-
Page 10: Safety And Warning Items Location
JETVARNISH 3DS 2. Security and Safety Rules 2.5 Safety and warning items location ① UV Radiation Protect your eyes from UV radiation. Exposure to UV radiation may cause serious eye injury. ② Eye protection Wear eye/face protection such as chemical splash proof UV goggles or face shield. - Page 11 JETVARNISH 3DS 2. Security and Safety Rules Inside ⑤ Inside ①②⑤ Inside ①②③④ Note: red dotted rectangle indicates an internal part of the machine. Note: red dotted rectangle indicates an internal part of the machine. Inside ⑦② ⑥ ①② Inside ⑦...
-
Page 12: Emergency Stop Buttons Location
JETVARNISH 3DS 2. Security and Safety Rules Note: red dotted rectangle indicates an internal part of the machine. Inside ⑧ ⑨ ⑨ ⑧ 2.6 Emergency stop buttons location Technical Manual - 12 -... -
Page 13: Before Doing Service Work Apply Security Rules When Using The Jetvarnish 3Ds
To release an emergency button, turn it counter clockwise to lift it: To reset a stop, press the Reset button to change the state of the JV3DS from RED to GREEN: GREEN 2.7 Before doing service work apply security rules when using the JETVARNISH 3DS 2.7.1 General using security rules For security purposes, always disconnect the main power plug before any maintenance or reparation on the equipment. -
Page 14: Jetvarnish 3Ds Safety Instructions
For user convenience, it is recommended to have an air renewal system. Recommendations As a matter of fact, the JETVARNISH 3DS operates together with UV LED which release heat, and the ambient temperature may rise at the end of the day. - Page 15 Any product having started a polymerization phase cannot be used as severe Caution relating to products damage to the JETVARNISH 3DS may occur, thus jamming the print heads. It is mandatory to dispose of any product having suspicious looks. The room where the JETVARNISH 3DS is located shall be as clean as possible as any dust deposited on sheets before varnish drying is "encapsulated"...
-
Page 16: Machine Specifications And Configurations
Registration Fully motorized and automatic left side lay guide New feature of automated registration using MGI ARC System with optical detection of printed crop marks. Overall registration of ± 200 µm Formats Min: 21.0x29.7 cm / 8 x 11.8” (in portrait mode i.e. long side first) Max: 36.4x102.0 cm / 14.33x40.15”... - Page 17 JETVARNISH 3DS 2. Security and Safety Rules In-line UV dryer “On-the-fly” drying & curing via integrated LED Spot Coated sheets can be immediately finished or handled, no additional drying time required Front end system Dedicated PC; CPU + touch-screen + keyboard/mouse...
-
Page 18: Expected Print Speeds
Since the release of the 3D Hub Manager V1.6, the method to compute, both the varnish consumption and the varnish thicknesses, has evolved. Therefore, the expected JETVARNISH 3DS print speeds are now the following: JETVARNISH 3DS with 1 printhead bar (standard configuration) -
Page 19: Machine Configurations
You will notice that JETVARNISH has two technical limits. The upper limit where the JETVARNISH cannot go faster than 0.3 meter per second. The lower limitation where the JETVARNISH 3DS cannot go slower than 0.05 meter per second. - Page 20 JETVARNISH 3DS 2. Security and Safety Rules AIS SmartScanner: Artificial Intelligence SmartScanner for an automated registration and make ready. Replace totally the ARC System (XY cameras) Refer to the “AIS Scanner User” manual User Manual - 20 -...
-
Page 21: Working Conditions
Standard: 2x 220-240V 32A 50/60 Hz. It is mandatory to be sure that the tension will not drop when all the machines are switched on. The JETVARNISH 3DS must always be connected to the 230V power due to the ink circuit depression system. 3.4.3 Temperature &... - Page 22 Precautions when handling varnish The JETVARNISH 3DS varnish is a skin irritant. Any manipulation in its liquid form needs to be done using gloves (one box of gloves is provided with the machine), protective clothes (such as a lab coat) and glasses.
- Page 23 & the use of the remote access. 3.4.11 Prohibition of the Use of Expired Consumable We hereby inform you that it is strictly forbidden to use any expired consumable on our MGI equipment. As you already know. consumables as varnish are made of chemical component which cannot be used after its lifetime (1 year).
- Page 24 JETVARNISH 3DS 2. Security and Safety Rules 3.4.15 Noise emissions: Machine running in stand-by: 62 dB (A) Machine running in printing without foiling: 72 dB (A) Machine running in printing with foiling: 79 dB (A) For continuous and all-day use at close proximity of the equipment. it is recommended to wear ear protection.
-
Page 25: General Description
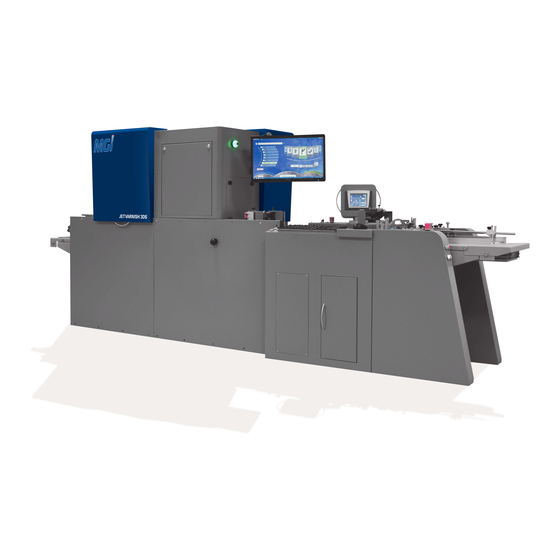
JETVARNISH 3DS 4. General description GENERAL DESCRIPTION Printer module Feeder module Stacker Dryer Printer Margin table Feeder 4.1 Feeder The feeder is able to feed paper sheets of different qualities from a pile into the machine. The sheets are being fed from the top of the pile by a vacuum drum system. For a perfect sheet separation. the feeder features an air blow system. -
Page 26: Dryer
JETVARNISH 3DS 4. General description 4.4 Dryer This section is also equipped with UV LED to have a perfect varnish curing on the sheet. 4.5 Stacker The stacker can receive sheets one by one. 4.6 Pilot presentation The pilot is a mainly technical interface. However. some operator parameters of the machine can be directly managed from this interface. - Page 27 [6] Print head maintenance screen access button Access to various print head maintenance [7] Buzzer enable/disable button [8] Technical menu/MGI mode service access button Reserved for technicians. a password it is necessary to access it [9] Printing information Display information about printing. Quantity asked and Stacker sheet counter. the thickness of the substrate [10] Varnish level Display the varnish diagram (container.
- Page 28 JETVARNISH 3DS 4. General description 4.6.2 Information screen The purpose of this screen is to give information about the machine. Refer to Chapter 4.6.1 Main screen for access. [16] [13] [17] [14] [15] [13] Machine information Display the machine serial number. PLC serial number and the IP address of the pilot...
- Page 29 JETVARNISH 3DS 4. General description 4.6.3 Margin table screen access button The purpose of this screen is to give an access to the side lay position. Refer to Chapter 4.6.1 Main screen for access. [18] [19] [21] [20] [22] [18] Paper custom width selection...
- Page 30 JETVARNISH 3DS 4. General description You can activate or disable the double sheet sensor [24] Belt cleaning Make the printing belt turn to clean it (Refer to 5.4 Cleaning of the printing belt) [25] Drum stop offset Length of substrate vacuum by the drum...
- Page 31 You can select the duration of a purge (of 3 seconds. 5 seconds or 8 seconds). [30] Printhead selection for the Fill Ink cleaning maintenance 4.6.6 Technical menu/MGI mode service access button This screen shows how to access to technical mode via a password. Refer to Chapter 4.6.1 Main screen to access.
-
Page 32: Jetvarnish 3Ds - Tactile Interface Presentation
4.7 JETVARNISH 3DS – Tactile Interface presentation The following icons are present on the desktop: 3DSHM is used to print, monitor production and set up the JETVARNISH 3DS. (Refer to Chapter 9 How to use the 3DSHM) MGI Kernel (“Noyau” in French) communicates with all physical components of the JETVARNISH 3DS. - Page 33 Substrate format. printing speed (in sheet/hour). remaining time of printing and varnishes level (in percentage) [7] Administration icons: For Varnish registration. User management and MGI access [8] Cleaning tab: This tab display the hot purge procedure. (Refer to Chapter 9.1 for the hot purge procedure)
-
Page 34: Periodical Maintenance
Refer to Chapter Security and Safety Rules to read carefully the Safety and Important Warning Items described below to understand them before doing service work. 5.1 Maintenance chart JETVARNISH 3DS - MAINTENANCE LIST Operation Time Clean the green cleaning roller... - Page 35 JETVARNISH 3DS 5. Periodical Maintenance Then rub with a cloth soaked with water onto the entire length of the green roller. Do not wipe the roller to keep its "adhering" effect. Put the green cleaning roller in its position on the cleaning unit and close the latches [1].
-
Page 36: Cleaning Of The Print Heads
Warning: Print heads are fragile parts that require great care to remain it operational as long as possible. A scratched nozzle plate can cause missing nozzles which deteriorate print quality. Caution: Use only cleaning solutions and cleaning foam validated by MGI. Use only one foam per head. Do not use an used foam. -
Page 37: Cleaning Of The Printing Belt
JETVARNISH 3DS 5. Periodical Maintenance 5.4 Cleaning of the printing belt - Localize the dry varnish on the printing belt. - Apply a very strong tape on this varnish. - Remove the tape by sharply pulling. Should varnish do not stick onto. please find a stronger tape. -
Page 38: Cleaning Of The Top Cells Reflectors
5.5 Cleaning of the top cells reflectors [1] Printing belt [2] Reflector Caution: Use only cleaning solutions and cleaning foam validated by MGI. Caution: Insert the stick properly in foam. Caution: During this operation wear protective equipment (gloves and glasses). - Page 39 JETVARNISH 3DS 5. Periodical Maintenance Skin and Hand protections: Eye protection Make move the printing belt [1] to reveal a reflector [2]. Use cleaning foam with cleaning solution on it and apply on the reflector [2] to remove dust and varnish.
-
Page 40: Installing The Machine Consumables
6. Erreur ! Résultat incorrect pour u JETVARNISH 3DS ne table. INSTALLING THE MACHINE CONSUMABLES 6.1 Installation of the Cleaning Agent. Waste and Varnish Containers The varnish. cleaning agent and waste containers are installed at the back side of the machine. - Page 41 6. Erreur ! Résultat incorrect pour u JETVARNISH 3DS ne table. 6.1.1 Cleaning agent container Open the cleaning agent container by unscrewing its cap. Insert the pipe with the pierced cap on the container. User Manual - 41 -...
- Page 42 6. Erreur ! Résultat incorrect pour u JETVARNISH 3DS ne table. Place the container to its location and connect the pipe connector. To remove the cleaning agent container. do the previous steps in reverse order. 6.1.2 Waste container The waste container is located on the left of the cleaning agent container.
- Page 43 6. Erreur ! Résultat incorrect pour u JETVARNISH 3DS ne table. Open the waste container by unscrewing its cap. Place the waste container to have the two pipes inside (one black pipe coming from the cleaning circuit and a white pipe coming from the purge tray).
- Page 44 6. Erreur ! Résultat incorrect pour u JETVARNISH 3DS ne table. To change a varnish container. remove the pipe inside the empty one and clean it. You can place the pipe on the holder next to the container with a tissue underneath.
-
Page 45: Varnish Registration Procedure
6. Erreur ! Résultat incorrect pour u JETVARNISH 3DS ne table. 6.2 Varnish registration procedure 6.2.1 Purpose of the registration Warning: An Ethernet connection is mandatory to register a varnish container. Varnish registration enables: - The varnish to be checked for compatibility with the equipment. - Page 46 The top of the screen indicates the “JET Code“ and “Control Code“ which are used to identify the machine. These codes are required to activate the consumables on the site. The center of the screen displays the list of varnishes which were registered on the JETVARNISH 3DS. The button below hides the empty pockets:...
- Page 47 6. Erreur ! Résultat incorrect pour u JETVARNISH 3DS ne table. The "Serial Number" corresponds to the first series of figures written on the consumable. The "type" corresponds to the varnish type. The third field shows the quantity of varnish used over the quantity of varnish of the consumable.
- Page 48 6. Erreur ! Résultat incorrect pour u JETVARNISH 3DS ne table. 4. For identification purposes. you must enter the “JET Code” and “Control Code” of the machine. When logging in with these codes for the first time. a more complete identification procedure is requested in order to localize the machine in the world and know the person responsible for the machine.
- Page 49 6. Erreur ! Résultat incorrect pour u JETVARNISH 3DS ne table. 8. The window below should open. The following fields must then be completed: - Serial Number. - Key. - Activation key. Identify whether the pocket is being used or not by checking the "Use pocket?" box and then pressing "Register"...
-
Page 50: Start Up & Shutdown Procedures
6. Erreur ! Résultat incorrect pour u JETVARNISH 3DS ne table. START UP & SHUTDOWN PROCEDURES 7.1 Procedure details By touching the Pilot Touch Screen. the starting procedure appears. It is mandatory to follow up step by step this procedure. -
Page 51: Start Up
6. Erreur ! Résultat incorrect pour u JETVARNISH 3DS ne table. 7.2 Start up The first step is to disable all emergency buttons (which are activated when the machine is shutdown) and switch on the power of electronic boards (next to the pilot panel). - Page 52 6. Erreur ! Résultat incorrect pour u JETVARNISH 3DS ne table. Start the computer at the back of the machine. This step need to be acknowledged During this step the machine make its initialization (the printing plate and purging tray are initialized).
-
Page 53: Shutdown
6. Erreur ! Résultat incorrect pour u JETVARNISH 3DS ne table. On the 3DSHM the following message appears when you are starting the machine: A wiping of print heads is mandatory. Follow the wiping procedure (Refer to 9.12 for Automatic cleaning of the print heads). - Page 54 6. Erreur ! Résultat incorrect pour u JETVARNISH 3DS ne table. The Pilot Touch Screen will show up the shutdown procedure. It is mandatory to follow up step by step this procedure every time you shutdown the machine. 7.3.2 Cleaning of the print heads...
- Page 55 6. Erreur ! Résultat incorrect pour u JETVARNISH 3DS ne table. [2] Switch off the power of the electronic boards and press an emergency button This step needs to be acknowledged [3] Shutdown the computer once you have finish to close everything on it...
- Page 56 6. Erreur ! Résultat incorrect pour u JETVARNISH 3DS ne table. [4] Wait for the machine extinction When all the steps are finished a timer starts to end the shutdown procedure. Once it is finished the pilot screen turns to the save-screen.
-
Page 57: How To Use The Machine
JETVARNISH 3DS 8. How to use the machine HOW TO USE THE MACHINE 8.1 Feeder 8.1.1 Feeder guides [1] Feeder plate [2] Back stop pile holding weight shaft [3] Stop pile holding weight [4] Side guides 8.1.2 Feeder panel (2 versions available) - Page 58 JETVARNISH 3DS 8. How to use the machine To move up the feeder plate. press button [7]. To bring down the feeder plate. press button [8]. To activate the pump and the margin table. press button [5]. To reset a double sheet error. press button [6] after removing the picked up printing substrate (margin table belt goes ON).
- Page 59 JETVARNISH 3DS 8. How to use the machine 2. Now raise and descent of feeder plate switch to automatic mode (button [7] lights up). 3. Reach this position. To reach this position. check if the positioning of feeder plate is on automatic mode. If it is.
- Page 60 JETVARNISH 3DS 8. How to use the machine 8.1.5 Blowing holes [15] [15] Blowing holes All blowing holes [15] can be opened and closed with a 3mm Allen screwdriver. Each hole is instead three holes which can be adjusted. OPEN CLOSE All blowing holes [15] outside the substrate pile have to be closed.
- Page 61 JETVARNISH 3DS 8. How to use the machine 8.1.6 Air flow adjustment [18] [17] [19] [16] [16] Compressor location [17] Compressor [18] Vacuum adjustment handle [19] Blowing adjustment handle The power of the air flow can be adjusted in order to separate correctly the different printing substrate according to their thickness.
- Page 62 Refer to Chapter 12.1 Error code to clean this error message. 8.1.10 Sidelay adjustment Caution: this adjustment needs to be checked during the JETVARNISH 3DS installation. Remove the ball holder plate. Select the format 210 mm on the pilot (refer: 4.6.3[19]).
- Page 63 JETVARNISH 3DS 8. How to use the machine Remove the 2 ball guide holder bars. To do so. unscrew the 2 Allen screws with Allen key number 3. User Manual - 63 -...
- Page 64 JETVARNISH 3DS 8. How to use the machine Remove the sidelay from the margin table. For that remove these 3 following screws. User Manual - 64 -...
- Page 65 JETVARNISH 3DS 8. How to use the machine Caution: behind all the screws a counter nut is present. Hold it with wrench key number 7. When the side lay is out of the margin table you can setup it. Uptight the 4 following screws.
- Page 66 JETVARNISH 3DS 8. How to use the machine Tight back the 4 screws. If the setup it is done correctly. you will be able to slide 3 plastics between the lower and the upper part of the side lay. If you feel some hard point. you have to do again the setting.
- Page 67 JETVARNISH 3DS 8. How to use the machine When it is done fix the side lay with the 3 screws and the counter nuts. Put back the 2 ball guide holder bars. then put back the ball guide. User Manual...
-
Page 68: Cleaning Unit
JETVARNISH 3DS 8. How to use the machine 8.2 Cleaning unit [1] Cleaning unit holder [2] Green cleaning roller [3] Grey cleaning roller This module consists of two rollers: - One grey roller [3] (in contact with the printed substrate). which is used to transport the substrate from the feeder to the margin table. -
Page 69: Margin Table
JETVARNISH 3DS 8. How to use the machine 8.3 Margin table 8.3.1 Margin table presentation [1] Margin table belt [2] Left side lay [3] Balls guide holding bar [4] Balls guide 8.3.2 Side lays position adjustment To put the substrate at the center of the printing belt. the substrate pile has to be also centering on the feeder to be well vacuuming by the vacuum drum. -
Page 70: Stacker
JETVARNISH 3DS 8. How to use the machine Refer to Chapter 12.1 Error code to clean these error messages. 8.4 Stacker 8.4.1 Stacker presentation [1] Side cleats stack [2] Top cleat stack [3] Cleats shaft [4] Stacker plate [5] Top pile sensor... - Page 71 JETVARNISH 3DS 8. How to use the machine 8.4.2 Stacker adjustment [11] [10] [13] [12] [6] Emergency button [7] Start button [8] Stop button [9] Reset / power initialize button [10] Up button [11] Down button [12] Stacker speed up button [13] Stacker speed down button The stacker can be controlled by the stacker panel.
-
Page 72: How To Use The 3Dshm
JETVARNISH 3DS 9. How to use the 3DSHM HOW TO USE THE 3DSHM 9.1 Main menu Listing of folder present on the computer [1] Folder selection: Path of folders Refresh button Sorting button (in alphabetical order or reverse) Searching button Rename. - Page 73 JETVARNISH 3DS 9. How to use the 3DSHM When a folder is selected. files inside appear on this [2] Job area. (Refer to Chapter 9.2 Standard printing to manage management: files) Sheet counter [3] Printing Play/Pause button progress: Printing stop button User icon access: Printing icon.
- Page 74 User management: management of operator and [7] Administration administrator logins (Refer to Chapter Login icons: Management) MGI access: TeamViewer with MGI connection for remote access (internet assistance and updates) (Refer to Chapter 9.11 for Remote access) This tab displays the cleaning maintenance procedures. [8] Cleaning: (Refer to Chapter 9.12 for Automatic cleaning of the...
-
Page 75: Standard Printing
Refer to Chapter 9.8 for Information and Cost calculator Script application on the selected file Open MGI Spot Editor (Refer to Chapter How to use the MGI Spot Varnish Editor) Copy the job ticket of the selected file [4] Job ticket... -
Page 76: Print Menu
JETVARNISH 3DS 9. How to use the 3DSHM Listing of saved job ticket Paste the job ticket on the selected file [5] Print menu Open the print menu to set the printing (Refer to button: Chapter 9.3 Print menu) 9.3 Print menu Click to open a tab displaying feeder. - Page 77 JETVARNISH 3DS 9. How to use the 3DSHM Click on the quantity to change the number of printing [5] Quantity: you want. You have to set all the parameters before to be able to print. [6] Print starting button: Once it is done the button become green: 9.3.2...
- Page 78 JETVARNISH 3DS 9. How to use the 3DSHM Substrate thickness. File position on the substrate. It is recommended to place the file on the center top of the substrate. To adjust the position of the varnish file on the printing substrate.
- Page 79 JETVARNISH 3DS 9. How to use the 3DSHM You can adjust the thickness of varnish you want by using the slider. Depending of your 3D Hub Manager version. 2 sets of thickness values are possible: 3DS Hub Manager < V2.6 From 15 to 100 µm (with one printhead bar)
- Page 80 Indicate the identification of the configured crop mark. selection: (Refer to Chapter 10 for MGI ARC system) Start the MGI ARC system software to configure the cameras. (Refer to Chapter 10 for MGI ARC system) If you use both cameras. you have to indicate to the 3DSHM the position of the crop mark on the substrate.
- Page 81 JETVARNISH 3DS 9. How to use the 3DSHM 9.3.5 Machine setting 9.3.5.1 Summary of settings Validate the machine settings and go back to the print menu (Refer to Chapter 9.3 Print menu) Close the machine setting tab and go back to the print menu (Refer to Chapter 9.3 Print menu)
- Page 82 JETVARNISH 3DS 9. How to use the 3DSHM Click on this tab or on the feeder part on the machine [16] Feeder tab: diagram to go on feeder setting tab. (Refer to Chapter 9.3.5.3 Feeder tab) Click on this tab or on the printer part on the machine [17] Printer tab: diagram to go on printer setting tab.
- Page 83 JETVARNISH 3DS 9. How to use the 3DSHM 9.3.5.4 Printer tab [22] [24] [25] [23] [26] [22] Paper Display the thickness of the substrate (Refer to 9.3.2 for thickness: Position to adjust the thickness) The printing belt maximum and minimum speeds are [23] Printing belt automatically adjusted with the varnish thickness.
- Page 84 JETVARNISH 3DS 9. How to use the 3DSHM [26] Varnish circuit Display the varnish circuit diagram. diagram: 9.3.5.5 Curing tab [27] [28] [29] [27] Stacker speed You can adjust the speed of the stacker. adjustment: DRY 1: UV LED 5W located just after the print heads to freeze the varnish.
- Page 85 JETVARNISH 3DS 9. How to use the 3DSHM You can activate or disable a curing unit by clicking on the corresponding icon: [29] Curing power management: You can adjust the power of each unit with the corresponding slider. Default values: ...
- Page 86 JETVARNISH 3DS 9. How to use the 3DSHM Display the cameras configuration. the detection and the corrections in X. Y directions and the skew. Display in which mode are the camera. Refer to Chapter 9.4 for Camera configuration in 3DSHM.
-
Page 87: Printing Summary
JETVARNISH 3DS 9. How to use the 3DSHM 9.4 Printing summary 9.4.1 Summary window Total asked substrate to print [1] Printing Total printed substrate summary Total time to print Total varnish consumption for the printed substrate Total good detections for all cameras... - Page 88 JETVARNISH 3DS 9. How to use the 3DSHM 9.4.2 Detailed window [11] [10] [12] [5] Number of the Display the number of the printed substrate in the order printed page: of printing Display if the camera 1 has a good (in green) or bad (in...
-
Page 89: History
JETVARNISH 3DS 9. How to use the 3DSHM 9.5 History Start date: printing date Duration: duration of the printing Speed: the number of sheet per hour [1] Job history Operator: which operator has printed the file listing: ... -
Page 90: Supervision Menu
JETVARNISH 3DS 9. How to use the 3DSHM [3] File preview: Display a preview of the selected file Display the name and the location of the selected file Start date: date when the file started to be printed End date: date when the file stopped ... - Page 91 JETVARNISH 3DS 9. How to use the 3DSHM You can select the date for the range of the chart. [2] Date selection: A blue day means that at least a printing was done this day. Bar chart (Refer to Chapter 9.6.1 Bar chart) [3] Chart Pie chart (Refer to Chapter 9.6.2 Pie chart)
- Page 92 JETVARNISH 3DS 9. How to use the 3DSHM 9.6.2 Pie chart [7] Pie chart: Operator distribution pie chart for the selected range User Manual - 92 -...
- Page 93 JETVARNISH 3DS 9. How to use the 3DSHM 9.6.3 Excel export [11] [10] [11] Select the dates between which you want to export [8] Date selection: information [9] Summary Select which information you want to export: export Total of printed pages information ...
-
Page 94: Settings Menu
JETVARNISH 3DS 9. How to use the 3DSHM 9.7 Settings menu [1] 3DSHM Display the actual version of the 3DSHM software version: Display the path of the files on the computer [2] Image folder: Click to change the folder where are stored... -
Page 95: Information And Cost Calculator
JETVARNISH 3DS 9. How to use the 3DSHM 9.8 Information and Cost Calculator Eiffel Tower 3D effects.tif [1] File name: Display the name of the file [2] Close button: Click on this button to close the Cost Calculator [3] File preview: Display a preview of the selected file in grey level ... - Page 96 JETVARNISH 3DS 9. How to use the 3DSHM You can adjust the thickness of varnish you want by [5] Thickness using this slider. Please read the remarks on section adjustment: “9.3.3 Quality” and item [10] Ink coverage: Covered surface given by the file ...
-
Page 97: How To Use The Mgi Spot Varnish Editor
JETVARNISH 3DS 9. How to use the 3DSHM 9.9 How to use the MGI Spot Varnish Editor The Spot Varnish Editor is a file modification embedded software. It can be accessed by double-clicking the file to be modified. or clicking the edit button (Refer to Chapter 9.2 for Standard printing). - Page 98 JETVARNISH 3DS 9. How to use the 3DSHM Used to move a selected area. Possibility of making up/down and right/left adjustments. Adjustments are made in pixels or millimeters (1 pixel = 0.07mm). Used to remove or add one or more pixels around a shape.
- Page 99 JETVARNISH 3DS 9. How to use the 3DSHM Used to rotate the selection area. with the fixed point being that at the top left of the area. This rotation is expressed in mm and the direction is negative in clockwise.
- Page 100 JETVARNISH 3DS 9. How to use the 3DSHM Used to adjust a trapeze effect on the global file. Used to set a general skew to the whole printed file. The operator must measure the skew as well as the position over the length at which the skew was measured.
- Page 101 JETVARNISH 3DS 9. How to use the 3DSHM This function is used to add a text and define its font and letter size in the image. Click the icon and then select the desired text location using the [7] Text: cross.
-
Page 102: Login Management
JETVARNISH 3DS 9. How to use the 3DSHM 9.10 Login Management 9.10.1 User A User operator can only modify his own password. Fill the actual password. then a new one and confirm it. To finish click on “Change your password”. -
Page 103: Remote Access
9.11 Remote access This icon starts the Remote Access software: TeamViewer (Refer to Chapter 9.1 Main menu) To make a technical intervention on the machine. a MGI trained technician is mandatory on site. 1. Call (do not email) the SSD Contact Support Center (CSC) at 800-825-5664. -
Page 104: Automatic Cleaning Of The Print Heads
JETVARNISH 3DS 9. How to use the 3DSHM 9.12 Automatic cleaning of the print heads [1] Print heads selection You can select all or none printhead by clicking on the icon. You can also select deselect a printhead by clicking on its icon. - Page 105 JETVARNISH 3DS 9. How to use the 3DSHM Once the start button is clicking to following window appear: Confirm your chose to clean the print heads. The following steps will be displayed. Wait until the cleaning is completed. Fill Ink action The "Fill Ink"...
- Page 106 Wiping is common to all print heads of the machine. To make a wiping: - Take out the wiping unit from the JETVARNISH 3DS located on the back on the purging tray. - Place a new wiping towel on the unit and lock it with the two holders at each end of the unit.
- Page 107 JETVARNISH 3DS 9. How to use the 3DSHM - Check that the wiping towel is flat. - Put back the wiping unit into the machine in wiping position (top position). Once the wiping unit is in position the message for wiping can be acknowledge.
- Page 108 JETVARNISH 3DS 9. How to use the 3DSHM [3] Depressure display The actual and standard value of depressurization into the Air/Varnish circuit. [4] Starting and Stopping button [5] Close icon User Manual - 108 -...
-
Page 109: Mgi Arc System
10. MGI ARC system 10 MGI ARC SYSTEM The cameras of the MGI ARC system compensate all shifts and skews on the pre-printed pages. 10.1 Substrate Put the substrate under cameras. The lead edge has to be under the camera sensors and the substrate perfectly inside the side lay (as should be during the printing triggering). -
Page 110: Camera Setting
JETVARNISH 3DS 10. MGI ARC system You are now connected to the camera in “Monitor” mode. 10.3 Camera setting Click on “Application” to set the camera. User Manual - 110 -... - Page 111 10. MGI ARC system To create a new camera setting. select the first setting “MGI default” and duplicate it. Do not delete or modify the “MGI Default” folder. some settings are already made to avoid any mistake or forgetting. Choose the name of the setting. The camera setting is to set a Crop mark so give the name of the Crop mark and not the name of the job.
-
Page 112: Image Quality
JETVARNISH 3DS 10. MGI ARC system 10.4 Image quality Select the Display mode “Live” and the Lightning “External”. Then click on "Extended options" tab in order to validate that the “Exposure time” is set to “230 µs” (if needed. up to 300 µs). If the quality is not good enough. adjust the camera lamp orientation and focus. - Page 113 JETVARNISH 3DS 10. MGI ARC system 10.4.1 Camera lamp orientation To adjust the position of the lamp of camera. turn it to have the maximum of light at screen. 2 angles can be adjusted. printing direction or crossed direction. Crossed direction Printing direction 10.4.2 Focus...
-
Page 114: Model Definition
JETVARNISH 3DS 10. MGI ARC system 10.5 Model definition You are now in the "Model definition" tab. in which you will configure the two optical marks as regards registration of the printing substrate. i.e.. crop mark (Crop) and edge of the printing substrate (Paper). - Page 115 JETVARNISH 3DS 10. MGI ARC system Press "Live" and then "Freeze". You then have a purple square which appears on the camera image. Adjust this purple square to highlight in green the Crop mark. Make the purple square the smallest as possible to just select the crop mark.
- Page 116 JETVARNISH 3DS 10. MGI ARC system You might have the following message if the selected model have symmetries. Define the “Search Zone” on the image taken by the camera. The blue search area should be 3 times bigger (in high and width) than the defined model of the crop mark.
- Page 117 JETVARNISH 3DS 10. MGI ARC system Check that the parameter is set to "user-defined. speed-optimized". Go to “Detailed evaluation” tab and check if the Detail evaluation mode is “OFF”. Then click on “Test model” to check if the parameters are good. The “Contour match” has to be 60% at least.
- Page 118 JETVARNISH 3DS 10. MGI ARC system Finally press "Next" and accept the modification you have made. The "Crop mark" configuration is complete; perform the same procedure for the lead edge: “Paper” of the substrate. Select “Paper” then “Edit”. User Manual...
- Page 119 JETVARNISH 3DS 10. MGI ARC system Press "Live" and then "Freeze". You then have a purple square which appears on the camera image. Adjust this purple square to highlight in green the edge of the substrate. Make the purple square the smallest as possible to just select few centimeters (1/5 of the screen high).
- Page 120 JETVARNISH 3DS 10. MGI ARC system Once is done. click on “Next” and acknowledge the message of detection of symmetries. Adjust the “Search Zone” to be slightly bigger than the model (in high) and 1/3 of the screen width. On the “Orientation & symmetry” tab. select the parameter to "user-defined. speed-optimized".
- Page 121 JETVARNISH 3DS 10. MGI ARC system Go to “Detailed evaluation” tab and check if the “Detail evaluation mode” is “OFF”. Then click on “Test model” to check if the parameters are good. The “Contour match” have to be at least 60%.
-
Page 122: Overall Function Test
JETVARNISH 3DS 10. MGI ARC system 10.6 Overall function test Then click 3 times on “Next” to go to the “Overall function” test page to test the whole configuration previously created. Click "Test application". then this window appears. User Manual... - Page 123 JETVARNISH 3DS 10. MGI ARC system Click on "Release trigger" when this one is available. The following picture validates the configurations previously set up. A percentage is given as regards the picture taken by the camera and its correspondence with the configured model. The result should be around 95%.
-
Page 124: 3Dshm Camera Configuration
JETVARNISH 3DS 10. MGI ARC system The new configuration appears in green in the tree. and is the active configuration. Only the active green configuration can be found by the camera. Go to “Connections” and “Disconnect” to disconnect from the configuration of camera. - Page 125 JETVARNISH 3DS 10. MGI ARC system Two modes are possible: red C = Calibration: this mode must be active when sending the first sheet of a new job to the machine. green P = Production: this mode is active once the marks have been seen for the first time by the two cameras so as to compensate for the printing movements in relation to the first Calibration sheet.
-
Page 126: Working Method With The Jetvarnish 3Ds
11 WORKING METHOD WITH THE JETVARNISH 3DS The following steps have to be followed in order to register a job to be varnished. and covers the simplest working method for operating the JETVARNISH 3DS: 1- Load the printing substrates Place the pile of substrate on the feeder plate at the center. Then move the 2 side cleats. do not tight too much to avoid blocking the pile. - Page 127 11. Working method with the JETVARNISH 3DS JETVARNISH 3DS Press again the up button of the feeder plate to switch on the automatic mode movement of the plate (the light of the up button is on). Adjust the heigh of the pile with the heigh adjustment handle.
- Page 128 11. Working method with the JETVARNISH 3DS JETVARNISH 3DS Then place the pile holding weight at the end of the pile. 2- Select the file to be printed in standard mode Select the folder in which the file was located. and then select the file to be printed.
- Page 129 11. Working method with the JETVARNISH 3DS JETVARNISH 3DS Printing Printing preview direction User Manual - 129 -...
- Page 130 11. Working method with the JETVARNISH 3DS JETVARNISH 3DS 4- In the position tab. set the printing substrate format or create it if it does not exist. 5- In the position tab. set the image position (left or right registering. file position in center).
- Page 131 ; Green is enable: Click on the to open the MGI ARC System to set the camera. (Refer to 10 MGI ARC system). Then put the ID number (Crop mark id) of the camera configuration. If you use both cameras. you have to measure the distance between the left side of the substrate to the left crop mark.
- Page 132 11. Working method with the JETVARNISH 3DS JETVARNISH 3DS 10- Set the Quantity of printing at 1 sheet. 11- Click on the to access to the parameters 12- Select the Feeder tab and set the following parameters: - Double sheet sensor = ON...
- Page 133 11. Working method with the JETVARNISH 3DS JETVARNISH 3DS 14- Select the Curing tab. and check the following parameters: - Dry 1 = 100% - Dry 2 = 100% - Stacker speed = 100% 15- Once theses parameters are set. you can click on the green flashing button next to the keyboard.
- Page 134 11. Working method with the JETVARNISH 3DS JETVARNISH 3DS You may have the following result: 17- The first step is to adjust the top left corner of the varnish print to match with the CMYK printing. User Manual - 134 -...
- Page 135 11. Working method with the JETVARNISH 3DS JETVARNISH 3DS To do that go to the Position tab (Refer to 9.3.2 for Position). and move the varnish print with the manual adjustment: The second sheet can be adjusted by millimeter and the third one can be adjusted by 0.1 mm.
- Page 136 11. Working method with the JETVARNISH 3DS JETVARNISH 3DS 18- How to use the MGI Spot Varnish Editor) in order to adjust skew and stretching. Adjust the skew with the bottom left corner of Then adjust the stretching with the bottom right the printing.
- Page 137 11. Working method with the JETVARNISH 3DS JETVARNISH 3DS Once the position is set. you can use the Spot Varnish Editor to adjust an object (bold/unbold, move, stretch, skew, etc.) Now that varnish is registered with the CMYK print. please enter the number of substrates to be printed.
-
Page 138: Troubleshooting
JETVARNISH 3DS 13. Glossary 12 TROUBLESHOOTING 12.1 Error codes 01/06/2017 ENGLISH FRENCH E500- No message in progress E500- Pas de message en cours E501- Machine in stand-by E501- Machine en attente E502- Ready to print E502- Disponible E503- Reserve fonctionnement... - Page 139 JETVARNISH 3DS 13. Glossary E533- Paper on belt(s) E533- Feuille sur le(s) tapis E534- Manual stop print E534- Arrêt impression manuel E535- Print head moving E535- Déplacement des têtes E536- Cleaning in progress E536- Nettoyage en cours E537- Fill ink in progress...
- Page 140 JETVARNISH 3DS 13. Glossary E573- Depressurization sensor error E573- Erreur capteur dépression E574- Depressurization not activated E574- Dépression arrêtées E575- Tank filling off E575- Remplissage réservoirs éteints E576- Stacker full / not in Auto mode E576- Stacker plein / pas en mode Auto...
- Page 141 JETVARNISH 3DS 13. Glossary A non-registered consumable can only be used up to 10% of its capacity. This message warns the user that a consumable is not registered on the Internet. and hence has no license for the varnish container.
-
Page 142: Jam Procedure
JETVARNISH 3DS 13. Glossary 12.2 Jam procedure 12.2.1 Jam sensors identification [1] C1: Cleaning unit entrance sensor (feeder) [2] C2: Double sheet sensor [3] C3: Cleaning unit exit sensor (margin table) [4] C10-C11: Camera triggering sensors (camera) [5] C6-C7: Curing 2 entrance sensor... - Page 143 JETVARNISH 3DS 13. Glossary 12.2.2 Jam detection principle Jams may happen during the print. The causes of jam detection come from the following reasons: E-566: Double sheets: This error is due to the detection of two sheet on the feeder entrance (C2). Below is explained the different double sheets sensor state.
- Page 144 JETVARNISH 3DS 13. Glossary If the printing substrate is detected for more than 20% of the printing substrate length by C1. C3. C10. C11. a jam will occur. If the printing substrate is detected for more than 10% of the printing substrate length by C6. C7. C8. a jam will occur.
- Page 145 JETVARNISH 3DS 13. Glossary 12.2.3 Unjam procedure In case of jam. please check the following rules: a substrate is on the printing belt? check if the jam sensors remove the substrate are centering on the from the printing belt printing belt holes...
- Page 146 JETVARNISH 3DS 13. Glossary 12.2.4 How to remove jam substrate First remove the jammed substrate indicated on the pilot screen by a green or a red dot. User Manual - 146 -...
- Page 147 JETVARNISH 3DS 13. Glossary Once the jammed substrate is removed. press on “Sheet ejection” on the pilot screen and wait few seconds. The “PRINT” button at stacker side will blinking. User Manual - 147 -...
-
Page 148: Emergency Stop Procedure
JETVARNISH 3DS 13. Glossary Keep this button pressing to make the printing belt turn and to activate the UV LED to cure the varnish before to exit to the stacker. Once all substrates are out of the machine. you can acknowledge the jam error message: 12.3 Emergency stop procedure... - Page 149 JETVARNISH 3DS 13. Glossary Before doing anything else. you have to solve the problem which make you do an emergency stop of the machine. If necessary contact a technician. Once the problem is solve. you can clear all the error messages following the next steps: 1.
-
Page 150: Power Failure Procedure
JETVARNISH 3DS 13. Glossary 12.4 Power failure procedure In case of power failure: - Unplug the depressure circuit - Remove manually the sheets. Caution: sheets between printhead and curing module number 2 are not dry. It is recommended to use gloves to remove these sheets - Call a trained technician. -
Page 151: Paper Feeding Issue
12.5 Paper feeding issue When facing a paper feeding issue follow the following steps: PAPER FEEDING ISSUE DID YOU CORRECTLY SEPARATE THE PAPER? IS THE PAPER WITHIN MGI JETVARNISH 3DS TECHNICAL SPECIFICATION? DOUBLE SHEET MISFEED LOWER THE TOP PILE RAISE THE TOP PILE... -
Page 152: File Troubleshooting
13. Glossary 12.6 File troubleshooting To avoid troubleshoot during printing and to be able to used fully the JETVARNISH 3DS. your printing file need to have some specifics features. You can see a summary of these features in this screen. -
Page 153: Varnish Image Troubleshooting
JETVARNISH 3DS 13. Glossary 12.7 Varnish image troubleshooting The following varnish image troubleshootings are the most commonly encountered on the JETVARNISH 3DS. For all examples. please note that the CMYK and varnish prints are those below: CMYK print Varnish print 12.7.1 Problem 1 - Varnish spreads on the print. - Page 154 JETVARNISH 3DS 13. Glossary 12.7.2 Problem 2 - Lines or bumps appear on the print 12.7.2.1 Explanation This phenomenon is explained by the printhead overlap. This phenomenon may be more or less present depending on the varnish thickness used and surface energy of the substrate used.
- Page 155 JETVARNISH 3DS 13. Glossary 7. Increase the varnish thickness on that substrate so as to cover the phenomenon of dots. 12.7.4 Problem 4 - Lines are present on the print. at a given position 12.7.4.1 Explanation Inkjet print heads eject varnish through nozzles of the order of few microns; should dust adhere to the print heads.
- Page 156 JETVARNISH 3DS 13. Glossary 12.7.5 Problem 5 - More and more lines are present on the print 12.7.5.1 Explanation Air bubbles are present in the varnish system. 12.7.5.2 Solution 12. Purge and wipe the system. To remove completly the air on the system you might have to make a manual pipe purge (8 seconds) of both manifold pipes and printhead pipes 12.7.6 Problem 6 - Varnish "spreads"...
- Page 157 JETVARNISH 3DS 13. Glossary 15. Reduce the printing substrate vacuum under the inkjet print heads. 12.7.7 Problem 5 - Varnish "spreads" at the end of the print as if it had been in contact with something during printing 12.7.7.1 Explanation The substrate is pressed against the printing belt.
-
Page 158: Glossary
Cleaning unit Unit to which the cleaning roller and paper transport roller are attached. Container Varnish reserve which feeds the JETVARNISH 3DS. Crop mark Symbol which enables the cameras (1 and 2) to locate the color print position on the printing substrate. - Page 159 JETVARNISH 3DS 13. Glossary Name Definition Main tank First tank into which varnish is pumped from the varnish container. and supplying the intermediate tank. Manifold Bar with drilled holes feeding the print heads. Manifold purging pipe Pipes intended to purge the manifold and intermediate tank.
- Page 160 JETVARNISH 3DS 13. Glossary Name Definition RCB-ICB communication cable RJ45 Ethernet cable which connects the RCB to the ICB. RCB-top printing detection cable Cable which connects the RCB to the printing substrate front edge detector. Side (right and left) stack cleats Guide to lock up the printing substrate stack sidewise at the printing substrate feeder infeed.
-
Page 161: Appendix
[3] Margin table centering/skew screen access button [4] Machine parameter screen access button [5] Print head maintenance screen access button [6] Buzzer enable/disable button [7] Technical menu/MGI mode service access button [8] Machine status message (warning + acknowledgment) [9] Back main menu User Manual... - Page 162 JETVARNISH 3DS 14. Appendix 14.1.2 Information screen The purpose of this screen is to give all machine information in particular the hours of use of the dryers. User Manual - 162 -...
- Page 163 JETVARNISH 3DS 14. Appendix 14.1.3 Margin table skew screen This screen purpose the skew and centring adjustment. User Manual - 163 -...
- Page 164 JETVARNISH 3DS 14. Appendix 14.1.4 Machine parameter screen This screen purpose the adjustment of the printing belt vacuum. putting into service the double sheet detection. User Manual - 164 -...
- Page 165 JETVARNISH 3DS 14. Appendix 14.1.5 Print head maintenance screen This screen purpose the various print head maintenance. User Manual - 165 -...
- Page 166 JETVARNISH 3DS 14. Appendix 14.1.6 Technical menu/MGI mode service This menu is reserved for technicians. a password it is necessary to access it. User Manual - 166 -...
-
Page 167: 3Ds Hub Manager Tree View
JETVARNISH 3DS 14. Appendix 14.2 3DS Hub Manager tree view User Manual - 167 -... - Page 168 JETVARNISH 3DS 14. Appendix User Manual - 168 -...
- Page 169 JETVARNISH 3DS 14. Appendix User Manual - 169 -...
- Page 170 JETVARNISH 3DS 14. Appendix User Manual - 170 -...
- Page 171 JETVARNISH 3DS 14. Appendix User Manual - 171 -...
- Page 172 JETVARNISH 3DS 14. Appendix See Print ON See Print ON See Print ON User Manual - 172 -...
- Page 173 JETVARNISH 3DS 14. Appendix User Manual - 173 -...
- Page 174 JETVARNISH 3DS 14. Appendix User Manual - 174 -...
- Page 175 JETVARNISH 3DS 14. Appendix User Manual - 175 -...
- Page 176 JETVARNISH 3DS 14. Appendix - end - User Manual - 176 -...
Need help?
Do you have a question about the JETVARNISH 3DS and is the answer not in the manual?
Questions and answers