
Related Manuals for ProofCam PC 105


Summary of Contents for ProofCam PC 105
- Page 1 PC 105 HD Dash Cam Designed and tested by experts INSTRUCTION MANUAL 2.0’’ 120° 32GB support Fo V...
- Page 2 Congratulations on choosing the PC 105 Forward Facing HD Dash Cam. Please read these instructions carefully before use.
-
Page 3: Table Of Contents
Contents Product Features Playing Back Videos and Photos Unpacking Play Video and Photo Screen Identification of Controls Playback Menu Options Preparing for Use Battery Warning and Installing the Dash Cam Installation Notes Connecting to Power Caution Powering the Dash Cam On / Off Warranty Set the Date / Time Specification... -
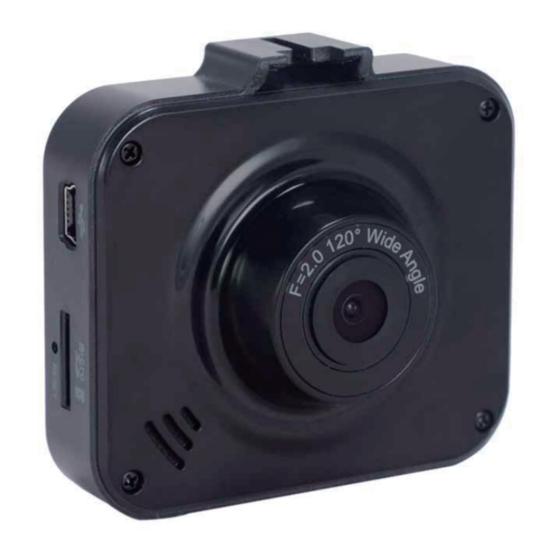
Page 4: Product Features P01
PC 105 HD Dash Cam Product Features › HD 720p Dash Cam › 1.3 Megapixel CMOS Sensor › 2.0” TFT Display › 120˚ Wide Angle Lens › Support up to 32GB Class10 Micro SD Memory Card › G-sensor Collision Recording Protection ›... -
Page 5: Identification Of Controls P02
Identification of Controls Controls: 1. Lens 7. REC/OK button 2. Power button 8. Up button 3. Mode button 9. Micro SD Card slot 4. Menu button 10. USB Port for power adaptor 5. LCD 11. Reset button 6. Down / Motion Detection button... -
Page 6: Preparing For Use P03
PC 105 HD Dash Cam Preparing for Use Battery Indicator and Charging Inserting the Micro SD Card (included) Follow the direction indicated on the dash cam to insert the Micro SD card, a click sound is heard indicating the Micro SD card is in position. -
Page 7: Installing The Dash Cam P04
2. Any excess cable can normally be tucked into the ceiling of the vehicle. We have a video to advise on how best to fit the PC 105 which is available at www.proofcam.com and visit “... -
Page 8: Powering The Dash Cam On / Off P05
If your vehicle in car power remains on after the car engine has been turned off, you may need to remove the car charger, or turn the PC 105 off using the power button. This is because if the in car power remains on, the PC 105 will not know that the engine has turned off. -
Page 9: Set The Date / Time P06
PC 105 off using the power button. This is because if the in car power remains... -
Page 10: Recording Screen P07
PC 105 HD Dash Cam Recording Screen Emergency File Protection Important: The RAC 107 records in segments onto the Micro SD card. The default segment duration is 2 minutes, which can be changed from the menu settings. For example, 1 hour of recording would generate 30 x 2 minute segments. - Page 11 NOTE: 1. The recording will stop automatically and the screen will show Micro SD card is full if the Micro SD card is full of protected files. To continue recording, please change a Micro SD card or delete the protected files manually.
-
Page 12: Motion Detection P09
PC 105 HD Dash Cam Motion Detection First, press REC/OK button to stop recording; Second, short press Down button to activate the Motion Detection function(the default setting is Off), the motion detection icon appears on the third icon positon on the left side of the screen, then standby for detection, it will recording automatically once the dash cam detects any motion in front of the lens, 5 second is a segment. -
Page 13: Video Menu Options P10
Video Menu Options Video Mode Function List Description Available Option 1080FHD 1920 x 1080 1080P 1440 x 1080 Setting for video resolution. 720P 1280 x 720 Resolution 720P 1280 x 720 is the default WVGA 848 x 480 settings. -
Page 14: Setup Menu Options P11
PC 105 HD Dash Cam Function List Description Available Option Setting to enable / disable the recording video voice. Off / On Off - Disables to record video without voice. Record Audio On - Enables to record video with voice. -
Page 15: Setup Mode P12
Setup Mode Function List Description Available Option DD / MM / YY Date / Time Set the system date & time. HH : MM : SS Set the automatic power off time when the dash cam is not recording or operating. - Page 16 PC 105 HD Dash Cam Function List Description Available Option Language Select the desired OSD language. English Frequency Set the suitable frequency. 50 Hz / 60 Hz Format the inserted Micro SD card videos and pictures. OK - Select this option completes the format process.
-
Page 17: Taking Picture P14
Taking Picture To take a picture make sure the Still Capture Mode is selected. Press the REC/OK button to take a photo. Photos are saved on the SD Card. Still Capture Screen 01521 1.3M Still SD Card Battery Remaining... -
Page 18: Still Capture Settings P15
PC 105 HD Dash Cam Still Capture settings Function List Description Available Option Single / 2S Timer / Capture Mode Set the photo zoom. 5S Timer / 10S Timer 12M 4032 x 3024 10M 3648 x 2736 8M 3264 x 2448 Set the photo resolution. -
Page 19: Playing Back Videos And Photos
Function List Description Available Option Set the photo effect. Auto / 100 / 200 / 400 -2.0 / -5/3 / -4/3 / -1.0 / Manual set the photo’s compensation -2/3 / -1/3 / +0.0 / +1/3 / Exposure for low or bright light levels. -
Page 20: Playback Menu Options P17
PC 105 HD Dash Cam Playback Menu Options Playback Function List Description Available Option This option allows for the deletion of one or more videos /photos from the memory card. Delete Current - This option allows a single video or photo to be deleted from... - Page 21 ONLY WITH THE SUPPLIED DC POWER LEAD AND AC ADAPTER FOR BATTERY CHARGING. To recycle your ProofCam Dash Cam unit, please take it to your local recycling centre. This product fully satisfies the requirements for CE marking when used in a residential, commercial or light industrial environment.
- Page 22 If you have a camera that requires service under warranty, then in the first instance you should return it to the retailer from whom it was purchased. Should you have any general or technical questions on your PC 105 Dash Cam, please email us at customer@proofcam.com. We will endeavour to answer your mail within 24 hours.
- Page 23 Specification LCD Display 2.0 inch TFT LCD monitor Image sensor 1.3MP View angle 120° Video Resolution 1920*1080 25fps / 1440*1080 25fps /1280*720 25fps Picture resolution 12M Interpolate Video format Picture format Memory Support Class 10 or higher rating Micro SD card,...
- Page 24 Important: It is your responsibility to make sure that you use the ProofCam Dash Cam in a safe and responsible manner. Do not access functions or change settings whilst you are driving, and the location and positioning of your ProofCam Dash Cam should not interfere with the driver’s field of vision.
Need help?
Do you have a question about the PC 105 and is the answer not in the manual?
Questions and answers