
Related Manuals for Radial Engineering HEADLIGHT


Summary of Contents for Radial Engineering HEADLIGHT
- Page 1 Guitar amp Selector Radial Engineering Ltd. 1588 Kebet Way, Port Coquitlam BC V3C 5M5 Tel: 604-942-1001 • Fax: 604-942-1010 • Email: info@radialeng.com...
-
Page 3: Table Of Contents
This allows the Headlight to be used as a typical ABY with two outputs, as a 3-output ABC switcher for clean rhythm and lead amps or switch between four amps to find the ultimate tone in the studio. -
Page 4: Features
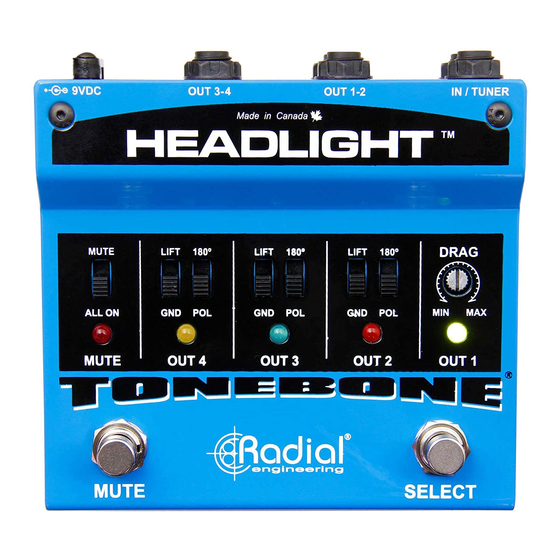
FEATURES INPUT: ¼” input used to connect a guitar or bass to the Headlight. TUNER: Dedicated separately buffered ¼” output is always-on, connects to tuner. OUTPUT-1: Default output and should always be used as it provides a safe ground path to the instrument. -
Page 5: Features
10. All-ON: Changes the MUTE footswitch function to ALL-ON when activated. 11. lIFT: Used to help reduce hum MUTE SELECT and buzz caused by ground loops. 12. 180º: Corrects the relative phase of one amp to another. Radial Engineering Ltd. Headlight™ User Guide... -
Page 6: Making Connections
Before making connections, ensure your amp is turned off or volume level turned down. This will eliminate connection transients from damaging more sensitive components. There is no power switch on the Headlight. As soon as you connect a 9V power supply, it will come to life. The Headlight em- ploys a typical 9V Boss ®... - Page 7 Plug your guitar into the Headlight INPUT using a standard ¼” coaxial guitar cable and connect your first amp to OUTPUT-1. Output-1 is the default amp and should always be connected as it provides a safety ground path to the guitar. Slowly turn up the volume on your amp to a comfortable listening 9VDC level.
-
Page 8: Connecting A Tuner
Tuner The Headlight is equipped with a dedicated TUNER OUTPUT and MUTE FOOTSWITCH. The tuner out is always on, allowing you to monitor your tuning on the fly or (using the footswitch) mute the signal going to the amps for quiet on-stage tuning. Having a separately buffered, dedicated tuner out helps eliminate clocking noise that can become audible if using an ultra-high gain amp. -
Page 9: All Amps On
To do this, set the MUTE/ALL-ON on the left side to the downward position. For instance, in this mode, with two amps connected you can now set the Headlight up as an ABY switcher. The right hand select footswitch will now toggle between output-1 and output-2 while the mute footswitch will turn them both on at the same time. -
Page 10: Lifting The Ground
As Radial Engineering Ltd is unable to control what is being connected to the Headlight, you agree to take full responsibility for its safe use and agree that Radial Engineering Ltd. -
Page 11: Adjusting The Phase
AdJUSTING THE PHASE Another important feature on the Headlight is the 180º polarity reverse switch that is found on outputs 2, 3 and 4. This is used to reverse the polarity of the amp that is connected as a means to bring all of your amps into the same absolute phase. -
Page 12: Setups
You can then add effects pedals before or after the Headlight to create various 9VDC Made in Canada 9VDC... - Page 13 9VDC Made in Canada between channels 9VDC OUT 3-4 OUT 1-2 IN / TUNER HEADLIGHT You can also use the Headlight to toggle between two channels if you do DRAG MUTE LIFT LIFT LIFT not have channel switching capabilities. ALL ON...
-
Page 14: Specifications
Construction: ................ 14 gauge steel chassis & outer shell Size (LxWxD): ................5” x 4.9” x 2” (127 x 124 x 51mm) Weight: .......................2 lbs (907 grams) Warranty: ....................Radial 3-year, transferable * Subject to change without notice. Radial Engineering Ltd. Headlight™ User Guide... -
Page 15: Block Diagram
ALL ON MUTE PHASE REV OUT 2 DRAG GND LIFT BUFFER INPUT OUTPUT PHASE REV SELECT SWITCH OUT 3 GND LIFT TUNER PHASE REV OUT 4 GND LIFT * Subject to change without notice. Radial Engineering Ltd. Headlight™ User Guide... - Page 16 3 YEAR TRANSFERABlE WARRANTY RADIAL ENGINEERING LTD. (“Radial”) warrants this product to be free from defects in material and workmanship and will remedy any such defects free of charge according to the terms of this warranty. Radial will repair or replace (at its option) any defective component(s) of this product (excluding finish and wear and tear on components under normal use) for a period of three (3) years from the original date of purchase.
Need help?
Do you have a question about the HEADLIGHT and is the answer not in the manual?
Questions and answers