Table of Contents
Advertisement
Quick Links
Advertisement
Table of Contents

Related Manuals for Philips FW-R7


Summary of Contents for Philips FW-R7
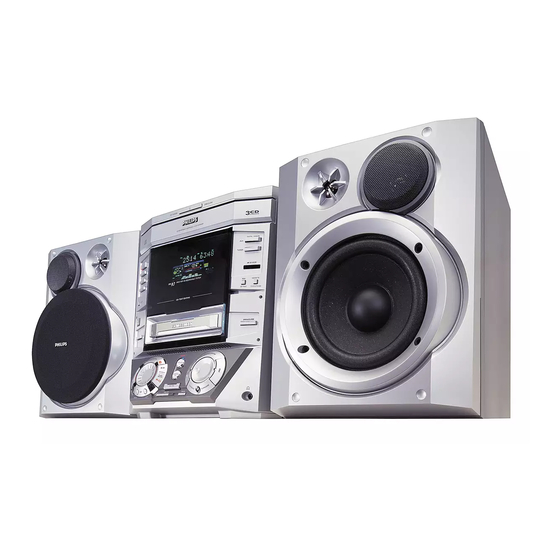
- Page 1 FW-R7 CDR Mini Hi-Fi system...
-
Page 2: How To Connect Plug
See Copyright Act 1956 and The Performer’s Protection Acts 1958 to 1972. Italia DICHIARAZIONE DI CONFORMITA’ Si dichiara che l’apparecchio FW-R8 Philips risponde alle prescrizioni dell’art. 2 comma 1 del D. M. 28 Agosto 1995 n. 548. Fatto a Eindhoven Philips Consumer Electronics... - Page 3 English ...4 Français...32 Español ...60 Deutsch...88...
-
Page 4: Table Of Contents
As an ENERGY STAR ® partner, Philips has determined that this ® product meets the ENERGY STAR guidelines for energy efficiency. his set complies with the radio interference... -
Page 5: Discs For Recording
Recording is permissable insofar as copyright or other rights of third parties are not infringed upon. In some countries the use of the Philips CDR Mini Hi-Fi system as shown or suggested in this user manual may require the authorization of copyright holders. -
Page 6: Controls And Connections
CONTROLS AND CONNECTIONS & STANDBY CD 1 CD 2 CD 3 DISPLAY On the back 1 AC MAINS ~ ...After all other connections have been made, connect the mains lead to the wall socket. For optimal performance use only the original mains cable. -
Page 7: Controls And Connections
On the front 0 Source selection CD 1, CD 2, CD 3 ...selects the CD changer, switches to CD 1, CD 2 or CD 3 CDR...selects the CD recorder TUNER...selects the tuner DIGITAL / ANALOG AUX ...selects the input for an additional appliance ! ...CD changer tray @ OPEN/CLOSE...opens and closes the... -
Page 8: Installation
INSTALLATION Mains The type plate is located on the rear of the set. 1 Check whether the mains voltage as shown on the type plate corresponds to your local mains voltage. If it does not, consult your dealer or service organisation. 2 Make sure all connections have been made before switching on the mains supply. -
Page 9: Analogue Audio Connections
CD PLAYER CD RECORDER Analogue audio connections AUX IN L/R It is possible to use an additional appliance, e.g. tape recorder, TV or VCR with the set. 1 Insert the red plug of a cinch cable to the red socket AUX IN R and the white plug to the white socket AUX IN L. -
Page 10: Remote Control
REMOTE CONTROL Remote control buttons 2 ...switches the set to standby CDR, TUNER, CD1, CD2, CD3, AUX...selects the sources Number/alphabet keys 1–0 ...keys in numbers for tracks or stations ABC – XYZ ...keys in letters for text SPACE ...keys in a space within the text EDIT TEXT ...enters the text edit menu -VOLUME...decreases the volume +VOLUME...increases the volume... -
Page 11: Display
Display The display of the set is divided into 3 sections, which show you the following: Information area PRESET PRESET STEP STEP TOTAL TOTAL TRACK TRACK TIME TIME TOTAL TOTAL CD CHANGER CD CHANGER CD RECORDER CD RECORDER COMPILE CDC COMPILE CDC CD R W CD R W... -
Page 12: Basic Functions
BASIC FUNCTIONS ATIBLE • 3 CD CHAN CD REWR ITABLE COMP STANDBY CD 1 CD 2 CD 3 E MIN I HIF I SYS CD REC ORD ABL FW - DISPLAY Switching on, switching to standby • To switch the set on press y STANDBY ON on the set. •... -
Page 13: Sound Control
Sound control Volume adjustment • Adjust the volume by using MASTER VOLUME (-VOLUME/+on the remote control). The volume level in (decibel) is displayed. Digital Sound Control enables you to select different preset sound settings. • Press DSC repeatedly to select the desired sound characteristics. -
Page 14: Selecting A Disc On The Cd Changer
BASIC FUNCTIONS Selecting a disc on the CD changer • Press either CD 1, CD 2 or CD 3 to select a particular disc. Selecting a track and searching Selecting a track during playback • Rotate JOG CONTROL (pressí or ë on the remote control) to skip to the beginning of the previous or next track on the selected disc. -
Page 15: Program
Programming track numbers You can select tracks and store them either in the CD changer or CD recorder memory. If you use the program for playback you can choose one of the two memories, else if you like to specify tracks for recording, use the CD changer memory only! You can store any track more than once. -
Page 16: About Recording
ABOUT RECORDING Basic information The CD recorder deck offers you 3 main functions: – Recording from the internal CD changer and tuner or from a selected external source – Finalizing your CDR(W) discs and unfinalizing your CDRW discs – Erasing a CDRW disc The recording procedure is the same for CDR and CDRW discs. -
Page 17: Internal Recording
Recording modes For internal recordings you can record from the internal CD changer or tuner. You can choose from the following recording modes: – High speed recording and automatic finalizing: Fast and easy! Record and finalize your CDR(W) in one quick step while the sound is muted. -
Page 18: High Speed Recording
INTERNAL RECORDING STANDBY CD 1 CD 2 CD 3 I SYS TEM BLE MIN I HIF CD REC OR DA FW - DISPLAY High speed recording High speed recording of an entire disc, a track, a program or a track edit 1 Make sure the CDR(W) is absolutely free of scratches and dust particles. -
Page 19: Manual Recording
STANDBY CD 1 CD 2 CD 3 I SYS TEM BLE MIN I HIF CD REC OR DA FW - DISPLAY Manual recording Manual recording from the FM tuner 1 Make sure the CDR(W) is absolutely free of scratches and dust particles. -
Page 20: External Recording
EXTERNAL RECORDING STANDBY CD 1 CD 2 CD 3 I SYS TEM BLE MIN I HIF CD REC OR DA FW - DISPLAY Analogue or digital recording? When making recordings from an external source, we recommend to do analogue recording only if digital recording is not possible. -
Page 21: Manual Recording
Manual recording Manual recording from an external source 1 Make sure the CDR(W) is absolutely free of scratches and dust particles. 2 Press repeatedly DIGITAL / ANALOG AUX to select the input for the external source you want to record from. is displayed if the digital input is selected. -
Page 22: (Un)Finalizing, Erasing
(UN)FINALIZING, ERASING Finalizing CDR(W) discs Finalizing a CDR(W) disc is a simple procedure, necessary to: – play a recorded CDR on a standard CD player, – play a recorded CDRW on a CDRW compatible CD player and CD recorder, – avoid further unwanted recordings on a disc, or –... -
Page 23: Erasing From A Cdrw Disc
Erasing from a CDRW disc It is possible to erase one or more tracks (starting from the end of the last track) or the entire CDRW. Erasing an entire CDRW 1 Insert the CDRW you want to erase in the CD recorder tray. 2 Press CDR to select the CD recorder. -
Page 24: Features
FEATURES EDIT TEXT (on CD recorder only) Storing text during stop mode After you have recorded your CDR(W) you can enter a text e.g. names to discs and tracks. The text will be displayed during playback. You can enter up to 60 characters per text field. Only use an unfinalized CDR or CDRW (finalized CDRW must be unfinalized first). -
Page 25: Track Editing (On Cd Changer Only)
Erasing text 1 Press EDIT TEXT to enter the text edit menu. is blinking, CD TEXT EDIT 2 Rotate JOG CONTROL to select the text erase menu. is displayed. 3 Press YES to confirm. 4 Rotate JOG CONTROL to select one of the following: : All text of the selected disc is chosen to be erased in one step. -
Page 26: Tuner
TUNER ATIBLE • 3 CD CHAN CD REWR ITABLE COMP STANDBY CD 1 CD 2 CD 3 E MIN I HIF I SYS CD REC ORD ABL FW - DISPLAY Tuning to radio stations 1 Press TUNER to select the tuner. is scrolled. -
Page 27: Rds
N E W R D S C L O C SY ST EM AB LE MI NI HI FI C D T E This feature Radio Data System is a service that allows FM stations to send additional information along with the regular FM radio signal. -
Page 28: Clock/Timer
CLOCK/TIMER ATIBLE • 3 CD CHAN CD REWR ITABLE COMP STANDBY CD 1 CD 2 CD 3 E MIN I HIF I SYS CD REC ORD ABL FW - DISPLAY Clock setting It is possible to set the clock by using a time signal which is broadcast together with the RDS signal. -
Page 29: Alarm Timer
You can select different timer functions which will be activated at a chosen time. Make sure the clock is set before using one of these features. Alarm timer Alarm timer setting The set can be used as an alarm clock, whereby the tuner, CD recorder or CD changer starts playback automatically at a preset time. -
Page 30: Technical Data
TECHNICAL DATA Subject to modification without notice. General AC Power...220–240 V / 50 Hz Power consumption Active...81 W Standby...< 22 W Economy power save mode ...< 2 W Dimensions, w h d ...265 310 400 mm Weight (without speakers) ...9 kg Amplifier Output power...2 100 W MPO, 2 50 W RMS, 6 , 1 kHz, THD 10%... -
Page 31: Troubleshooting
WARNING Under no circumstances should you try to repair the set yourself as this will invalidate the guarantee. Do not open the set as there is a risk of electric shock. If a fault occurs, first check the points listed, before taking the set for repair. - Page 32 Meet Philips at the Internet http://www. philips.com CLASS 1 LASER PRODUCT 3103 306 1690.1 FW-R7 VieEvS0010...