Table of Contents
Advertisement
Quick Links
Assembly Instructions
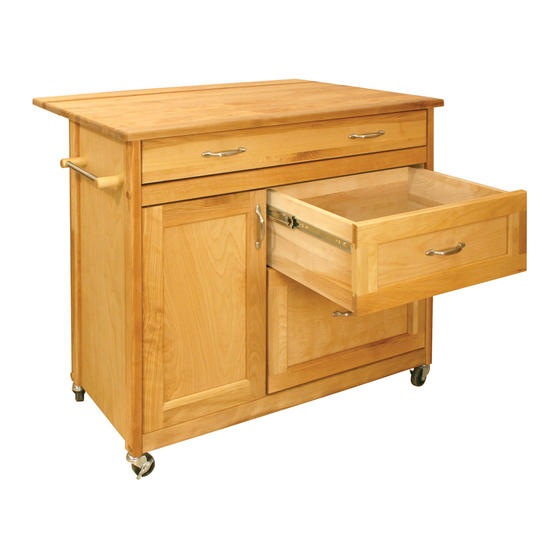
Model 15218
Deep Drawer Island
GENERAL:
1. You have purchased model 15218.
2. Should you need assistance or need to replace a damaged or missing part simply give us a call
M-F at 607-652-7321 from 7:30 am - 4:30 pm Eastern and we'll send you the prepaid part via UPS
usually that same day! You may also email us: info@catskillcraftsmen.com.
3. Read the assembly instructions and the enclosed brochure before beginning assembly. Assembly is
easy if you read and follow the instructions step by step. See our website for instructions and assembly
videos: www.catskillcraftsmen.com.
4. The only tools needed are a hammer, medium and small Phillips head screwdrivers and a pencil.
A power screwdriver will speed assembly, but is not required.
5. Glides are sometimes pre-packed with screws. These are not used.
6. Instructions (left/right, top/bottom) are given as you face an assembled unit.
Advertisement
Table of Contents

Related Manuals for CATSKILL 15218


Summary of Contents for CATSKILL 15218
- Page 1 Deep Drawer Island GENERAL: 1. You have purchased model 15218. 2. Should you need assistance or need to replace a damaged or missing part simply give us a call M-F at 607-652-7321 from 7:30 am - 4:30 pm Eastern and we’ll send you the prepaid part via UPS usually that same day! You may also email us: info@catskillcraftsmen.com.
- Page 2 Top Drawer Front (1) Top Right Drawer Side (1) P/N DF-15218 P/N Top DS-15218/R Top & Bottom Front Braces (2) P/N B34 1/4 / 2 1/2 /BOT-15218 Top Drawer Back (1) Top Left Drawer Side (1) P/N DBK-15218 P/N Top DS-15218/L...
-
Page 3: Table Of Contents
Hardware List Model 15218 To ease assembly, sort and count the hardware before getting started. Nickel Handle (5) (Cabinet Assembly) 10-24 Hex Nut (8) 1 3/4” Phillips Flat Head Bolt (8) 3/16” Flat Washer (13) (Drawer Backs Table Top Sticks) 1 1/4”... - Page 4 STEP 1A - Important - Please Read These Instructions Carefully! Attach Glides to Side Panels 1. Remove the drawer side Push this lever down, then section of the glide by pushing slide the inner glide section the black lever down and out of the glide assembly.
-
Page 5: 1/4" Phillips Flat Head #8 Screw
STEP 1B IMPORTANT - There is a right and a left side panel. Lay them out as shown below. Pay close attention to the glides so that they are properly positioned when attaching to the side panels. Review Step 1A for specific instructions on the full extention glides. Attach L Brackets with 5/8”... - Page 6 TIPS ON HOW THE BASTION FASTENING SYSTEM WORKS 1. The Bastion fastening system consists of a steel post (threaded on one end with a hole through the shaft on the other end); a Barrel Nut (cylindrical barrel-shaped with Illustration Bas. 1 threaded open end &...
- Page 7 STEP 2 A. Attach the Top Drawer Back to the Drawer Sides with four 1 1/4” #8 screws. There are left and right sides. Make sure the slots that run the length of the Sides are aligned with the slot in the Drawer Back to accept the Drawer Bottom.
- Page 8 STEP 3 Perform a similar drawer assembly as Step 2 for the lower drawers. A. Using 1-1/4” #8 screws, attach the drawer back to the drawer sides as shown below. B. Slide the drawer bottom into the slots. C. Insert Bastion Posts into the drawer front and tighten into position. D.
-
Page 9: 1" Truss Head Machine Screw
STEP 4 A. Tap/insert ONE 1 1/2” pin into each end of the door. DON’T OVERDRIVE PINS! Pins should stick up about 1/2” when seated. Ok if loose. B. Attach the magnet plate (may be stuck to magnet in the hardware pack!) with a 1/2” #4 screw to the top of the door. -
Page 10: 1" Long 3/16" Dia. Steel Pin
STEP 6 A. Tap/insert 3/4” pin into each long edge of the center divider. DON’T OVERDRIVE PINS! Pins should stick up about 1/4” when seated. Ok if loose. B. Attach the magnet with 1/2” #4 screws to the top of the door. C. -
Page 11: Metal Middle Shelf Pin
STEP 7 A. Lay Back Panel flat on a smooth surface with holes up. B. Attach Side Panels with 1 3/4” machine screws (bolts) and hex nuts. After inserting bolts(s) thru the holes in the Side Panels, thru the holes in the long edges of the Back Panel, place a hex nut on the tip of your finger, align nut with bolt and tighten. -
Page 12: Casters
STEP 9 A. Fit a washer onto the bottom door pin and slide the pin into the bottom front brace. B. Loosely secure the left side of the Top Front Brace with a 1 3/4” machine screw/nut after inserting the top door pin into the hole in the bottom edge of the brace. - Page 13 STEP 11 A. Upright unit. B. Attach Towel Bars to the Side Panels with 1” #8 screws from inside each Side Panel. Place a washer over the screws. STEP 12 A. Assemble top by placing the top and the drop leaf upside down on a smooth flat surface. Install hinges using 5/8 #8 screws.
- Page 14 STEP 13 Slide the lower drawers into place. In initially seating the glides the drawer will stop about 2/3 of the way in when the glides hit the plastic tabs. At this point just shove the drawer in with a little force.
- Page 15 STEP 15 A. Slide the top drawer into the front of the cart. B. Retighten all 1 3/4 in. machine screws and nuts. Tap in the 5/8 wooden plugs into the holes on the legs. C. Illustration 15B shows completed 1521. ILLUSTRATION 15A ILLUSTRATION 15B...
- Page 16 Catskill Craftsmen’s factory. For Please send me______# of bottle(s) of the one eight ounce (8 fl. oz.) bottle, which Catskill Craftsmen Butcher Block Oil at $6.95 is sufficient for two applications, simply per bottle. My check or money order is send $6.95 along with the completed...
Need help?
Do you have a question about the 15218 and is the answer not in the manual?
Questions and answers