Table of Contents
Advertisement
50
/
ECMP
MODEL
MODELO
Instruction Manual with Recipes
MR. COFFEE
Espresso &
®
Cappuccino Maker
READ ALL INSTRUCTIONS BEFORE USING THIS APPLIANCE
Manual de Instrucciones con Recetas
Cafetera Para Cafe Expreso
y Capuchino MR. COFFEE
®
LEA TODAS LAS INSTRUCCIONES ANTES USAR ESTE APARATO
WWW.MRCOFFEE.COM
911
BVMC-ECMP50_15ESM1.indd 1
10/12/14 9:56 AM
Advertisement
Table of Contents

Related Manuals for Mr. Coffee ECMP50


Summary of Contents for Mr. Coffee ECMP50
- Page 1 Espresso & ® Cappuccino Maker READ ALL INSTRUCTIONS BEFORE USING THIS APPLIANCE Manual de Instrucciones con Recetas Cafetera Para Cafe Expreso y Capuchino MR. COFFEE ® LEA TODAS LAS INSTRUCCIONES ANTES USAR ESTE APARATO WWW.MRCOFFEE.COM BVMC-ECMP50_15ESM1.indd 1 10/12/14 9:56 AM...
-
Page 2: Important Safeguards
Return this appliance only to the nearest authorized MR. COFFEE Service Center for examination, repair or adjustment. ® 7. The use of accessory attachments not recommended for MR. COFFEE products may result ® in fire, electric shock or injury to persons. -
Page 3: Special Cord Instructions
IN ORDER TO AVOID POSSIBLE BURNS TO BODY PARTS AND/OR OTHER INJURY FROM HOT STEAM AND WATER OR DAMAGES TO THE UNIT, NEVER REMOVE THE WATER RES- ® ERVOIR OR THE BREW BASKET WHILE YOUR MR. COFFEE ESPRESSO/CAPPUCCINO MAKER IS BREWING COFFEE OR FROTHING. THE SIDE KNOB SHOULD BE IN THE OFF POSITION “... -
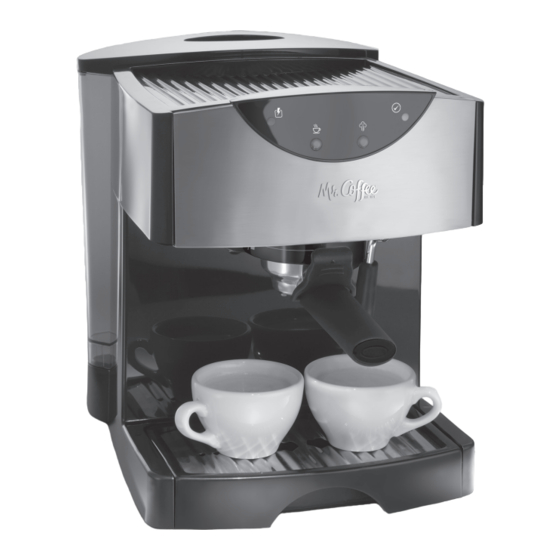
Page 4: Diagram Of Parts
DIAGRAM OF PARTS team utton With ater eservoir ndicator ight reen oWer ndicator utton ight With ndicator eady ndicator emovaBLe arge Lear ight reen ight reen ater eservoir ontroL rothing iLter etention asket rothing iLter oLder utton emovaBLe iLters easuring cooP 1 &... - Page 5 INTRODUCTION Congratulations! You have selected a quality MR. COFFEE Espresso/Cappuccino Maker. ® This unique appliance has been designed to provide you with delicious espresso/cappuccino quickly and conveniently. Espresso is a unique method of coffee brewing in which hot water is forced through finely ground coffee.
- Page 6 HOW TO PREPARE QUALITY ESPRESSO AND CAPPUCCINO AT HOME COFFEE TIPS The coffee should be freshly ground and dark roasted. You may want to try a French or Italian roast. Pre-ground coffee will only retain its flavor for 7 – 8 days, provided it is stored in an airtight container and in a cool, dark area.
-
Page 7: Brewing Espresso
1. Make sure the unit is switched off “O” and the side knob is in the off position “ ”. 2. Fill the reservoir with water, you may either use bottled water or a jar to fill it up or remove it from the unit and then fill it up under the tap. -
Page 8: How To Make Cappuccino
5. Once the ready light becomes solid green, press the brew button “ ” and then rotate the side knob counter-clockwise to the brew “ ” position. This will initiate the brewing process and espresso will begin to flow in just seconds. NOTE: If the brew and steam buttons begin to flash, after the side knob is rotated the unit has informed you that the instructions were not followed correctly. -
Page 9: Cleaning Your Espresso/ Cappuccino Maker
1. The first step in making cappuccino is to make espresso. Therefore, fill the water reservoir with cold water. Never use warm or hot water to fill the water reservoir. 2. Follow the steps in the “HOW TO BREW ESPRESSO” section at the bottom of page 5. 3. - Page 10 4. Discard the remaining water by removing the reservoir and turning it upside down over the sink. It is recommended to empty the water reservoir between uses and use fresh water for each brew. Do not immerse appliance in water. 5.
- Page 11 2. Make sure all controls are in the off position and the power cord is disconnected from the electrical outlet. (See Section “CAUTION” on Page 4). Fill the reservoir with white vinegar above the minimum level into reservoir. 3. Insert the brew basket (with filter) and place jar/carafe or regular cup on top of the drip tray and under the brew basket.
-
Page 12: Problems And Causes
PROBLEMS AND CAUSES PROBLEM CAUSES SOLUTIONS Coffee does • No water in reservoir. • Add water. not come out • Coffee grind is too fine. • Grind coffee medium ground. • Too much coffee in the filter. • Fill filter with less coffee. •... - Page 13 RECIPE IDEAS THAT YOU WILL LOVE TO TRY! CAFÉ LATTE CAFÉ MOCHA 1/4 espresso and 3/4 steamed milk, 30 ml (1oz.) of chocolate syrup, one shot pour both in a mug at the same time of espresso, 237 ml (1 cup) frothed milk CAFÉ...
-
Page 14: Year Limited Warranty
YEAR LIMITED WARRANTY Sunbeam Products, Inc. doing business as Jarden Consumer Solutions or if in Canada, Sunbeam Corporation (Canada) Limited doing business as Jarden Consumer Solutions (collectively “JCS”) warrants that for a period of one year from the date of purchase, this product will be free from defects in material and workmanship. JCS, at its option, will repair or replace this product or any component of the product found to be defective during the warranty period. -
Page 15: Precauciones Importantes
5. NO opere ningún artefacto con un cable o enchufe dañado, después de que el artefacto haya fallado o si se cae al suelo o se daña de cualquier otra manera. Regrese el artefacto al Centro de Servicio MR. COFFEE® Autorizado más cercano para examinarlo, repararlo o para ajustarlo mecánica o eléctricamente. - Page 16 IN ORDER TO AVOID POSSIBLE BURNS TO BODY PARTS AND/OR OTHER INJURY FROM HOT STEAM AND WATER OR DAMAGES TO THE UNIT, NEVER REMOVE THE WATER RES- ® ERVOIR OR THE BREW BASKET WHILE YOUR MR. COFFEE ESPRESSO/CAPPUCCINO MAKER IS BREWING COFFEE OR FROTHING. THE SIDE KNOB SHOULD BE IN THE OFF POSITION “...
- Page 17 DIAGRAM OF PARTS team utton With ater eservoir ndicator ight reen oWer ndicator utton ight With ndicator eady ndicator emovaBLe arge Lear ight reen ight reen ater eservoir ontroL rothing iLter etention asket rothing iLter oLder utton emovaBLe iLters easuring cooP 1 &...
- Page 18 INTRODUCTION Congratulations! You have selected a quality MR. COFFEE Espresso/Cappuccino Maker. ® This unique appliance has been designed to provide you with delicious espresso/cappuccino quickly and conveniently. Espresso is a unique method of coffee brewing in which hot water is forced through finely ground coffee.
- Page 19 HOW TO PREPARE QUALITY ESPRESSO AND CAPPUCCINO AT HOME COFFEE TIPS The coffee should be freshly ground and dark roasted. You may want to try a French or Italian roast. Pre-ground coffee will only retain its flavor for 7 – 8 days, provided it is stored in an airtight container and in a cool, dark area.
- Page 20 1. Make sure the unit is switched off “O” and the side knob is in the off position “ ”. 2. Fill the reservoir with water, you may either use bottled water or a jar to fill it up or remove it from the unit and then fill it up under the tap.
- Page 21 5. Once the ready light becomes solid green, press the brew button “ ” and then rotate the side knob counter-clockwise to the brew “ ” position. This will initiate the brewing process and espresso will begin to flow in just seconds. NOTE: If the brew and steam buttons begin to flash, after the side knob is rotated the unit has informed you that the instructions were not followed correctly.
- Page 22 1. The first step in making cappuccino is to make espresso. Therefore, fill the water reservoir with cold water. Never use warm or hot water to fill the water reservoir. 2. Follow the steps in the “HOW TO BREW ESPRESSO” section at the bottom of page 5. 3.
- Page 23 4. Discard the remaining water by removing the reservoir and turning it upside down over the sink. It is recommended to empty the water reservoir between uses and use fresh water for each brew. Do not immerse appliance in water. 5.
- Page 24 2. Make sure all controls are in the off position and the power cord is disconnected from the electrical outlet. (See Section “CAUTION” on Page 4). Fill the reservoir with white vinegar above the minimum level into reservoir. 3. Insert the brew basket (with filter) and place jar/carafe or regular cup on top of the drip tray and under the brew basket.
-
Page 25: Problemas Y Causas
PROBLEMAS Y CAUSAS PROBLEMA CAUSA SOLUCCIONES El café no sale • No hay agua en el depósito. • Añada agua. • El café está molido demasiado fino. • Muela los granos de café a un termino medio. • Hay demasiado café en el filtro. •... - Page 26 ¡IDEAS DE RECETAS QUE LE ENCANTARÁ PROBAR! CAFÉ LATTE CAFÉ CON CHOCOLATE 1/4 expreso y 3/4 leche 30 ml (1 onza) de jarabe de chocolate, vaporizada,vierta ambos en una taza al una parte de expreso, 237 ml (1 taza) de mismo tiempo espuma de leche CAFÉ...
-
Page 27: Garantía Limitada De 1 Año
GARANTÍA LIMITADA DE AÑO , s t , . c o j a o i t , á d i t a (Canada) Limited, operando bajo el nombre de Jarden Consumer Solutions (colectivamente “JCS”), garantiza por un periodo de un año desde la fecha de compra, que este producto no tendrá defectos de material ni mano de obra JCS, a su elección, reparará... - Page 28 ©2015 Sunbeam Products, Inc. doing business as Jarden Consumer Solutions. All rights reserved. Distributed by Sunbeam Products, Inc. doing business as Jarden Consumer Solutions, Boca Raton, Florida 33431. Sunbeam Products, Inc.is a subsidiary of Jarden Corporation (NYSE:JAH). ©2015 Sunbeam Products, Inc. operando bajo el nombre de Jarden Consumer Solutions. Todos los derechos reservados.
Need help?
Do you have a question about the ECMP50 and is the answer not in the manual?
Questions and answers