Table of Contents
Advertisement
Advertisement
Table of Contents

Summary of Contents for Centsys D2 Turbo
- Page 1 D2 Turbo and D2 Turbo Low-Voltage User Guide DOMESTIC SLIDING GATE MOTOR...
- Page 2 The equipment is installed worldwide and is available through a network of competent distributors and installers. Further information is available on our website www.CentSys.com.au Centurion Systems (Pty) Ltd reserves the right to make changes to the products described in this manual without notice and without obligation of Centurion Systems (Pty) Ltd to notify any persons of any such revisions or changes.
-
Page 3: Table Of Contents
Contents IMPORTANT SAFETY FEATURES page 1 IMPORTANT SITE CONSIDERATIONS page 2 Introduction page 3 D2 Turbo/D2 Turbo Low-Voltage Overview page 3 Identification of Parts page 4 Manual Override page 5 2.1. Disengage the Gearbox/Drive page 5 2.2. Re-engage the Gearbox/Drive... - Page 4 Examples: page 18 A. Setting up the gate limits page 19 B. Remote control administration page 20 C. Adding CentSys code-hopping remote controls D. Deleting specific remote controls page 21 page 22 E. Deleting ALL remote controls page 23 F. Setting the Autoclose feature page 25 G.
-
Page 5: Important Safety Features
Even if you have owned and used an automated gate before, we suggest that you read through the safety instructions below very carefully. Although years of thought have been put into every CentSys product - and your safety is our top priority – accidents do happen. So, please make sure that you fully understand the following safety requirements before using your automated gate. -
Page 6: Important Site Considerations
IMPORTANT Site Considerations for the D2 Turbo Low-Voltage Before you attempt to use your new gate motor for the first time, you should know: At no point must 220V be supplied to the system! This is a low-voltage model and connecting a voltage supply that... -
Page 7: Introduction
– even when the power is out. For increased power capacity you can install a larger, 7Ah battery (your D2 Turbo was designed to cater for this), or you can even use a solar panel to power it. -
Page 8: Identification Of Parts
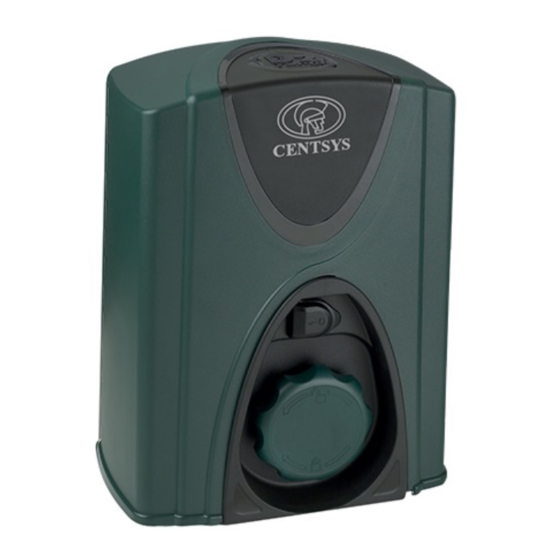
Identification 1. Identification of Parts Parts Refer to the drawings below, for how to identify your D2 Turbo/ D2 Turbo Low-Voltage motor and its parts. 1. Motor fuse 2. Motor enclosure unit 3. Camlock cover 4. Manual elease thumbwheel 5. Foundation plate 6 . -
Page 9: Manual Override
2. Manual Override 2.1. Disengaging the Manual gearbox/drive Override To manually override the motor you will need to: Open the camlock cover, insert the camlock key and rotate it 90° clockwise (the motor cover can also be removed at this stage if so desired). -
Page 10: Features And Functions
FIGURE 5. 3.1.2. Modes of Operation To operate the gate to open fully, the D2 Turbo has three modes to choose from depending on the application. Only one mode can be selected at any given time. 3.1.2.1. Standard Mode Standard Mode is the most commonly used mode for domestic applications as it allows full control of the gate. -
Page 11: Open Only Mode
We highly recommend that a pair of photocells installed across the gate entrance and connected to the losing afety eam input on the D2 Turbo if you select Open Only Mode. This will prevent the gate from closing on people, pets or vehicles. (page... -
Page 12: Automatic Closing (Autoclose Mode)
3.1.3. Automatic Closing (Autoclose Mode) The D2 Turbo has the facility to automatically close the gate after it has opened (Autoclose Mode). The time that the gate stays open is by default fifteen seconds, but this time-period can be set to be five, ten, fifteen, thirty, or forty-five seconds. -
Page 13: Pedestrian Opening
If the Courtesy Light (page ) is connected to the D2 Turbo control card, it will flash indicating that the gate will open approximately one metre. The gate will close after a default time of five seconds. -
Page 14: Pirac Mode (Beam Autoclose) - Optional
3.1.5. PIRAC Mode (Beam Autoclose Mode) - optional This mode can only be used if a Closing Photocell (page 13 is fitted. This mode can be used in conjunction with any of the Operating Modes - Features Standard, Open Only and Reversing Modes. Functions Gate opening... -
Page 15: Holiday Lockout Mode
When Holiday Lockout is enabled, any of the access control devices that are connected to the D2 Turbo will be rendered inactive. Not even tampering with the keyswitch or keypad on the outside of the property will open the gate –... -
Page 16: Positive Close Mode
3.1.8. Speed Profiles There’s no substitute for speed! The D2 Turbo can be set to run in either a High Speed Mode (default) which is approximately 24 metres per minute, or a Low Speed Mode which is approximately 16 metres per minute. -
Page 17: Photocell(S) (Optional, But Recommended Feature)
The typical device is a pair of infrared photocells which can detect the presence of any vehicle, person or pet that breaks the beam and Features communicates back to the D2 Turbo that something is in the path of Functions the gate. -
Page 18: Courtesy (Pillar) Light Timer (Optional Feature)
Using the Pedestrian Opening feature will cause the Courtesy (Pillar) Lights to flash three times before the gate opens. *The cabling that supplies the supply to the D2 Turbo must be suitably sized to carries the additional load of the Courtesy (Pillar) Lights or a separate power source must be utilised. -
Page 19: External Gate Status Indication Led
If you choose not to fit a Gate Status Indicator, the status LED on the controller can also be used for troubleshooting. 3.1.13. Battery-low Protection The D2 Turbo controller has circuitry that monitors the state of the battery. During a power failure, energy is drawn from the battery but not replaced. -
Page 20: Customising The Features And Functions
4. Customising the Features and Functions ‘Simplicity is the ultimate sophistication’. ~ Leonardo Da Vinci The D2 Turbo controller makes ordinarily complex settings as quick and easy as possible. Using the Function and Setting Dials, the select/Toggle pushbutton , and the bi-colour (red and green) status LED you can set up the many features and functions in a flash. - Page 21 Then move the Setting Dial to the preferred setting. FIGURE 22. Customising Features If a setting is for a single fixed value, for example, 15 seconds Functions Autoclose time, then the Select pushbutton acts as a select for that single choice. However, if the setting has two options, for example On/Off or Hi/Lo then the pushbutton acts...
-
Page 22: Setting Up The Gate Limits
Examples: A. Setting up the gate Limits This is usually performed by an installer at the end of the installation. However, should you need to change these settings, you can do this by simply following these steps: Step 1: Ensure the gate is in the fully closed position and the motor drive is engaged. -
Page 23: Remote Control Administration
FIGURE 31. It’s important to note that the other devices cannot be activated with the new shift button, only the D2 Turbo (and other CentSys operators that are equipped with an onboard receiver) is able to recognise the shift button signals. -
Page 24: Adding Centsys Code-Hopping Remote Controls
C. Adding CentSys code-hopping remote controls To add a CentSys code-hopping remote control to the onboard receiver and assign a button to any specific function as described on the previous page, follow the steps below: Step 1: Rotate the Function Dial to the REMOTES position (B). -
Page 25: Deleting Specific Remote Controls
D. Deleting specific remote controls To delete specific remote controls from the D2 Turbo onboard receiver follow the steps below: Step 1: Rotate the Function Dial to the REMOTES position (B). Step 2: Rotate the Setting Dial Customising to DELETE Tx along the ‘B’ row of options. -
Page 26: Deleting All Remote Controls
E. Deleting ALL remote controls To delete all the learned-in remote controls from the D2 Turbo onboard receiver follow the steps below: Step 1: Rotate the Function Dial to the REMOTES position (B). Step 2: Rotate the Setting Dial to the DELETE ALL position Customising along the ‘B’... -
Page 27: Setting The Autoclose Feature
F. Setting the Autoclose feature The Autoclose feature can be selected to be either Off or Activated, with a pre-selected time delay. F1. Activating the Autoclose feature To activate the Autoclose feature with a pre-selected time delay, follow the steps below: Step 1: Rotate the Function Dial Customising to the AUTOCLOSE position (C). - Page 28 F2. De-activating the Autoclose feature To de-activate the Autoclose feature, follow the steps below: Step 1: Rotate the Function Dial to the AUTOCLOSE position (C). Step 2: Rotate the Setting Dial to the OFF selection along the ‘C’ row of options. The status LED will be red if Customising Autoclose is on.
-
Page 29: Setting The Mode Of Operation
G. Setting the Mode of Operation The D2 Turbo has three modes to choose from depending on the application. Only one mode can be selected at any given time. G1. Standard Mode Step 1: Rotate the Function Dial to the MODE position (D). - Page 30 Step 3: Press the pushbutton to select the setting. The status LED will change from red to green indicating that the Open Only Mode has been activated. FIGURE 54. Step 4: Return the Function Dial to the RUN position. Customising Features FIGURE 55.
-
Page 31: Setting Pirac Mode
H. Setting PIRAC Mode PIRAC (Beam Autoclose) Mode can be activated when using any of the three Operating Modes (Standard, Open Only, or Reversing). To select PIRAC Mode as either On or Off, please follow the following steps: Step 1: Rotate the Function Dial Customising to the MODE position (D). -
Page 32: Setting The Pre-Flashing Modes
I. Setting the Pre-flashing Modes Pre-flashing Mode A and Pre-flashing Mode C can be activated in addition to any of the above Modes of Operation. To select a Pre-flashing Mode as either on or off please follow these steps: Step 1: Rotate the Function Dial to the MODE position (D). -
Page 33: Setting The Operating Profiles
J. Setting the Operating Profiles Three Operating Profiles- Positive Close Mode, Speed and Collision Sensitivity, can each be configured depending on your individual requirements. J1. Positive Close Mode To activate or deactivate Positive Close Mode please follow these steps: Step 1: Rotate the Function Dial Customising to the PROFILE position (E). - Page 34 J2. Setting the Speed Profile to High or Low To select the desired speed profile, either High (approximately 24m/min) or Low (approximately 16m/min) please follow these steps: Step 1: Rotate the Function Dial to the PROFILE position (E). Step 2: Rotate the Setting Dial Customising to SPEED Hi/Lo along the ‘E’...
-
Page 35: Verifying Your Setup
J3. Setting the Anti-crushing Sensitivity Profile To select the desired sensitivity of the anti-crushing technology to either High or Low please follow the following steps: Step 1: Rotate the Function Dial to the PROFILE position (E). Step 2: Rotate the Setting Dial Customising to SENS Hi/Lo along the ‘E’... -
Page 36: Reverting To Factory Defaults
L. Reverting to factory defaults It is possible to clear and default the system completely, resetting all programmed settings to default values and clearing all learned remotes as well as gate limits. To perform a complete reset: Remove power from the unit by disconnecting both the mains supply and one battery terminal ... -
Page 37: Additional Features
Contact Centurion Systems (Pty) Ltd or your gate automation specialist for details on what solar panel to select in your area. The mains fail buzzer can be silenced on the D2 Turbo Low- Voltage by inserting a wire link between Aux 12V and power input terminal. -
Page 38: Basic Maintenance
Your D2 Turbo sliding gate motor requires no special care other than that described in the Maintenance section. If you are having a problem with your D2 Turbo sliding gate motor, please contact your installer or Centurion Systems (Pty) Ltd. -
Page 39: Diagnostics
8. Diagnostics Depending on the type of fault or condition of the motor, audible feedback will be given via the onboard buzzer. Listen out for this and refer to the table below: The different conditions are given in order of precedence. Battery-low - Buzzer will emit three beeps every two seconds for 30 seconds. -
Page 40: Specifications
9. Specifications Technical specifications D2 Turbo Technical data D2 Turbo Low-Voltage 90V - 240V AC ± 10V - 24V AC Input voltage 10V - 28V DC 10%, 50Hz Voltage output: 13.76V DC 10V AC 400mA input output 90V AC input... -
Page 41: Month Product Warranty
(please consult with your installer about their workmanship warranty terms and conditions). For equipment not of CentSys' manufacture the warranty as supplied by the original manufacturer will apply. No claims whatsoever will be recognised under the terms of this... - Page 42 D2 Turbo 24 Month Warranty Sticker For your own record and reference purposes if claiming against the warranty - stick Barcode product and serial number label for the motor below. 24 Month Product Warranty page 38...
-
Page 43: Optional Extras
- requires ground loop to be fitted FLUX inductive loop detector Plug-in step-down transformer The perfect power solution for your D2 Turbo Low-Voltage Plug-in step-down transformer GSM-devices Cellular network-based devices helping you to control and GSM-devices G-SPEAK / G-SWITCH-22... - Page 44 Theft-resistant cage Retro-installable steel cage that increases the resistance of the Theft-resistant operator against theft Theft-resistant Nut with Discus padlock Retro-installable Theft-resistant Nut and padlock set Discus padlock Theft-resistant cage FIGURE 78. Optional Extras page 40...
- Page 46 YouTube.com/CenturionSystems @askCentSys Subscribe to the newsletter: www.CentSys.com/Subscribe Call Centurion Systems (Pty) Ltd. South Africa Head Office: +27 11 699 2400 Call Technical Support: +27 11 699 2481 from 07h00 to 18h00 (GMT+2) 0.07.B.0085_15042014 www.CentSys.com.au...
Need help?
Do you have a question about the D2 Turbo and is the answer not in the manual?
Questions and answers