
Related Manuals for Avermedia Game Capture HD II

Summary of Contents for Avermedia Game Capture HD II
- Page 1 Italiano Game Capture HD II C285 English Français Deutsch Italiano Español Português User Manual...
- Page 3 AVerMedia Technologies, Inc. No. 135, Jian 1st Rd.,Zhonghe Dist., New Taipei City 23585, Taiwan TEL: +886-2-2226-3630 European Community contact: AVerMedia Technologies Europe B.V. Kwartsweg 50, 2665 NN, Bleiswijk, The Netherlands Technical Support: http://www.avermedia.com/avertv/Support/ FCC Compliance Statement (United States) FCC NOTICE This device complies with Part 15 of the FCC Rules.
- Page 4 Responsible manufacturer: AVerMedia Technologies, Inc. No. 135, Jian 1st Rd.,Zhonghe Dist., New Taipei City 23585, Taiwan TEL: +886-2-2226-3630 USA Office contact: AVerMedia Technologies U.S.A. 47358 Fremont Blvd., Fremont, CA 94538 Technical Support: http://www.avermedia.com/avertv/Support/ WASTE ELECTRICAL AND ELECTRONIC EQUIPMENT (WEEE) The mark of Crossed-out wheeled bin indicates that this product must not be disposed of with your other household waste.
-
Page 5: Specifications
Disclaimer & Copyright © 2013 by AVerMedia Technologies, Inc. All rights reserved. No part of this document may be reproduced or transmitted in any form, or by any means (Electronic, mechanical, photocopy, recording, or otherwise) without prior written permission of AVerMedia Technologies, Inc. -
Page 6: Table Of Contents
File Management ................43 Settings ....................47 Chapter 7 Pairing Capture Box and GameMate by AVerMedia ..61 Appendix A How to Set Your Gameplay Snapshot as PS3 Wallpaper63 Appendix B Troubleshooting ..............65 Appendix C Measuring Your HDD Height Before Installation .... 70... -
Page 7: Chapter 1 Package Contents
Chapter 1 Package Contents Please confirm that the package contains the following items. If any of the package contents are missing or damaged, please contact the distributor immediately. Game Capture HD II Power Adapter Power Adapter Outlet Module English-2... - Page 8 Any violation of copyrights or other intellectual property rights is not allowed. AVerMedia regularly releases the latest version of firmware for the Capture Box. Having the latest firmware enhances the functionality of the Capture Box. To download the latest firmware file, please go to /www.avermedia.com and then enter the model name in Product Search field.
-
Page 9: Other Items You Need
Headset / Microphone Record live commentary. RJ45 Cable To upload captured content Other than iPhone, 4, iPhone 4s, iPhone 5, GameMate also supports iPad and iPod touch. For further smartphone support, refer to www.avermedia.com for latest update. English-4... -
Page 10: Chapter 2 The Unit Parts
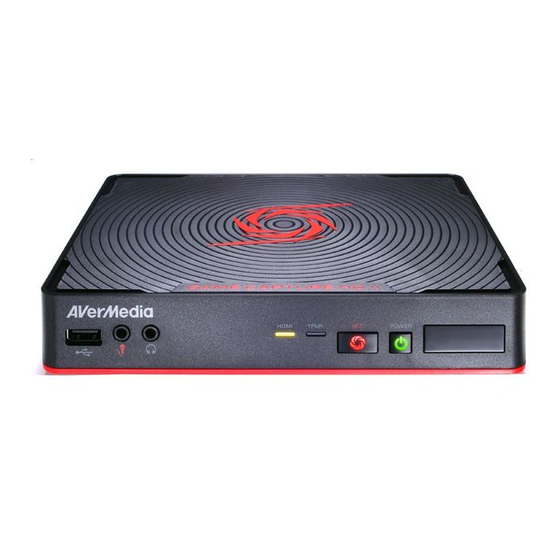
Chapter 2 The Unit Parts 2.1 Front Panel The button panel found on the front of the unit provides quick access to commonly used functions. # Buttons Descriptions Record Press to start / stop recording. Hold down the button for 4 seconds to force shut down the Capture Box Power Press to turn the unit on 2.2 Infrared Sensor... -
Page 11: Led Indicator
2.3 LED Indicator The LED indicators on the front of the unit show the device’s status. HDMI source LED indicator YPbPr source LED indicator Record status LED indicator Power status LED indicator Condition Source Record Power Glows solid Powered on green Ready to Solid green... -
Page 12: Connection Ports
Condition Source Record Power Solid green Glows at a Solid green Storage space is low slowly pace Flashes green Device is not ready continuously Problems like no Flashes green storage/ no signal/ continuously protected content Accepting a remote Flashes green control command once Press [F1] to obtain LED light indicator status. -
Page 13: Rear View
2.4.2 Rear View Component video input HDMI output LAN port Audio L/R input DC-IN HDMI input English-8... -
Page 14: Chapter 3 The Remote Control
Chapter 3 The Remote Control The descriptions below show the deployment of the keys on the remote control. English-9... - Page 15 Buttons Descriptions Press to turn the unit on / into stand-by mode. Press to access the main menu. Press again to exit. Press the navigation keys to move among options. Press OK to confirm a selection. Press OK to mark/ unmark segment in post- editing. Press to play the latest recorded file or view the last captured image.
- Page 16 Press to pause the playback. Press OK or to resume playback. Press to pause the recording. Press to play the video in slow motion (1/2x). Press again to enter frame- by- frame mode (See Chapter 5 for details). Press to fast-forward (2x, 4x, 8x, 16x, 32x). Press to go to the next page.
-
Page 17: Chapter 4 Installation & First Time Setup
Chapter 4 Installation & First Time Setup 4.1 Supported Resolutions The Game Capture HD II supports Component (YPbPr) and HDMI input resolution as follows: HDMI / Component (YPbPr) 480i/576i 480p/576p 720p (50 & 60Hz) 1080i (50 & 60Hz) 1080p (50 & 60Hz) The Game Capture HD II records the exact display resolution under most circumstances. - Page 18 Estimated recording duration for different video quality settings: HD 1080p Video Quality Optimal Good Maximum Recording (18 Mbps) Length (15 Mbps) (20 Mbps) Storage Capacity 100 hrs 110 hrs 125 hrs 200 hrs 220hrs 250hrs HD 720P Video Quality Optimal Good Maximum Recording (15 Mbps)
-
Page 19: Hardware Installation
4.2 Hardware Installation Please follow the steps below to properly connect the Capture Box and your TV/ video game consoles. If you would like to install internal hard drive, install it before turning on the Capture Box. Make sure that the cables are firmly connected and that neither of the cables is loose. If any of the cables are loose or disconnected, there may be a loss of signal or screen color problems. - Page 20 “PlayStation 3 Component AV Cable” and Wii Component Cable is NOT Included. Please purchase separately if needed. Step 3 Connecting the Device to Your TV Using HDMI Cable Connect one end of the HDMI cable to the HDMI OUT port on the rear of the device and the other end to the HDMI IN port on your TV.
- Page 21 Step 5 Install and Connecting the Power Adapter Slide the Power Adapter Outlet Module into the groove on the Power Adapter. Connect the Power Adapter connector to the DC-IN port on the rear of the device. Then plug the power adapter to a wall outlet.
- Page 22 To automatically obtain time and other information, you need to connect the Capture Box to an Ethernet LAN. Make sure the LAN wire is well-connected before you continue to the next step. Meanwhile, a router which supports DHCP IP network is recommended for you to pair up the Game Capture HD II with your iPhone.
- Page 23 Step 8 Power on the Capture Box Press the power button on the front panel of the device. Use the power button on the remote control. The POWER LED indicator lights up green, when that the device is power-on. It is important that you power on/ off the Capture Box following suggested procedure . Fail to do so may lead to damage of the Capture Box or data loss English-18...
- Page 24 Power off Capture Box and then make sure that the device is connected properly and with the proper cables. If there is still no video signal on TV, refer to FAQ section at www.avermedia.com for further troubleshooting. Connecting the Device to Your Microphone and Headset Plug in the microphone connector into the MIC Input port on the front panel of the device.
-
Page 25: Storage Device Installation
4.3 Storage Device Installation The Capture Box supports 2.5 inch internal hard drive and external USB storage device. You can save the recorded files and snapshots either to the internal HDD or external one. 4.3.1 USB Storage Device Insertion Connect your portable USB hard drive to the USB port on the front of the Capture Box ... - Page 26 To install the internal HDD: Step 1 Remove the HDD Lid Open the HDD lid on the bottom of the Capture Box. Step 2 Before Installing Internal HDD Use the measuring card to measure the height of your HDD (7mm or 9.5mm). ...
- Page 27 Adjust the rotary knob attached to the inner side of the lid to fit the height of your HDD. The default position of the rotary knob fits HDD with 9.5mm height. If you use HDD with 7mm/ 9.5mm height, rotate the rotary knob to the other direction. Using a 9.5mm HDD: Using a 7mm HDD: Step 3...
- Page 28 Step 4 Replace the HDD Lid Place the HDD lid back and snap it into place. To remove the internal HDD: Step 1 Remove the HDD Lid Please wait until the HDD cools down completely (it takes approximately 10 minutes) before any attempt to remove it.
- Page 29 Lift off the lid and set it aside. Step 2 Removing the HDD Pull the HDD out in the direction of the arrow. Then lift the HDD out of the slot. Step 3 Replacing the HDD Lid Place the HDD lid back and snap it into place. English-24...
-
Page 30: Setup Wizard
For the first-time initialization, a short duration of black screen (approximately 20 seconds) is followed by AVerMedia logo. The blinking green status light indicates that the Game Capture HD II is starting up. Please wait until the welcome screen appears. - Page 31 Step 2 A/V Pass Thru. It is suggested that A/V Pass Through to be turned Step 3 (1) Reminder Make sure a NTFS-formatted hard drive is connected or installed to the device. (For details, see Chapter 4.2) Check the connection of network. Press OK to start setup.
- Page 32 Step 4 (1) No Hard Drive Detected If you have not yet installed any storage device, install it before continuing the setup process. Then press to go to the previous screen and press OK to run disk checking process. Step 4 (2) Finishing Setup Wizard Once a NTFS-formatted hard drive is connected, a Settings Complete notice will be shown.
-
Page 33: Video Output Settings For Game Consoles
4.5 Video Output Settings for Game Consoles The Capture Box supports YPbPr / HDMI input resolution up to 1080p. 4.5.1 Video Output Settings for PlayStation 3 Step 1 Power on your PlayStation 3 console. On your console, go to Settings > Display Settings >... -
Page 34: Video Output Settings For Xbox 360
Step 3 Check ALL the resolutions. Confirm the setting. Step 4 Select Set Audio Output Settings. Select Audio Input Connector/SCART/ AV MULTI as audio output. Confirm the setting. 4.5.2 Video Output Settings for Xbox 360 Before resetting video output for XBox 360, make sure to properly connect the Capture Box with your Xbox 360. ... - Page 35 Power on your Xbox console. On your console, go to My Xbox on the dashboard and scroll all the way to the right to System Settings. Then select Console Settings > Display > HDTV Settings. Please set the audio output of all game consoles as auto. ...
-
Page 36: Chapter 5 Basic Operation
Chapter 5 Basic Operation This chapter guides you to record gameplay, capture images, add voice commentary to videos, and instantly play files. All the recorded files or snapshots will be saved to the default hard drive destination automatically. Please see Chapter 6 for details. - Page 37 Quick Snapshot During Gameplay - Press to capture current image. Long Press to activate continuous capture mode. The Capture Box will take 5 snapshots at one time. Instant Playback - Press to play the latest recorded file or view the last captured image. - Press to stop the playback.
-
Page 38: Adding Commentary
Disk Information Press then press OK to display the disk information. Press again to hide it. 5.2 Adding Commentary This section shows you how voice commentary is added to your video recording. Requirements for headset/microphone: Headset Connector: 3.5mm jack Microphone Frequency Response : 20-16kHz Impedance: 2.0 KΩ... - Page 39 If headset or microphone is plugged in during the Wizard Setup, the sound can only be heard from your headphone and instructions on voice commentary will not be displayed. Therefore, plug in headset or microphone after you complete Wizard setup so as to follow the headphone/ microphone instructions. ...
-
Page 40: Chapter 6 Osd Menu
Chapter 6 OSD Menu Under the menu, you can check and manage both your recorded files and snapshots, and customize your preferences. Remaining Time for Recording 3 Network Connection Connecting to GameMate 4 Current Time OSD Menu Descriptions Basic Operation - Press to bring up the menu. -
Page 41: Media Studio
Press F1 to safely remove the storage device.. *The upper left corner shows your current default storage device and available remaining recording 6.1 Media Studio You can check both recordings and snapshots captured by the Capture Box in “Media Studio”. Capture Format: Video MP4 (Codec: H.264 format with AAC audio) -
Page 42: Post- Edit Capture Box Recorded Videos
Video Playback - Press or OK to start playing the selected video. - Press or OK to pause the playback. Press or OK to resume playback. - Press to play the video in slow motion (1/2x). - Press to rewind at 2x, 4x, 8x, 16x, 32x speed. - Press to fast forward at 2x, 4x, 8x, 16x, 32x speed. - Page 43 OSD Menu Descriptions Select a Video - Select the file you would like to edit by using the navigation keys ◄/►/▲/▼. Edit/ Share Press F3 to edit or share the selected video. Change File Name Input your file name by using the navigation keys ▲/▼...
- Page 44 How to Edit An instruction on how to edit a video will be displayed, press OK to start editing. Edit Mode You can cut and recombine your selected video in Edit Mode. - To cut the video, you will need to create one or more segments within the video.
- Page 45 Preview - The Capture Box automatically recombines the segments you choose to keep during editing. Export - The estimated time varies by different storage disks. Refer export time to the actual use of your storage disk. - Press OK to export the video. - Press to continue editing.
- Page 46 Exit Press OK to exit from the editing mode. - Press to exit Press F1 to continue editing. OSD Menu Descriptions Share Videos on YouTube Use ▲/▼ to select the task you would like to undergo. Select ‘Share on YouTube’ to share your videos.
- Page 47 - Press OK to continue uploading. - Press F1 to skip this reminder afterwards. Account Setup - Use ▲/▼ to select the task you would like to undergo. Press to go back to last level. Press OK to edit your email or password. Press F1 to save the change you made.
-
Page 48: File Management
The recommended length of each video should be less than 1 hour. The Capture Box is made for record and capture media materials that are legally owned or licensed by the user only. Uploading videos that are protected by copyright and other laws is not allowed. YouTube may shut down the account for copyright protection reason. - Page 49 File Management User Interface: A list displaying files located on the internal hard disk A set of editing tools A list displaying files located on the USB disk Information display area Descriptions on Editing Tools: # Buttons Descriptions Copy files to USB disk Copy files to internal hard disk Select all Deselect all...
- Page 50 Copying Files from Internal HDD to USB Disk Step 1: - On the left-side list, use ▲/▼ to highlight the file that you want to copy to USB disk. Press OK to select / unselect an item. - Select and press OK to select all files. - Select and press OK to deselect all files.
- Page 51 Press on the remote and then press OK to remove the file from the list. - Press to cancel deleting the files in a progress. Step 3: - Press OK. USB Storage Device Removal In order to avoid data loss, it is highly recommended to safely remove your external storage device.
-
Page 52: Settings
Settings You can customize your preferences in “Settings”. Descriptions OSD Menu Basic Operation - Use ▲/▼ to select a preferred category. Press OK to make a selection. - Press to return to the previous page. Press to directly access the main menu. - Press F1 to safely remove the storage device. - Page 53 Real-Time Mode Real-time mode lets you play games with zero delay. And it is best for FTG, STG, RAC, and other rhythm games. No recording or snapshot status will be shown on screen. All capture work will run in the background. However, if any problem occurs during the capturing process, OSD will automatically jumps out.
- Page 54 Descriptions OSD Menu Network Settings Use ▲/▼ to move among options. Press OK to confirm. Before setup, please make sure the Ethernet cable is well connected. Auto Setup (Recommended) It is recommended to use Auto Setup to automatically obtain IP and DNS addresses. Manual Setup : Use Manual Setup to manually configure IP and DNS addresses.
- Page 55 PPPoE : Use username and password provided by ISP for connection. STEP 1: Use ▲/▼ to select an item for configuration. Press OK to confirm. STEP 2: Use ◄/► to move among options and ▲/▼ to select a character. Press F1 to switch among capital letters, lower cases, numbers, or signs.
- Page 56 Network Connectivity Test Once network setting is completed, a list of connection details will be displayed. Press OK to confirm. Current Network Information This page displays the current status of your network connection. If network is temporarily inaccessible, manually set up the time zone settings so that the videos and snapshots is named correctly.
- Page 57 Date Format Use ▲/▼ to select a preferred date format. Press OK to confirm. Auto Update Use ▲/▼ to enable/disable automatic date and time update. Press OK to confirm. *To use this function, a network connection is required. Time Zone STEP 1: Use ▲/▼...
- Page 58 Daylight Saving Time Use ▲/▼ to enable/disable Daylight Saving Time. Press OK to confirm. *To use this function, a network connection is required. Descriptions OSD Menu Disk Management Storage Destination Step 1: Select and press OK to change your current desired default storage device for both recorded files and snapshots.
- Page 59 Use ▲/▼ to move among options. Press OK to confirm. Press to switch from component and HDMI input sources. Video Input: Use ▲/▼ to toggle between various video input source options (Component / HDMI). Press OK to confirm. Audio Input: Use ▲/▼...
- Page 60 Descriptions OSD Menu A/V Pass Through: Use ▲/▼ to enable/disable A/V Pass Through. Press OK to confirm. *The default setting is set Off to yield to the power-saving regulation. If this function is enabled, Capture Box still output signal when the Capture Box is off. If this function is disabled, Capture Box does not output signal when the Capture Box is off.
- Page 61 Watermark Type: Use to ▲/▼ select from the listed watermark types. Press OK to save the change. - Press to go back to last level. Position: Use ▲/▼ to select from the listed watermark positions. Press OK to save the change. - Press to go back to last level.
- Page 62 Descriptions OSD Menu Auto Save Use ▲/▼ to switch from enable or disable the Auto Save function. Recording/ Snapshot Video Quality: Use ▲/▼ to toggle among various video quality options (Optimal/ Good/ Maximum recording length). Press OK to confirm. Snapshot Quality: Use ▲/▼...
- Page 63 Live Commentary A short demonstration will be played in this section. Press OK to continue. Volume: Use ▲/▼ to move among options and ◄/► to adjust the volume. Press OK to save the setting. Press F1 to restore to the default setting. Sound Mode: Use ▲/▼...
- Page 64 Follow the steps below to upgrade the firmware via USB storage device: Step 1: To download the latest firmware binary package, please go to www.avermedia.com, and then enter the model name in Product Search field. Firmware file is available on the product information page.
- Page 65 Press OK to save the name. To change product name, go to Menu >Product Name. The display name will not only show up when you enable watermark function but also on the pair up list with GameMate by AVerMedia. English-60...
-
Page 66: Chapter 7 Pairing Capture Box And Gamemate By Avermedia
Pairing Capture Box and GameMate by AVerMedia GameMate by AVerMedia is the dedicated app for smart phones. It allows you to use your smart phone as remote control. You are only a few steps from pairing up the Capture Box with GameMate. - Page 67 Tap to input the provided four-digit pairing number correctly. You will see GameMate as shown left hand side when it successfully pairs up with Capture Box. You can also check the connection of GameMate from the Menu. You will see sign on the upper level of the Menu.
- Page 68 Appendix A How to Set Your Gameplay Snapshot as PS3 Wallpaper Start to give your PS3 menu screen a fresh and personalized look to show how cool you are! Please follow the steps below to set the image captured by the Capture Box as your PS3 background wallpaper. Step 1 Remove your USB storage device from the Capture Box, and then plug it into your PS3 console via USB port.
- Page 69 Step 4 Use the right joystick to zoom in/out and left joystick to frame the image. When it is the proper ○ size, press (Enter). ○ Confirm with (Enter) if you are prompted to overwrite your current wallpaper. Step 5 Done! The snapshot that you have chosen is now set as your PS3 wallpaper.
- Page 70 Appendix B Troubleshooting To download the latest firmware for the Capture Box: Go to www.avermedia.com. Enter the model no. (C285) in Product Search field. The latest firmware file is available on the “AP & Driver” section on the product information page.
- Page 71 sure that the device is connected with the proper cables (See 3.1 Hardware Installation in user manual for details). Green screen color with buzzing noise: Make sure that the red and blue connectors do not come loose. Screen color appears abnormal using component input Mono screen color: ...
- Page 72 Check video output settings of your game console. For PS3, set 1080p, 1080i and 720p as video output resolutions. If you only select 1080i, the screen resolution automatically goes to 480i Poor quality of captured video when you play a game that supports 720p. (See 3.5 Video Output Settings for Game Consoles in user manual for details).
- Page 73 : 130415-0930 (Mic-Edit-1) The Game Capture HD II detects all kinds of folder that built in your hard drive; as a result, it is likely that the destination is set to a non-standard folder, for example, a hidden folder.
- Page 74 Select your USB and format it to NTFS format. Save the firmware file into the NTFS USB and reconnect it to the Capture Box to upgrade firmware. If the problem still persists, refer to FAQ at www.avermedia.com for further troubleshooting. English-69...
-
Page 76: Appendix C Measuring Your Hdd Height Before Installation
Appendix C Measuring Your HDD Height Before Installation English-70... - Page 77 Open Source Code Notice The following GPL executables and LGPL, MPL libraries used in this product are subject to the BSD/FreeBSD/ GPL/GPLv2/GPLv2+/GPLv3 with GCC/ RLE/jpeg/LGPLv2/LGPLv2.1/LGPLv2.1/ GPLv2/LGPLv2.1+/LGPLv2+/ libpng/MIT/NewBSD/OPENSSL/PD/zlib License Agreements: cppstub/db/libpcre0/JSONKit FreeBSD thttpd makedevs GPLv2 busybox/dbus/dbus-x11/devmem2/dosfstools/fbset/i2c-tools/iproute2/libblkid1/libdbus-1-3/libfreetype6/libpam/ libuuid1/linux-kernel/module-init-tools/module-init-tools-depmod/mtd-utils/netbase/u-boot/update-modules/ usbutils/util-linux-ng GPLv2+ iptables/sysvinit/tinylogin/udev/update-rc.d GPLv3 with GCC RLE libgcc1/libstdc++6 jpeg libjpeg8/libjpeg-tools...
- Page 78 AVerMedia Technologies Inc. offers to provide source code to you for a charge covering the cost of performing such distribution, such as the cost of media, shipping and handling upon e-mail request to AVerMedia Technologies Inc. at http://www.avermedia.com For more information, please visit our website: http://www.avermedia.com...
- Page 79 Pour la première initialisation, vous aurez un écran noir pendant une courte période (environ 20 secondes), suivi par le logo AVerMedia. La lumiére verte qui clignote indique le Game Capture HD II est en train de démarrer. Attendez ensuite l’apparition de l’écran de bienvenue.
- Page 80 Etape 3 (1) Rappel Assurez-vous que le disque dur branché ou installé sur le boî tier est bien formaté en NTFS. (Pour plus de détails, reportez-vous au Chapitre 4.2) Vérifiez la connexion au réseau. Appuyez ensuite sur OK pour démarrer la configuration. Nous vous recommandons d’utiliser un routeur qui supporte les réseaux IP DHCP.
- Page 81 Etape 4 (2) Fin du Processus d’Installation Une fois qu’un disque dur formaté en NTS est connecté au boî tier, un message de fin d’installation s’affiche. Vous pouvez commencer à enregistrer et You can start to record and take snapshot right away. Press OK to exit the wizard and start using Capture Box.
- Page 82 Internet herzustellen. Bei der erstmaligen Initialisierung folgt nach kurzfristiger Anzeige eines schwarzen Bildschirms (circa 20 Sekunden) das AVerMedia-Logo. Die blinkende grüne Statusleuchte zeigt an, dass der Game Capture HD II startet. Bitte warten Sie, bis der Willkommensbildschirm erscheint. Schritt 1...
- Page 83 Schritt 3 (1) Erinnerung Achten Sie darauf, dass eine NTFS-formatierte Festplatte angeschlossen oder im Gerät installiert ist. (Einzelheiten finden Sie in Kapitel 4.2) Prüfen Sie die Netzwerkverbindung. Drücken Sie zum Starten der Einrichtung OK. Wir empfehlen einen Router, der DHCP-IP-Netzwerke unterstützt. Beachten Sie zur manuellen Verbindungseinrichtung auch Kapitel 6.2.
- Page 84 Schritt 4 (2) Einrichtungsassistenten abschließ en Sobald eine NTFS-formatierte Festplatte verbunden ist, zeigt eine Benachrichtigung an, dass die Einrichtung abgeschlossen ist. Sie können nun direkt mit der Aufnahme und Erstellung von Schnappschüssen beginnen. Drücken Sie OK; dadurch verlassen Sie den Assistenten und können mit der Nutzung der Capture Box beginnen.
- Page 85 Per la prima inizializzazione, una breve schermata nera (circa 20 secondi) è seguita dal logo AVerMedia. La spia di stato verde lampeggiante indica che Game Capture HD II è in fase di avvio. Attendere che appaia la schermata di benvenuto.
- Page 86 Fase 3 (1) Promemoria Assicurarsi che un disco rigido con formattazione NTFS sia collegato o installato sul dispositivo (per i dettagli, consultare il Capitolo 4.2). Controllare la connessione di rete. Premere OK per avviare la configurazione. Si consiglia di utilizzare un router che supporti la rete IP DHCP.
- Page 87 Fase 4 (2) Termine dell'installazione guidata Una volta collegato un disco rigido con formattazione NTFS, viene visualizzato un avviso di impostazioni completate. È possibile avviare la registrazione e scattare immediatamente istantanee. Premere OK per uscire dalla procedura guidata e iniziare ad usare Capture Box.
- Page 88 La primera vez que inicie la unidad, aparecerá una pantalla con fondo negro (aproximadamente durante 20 segundos) y, a continuación, se mostrará el logotipo de AVerMedia. La luz de estado verde parpadeante indica que Game Capture HD II se está...
- Page 89 Paso 3 (1) Recordatorio Asegúrese de que una unidad de disco duro con formato NTFS está conectada o instalada en el dispositivo. (Para obtener más información, consulte el Capí tulo 4.2) Compruebe la conexión de la red. Presione OK (Aceptar) para iniciar la instalación. Se recomienda utilizar un enrutador que admita la red IP de DHCP.
- Page 90 Paso 4 (2) Finalizació n del asistente de instalació n Una vez conectada una unidad de disco duro con formato NTFS, se mostrará un aviso de instalación finalizada. Puede empezar a grabar y tomar instantáneas cuando desee. Presione OK (Aceptar) para salir del asistente y empezar a utilizar Capture Box.
- Page 91 Para a inicialização pela primeira vez, um curto perí odo de tela preta (aproximad amente 20 segundos) é seguido pelo logotipo da AVerMedia. A luz de status verde piscando indica que a GAME CAPTURE HD II está iniciando. Por favor, aguarde até que a tela de boas vindas aparece.
- Page 92 Passo 3 (1) Lembre - se Certifique-se de um disco rí gido formatado com NTFS está ligado ou instalado no aparelho. (Para mais detalhes, consulte o Capí tulo 4.2) Verifique a conexão de rede. Pressione OK para iniciar a instalação. Um roteador que suporta a rede IP DHCP é...
- Page 94 M o d e l N o . C 2 8 5 P / N 3 0 0 A C 2 8 5 - D 2 5 M a d e i n T a i w a n...
Need help?
Do you have a question about the Game Capture HD II and is the answer not in the manual?
Questions and answers