Table of Contents
Advertisement
Advertisement
Table of Contents

Summary of Contents for ActionPac ME109 series
- Page 1 REVOLUTIONARY PRECISION AND ECONOMY IN AUTOMATED WEIGH FILLING...
- Page 2 Using This Manual All Actionpac systems are designed to be simple and are custom engineered with your application in mind. This User Manual is intended as a guide and you may find that certain illustrations, diagrams and/or descriptions vary from the equipment with which you have been supplied.
-
Page 3: Table Of Contents
Table of Contents TECHNICAL SUPPLEMENTS SYSTEM OVERVIEW SECTION 7 Load Cell Info SECTION 1 General System Info Utility Requirements Hex Codes Subroutine Bit Assignments BILL OF MATERIALS Mother Board SECTION 2 ME109 Scale Assembly Main Board Sub Assemblies Feeder/Triac Board Display Board INSTALLATION Known Values... -
Page 4: System Overview Supplements
All el- ements are thoughtfully incorporated to complement every customer’s budget and the scope of their application. Actionpac never offers “value add”components, instead choosing only those that are right for the job. -
Page 5: Utility Requirements
Utility Requirements ME109 Your requires both electrical and pneumatic supplies. Electrical 115 V AC 60 Hz 3 Amps (5 MAX) Ensure the grounded circuit supplying power is isolated and dedicated. We recommed you verify the quality of your facility’s pow- er supply by checking it with a voltmeter prior to plugging in your ME109 for the first time in order to avoid damage to the electronics. -
Page 6: Bill Of Materials
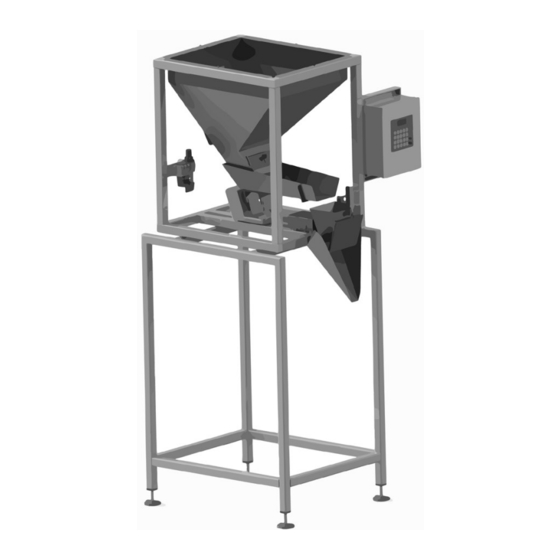
ME109 Scale Assembly This section illustrates all major components and their configurations. Please refer to this section and relavent component names when discussing your system with Actionpac technicians to maintain clarity and avoid unneccesary confusion. Hopper Scale Frame Controller Hopper Vibrator... -
Page 7: Sub Assemblies
Sub-Assemblies Stand Frame Leveling Feet w/Inserts 2.2.B Pneumatic Manifold 2.2.A Standard Controller Regulator Regulator Mounting Isolators 160 psi Natural Rubber 1/4”-20 Thread, M/M Mounting Frame Manifold Bank 1/2” H, 1” Dia. Aluminum 2, 4, 6 Position Enclosure Display Straight Fitting Brass 1/8”... - Page 8 Sub-Assemblies Feeder Feeder Pan 304 SS, 16 ga. Hopper Feeder Locator Pins Hopper 304 SS, 16 ga. “Springs” Fiberglass Qty. will vary Mounting Isolators Natural Rubber 1/4”-20 Thread, M/F 1/2” H, 1” Dia. 2.2.G 3 Arm Knob Bucket Black Nylon Hopper Gate 304 SS, 16 ga.
- Page 9 Sub-Assemblies Open Utility Funnel Stand Up Pouch Former 2.2.K Side Gusset Former 2.2.J 2.2.L Section 2 Bill of Materials REV A...
-
Page 10: Installation
Various Elevator systems are available as options; if this is of interest contact your Actionpac Sales Associate. If your system is equipped with a Touchscreen Controller you may want to take advantage of our remote assis- tance capabilities by supplying a broadband internet connection so that we may offer you maximum technical assistance. - Page 11 Location Things to Avoid Avoid placing your scale in areas where it will be subjected to wind/breeze such as in front of open doors. All Fans wind generating equipment such as fans should be avoided. Point any wind generating equipment AWAY from the scale as this disturbs the weighing process.
- Page 12 & Set-up Assembly You will need the following tools. We recommend you gather them before begining set-up and assembly We also encourage you to recruit some help, it will make the process easier, not to mention faster. • 2-3 Capable Individuals • Hand Tools (e.g.
-
Page 13: Setup & Assembly
“potting”, along the top. NEVER use the Bucket bracket as a handle, grip or for leverage, NEVER apply any other load to the Load Cell or Bucket Bracket other than an Actionpac supplied Weigh Bucket. Mount Bucket by sliding it into the keyhole slot, Fig. - Page 14 & Set-up Assembly # 23 Fix Hopper Gate into position with supplied three arm nylon mounting knob , Fig. # 3.2.R. # 24 Check that the Feeder, Load Cell and Hopper Vibrator (if equipped) connectors are engaged, Fig. # 3.2.S. # 25 Open Controller and remove any packaging materials.
-
Page 15: Getting Started
Understanding the Controller Please read everything in this section. It is a review of system logic & fundamentals and demonstrates operational procedures. Before you begin running your new scale let’s review the Controller. ME109 Your standard Controller is operated with a digital Keypad consisting of an LED Display, twenty (20) alpha/numeric Buttons, and four (4) Indicator Lights &... - Page 16 Understanding the Controller Inside the Controller Enclosure you will find the microprocessor based brains of the system. The scale is equipped with boards developed and manufactured by Actionpac here in the US and is programmed with Actionpac’s proprietary software and weighing technology.
-
Page 17: The Standard Keypad
The Standard Keypad touched lightly on the Keypad as an element of the controller; in this section the Keypad is explored in greater detail. Sec. # 4.1 For the purposes of message clarity all keypad commands in this section and throughout this manual with be styled in the following manner: (i.e. - Page 18 The Standard Keypad Setpoint Buttons These buttons, , are also used for adjusting or creating programs, a set point Fig. # 4.2.G is the weight at which a specific sub-routine is activated. 1] DISPLAY BULK CUTOFF 4] DISPLAY OVER The weight at which bulk feeding Weight at which a cycle is “Over”...
-
Page 19: Scale On/Off
When referencing the scale being “on” or “off” we are basically saying it is plugged in or un-plugged. 4.3.A 4.3.B When you turn the scale on the Display will read Actionpac followed by our phone number (805) 487-0403 then flash V 9˙2˙1 (the operating system’s version) -
Page 20: Recall A Program
Recall a Program You will need to know how to “Recall a Program” in order to run and use your scale in production during day to day operations as well as when you modify an existing program. First we will quickly review what a “program” is. Your ME109 series system has been pre-programed and tuned based on the weights you provided us and the bulk sample... -
Page 21: Emptying The Bucket
Emptying the Bucket Before you start running the scale you must empty the weigh buckets. If you fail to do this the scale will tare itself with the product and will result in over weight cycles. You must stop the scale before attempting to empty the bucket as the scale will not respond to commands while in “Run” mode Exit “Run”... -
Page 22: Run" Mode
“RUN” Mode You should now be relatively familiar with your scale and ready to get your production on, finally. CUSTOMER: DATE: PRODUCT TYPE: COFFEE BEANS REV: K27D PROGRAM DATA SHEET Now would be a good time for you to fill the Hopper with product if you have not already done so, refer to the program’s PDS TARGET WEIGHT: TARGET WEIGHT: 16 OZ... -
Page 23: Funneling Instructions
Funneling Instructions Actionpac has a variety of standard specialty funnels of which you will have received at least one unless you commissioned a custom funnel designed for an un-conventional bag. If you do have a custom funnel these instructions will more than likely still be relevant enough to apply. - Page 24 Funneling Instructions Stand Up Pouch Former Funnel Designed and used specifically for stand up pouches, doy pouches and bags with bottom gussets that need to be opened prior to filling, two standard sizes available. Slide bag up the funnel Hold bag in place with Insert both fingers into Slip bag opening onto as far as it will go and...
-
Page 25: Controls
Program Fundamentals is dedicated to the control system of your ME109 and reviews general programming matters. Section # 5 A few things to keep in mind as we move through this section: ME109 Your series net weigh has been programmed to run with the sample product you provided at regulated 115 VAC power. - Page 26 We recommend you not make changes to those labeled “Factory Set” Note This manual styles them Sub 0, Sub 1, Sub 2, etc. in Table I , below, without consulting an Actionpac technician. BIT # 1 BIT # 2 Supervisor Codes Factory Set...
-
Page 27: Setpoints & Subroutines
Setpoints & Subroutines The easiest changes to make are to the Setpoints. In fact when creating programs of differing weights and accuracies with the same product adjusting the Setpoints may be all that is necessary. Setpoints View & Change You can determine a program’s Setpoints in two ways. You can look and find them on that proram’s PDS, as discussed previously in , or you can Sec. -
Page 28: Supervisor Codes
Supervisor Codes One of the most consistent problems encountered by users of weigh fill/counting equipment is the alteration, inadvertent or not, of supervisor or factory settings of all fourteen interactive variables controlling speed and accuracy. Therefore, in addition to the instructions elsewhere, the following information is meant for the supervisor only. The level of access to any given program is controlled by the “Most Significant Digit”... -
Page 29: To Make A New Program
To Make a New Program Add/Subtract Value The simplist way to make a new program based on an old program with the same product is with the Add/Subtract Command Sequence which adds or subtracts the difference between an old and new target weight. Remember to check the Supervisor Code and set MSD to if necessary. - Page 30 To Make a New Program Add/Subtract Value “Make a New Program” using the Add Value Command Sequence RECALL PROGRAM A] ADD VALUE E] ENTER Save to the memory location E] ENTER Update your records, & Fig. # 5.4.E 5.4.F. 5.4.E And one more for practice...
-
Page 31: Scale Calibration
Scale Calibration Before beginning locate a “Known Weight,” something that you have independently verified as a specific weight. Most stan- dard ME109 units (shipped after 10/2014) come with a supplied Calibration Weight. If your system did not come with that or if you’ve misplaced it you can use anything which is convenient and verifiable. -
Page 32: Optimization
Speed & Flow As already mentioned products that look the same do not always act the same and may have different flow characteristics. Products with different flow characteristics must be handled as such and may require both mechanical and electronic adjust- ments for optimal performance. -
Page 33: Bucket Adjustments
Bucket Adjustments It is very important that the Weigh Bucket open and close properly. If, for example, the Bucket door opens too slowly product accrual may occur. While altered or inconsistent weights as well as Load Cell damage can result from a slamming door. There are four elements of Bucket performance: Mechanical Force, Door Aperature, Bucket Duration &... -
Page 34: Load Cell Info
If you are experiencing negatively displayed weights, all zeros when a load is applied, no displayed weight at all, etc. or if you have received a new Load Cell from either Actionpac or an alternate source and it doesn’t work when you connect it then checking the wiring is the first course of action you should take. - Page 35 Load Cell Info How to Check Voltage Input/Output To check the DC voltage the Load Cell is recieveing and putting out you will need to locate the wiring terminals located on the Mother Board, . You will also need a voltmeter to check the voltage. Fig.
-
Page 36: Hex Codes
Hex Codes Actionpac’s proprietary controls are based in Hex Code allowing more programming options and expands system capabilities. Hex Codes [Base 16] Numbers composed of two digits are expressed as a letter;. 0, 1, 2, 3, 4, 5, 6, 7, 8, 9, A (10), B (11), c (12), d (13), E (14), F (15) -
Page 37: Subroutine Bit
Subroutine Bit Assignments are used to maintain the control options for any given SUB 0 SUB 1 SUB 6 Digit Positions program such as Supervisor Codes, peripheral equipment options and oth- MSD: Most Significant Digit er miscellaneous variables not associated with a specific numeric value. 2MSD: 2 Most Significant Digit Each digit position can be set to a particular Hex Code for the performance... -
Page 38: Motherboard
Motherboard T e c h n i c a l Section 7 Supplements REV A... -
Page 39: Main Board
Main Board T e c h n i c a l Section 7 Supplements REV A... - Page 40 Main Board Main Board Major Component Functions Buffer/Driver, affects display, foot pedal, feeder speed, memory retention Feeder Speed Control, affects feeder speed Feeder Speed Control affects feeder speed Feeder Speed Control affects feeder speed Feeder Speed Control affects feeder speed Hopper Speed Control affects hopper speed Hopper Speed Control affects hopper speed Resistor Pack, pulls up resistors, affects foot pedal, lamp and peripheral...
-
Page 41: Feeder/Triac Board
Feeder/Triac Board T e c h n i c a l Section 7 Supplements REV A... -
Page 42: Display Board
Display Board Display Board Component Functions Display (shows data) Display Driver (affects displayed data) Display Driver (affects displayed data) Table IX T e c h n i c a l Section 7 Supplements REV A... -
Page 43: Known Values
Known Values Read the Mass Unit Conversion Chart horizontally. Mass Unit Conversion Chart TROY AVOIR METRIC Quick Conversion Reference Abbreviations 1 lbs. 16 oz. Pounds lbs. 1 Kg Ounces 2.204 lbs. 1 Kg 1,000 g Kilograms 1 oz. 28.3495 g Grams Milligrams .001 Kg... -
Page 44: Interconnect Template
Interconnect Template Lane 1 Lane 2 Lane 3 Lane 4 T e c h n i c a l Section 7 Supplements REV A... -
Page 45: Available Program
7.10 Available Program Memory Locations T e c h n i c a l Section 7 Supplements REV A... - Page 46 7.10 Available Program Memory Locations T e c h n i c a l Section 7 Supplements REV A...
-
Page 47: Program Data Sheets
7.11 Program Data Sheets TARGET WEIGHT: TARGET WEIGHT: TARGET WEIGHT: PRODUCT: PRODUCT: PRODUCT: SETPOINTS: SETPOINTS: SETPOINTS: BULK CUTOFF BULK CUTOFF BULK CUTOFF TARGET WEIGHT TARGET WEIGHT TARGET WEIGHT UNDR TLERANCE UNDR TLERANCE UNDR TLERANCE OVER WEIGHT OVER WEIGHT OVER WEIGHT SUBROUTINES: SUBROUTINES: SUBROUTINES:...
Need help?
Do you have a question about the ME109 series and is the answer not in the manual?
Questions and answers