weintek cMT-G01 User Manual
Hide thumbs
Also See for cMT-G01:
- User manual (33 pages) ,
- Installation instructions and parts list (2 pages)
Table of Contents
Advertisement
Quick Links
Advertisement
Table of Contents

Related Manuals for weintek cMT-G01


Summary of Contents for weintek cMT-G01
- Page 1 User Manual V1.0.0...
-
Page 2: Table Of Contents
System Setting ..........................6 Updating Web Package and OS ....................11 Updating Web Package ........................11 Updating OS ............................. 12 How to create a cMT-G01 project ....................14 4.1. Create a new project ........................14 4.2. Download project to cMT-G01 ......................16 4.3. -
Page 3: Overview
cMT-01 Startup Guide Overview 1.1. Specification IIoT Gateway Features Supports OPC UA Supports MQTT Supports MODBUS TCP/IP Gateway Compact Design and DIN-rail Mountable Fan-less Cooling System Built-in 256 MB Flash Memory Supports MPI 187.5K ... -
Page 4: Dimensions
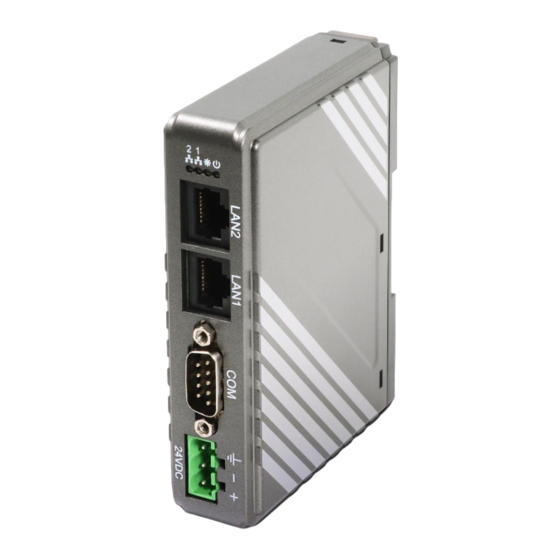
cMT-01 Startup Guide 英文版 1.2. Dimensions 27mm [1.06"] 81mm [3.19"] 27mm [ Side View Front View Top View Bottom View Ethernet 2 Port (10M/100M) Ethernet 1 Port (10M/100M/1G) COM1: RS-232 2W COM2: RS-485 2W/4W COM3: RS-485 2W Power Connector Default Button V1.0.0... -
Page 5: Connector Pinouts
LED indicators show the operation status of cMT-G01. Color Meaning Icon Blue LAN 1 Communication Status Blue LAN 2 Communication Status Orange Power Status Helps the operator to find the cMT-G01. Triggering system register LB-11959 can Green turn this indicator on/off. V1.0.0... -
Page 6: Cr1225 Battery
Startup Guide 1.6. CR1225 battery The cMT-G01 Series HMI requires a CR1225 coin type lithium battery to keep the RTC running. Battery type: CR1225 3V lithium battery 1.7. Power connection Power: The unit can be powered by DC power only, voltage range: 24±20% Volts DC, compatible with most controller DC systems. -
Page 7: Cmt-G01 System Setting
Connect cMT-G01 via Ethernet cable, and configure system settings using the following ways. Set in internet browser Open internet browser (IE, Chrome, or Firefox), and enter cMT-G01 IP address (for example: 192.168.100.1) to configure cMT-G01. The default IP: Ethernet 1: DHCP, Ethernet 2: 192.168.100.1 2.1.1. -
Page 8: System Setting
Set the IP address of Ethernet 1 and Ethernet 2. The default IP address of Ethernet 1 is DHCP. The default IP address of Ethernet 2 is 192.168.100.1. Date/Time Set RTC date and time. Select [Sync. with host] and then click [Save] to synchronize cMT-G01 time V1.0.0... - Page 9 Startup Guide with the computer time. HMI Name Enter a cMT-G01 name to identify the unit when transferring data. This avoids remembering the IP address of each cMT-G01. [Identification light]: The indicator of current cMT-G01 will flash three times when this button is clicked, helping user to find the cMT-G01.
- Page 10 Startup Guide History [Clear]: Clears history data in cMT-G01. [Backup]: Downloads history data in cMT-G01 to this computer. Email [SMTP]: Configure email server and relevant settings. [Contacts]: Set email contacts in this tab. [Update Email Contacts]: Import the email contacts built using Administrator Tools.
- Page 11 Startup Guide Project Management [Restart Project]: Restart cMT-G01 project. [Update Project]: Upload the project’s *.cxob file to cMT-G01. [Backup Project]: Backup the project file to this computer. System Password Set user password and the password for transferring project file.
- Page 12 EasyBuilder Pro project file. [Accounts]: Add user or change user password and operable classes. [Import User Account]: Import the user accounts built in Administrator Tools. EasyAccess 2.0 Activate EasyAccess 2.0 for the cMT-G01 and set up Proxy. V1.0.0...
-
Page 13: Updating Web Package And Os
Startup Guide Updating Web Package and OS cMT-G01 Web Package and OS can be updated through Ethernet. Launch Utility Manager, select [cMT Series] » [Maintenance] » [cMT-G01 OS Upgrade]. 3.1 Updating Web Package 1. Select a cMT-G01. 2. Select [Web package] and browse for the source file. -
Page 14: Updating Os
1. Select a cMT-G01. 2. Select [OS], a Warning message shows, please read this message carefully before you click [OK]. 3. If you click [OK], the cMT-G01 OS Update window opens again, browse for the source file, and then click [Update]. - Page 15 cMT-01 Startup Guide V1.0.0...
-
Page 16: How To Create A Cmt-G01 Project
3. Download the project to HMI. The following explains how to set up OPC UA Server in the project. 4.1. Create a new project Step 1. Launch EasyBuilder Pro and select cMT-G01 model. Step 2. Add a PLC into the Device List. V1.0.0... - Page 17 cMT-01 Startup Guide Step 3. Click [IIoT] » [OPC UA Server], and select [Enable] check box to enable OPC UA Server. Step 4. Click [Tags] of the device and then click [New Tag] to add tags used for OPC UA. When finished, click [OK] to leave.
-
Page 18: Download Project To Cmt-G01
Startup Guide 4.2. Download project to cMT-G01 The format of the project file run on cMT-G01 is *.cxob. In EasyBuilder Pro, click [Tools] » [Compile] to compile the project into *.cxob format. When finish compiling, you can download the project to cMT-G01 by two ways. -
Page 19: Monitoring Opc Ua Client
Startup Guide 4.3. Monitoring OPC UA Client After downloading the project file to HMI, use OPC UA Client software to connect with cMT-G01, in order to monitor data change of OPC UA tags. Note: For more information on OPC UA Client software settings, please refer to the software’s manual. - Page 20 cMT-01 Startup Guide On-line simulation, cMT Gateway Viewer can read from or write to PLC. Please note that On-line simulation is limited to 10 minutes. Step 1. In EasyBuilder Pro click [Tools] » [On-line Simulation] / [Off-line Simulation] to open cMT Gateway Viewer window.
-
Page 21: Functions Supported By Cmt-G01
Startup Guide Functions supported by cMT-G01 OPC UA Server http://www.weintek.com/download/EBPro/Document/UM016009E_OPC_UA_UserManual_en.pdf Please note that a cMT-G01 can simultaneously connect to 64 OPC UA Clients at maximum. EasyAccess 2.0 http://www.weintek.com/download/EasyAccess20/Manual/eng/EasyAccess2_UserManual_en.pdf Modbus TCP/IP Gateway MQTT Administrator Tools ...
Need help?
Do you have a question about the cMT-G01 and is the answer not in the manual?
Questions and answers