
Related Manuals for MITEX GENERAL Xtreme

Summary of Contents for MITEX GENERAL Xtreme
- Page 1 (MITEX LOGO) GENERAL Xtreme Professional Two-Way Radio (SAME BACK PAGE AS OUR OTHERS) (MITEX LOGO) GENERAL Xtreme GENERAL Xtreme INSTRUCTION MANUAL...
- Page 2 Introduction Thank you for purchasing this Mitex two-way radio, a truly professional and durable radio that will provide reliable, high quality communication, even under harsh and demanding conditions. Before operation and to obtain the best performance please read this manual carefully to become familiar with the radios...
-
Page 3: Table Of Contents
Contents Contents Key Assignment ............. 11 1 Safety Information ........... ■ Time-out Timer(TOT) {set by Mitex} ......11 2 Supplied Accessories ........■ VOX Function {set by Mitex} ........11 3 Battery Information ......... ■ ■ Battery Save ............11 Caution .............. -
Page 4: Safety Information
If you find any items are missing or have been damaged Do not attempt to repair, disassemble or re-assemble the radio. during shipment, please contact your Mitex dealer immediately. Repair should only be carried out by a qualified Radio Engineer. -
Page 5: Battery Information
Caution Installing and Removing the Battery Pack In order to avoid damage to the battery, only use the Mitex Place the rechargeable battery pack onto the back of the radio. (It will charger provided. The supplied charger is an ‘intelligent’... -
Page 6: Installing/Removing The Antenna
Accessories Installation Accessories Installation ■ ■ Installing the Earpiece Installing/Removing the Antenna First with the radio switched off release Screw the antenna into the connector on the top of the transceiver the Speak/microphone cover then insert by holding the antenna at its base and turning it clockwise until the speaker/microphone plugs into the secure. -
Page 7: Getting Acquainted
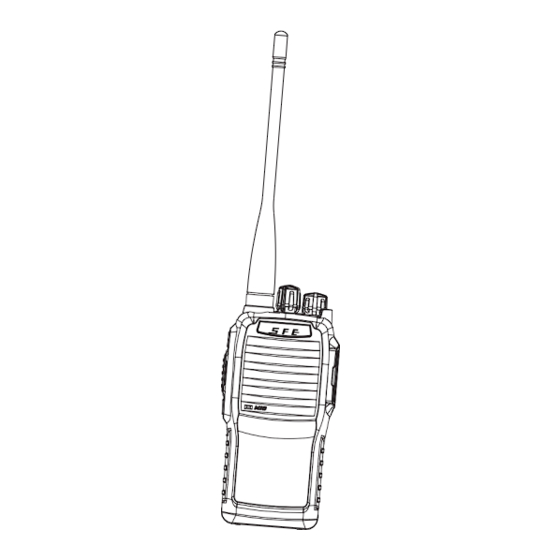
Getting Acquainted Function and Operation ■ ■ Power ON/OFF Radio Diagram Turn the On/Off/Volume knob clockwise to switch the radio ON. Turn the On/Off/Volume knob counter-clockwise to switch the radio Channel knob Antenna OFF. Power switch/volume control Speaker Microphone ■ Channel Selection Rotate the channel knob to select the required channel. -
Page 8: Receiving
3, the scan sequence is as follows: standby or receive calls. CH1 → CH3 → CH2 → CH3 → → CH16 ■ TDR(Dual Standby) ■ CTCSS/DCS Allows the user to select a specific CTCSS/DCS code per channel – set by Mitex Set by Mitex... -
Page 9: Key Assignment
Function and Operation Function and Operation ■ ■ Key Assignment Battery Save The side key is assigned to the following function by the If this function is programmed by your dealer, Battery Save will be programming and you can select “short press” or “Long press”. automatically activated once no activity on the channel or no operation is Short press: Monitor performed (no key pressing or any knob selection). -
Page 10: Troubleshooting And Maintenance
Troubleshooting and Maintenance Specifications ■ Troubleshooting General Problem Solution Frequency range 400-470MHz (Set by Mitex) The transceiver does Channel capacity The battery is low. Please recharge the 16CH not work when battery pack and make sure the battery pack Channel spacing 25Hz/12.5Hz (Set by Mitex) -
Page 11: Sub-Tone Table
Sub-tone Table Channel Table 50 Groups CTCSS 67.0 85.4 107.2 136.5 165.5 186.2 210.7 254.1 69.3 88.5 110.9 141.3 167.9 189.9 218.1 THE MITEX RADIO UHF FAMILY 71.9 91.5 114.8 146.2 171.3 192.8 225.7 CHANNEL GENERAL/ SECURITY SITE 74.4 94.8 118.8 151.4 173.8... -
Page 12: Ce Declaration
Electrical and Electronic Equipment This warranty is valid if the enclosed card is properly filled in and returned to Mitex (UK) Ltd within (WEEE) directive requires that products Ten days from the date of purchase and is limited to the terms and conditions contained herein.
Need help?
Do you have a question about the GENERAL Xtreme and is the answer not in the manual?
Questions and answers