Advertisement
DAILY REFERENCE
GUIDE
THANK YOU FOR PURCHASING AN
HOTPOINT PRODUCT
To receive more comprehensive help and
support, please register your product at
www. hotpoint. eu/ register
Before using the appliance carefully read the Health and Safety guide
PRODUCT DESCRIPTION
1
2
3
4
5
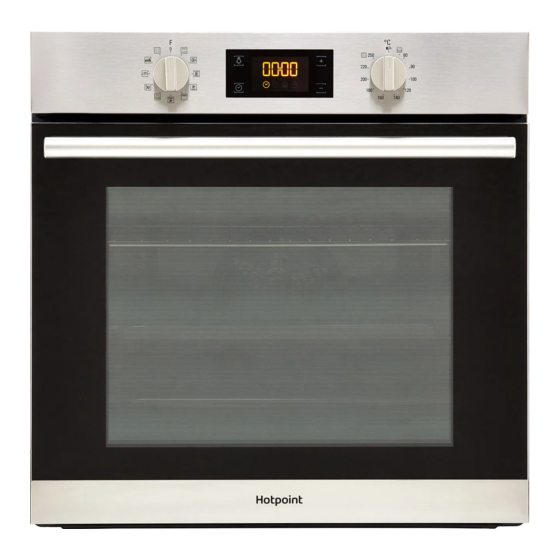
CONTROL PANEL
1
1. SELECTION KNOB
For switching the oven on by
selecting a function.
Turn to the
position to switch
the oven off.
2. LIGHT
With the oven switched on, press
to turn the oven compartment
lamp on or off.
WWW
2
3
4
3. SETTING THE TIME
For accessing the cooking time
settings, delayed start and timer.
For displaying the time when the
oven is off.
4. DISPLAY
You can download the Safety Instructions
and the Use and Care Guide by visiting our
website docs . hotpoint . eu and following
the instructions on the back of this booklet.
1. Control panel
2. Fan
3. Lamp
6
4. Runners for accessories
(the level is indicated on the wall
7
of the cooking compartment)
8
5. Door
6. Door lock
(locks the door while automatic
cleaning is in progress and
afterwards)
9
7. Upper heating element/grill
8. Circular heating element
(not visible)
9. Identification plate
10
(do not remove)
10. Lower heating element
(not visible)
5
5. ADJUSTMENT BUTTONS
For changing the cooking time
settings.
6. THERMOSTAT KNOB
Turn to select the temperature you
require when activating manual
functions. Automatic functions use
.
EN
6
1
Advertisement
Table of Contents

Related Manuals for Hotpoint SA2840PIX


Summary of Contents for Hotpoint SA2840PIX
- Page 1 HOTPOINT PRODUCT and the Use and Care Guide by visiting our To receive more comprehensive help and website docs . hotpoint . eu and following support, please register your product at the instructions on the back of this booklet. www. hotpoint. eu/ register...
- Page 2 ACCESSORIES Download the Use and Care Guide from www.hotpoint.eu for more information WIRE SHELF DRIPPING PAN BAKING TRAY The number of accessories may vary depending on which model is purchased. Other accessories can be purchased separately from the After-sales Service.
-
Page 3: Using The Appliance For The First Time
USING THE APPLIANCE FOR THE FIRST TIME SET THE TIME HEAT THE OVEN You will need to set the time when you switch on the A new oven may release odours that have been left appliance for the first time: Press until the icon behind during manufacturing: This is completely... - Page 4 . PROGRAMMING COOKING . SETTING THE TIMER You will need to select a function before you can start This option does not interrupt or program cooking programming cooking. but allows you to use the display as a timer, either during while a function is active or when the oven is DURATION off.
-
Page 5: Cooking Table
COOKING TABLE TEMPERATURE DURATION LEVEL RECIPE FUNCTION PREHEAT (°C) (MIN) AND ACCESSORIES 160-180 30-90 Leavened cakes 160-180 30-90 160–200 35-90 Filled cake (cheese cake, strudel, fruit pie) 160–200 40-90 160-180 20-45 Biscuits/tartlets 150 – 170 20-45 150 - 170 20-45 180 - 210 30-40 Choux buns... - Page 6 * Turn food halfway through cooking. Download the Use and Care Guide from ** Turn food two thirds of the way through cooking www . hotpoint . eu for the table of tested recipes, (if necessary). compiled for the certification authorities in *** Estimated length of time: dishes can be removed accordance with the standard IEC 60350-1.
-
Page 7: Maintenance And Cleaning
MAINTENANCE Download the Use and Care Guide from www.hotpoint.eu for more information AND CLEANING Do not use steam cleaning Carry out the required Do not use wire wool, abrasive equipment. operations with the oven cold. scourers or abrasive/corrosive cleaning agents, as these could... -
Page 8: Troubleshooting
HOW TO OBTAIN THE USE AND CARE GUIDE provided on your > Download the Use and Care Guide product’s identification from our website docs . hotpoint . eu (you plate. can use this QR Code), specifying the XXXXXXXX X XX Model: xxxXXXXxx...
Need help?
Do you have a question about the SA2840PIX and is the answer not in the manual?
Questions and answers