Table of Contents
Advertisement
Advertisement
Table of Contents

Related Manuals for Huawei F610


Summary of Contents for Huawei F610
- Page 1 Capetune Limited 224A Riverdale road, Erith, Bexley, London. DA8 1QE United Kingdom. Phone: +44(0)1322 43 1983 Mobile: +44 (0)7878 254 022 Email: info@capetune.com Website: www.capetune.com HUAWEI F610 Desk phone user guide V5102C00310-One Net Desk Phone Guide-EH-V7.indd 1 25/04/2012 15:47...
- Page 2 Thus the descriptions herein may not exactly match the product or its accessories you purchase. Huawei Technologies Co., Ltd reserves the right to change or modify any information or specifications contained in this manual without prior notice or obligation.
-
Page 3: Table Of Contents
Contents Introduction Appearance Front view and function keys Feature access keys Installation Basic operations Using the menu Contacts Groups Call log Tools Profiles Settings Phone settings Call settings FAQs Safety precautions and warnings Safety instructions EU Regulatory Conformance Certification information (SAR) Antenna location V5102C00310-One Net Desk Phone Guide-EH-V7.indd 3 25/04/2012 15:47... -
Page 4: Introduction
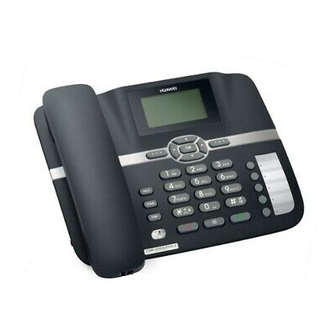
1 Introduction Appearance The figures in this guide are provided for your reference only. Front view and function keys V5102C00310-One Net Desk Phone Guide-EH-V7.indd 1 25/04/2012 15:47... - Page 5 Item Description Menu key • Select to access the phone’s menu including Contacts, Messages, Call Logs, Tools, Profiles and settings. • • • Navigation keys Left navigation key • Allows you to select the call log • You can select the option displayed in the lower left corner of the screen.
-
Page 6: Feature Access Keys
Feature access keys Item Description Hold Key • Press the hold key to ensure the call is held in progress – a “HOLD” small capital H appears on the display. This allows for the user to make choices from the options menu while the call is held. Transfer Key •... -
Page 7: Installation
Installation Before using the phone, install the battery properly. When installing the battery, ensure that the phone is powered off and is disconnected from the power adapter; ensure that the golden contacts of the battery mate securely with those in the battery slot. If the phone will not be used for a long time, remove the battery from the phone. -
Page 8: Text Input
Text input Notes: • Press the Right Navigation Key to switch between input methods. • Press # key to enable or disable T9 method. • Press 1 key to display the list of symbol. • Press Navigation key to delete the letter in front of the cursor. T9 input method (also known as Predictive text) •... -
Page 9: Basic Operations
2 Basic operations Using the menu 1. In the default mode, press Menu key to enter the main menu. • • • 2. Press the upper and lower Navigation keys to move around the menus, and then press Menu key or OK to select items. 3. -
Page 10: Making Emergency Calls
Answering or rejecting a voice call • When there is an incoming call, press , Menu key or lift the handset to answer it. Press to reject it. Making emergency calls • With or without SIM card inserted into the phone – dial either 999 or 112 and press the call/send key to make the call. -
Page 11: Set Up A Conference Call
• Once a second call has been established then two further menu options becomes available: • Swap is available, to allow the user to swap between the two calls, the one on hold and the active call. • Conference is also available, allowing the user to connect all three parties together in a single conference call, (in fact up to 6 additional parties can be added to a single call). -
Page 12: Contacts
3 Contacts Making calls from contacts • In the Contacts screen, select Phone or SIM. • Select a contact and select Options > Voice call. Alternatively, you can select Edit before call to edit the number before making the call. Searching for a contact •... -
Page 13: Other Operations
Other operations In Contacts screen, select one of the following options. • View the contacts in the device. • View the contacts in the SIM card. • View the groups of the contacts. • Copy all the contacts from your device to the SIM card or from your SIM card to the device. -
Page 14: Call Log
4 Call log View the call records • Select Call Log in the main menu and then press to select Missed, Received or Dialled. Then select Options for the following operations: • Edit the number before making a call. • Create a message. •... -
Page 15: Tools
5 Tools Alarms • Select Tools > Alarms. You can select one alarm from the list then press key to set an alarm clock. • When it is time for an alarm clock to ring, the tone sounds and a prompt is displayed. Press any key to stop it, or select snooze or stop the prompt. -
Page 16: World Time
World time Select Tools > World Time. You can view the time of important cities around the world. To switch among the time zones, press . To set the device to DST (daylight saving time), switch to the desired time zone and then select Options > Set time zone. V5102C00310-One Net Desk Phone Guide-EH-V7.indd 13 25/04/2012 15:47... -
Page 17: Profiles
6 Profiles Select a profile In the Profiles screen, select a profile. • Activate the selected profile. • Press to activate it. • Select Options and select On to activate it. As a shortcut it is also possible to press and hold the # button in standby mode, this will allow the device to be toggled between Silent and Normal profiles. -
Page 18: Settings
7 Settings Phone settings Select Settings > Phone settings. You can change the settings of the device. • Change the system time for the device. • Change the display format of the date. • Assign the frequently used functions to the keys as shortcut keys. •... -
Page 19: Call Settings
Call settings Call forwarding When you cannot answer the phone or you want to forward all calls, you can use this function to set up the options. In this menu you can select to: 1. Set the destination for calls if you are busy. 2. -
Page 20: Auto Dial
Auto dial If the function is activated, the number you key in is dialled automatically at the time you set. Network You can change the settings for the network. Select Settings > Network this will allow configuration of UMTS, GSM or Auto Mode, (we would also recommend Auto), and to select the network you are connected to, (this feature is only relevant if you take the device abroad and roam into a foreign network, the device will connect automatically, but this feature allows you to override the... - Page 21 Notes: • To modify the PIN code, you must set PIN lock to On firstly. • If you enter the wrong PIN or PIN2 three times, the SIM card is locked. You need the PUK or PUK2 code to unlock the SIM card. If you enter the wrong PUK or PUK2 code 10 times in total, the SIM card is locked permanently.
-
Page 22: Faqs
8 FAQs If problems occur during the use of the phone, refer to the following sections for a proper solution. If a problem persists, contact Vodafone. Phone cannot be powered off 1. Remove the battery cover and check whether the battery is installed properly. 2. -
Page 23: Safety Precautions And Warnings
9 Safety precautions & warnings Safety instructions Read these guidelines. Not following them may be dangerous and/or illegal. You alone are responsible for how you use your device and any consequences of its use. Do not switch the product on wherever the use of a wireless product is prohibited or when it may cause interference or danger. -
Page 24: Small Children
Radio frequency exposure limits To avoid the possibility of exceeding radio frequency exposure limits, you should keep a distance of at least 20 cm between you (or any other person in the vicinity) and the antenna that is contained within the phone as shown at the bottom of this document (under the heading “Antenna Location”). -
Page 25: Medical Devices
Medical devices Please consult your Doctor and the medical device manufacturer to determine if the operation of your device may interfere with the operation of your medical device. Hospitals Switch off your wireless device when requested to do so in hospitals, clinics or health care facilities. -
Page 26: Blasting Caps And Areas
Blasting caps and areas • Turn off your device when in a blasting area or in areas posted turn off “two-way radios” or “electronic devices” to avoid interfering with blasting operations. Observe restrictions, and follow all regulations and rules. • Do NOT use this product near water, for example, in a wet basement or near a swimming pool. -
Page 27: Eu Regulatory Conformance
EU Regulatory Conformance • Hereby, Huawei Technologies Co., Ltd. declares that this device is in compliance with the essential requirements and other relevant provisions of Directive 1999/5/EC. • Notice: Observe the national local regulations in the location where the device is to be used. -
Page 28: Certification Information (Sar)
Certification information (SAR) • This device meets guidelines for exposure to radio waves (Report No.: RZA1112- 2086SAR). • Your device is a low-power radio transmitter and receiver. As recommended by international guidelines, the device is designed not to exceed the limits for exposure to radio waves. -
Page 29: Antenna Location
Antenna location V5102C00310-One Net Desk Phone Guide-EH-V7.indd 26 25/04/2012 15:47... - Page 30 V5102C00310-One Net Desk Phone Guide-EH-V7.indd 27 25/04/2012 15:47...
- Page 31 V5102C00310-One Net Desk Phone Guide-EH-V7.indd 28 25/04/2012 15:47...
- Page 32 V5102C00310-One Net Desk Phone Guide-EH-V7.indd 29 25/04/2012 15:47...