
Related Manuals for Canon MB2100 Series


Summary of Contents for Canon MB2100 Series
-
Page 1: Online Manual
MB2100 series Online Manual Printer Functions Overview Printing Scanning Faxing Troubleshooting English... -
Page 2: Table Of Contents
Before Using Canon Inkjet Cloud Printing Center........ - Page 3 Troubleshooting Canon Inkjet Cloud Printing Center........
- Page 4 If Printing Is Faint or Uneven..........200 Maintenance Procedure.
- Page 5 Turning the Machine On and Off..........266 Checking the Power Plug/Power Cord.
- Page 6 Canon IJ Network Tool Screen........
- Page 7 Set Cassette Paper Information After Loading Paper........392 Canceling Print Jobs.
- Page 8 Obtaining the Latest Printer Driver..........Delete the Unnecessary Canon IJ Printer from the Printer List..... . . 482 Before Installing the Printer Driver.
- Page 9 Printing Directly from Smartphone/Tablet..........503 Android Print.
- Page 10 Starting IJ Scan Utility............565 Scanning Documents.
- Page 11 Registering Recipients in Group E-Mail..........690 Changing Registered Information.
- Page 12 Registering Recipients Using Speed Dial Utility2 (Mac OS)....... . . 765 Starting Up Speed Dial Utility2.
- Page 13 Cannot Find Machine on Network........... . . 827 Cannot Find Machine on Check Printer Settings Screen.
- Page 14 Print Results Are Unsatisfactory............876 Cannot Complete Printing.
- Page 15 Scanner Driver Error Messages............921 Faxing Problems.
- Page 16 List of Support Code for Error (Paper Jams)........971 1300.
- Page 17 3404..............1017 3405.
- Page 18 5103..............1050 5104.
- Page 19 6938..............1083 6939.
-
Page 20: Using This Online Manual
Using This Online Manual Symbols Used in This Document Touch-enabled Device Users (Windows) Symbols Used in This Document Warning Instructions that, if ignored, could result in death or serious personal injury caused by incorrect operation of the equipment. These must be observed for safe operation. Caution Instructions that, if ignored, could result in personal injury or material damage caused by incorrect operation of the equipment. -
Page 21: Trademarks And Licenses
Adobe Systems Incorporated in the United States and/or other countries. • Bluetooth is a trademark of Bluetooth SIG, Inc., U.S.A. and licensed to Canon Inc. • Autodesk and AutoCAD are registered trademarks or trademarks of Autodesk, Inc., and/or its subsidiaries and/or affiliates in the USA and/or other countries. - Page 22 Apache License Version 2.0, January 2004 http://www.apache.org/licenses/ TERMS AND CONDITIONS FOR USE, REPRODUCTION, AND DISTRIBUTION 1. Definitions. "License" shall mean the terms and conditions for use, reproduction, and distribution as defined by Sections 1 through 9 of this document. "Licensor" shall mean the copyright owner or entity authorized by the copyright owner that is granting the License.
- Page 23 copyright license to reproduce, prepare Derivative Works of, publicly display, publicly perform, sublicense, and distribute the Work and such Derivative Works in Source or Object form. 3. Grant of Patent License. Subject to the terms and conditions of this License, each Contributor hereby grants to You a perpetual, worldwide, non-exclusive, no-charge, royalty-free, irrevocable (except as stated in this section) patent license to make, have made, use, offer to sell, sell, import, and otherwise transfer the Work, where such license applies only to those patent claims licensable by such...
- Page 24 limitation, any warranties or conditions of TITLE, NON-INFRINGEMENT, MERCHANTABILITY, or FITNESS FOR A PARTICULAR PURPOSE. You are solely responsible for determining the appropriateness of using or redistributing the Work and assume any risks associated with Your exercise of permissions under this License. 8.
- Page 25 * Redistributions of source code must retain the above copyright notice, this list of conditions and the following disclaimer. * Redistributions in binary form must reproduce the above copyright notice, this list of conditions and the following disclaimer in the documentation and/or other materials provided with the distribution. * Neither the name of the Networks Associates Technology, Inc nor the names of its contributors may be used to endorse or promote products derived from this software without specific prior written permission.
- Page 26 This distribution may include materials developed by third parties. Sun, Sun Microsystems, the Sun logo and Solaris are trademarks or registered trademarks of Sun Microsystems, Inc. in the U.S. and other countries. Redistribution and use in source and binary forms, with or without modification, are permitted provided that the following conditions are met: * Redistributions of source code must retain the above copyright notice, this list of conditions and the following disclaimer.
- Page 27 ---- Part 6: Cisco/BUPTNIC copyright notice (BSD) ----- Copyright (c) 2004, Cisco, Inc and Information Network Center of Beijing University of Posts and Telecommunications. All rights reserved. Redistribution and use in source and binary forms, with or without modification, are permitted provided that the following conditions are met: * Redistributions of source code must retain the above copyright notice, this list of conditions and the following disclaimer.
- Page 28 IN CONTRACT, STRICT LIABILITY, OR TORT (INCLUDING NEGLIGENCE OR OTHERWISE) ARISING IN ANY WAY OUT OF THE USE OF THIS SOFTWARE, EVEN IF ADVISED OF THE POSSIBILITY OF SUCH DAMAGE. LEADTOOLS Copyright (C) 1991-2009 LEAD Technologies, Inc. CMap Resources ----------------------------------------------------------- Copyright 1990-2009 Adobe Systems Incorporated.
- Page 29 Copyright (c) 1998, 1999, 2000 Thai Open Source Software Center Ltd Permission is hereby granted, free of charge, to any person obtaining a copy of this software and associated documentation files (the "Software"), to deal in the Software without restriction, including without limitation the rights to use, copy, modify, merge, publish, distribute, sublicense, and/or sell copies of the Software, and to permit persons to whom the Software is furnished to do so, subject to the following conditions:...
-
Page 30: Search Tips
Enter keywords in the search window and click (Search). You can search for target pages in this guide. Entry example: "(your product's model name) load paper" Search Tips You can search for target pages by entering keywords in the search window. Important •... - Page 31 Note • The displayed screen varies depending on your product. • Searching for Application Functions Enter your application's name and a keyword for the function you want to learn about Example: When you want to learn how to print collages with My Image Garden Enter "My Image Garden collage"...
-
Page 32: Using The Machine
Using the Machine Printing Documents from Your Computer (Windows) Printing Documents from Your Computer (Mac OS) Copying Faxing... -
Page 33: Printing Documents From Your Computer (Windows)
Printing Documents from Your Computer (Windows) Print documents from applications on a computer or other device as follows. 1. Pull out the cassette. 2. Load paper printing-side DOWN. 3. Align the paper guides with the paper length and width. 4. Insert the cassette. After you insert the cassette, a screen for registering paper information for the cassette is displayed on the LCD. - Page 34 Follow the instructions of any messages displayed to register the paper information. 6. Pull out the output tray extension (A) and open the paper output support (B). 7. In the application, select Print. You can often access the Print dialog box by selecting Print in the File menu. 8.
- Page 35 10. Once the print settings are complete, click OK to print. Note • A variety of print settings can be configured with the printer driver. Printing from Application Software (Windows Printer Driver)
-
Page 36: Printing Documents From Your Computer (Mac Os)
Printing Documents from Your Computer (Mac OS) Print documents from applications on a computer or other device as follows. 1. Pull out the cassette. 2. Load paper printing-side DOWN. 3. Align the paper guides with the paper length and width. 4. - Page 37 Follow the instructions of any messages displayed to register the paper information. 6. Pull out the output tray extension (A) and open the paper output support (B). 7. In the application, select Print. You can often access the Print dialog by selecting Print... in the File menu. Note •...
- Page 38 9. Select the paper size. In Paper Size, select the paper size you use. 10. Select Quality & Media from the pop-up menu.
- Page 39 11. Select the media type. In Media Type, select the same media type loaded in the machine. 12. Once the print settings are complete, click Print to print. Note • A variety of print settings can be configured with the printer driver. Printing from Application Software (Mac OS Printer Driver)
-
Page 40: Copying
Copying Load originals and copy them on plain paper as follows. 1. Pull out the cassette. 2. Load paper printing-side DOWN. 3. Align the paper guides with the paper length and width. 4. Insert the cassette. After you insert the cassette, a screen for registering paper information for the cassette is displayed on the LCD. - Page 41 Follow the instructions of any messages displayed to register the paper information. 6. Pull out the output tray extension (A) and open the paper output support (B). 7. Press the HOME button (C). 8. Select Copy (D), and then press the OK button. 9.
- Page 42 Note • For continuous copying of multiple originals, use the ADF (Auto Document Feeder). 11. Close the document cover. 12. Check the paper settings, and then press the Black or Color button (G). Important • Do not open the document cover until copying is finished. Note •...
-
Page 43: Faxing
Faxing Fax multiple documents in black and white as follows. 1. Open the document tray (A). 2. Insert the documents face-UP. 3. Adjust the document guides as needed. 4. Press the HOME button (B). 5. Select FAX (C), and then press the OK button. - Page 44 6. Use the keypad to enter the fax number (D). 7. Press the Black button (E). Note • Many other convenient faxing features are available. Faxing...
-
Page 45: Printer Functions
Managing Printer Conveniently Using Quick Utility Toolbox Available Connection Methods Scan Originals Larger than the Platen Scan Multiple Originals at One Time Using PIXMA/MAXIFY Cloud Link Print Easily from a Smartphone or Tablet with Canon PRINT Inkjet/SELPHY Printing with Windows RT Online Storage Integration Function... -
Page 46: Printing From An Airprint-Enabled Printer
Printing from an AirPrint-enabled Printer Printing from an AirPrint-enabled Printer with Mac Printing from an AirPrint-enabled Printer with iOS Device... -
Page 47: Printing From An Airprint-Enabled Printer With Mac
Printing from an AirPrint-enabled Printer with Mac Using AirPrint to print from your iPhone, iPad, iPod touch, or Mac. AirPrint enables you to print photos, email, Web pages and documents from iPhone, iPad, iPod touch, and Mac without the need to install drivers, or download apps or software. Note •... - Page 48 Note • If the printer's Auto Power On function is enabled, the printer is turned on automatically when it receives the print data. Load paper. 3. Perform printing on your application software. Print dialog appears. 4. Select your model name added as AirPrint printer from the Printer list in the Print Dialog. 5.
-
Page 49: Printing From An Airprint-Enabled Printer With Ios Device
Printing from an AirPrint-enabled Printer with iOS Device Using AirPrint to print from your iPhone, iPad, iPod touch, or Mac. AirPrint enables you to print photos, email, Web pages and documents from iPhone, iPad, iPod touch, and Mac without the need to install drivers, or download apps or software. Note •... - Page 50 4. Tap Print from menu options. 5. Select your model name from Printer on Printer Options. Important • Because some applications do not support AirPrint, Printer Options may not be displayed. If an application does not let you use printer options, you cannot print from that application.
- Page 51 Note • Printer Options differ depending on the application that you are using. 6. When printing file type that has multiple pages, such as PDF file, tap Range and tap All Pages or select range of pages to be printed. 7.
- Page 52 Load the envelope in vertically with the address side facing down so that the folded flap of the envelope will be faced up on the right side. Checking Print Status During printing, a Print Center icon is displayed in the list of recently used applications and you can use it to check the print progress.
-
Page 53: Connect Wirelessly In "Direct Connection
Connect Wirelessly in "Direct Connection" The printer supports "direct connection" in which you can connect to the printer wirelessly from a computer or smartphone without a wireless router. Switch to "direct connection" to print or scan wirelessly. Using Machine with Direct Connection... -
Page 54: Download A Variety Of Content Materials
PREMIUM Contents can be downloaded easily via Easy-PhotoPrint+. Downloaded PREMIUM Contents can be printed directly with Easy-PhotoPrint+. To download PREMIUM Contents, make sure that genuine Canon ink tanks/ink cartridges are installed for all colors on a supported printer. Note... -
Page 55: Print Items With Easy-Photoprint+ (Web Application)
Print Items with Easy-PhotoPrint+ (Web Application) You can easily create and print personalized items such as calendars and collages, anytime and anywhere, by simply accessing Easy-PhotoPrint+ on the web from a computer or tablet. By using Easy-PhotoPrint+, you can create items in the latest environment without going through the trouble of installation. -
Page 56: Managing Printer Conveniently Using Quick Utility Toolbox
Managing Printer Conveniently Using Quick Utility Toolbox Quick Utility Toolbox is a shortcut menu that lets you access the functions you want to use with one click. After installing utilities compatible with Quick Utility Toolbox, they will be added to this menu. The Quick Utility Toolbox provides a convenient way to quickly launch added utilities for making printer settings and doing other management tasks. -
Page 57: Available Connection Methods
Available Connection Methods The following connection methods are available on the printer. Wireless Connection • With a wireless router • Without a wireless router USB Connection Wireless Connection There are two methods for connecting the printer to your device (e.g. smartphone or tablet). One method is to connect using a wireless router, and the other method is to connect without using a wireless router. -
Page 58: Usb Connection
◦ You can change network settings such as the SSID and security protocol on the printer. ◦ When the connection between a device and a wireless router is completed and (Wi-Fi icon) is displayed in the device's screen, you can connect the device to the printer using the wireless router. -
Page 59: Scan Originals Larger Than The Platen
Scan Originals Larger than the Platen By using the stitch function of IJ Scan Utility, you can scan the left and right halves of an item larger than the platen and combine them back into one image. Items up to approximately twice as large as the platen are supported. -
Page 60: Scan Multiple Originals At One Time
Scan Multiple Originals at One Time By using IJ Scan Utility, you can scan two or more photos (small items) placed on the platen at one time and save each image individually. Refer to the following for details. Scanning Multiple Originals at One Time (Windows) Scanning Multiple Originals at One Time (Mac OS) -
Page 61: Using Pixma/Maxify Cloud Link
Using PIXMA/MAXIFY Cloud Link By using PIXMA/MAXIFY Cloud Link, you can connect your printer to a cloud service, such as CANON iMAGE GATEWAY, Evernote, or Twitter, and use the following functions without using a computer: • Print images from a photo-sharing service •... -
Page 62: Notice For Web Service Printing
Canon shall not be held responsible for any damages resulting from such actions. • In no event shall Canon be liable for any damages whatsoever resulting from the use of the web services. -
Page 63: Using Pixma/Maxify Cloud Link From Your Printer
Using PIXMA/MAXIFY Cloud Link from Your Printer Before Using PIXMA/MAXIFY Cloud Link Registering Printer Information to PIXMA/MAXIFY Cloud Link Using PIXMA/MAXIFY Cloud Link Cloud Troubleshooting... -
Page 64: Before Using Pixma/Maxify Cloud Link
◦ Your printer may not support the scan function. ◦ The printer must support the Canon Inkjet Cloud Printing Center. To check whether your model supports this function, see "Models that Support Canon Inkjet Cloud Printing Center". • Network environment The printer must be connected to a LAN and to the Internet. - Page 65 following disclaimer in the documentation and/or other materials provided with the distribution. * Neither the name of the University of Cambridge nor the name of Google Inc. nor the names of their contributors may be used to endorse or promote products derived from this software without specific prior written permission.
-
Page 66: Registering Printer Information To Pixma/Maxify Cloud Link
If the Security code is incorrect, use your smartphone, tablet, or computer, and change the setting from the My account of the Canon Inkjet Cloud Printing Center. 3. When the registration preparation completed screen appears, select OK 4. On the confirmation screen, select Next 5. - Page 67 <Privacy statement> Note • If you select Do not agree, a confirmation screen asking whether you want to cancel Register My account appears. If you select Yes, then Register My account is canceled, and you return to the Home screen. Even if you select Do not agree, you can still use this service by selecting Agree from the registration screen later.
- Page 68 The registration of printer information is completed, and a list of apps is displayed. here for the description of the apps list screen. After you complete the registration, you can print photos and documents that have been uploaded to apps on the linked cloud service and add/delete/sort apps.
-
Page 69: Application Management
Important • Select how to manage allows you to change which users can use this service. For details, see "Canon Inkjet Cloud Printing Center window". Add apps You can add your favorite apps to the printer. Follow the steps described below to add apps. - Page 70 5. From the displayed apps list, select the app that you want to register Note • Description of displayed icons : Can be used with genuine Canon ink. If you are using a G3000 series model, you cannot use this service because the model is not supported.
- Page 71 : Cannot be used because it is not yet released or does not support your region, model, or language. : Can be used with genuine Canon ink. If you are using a G3000 series model, you cannot use this service because the model is not supported.
- Page 72 When the deletion is finished, the app will be deleted from the apps list on the main screen. To delete another app, repeat the procedure from step 4. To end the app deletion, select Back and return to the cloud's Main screen. Note •...
- Page 73 : Cannot be used because it is not yet released or does not support your region, model, or language. : Can be used with genuine Canon ink. If you are using a G3000 series model, you cannot use this service because the model is not supported.
-
Page 74: Using Pixma/Maxify Cloud Link
Using PIXMA/MAXIFY Cloud Link This section introduces the photo printing procedure by using CANON iMAGE GATEWAY as an example. Important • The available functions differ depending on the app. • The printing procedure differs depending on the app. • You need to get the account and register photo and other data beforehand. - Page 75 4. In the displayed image list, select the image that you want to print, and then select Next 5. Make the necessary print settings, and then select Color A message that indicates the completion of issuing print job appears, and printing starts. To continue printing, select Continue, and perform the operation from Step 3.
- Page 76 Note • To leave a usage history of this service, from the Home window on the operation panel, select Setup -> Web service setup -> Web service connection setup -> IJ Cloud Printing Center setup -> History setting for this service -> Save. Cloud Troubleshooting...
-
Page 77: Cloud Windows
This section describes the Main screen of Cloud and the services available on the Main screen. Important • Select how to manage allows you to change which users can use this service. For details, see "Canon Inkjet Cloud Printing Center window". When you select Cloud from the printer home screen, the cloud's Main screen appears. - Page 78 : Cannot be used because it is not yet released or does not support your region, model, or language. : Can be used with genuine Canon ink. If you are using a G3000 series model, you cannot use this service because the model is not supported.
-
Page 79: Legal Information
Manage jobs From the Status list window, you can check the status of a job. Settings Select this to set the Time zone. Select your region on the list. For some regions, you can set whether or not to apply the daylight saving time setting. -
Page 80: Cloud Troubleshooting
Cloud Troubleshooting If you cannot print Check the following if you cannot print. • Check that the printer is connected to the Internet. • Check that the printer is connected to a LAN and the LAN environment is connected to the Internet. •... -
Page 81: Using Pixma/Maxify Cloud Link From Your Smartphone, Tablet, Or Computer
Using PIXMA/MAXIFY Cloud Link from Your Smartphone, Tablet, or Computer Before Using Canon Inkjet Cloud Printing Center Registering User Information to Canon Inkjet Cloud Printing Center Using Canon Inkjet Cloud Printing Center Adding a Printer Adding a PIXMA/MAXIFY Cloud Link User... -
Page 82: Before Using Canon Inkjet Cloud Printing Center
Before Using Canon Inkjet Cloud Printing Center Canon Inkjet Cloud Printing Center is a service that links with the cloud function of the printer and allows you to perform operations such as registering and managing apps from your smartphone or tablet device, and checking the print status, print error, and ink status of the printer. -
Page 83: Requirements For Canon Inkjet Cloud Printing Center Operation
Requirements for Canon Inkjet Cloud Printing Center operation Computer x86 or x64 1.6 GHz or higher 2 GB or higher Resolution 1024 x 768 pixels or higher Monitor display Number of display colors 24 bits (true-color) or higher Browser Internet Explorer 9... - Page 84 • In an in-house network environment, the 5222 port must be released. For confirmation instructions, contact the network administrator.
-
Page 85: Registering User Information To Canon Inkjet Cloud Printing Center
Registering User Information to Canon Inkjet Cloud Printing Center To use the Canon Inkjet Cloud Printing Center, you need to follow the steps described below and register My account information. If your model has color LCD monitor If your model has monochrome LCD monitor... -
Page 86: Registering User Information To Canon Inkjet Cloud Printing Center (Color Lcd Monitor)
Registering User Information to Canon Inkjet Cloud Printing Center (Color LCD Monitor) To use the Canon Inkjet Cloud Printing Center, you need to follow the steps described below and register My account information. Registering from Printer 1. Check that the printer is connected to the Internet 2. - Page 87 To return to the cloud main screen, select Exit. Note • You must have a special app to read QR codes from your smartphone or tablet. If you do not have an app that reads QR codes on your smartphone or tablet, install one from App Store or Google Play.
- Page 88 In the displayed screen, enter the E-mail address that you want to register, and then select Continue registration. Note • If you enter an e-mail address that has already been registered, you will receive an "already registered" e-mail. Follow the instructions in the e-mail, and register a different e-mail address. Important •...
- Page 89 1. Check that e-mail containing URL has been sent to registered e-mail address, and access URL 2. In the License agreement and Privacy statement windows of Canon Inkjet Cloud Printing Center, read the statements, and select Agree if you agree...
- Page 90 3. Register password for logging in to Canon Inkjet Cloud Printing Center In the My account registration screen, enter the password you want to register into Password and Password (Confirmation), and then select Next.
- Page 91 Important • There are character restrictions for the Password, as shown below. • The password must be between 8 and 32 characters long, using single-byte alphanumeric characters and symbols (!"#$%&'()*+,-./:;<=>?@[¥]^_`{|}~). (Alphabets are case-sensitive) 4. Enter Nickname Enter any user name you want to use. Important •...
- Page 92 • The user name must be between 1 and 20 characters long, using single-byte alphanumeric characters and symbols (!"#$%&'()*+,-./:;<=>?@[¥]^_`{|}~). (Alphabets are case-sensitive) 5. Specify the Time zone setting, and select Done Select your region on the list. If you cannot find your region on the list, select the one closest to your region.
- Page 93 Enter the registered E-mail address and Password, and Log in to the Canon Inkjet Cloud Printing Center. Using Canon Inkjet Cloud Printing Center...
-
Page 94: Monitor)
Registering User Information to Canon Inkjet Cloud Printing Center (Monochrome LCD Monitor) To use the Canon Inkjet Cloud Printing Center, you need to follow the steps described below and register My account information. Print registration information from the printer 1. On the printer operation panel, select the Setup button, and then select Web service setup ->... - Page 95 2. When the printer registration screen is displayed, select Create new account 3. Enter the E-mail address and Printer registration ID of the printer's owner, and then select OK The registration page URL is sent to the e-mail address entered.
- Page 96 User Registration 1. Check that e-mail containing URL has been sent to entered e-mail address, and access 2. In the License agreement and Privacy statement windows of Canon Inkjet Cloud Printing Center, read the statements, and select Agree if you agree...
- Page 97 3. Register password for logging in to Canon Inkjet Cloud Printing Center In the My account registration screen, enter the password you want to register into Password and Password (Confirmation), and then select Next.
- Page 98 Important • There are character restrictions for the Password, as shown below. • The password must be between 8 and 32 characters long, using single-byte alphanumeric characters and symbols (!"#$%&'()*+,-./:;<=>?@[¥]^_`{|}~). (Alphabets are case-sensitive) 4. Enter Nickname Enter any user name you want to use. Important •...
- Page 99 • The user name must be between 1 and 20 characters long, using single-byte alphanumeric characters and symbols (!"#$%&'()*+,-./:;<=>?@[¥]^_`{|}~). (Alphabets are case-sensitive) 5. Specify the Time zone setting, and select Done Select your region on the list. If you cannot find your region on the list, select the one closest to your region.
- Page 100 Enter the registered E-mail address and Password, and Log in to the Canon Inkjet Cloud Printing Center. Using Canon Inkjet Cloud Printing Center...
- Page 101 • Some models do not support this function. To add a printer by using Canon Inkjet Cloud Printing Center, you will need a Printer registration ID. From the operation panel of this printer, print the URL of the authentication site and your Printer registration ID.
- Page 102 If your model has monochrome LCD monitor 2. On the printer operation panel, select the Setup button, and then select Web service setup -> Connection setup -> IJCloudPrintingCtr -> Register w/ service 3. In the registration confirmation window, Select Yes 4.
-
Page 103: Registering User Information To Canon Inkjet Cloud Printing Center (No Lcd Monitor/Using Pro-1000 Series Or Pro-500 Series)
Registering User Information to Canon Inkjet Cloud Printing Center (No LCD Monitor/Using PRO-1000 series or PRO-500 series) To use the Canon Inkjet Cloud Printing Center, you need to follow the steps described below and register My account information. Registering from Your Smartphone, Tablet, or Computer 1. - Page 104 If you want to register a different e-mail address, select Do not send to display the E-mail address entry screen. In the displayed screen, enter the E-mail address that you want to register, and then select Continue registration. Note • If you enter an e-mail address that has already been registered, you will receive an "already registered"...
- Page 105 1. Check that e-mail containing URL has been sent to registered e-mail address, and access URL 2. In the License agreement and Privacy statement windows of Canon Inkjet Cloud Printing Center, read the statements, and select Agree if you agree...
- Page 106 3. Register password for logging in to Canon Inkjet Cloud Printing Center In the My account registration screen, enter the password you want to register into Password and Password (Confirmation), and then select Next.
- Page 107 Important • There are character restrictions for the Password, as shown below. • The password must be between 8 and 32 characters long, using single-byte alphanumeric characters and symbols (!"#$%&'()*+,-./:;<=>?@[¥]^_`{|}~). (Alphabets are case-sensitive) 4. Enter Nickname Enter any user name you want to use. Important •...
- Page 108 • The user name must be between 1 and 20 characters long, using single-byte alphanumeric characters and symbols (!"#$%&'()*+,-./:;<=>?@[¥]^_`{|}~). (Alphabets are case-sensitive) 5. Specify the Time zone setting, and select Done Select your region on the list. If you cannot find your region on the list, select the one closest to your region.
- Page 109 Enter the registered E-mail address and Password, and Log in to the Canon Inkjet Cloud Printing Center. Using Canon Inkjet Cloud Printing Center...
-
Page 110: Using Canon Inkjet Cloud Printing Center
Using Canon Inkjet Cloud Printing Center When the user registration is completed, you can log in to the Canon Inkjet Cloud Printing Center and use the service. 1. From your PC, smartphone, or tablet, access the service login URL (http://cs.c-ij.com/) 2. -
Page 111: Printing Procedure
Printing procedure This section introduces the photo printing procedure by using CANON iMAGE GATEWAY as an example. Important • The available functions differ depending on the app. • The printing procedure differs depending on the app. • You need to get the account and register photo and other data beforehand. - Page 112 4. In the displayed image list, select the image that you want to print, and then select Next 5. Make the necessary print settings, and then select Print...
- Page 113 6. A print job completion message appears, and printing starts To continue printing, select Continue, and perform the operation from Step 3. To end the printing, select Apps. The screen returns to the apps list screen. Important • If a print job is not printed within 24 hours after the print job is issued, the print job will expire and cannot be printed.
-
Page 114: Canon Inkjet Cloud Printing Center Window
Canon Inkjet Cloud Printing Center window This section describes the Canon Inkjet Cloud Printing Center screens that are displayed on your smartphone, tablet device, or computer. Description of the Login screen Description of the Main screen Description of the Login screen This section provides the description of the Login screen of Canon Inkjet Cloud Printing Center. - Page 115 The licensing information of Canon Inkjet Cloud Printing Center is displayed. Description of the Main screen When you log in to the Canon Inkjet Cloud Printing Center, the Main screen appears. If you are using a smartphone or a tablet, you can also print photos and documents.
- Page 116 Select how to manage and set Manage by group (for office users). Mng. printer screen From the Mng. printer screen, you can check update printer information registered to the Canon Inkjet Cloud Printing Center, copy apps, change printer names, delete printers, and printers.
- Page 117 • If Select how to manage has been set, you can use this function only when you select Manage app availability by printer. For details, see "Tips on Using Canon Inkjet Cloud Printing Center (at Work)". • Change the printer name When you select , a screen to change the printer name appears.
- Page 118 • Although the number of printers that can be registered for one domain is not limited, only up to 16 printers are guaranteed to operate. Manage users screen From the Manage users screen, you can check user information registered to the Canon Inkjet Cloud Printing Center, delete...
- Page 119 To change the privileges of the Administrator or a Standard user, select Authority for the user whom you want to change the settings for. Group management screen From the Group management screen, you can use functions for checking group information registered to Canon Inkjet Cloud Printing Center, changing groups, deleting groups, adding groups, and setting up users, printers, and apps belonging to each group.
- Page 120 To switch between app registration/deletion, select Web services Displays the external link service. You can restrict the use of other web services that use Canon Inkjet Cloud Printing Center accounts such as Easy-PhotoPrint+. To switch between service linking/release, select appears for items that do not have anything selected.
- Page 121 If you delete all groups, you must create a new one. To set a different management method, set the target method from the Select how to manage screen. • Add group Add a group to be used in Canon Inkjet Cloud Printing Center. Note • You can register up to 20 groups.
- Page 122 Advanced management screen The Advanced management screen allows you to set the management method for printer users and apps that can be used. To go to the setup screen, select • Require security code Each user can set a Security code, start the app, and perform printing and other operations.
- Page 123 Manage app availability by user When one printer is used, you can manage the usable apps by user. For usage examples, see "Tips on Using Canon Inkjet Cloud Printing Center (at Home/If you are using PRO-1000 series or PRO-500 series)".
- Page 124 (3) Printer name area The registered name of the printer selected is displayed. The Administrator can change the printer name from the Mng. printer screen of the left context menu. (4) Right context menu When you select , the context menu appears. The information displayed depends on the menu currently selected in the menu area.
- Page 125 From the My account screen, you can display the Permitted services screen and clear any linked service setting. • Help/legal notices The description of the Canon Inkjet Cloud Printing Center screen and various reminders are displayed. • Log out This opens the Log out screen of the Canon Inkjet Cloud Printing Center.
- Page 126 (5) Display area The display changes based on the menu you select. (6) Menu area The following 4 menu buttons are displayed: • Apps This displays the list of registered apps in the Display area. • Config This displays the Register apps screen in the Display area.
- Page 127 On the Search apps screen, the apps that you can register by using the Canon Inkjet Cloud Printing Center are displayed by category. ◦ When you select , the details of the app are displayed. When you select , you can choose to register or unregister the app.
- Page 128 : Can be used with genuine Canon ink. If you are using a G3000 series model, you cannot use this service because the model is not supported. • Properties This screen displays the status of the printer that is currently selected.
- Page 129 This section introduces those functions by using a family of 3 (father, mother, and child) as an example. If the father registers the printer to Canon Inkjet Cloud Printing Center, only the father is managed by the service, and the mother and the child cannot use the service unless the father tells them the login E-mail address and Password.
- Page 130 3. The father selects Add user, and by following the screen instructions, registers the mother and child as users. After this registration is complete, the mother and child can individually use the service.
- Page 131 After the Administrator (father) specifies settings according to the procedure below, the father, the mother, and the child will be able to manage apps individually. 1. As the Administrator, the father logs in to Canon Inkjet Cloud Printing Center selects Advanced management from 2. For Select how to manage, the father selects Set...
- Page 132 3. The father sets Manage app availability by user and selects OK 4. The screen for checking the management method change appears To complete the setup and return to the Advanced management window, select OK.
- Page 133 All registered users can register and delete apps freely.
- Page 134 Tips on Using Canon Inkjet Cloud Printing Center (at Work) The Group management function allows you take advantage of the many useful functions that the service offers for office use. This section introduces an example in which two printers are used, the Administrator is the senior clerk, and the other members are the company president, the section manager, and the new hire.
- Page 135 4. The senior clerk selects Advanced management from 5. For Select how to manage, the senior clerk selects Set...
- Page 136 6. The senior clerk sets Manage by group (for office users) and selects OK Note • If Group management has already been set up, refer to step 10 and the subsequent steps. 7. On the screen for checking management method changes, the senior clerk checks the displayed information and selects OK.
- Page 137 This appears only if the selected mode is Group management. To complete the setup and display the Group management screen, select OK. Note • With the default settings, the group is named "group1". • With the default settings, all registered users belong to the same group. 8.
- Page 138 10. Select Settings, and in group setup screen, check that all users on the Users tab are selected 11. On Printers tab, check that all printers are selected 12. On Apps tab, set only Evernote app to...
- Page 139 To switch between app registration/deletion, select To return to the Group management screen, select Close. This completes the setup of the group to be used by the entire office. Note • The group setup screen displays all users and printers that are registered in the domain. •...
- Page 140 1. From , select Group management Note • This appears only if Manage by group (for office users) is set in Advanced management. 2. In displayed screen, select Add group...
- Page 141 3. The senior clerk enters the Group name and selects OK In this field, enter "President" as the president-only group because you will be setting apps that only the president can use. Important • The following restrictions apply to entering the Group name. •...
- Page 142 5. On Users tab, select only president 6. On the Printers tab, select printer to be used. 7. On the Apps tab, set the Evernote and Facebook apps to...
- Page 143 To switch between app registration/deletion, select To return to the Group management screen, select Close. The above procedure allows you to set apps that only the president can use. Note • The group setup screen displays all users and printers that are registered in the domain. Limiting Apps That All Members Can Use on Printer To set the apps to be used on the printer, use the following procedure provided by this service.
- Page 144 Note • This appears only if Manage by group (for office users) is set in Advanced management. 2. For Apps available on printers that do not require a security code, select Settings 3. On Apps tab, set only Evernote app to...
- Page 145 To switch between app registration/deletion, select To return to the Group management screen, select Close. The above procedure sets up Evernote as the only app that all users can use on the printer. Limiting Apps That Individual Users Can Use on Printer For each user, you can set the apps that the user can use on the printer.
- Page 146 2. For Require security code, select Set. 3. Select printer for setting up Security code. Security codes identify individual users when multiple users are using a printer.
- Page 147 Note • On models where the settings cannot be changed, this function cannot be selected. Some models do not support this function. To check whether your model supports this function, see "Models that Support Security Codes". 4. Set up Security code If there are users who have not set up a Security code, a screen appears for checking whether to send an e-mail prompting those users to set up a Security code.
- Page 148 Important • The following character restriction applies to Security code entries: • Up to 8 alphanumeric characters The Security code change process ends, and the change completion message appears. In the message screen, select OK to return to the main screen. 5.
- Page 149 Note • If you have not set a Security code, set a Security code from account, and then Log in. 8. Select Facebook app Only the president will be able to use the Facebook app from the printer. Limiting Printers That Individual Users Can Use As an example, this section describes the procedure for setting up one printer for the president and another printer for all users.
- Page 150 1. From , select Group management Note • This appears only if Manage by group (for office users) is set in Advanced management. 2. Select Settings for the group containing all users 3. On the Printers tab, clear printer that was set up for president...
- Page 151 To return to the Group management screen, select Close. Important • If a user is being managed in multiple groups and an app is deleted or the target printer is changed for one of those groups, the user can still use that app or printer if the one of the other groups allows it.
- Page 152 Security code to prevent other users from using your account. • This code is valid only when you use MAXIFY Cloud Link from the printer operation panel. You cannot use this code when you access the Canon Inkjet Cloud Printing Center from your smartphone, tablet, or computer.
-
Page 153: Adding A Printer
Adding a Printer With one account, you can use the Canon Inkjet Cloud Printing Center services on multiple printers. The procedure for adding a printer is as follows: If your model has color LCD monitor If your model has monochrome LCD monitor... - Page 154 2. Enter the information according to the instructions on the authentication screen, and then select Log in 3. When printer addition complete message appears, select OK The printer addition process ends, and the main screen of Canon Inkjet Cloud Printing Center appears.
- Page 155 Note • If you select Cancel, the printer selection status does not change and the main screen of Canon Inkjet Cloud Printing Center appears. Adding a PIXMA/MAXIFY Cloud Link User...
-
Page 156: Adding A Pixma/Maxify Cloud Link User
Adding a PIXMA/MAXIFY Cloud Link User Several people can use one printer. This section describes the user addition procedure and the user privileges. Adding a user 1. On the service screen, select Manage users from 2. Select Add user... - Page 157 Note • When you select Add user, the service first checks whether the maximum number of users has been reached. If new users can be added, the user registration screen appears. • The maximum number of users that can be added for 1 printer is 20. 3.
- Page 158 6. Register a password for logging in to the Canon Inkjet Cloud Printing Center. On the My Account Registration screen, enter you desired password into Password and Password (Confirmation) and select Next. Important • There are character restrictions for the Password, as shown below.
- Page 159 7. Enter Nickname Enter any user name that you want to use. Important • The user name entry field has the following character restrictions: • The user name must be between 1 and 20 characters long, using single-byte alphanumeric characters and symbols (!"#$%&'()*+,-./:;<=>?@[¥]^_`{|}~). (Alphabets are case-sensitive) 8.
- Page 160 A Standard user can check printer information and start apps. For information about the functions that each user can use, refer to the "Canon Inkjet Cloud Printing Center window". If you are using MAXIFY Cloud Link from the printer, select Multiuser mode in the Mng.
- Page 161 • To set Multiuser mode without sending a notification e-mail, select Cancel. Troubleshooting Canon Inkjet Cloud Printing Center...
-
Page 162: Troubleshooting Canon Inkjet Cloud Printing Center
If the information is still not updated, then check that the product is connected to the Internet. If you do not receive the registration e-mail You may have entered a different e-mail address during the user registration of Canon Inkjet Cloud Printing Center. - Page 163 To display printer information, go to the Online Manual home page, and see "Checking Printer Information" for your model. After resetting the printer, repeat the user registration of Canon Inkjet Cloud Printing Center from the beginning. If you cannot print Check the following if you cannot print.
- Page 164 Internet connection, and then re-submit the print job. Printing starts on its own even if you do not do anything A third party may be able to illegally use the Canon Inkjet Cloud Printing Center services. If your model has color LCD monitor...
-
Page 165: Print Easily From A Smartphone Or Tablet With Canon Print Inkjet/Selphy
Print Easily from a Smartphone or Tablet with Canon PRINT Inkjet/ SELPHY Use the "Canon PRINT Inkjet/SELPHY" application to easily print photos saved on a smartphone or tablet (iOS or Android) wirelessly. You can also receive scanned data (PDF or JPEG) directly on a smartphone or tablet without using a computer. -
Page 166: Printing With Windows Rt
When the connection is complete, the Canon Inkjet Print Utility software, which allows you to specify detailed print settings, is downloaded automatically. By using Canon Inkjet Print Utility, you can check the Printer status and specify detailed print settings. (The available functions will differ depending on your usage environment and connection method.) -
Page 167: Online Storage Integration Function
Online Storage Integration Function The printer can integrate with online storage services such as Evernote. Integration with Online Notetaking Service "Evernote" If an Evernote client application is installed on your computer, you can import scanned images into the application and upload them to the Evernote server. The uploaded images can be browsed from other computers, smartphones, etc. -
Page 168: Handling Paper, Originals, Ink Tanks, Etc
Handling Paper, Originals, Ink Tanks, etc. Loading Paper Paper Sources Loading Plain Paper / Photo Paper Loading Envelopes Loading Originals Where to Load Originals Loading Originals on the Platen Glass Loading Documents in the ADF (Auto Document Feeder) Loading Based on Use Supported Originals Inserting a USB Flash Drive Inserting a USB Flash Drive... -
Page 169: Loading Paper
Loading Paper Paper Sources Loading Plain Paper / Photo Paper Loading Envelopes... -
Page 170: Paper Sources
Paper Sources Adjusting the cassette to the Size of Paper Used The cassette can be adjusted to three lengths. To extend the cassette, hold down the lock (A) as you pull the front toward you. B: Lock position for stowing the cassette Set to position B when the machine will not be used for some time, or before shipping it. - Page 171 Note • When printing, select the correct sizes and types of paper. Incorrect page size and media type settings may cause improper print quality. For instructions on loading paper in the cassette, see these sections. Loading Plain Paper / Photo Paper Loading Envelopes...
-
Page 172: Loading Plain Paper / Photo Paper
Loading Plain Paper / Photo Paper Load paper in the cassette. Important • Paper may jam if you test printing by cutting plain paper into smaller sizes, such as 4" x 6" (10 x 15 cm) or 5" x 7" (13 x 18 cm). Note •... - Page 173 3. Slide the front (A) and right (B) paper guides out to make room for the paper. 4. Load the stack of paper printing-side DOWN, centered on the cassette. Important • Always load paper in portrait orientation (C). Loading paper in landscape orientation (D) may cause paper jams.
- Page 174 • To load paper larger than A4 size, press the lock (G) and pull the cassette all the way out. 5. Align the front paper guide (A) with the stack. The paper guide (A) clicks into place when aligned with a page size marked on the cassette. 6.
- Page 175 Note • Do not load sheets of paper past the load limit mark (H). • Keep the stack height below the paper guide tabs (I). 7. Insert the cassette. Push the cassette into the machine until it stops. After you insert the cassette, a screen for registering paper information for the cassette is displayed on the LCD.
- Page 176 9. Pull out the output tray extension (J) and open the paper output support (K). Note • Before printing, select the size and type of paper loaded, either on the print settings screen of the operation panel or in the printer driver.
-
Page 177: Loading Envelopes
Loading Envelopes Once you have set up the printer driver correctly, addresses are automatically rotated and printed to suit the envelope orientation. Important • Do not use the following envelopes. These kinds of envelops may become stuck or cause the machine to malfunction. - Page 178 3. Slide the front (A) and right (B) paper guides out to make room for the paper. 4. Load the envelopes face-DOWN, centered in the cassette. The flap will face up, as shown below. Up to 10 envelopes can be loaded at once. Note •...
- Page 179 5. Align the front paper guide (A) with the edge of the envelopes. 6. Slide the right paper guide (B) to align the right and left guides with both edges of the envelopes. Do not set the paper guides too firmly against the envelopes, which may cause feeding problems. Note •...
- Page 180 8. Select the size and type of envelopes in the cassette in Page size and Type, and then press the OK button. Paper Settings 9. Pull out the output tray extension (F), and then open the paper output support (G). Note •...
-
Page 181: Loading Originals
Loading Originals Where to Load Originals Loading Originals on the Platen Glass Loading Documents in the ADF (Auto Document Feeder) Loading Based on Use Supported Originals... -
Page 182: Where To Load Originals
Where to Load Originals Load originals on the platen glass or in the ADF (Auto Document Feeder). To decide where to load originals, consider the size and type of originals and the purpose of use. Supported Originals Loading Originals, Photos, or Books on the platen glass Loading Multiple Documents of the Same Size and Thickness in the ADF Individual documents can also be loaded in the ADF. -
Page 183: Loading Originals On The Platen Glass
Loading Originals on the Platen Glass 1. Open the document cover. Important • When opening or closing the document cover, be careful not to touch buttons or the LCD on the operation panel. This may cause unexpected operation. 2. Load the original face-DOWN on the platen glass. Supported Originals Loading Based on Use Important... -
Page 184: Loading Documents In The Adf (Auto Document Feeder)
Loading Documents in the ADF (Auto Document Feeder) Note • For best results, load documents on the platen glass. 1. Remove any originals left on the platen glass. 2. Open the document tray. 3. Insert the document in the document tray until the machine beeps. Load documents face-UP in the document tray. -
Page 185: Loading Based On Use
Loading Based on Use Load originals correctly for how they will be used. Originals loaded incorrectly may cause scanning problems. Align Originals with the alignment mark • When loading originals to copy or fax • When selecting Doc.type > Document or Photo in Scan and specifying a standard size (such as A4/ Letter) in Scan size •... - Page 186 Load Multiple Originals on the platen glass • When selecting Doc.type > Photo in Scan and specifying Scan size > Auto multi scan to scan multiple originals • When scanning multiple photos, postcards, or business cards from a computer Load the originals face-DOWN. Leave at least 0.4 inch (1 cm) open between originals and from the edges of the platen glass.
-
Page 187: Supported Originals
Supported Originals On the platen glass Item Details Kind of original - Document, magazine, or newspaper - Photo, postcard, business card, or optical disc (Blu-ray disc, DVD, or - Documents unsuitable for the ADF Size (width x height) Max. 8.5 x 11.7 inches (216 x 297 mm) Quantity One or more sheets* Thickness... - Page 188 • Glued documents • Documents with sticky notes • Documents on carbon paper • Documents on coated paper • Documents on onion skin or other thin paper • Photos or excessively thick documents...
-
Page 189: Inserting A Usb Flash Drive
Inserting a USB Flash Drive Inserting a USB Flash Drive Removing a USB Flash Drive... -
Page 190: Inserting A Usb Flash Drive
Inserting a USB Flash Drive Supported Image Files • Can print images taken with cameras conforming to Design Rule for Camera File System specifications, as well as TIFF images. Both types of images must conform to Exif 2.2/2.21/2.3. Other types of images or movies such as RAW images cannot be printed. •... -
Page 191: Removing A Usb Flash Drive
Removing a USB Flash Drive 1. Before removing a USB flash drive, make sure the machine is not reading or writing data. During these operations, a message appears on the LCD. Important • Do not remove a USB flash drive or turn off the machine while the machine is reading or writing data. -
Page 192: Replacing Ink Tanks
Replacing Ink Tanks Replacing Ink Tanks Checking Ink Status on the LCD... -
Page 193: Replacing Ink Tanks
Replacing Ink Tanks In the case of warnings or errors caused by low ink levels, messages appear on the LCD to notify you. Respond to the message as needed. Message Appears Note • If printing is faint or affected by white streaks even when there is enough ink, see Maintenance Procedure. - Page 194 Note • If a warning about ink tank replacement appears, check the message and press the OK button. 2. Once the ink tank for replacement is identified on the LCD, push up the ink tank eject lever (B). The ink tank is ejected. To replace another ink tank, press the right Function button to select Next and display the screen for the next ink tank to replace.
- Page 195 4. Insert the new ink tank, aligning it with the installation guide (E) on the machine. Important • The ink tank will not fit in the wrong position. Check the label under the installation position, and install the ink tank in the correct position. 5.
- Page 196 To exit ink tank replacement, press the right Function button until Exit is displayed. The print head holder moves to the standby position. The ink tanks cannot be removed from this position. Important • Printing is not possible without a complete set of ink tanks installed. Install all ink tanks. •...
- Page 197 Notes on ink tanks Important • Install replacement ink tanks promptly. Do not leave the machine without ink tanks installed. • Replace empty ink tanks with new ones. Installing used ink tanks may clog the nozzles. Used ink tanks may also prevent correct notification of the ink tank replacement timing. •...
-
Page 198: Checking Ink Status On The Lcd
Checking Ink Status on the LCD Note • If one or more ink colors runs out, changes to in the HOME screen. When appears, check which ink (or inks) has run out using the following procedure. 1. Make sure the machine is on, and display the HOME screen. If the HOME screen is not displayed, press the HOME button to display it. -
Page 199: Maintenance
Maintenance If Printing Is Faint or Uneven Performing Maintenance Functions from Your Computer (Windows) Performing Maintenance Functions from Your Computer (Mac OS) Cleaning... -
Page 200: If Printing Is Faint Or Uneven
If Printing Is Faint or Uneven Maintenance Procedure Printing the Nozzle Check Pattern Examining the Nozzle Check Pattern Cleaning the Print Head Deep Print Head Cleaning Aligning the Print Head Aligning the Print Head Manually... -
Page 201: Maintenance Procedure
Maintenance Procedure Follow these steps to restore print quality if printing becomes faint or uneven, colors are incorrect, or printing results are not as expected (as when parallel lines are not printed parallel). Note • Increasing the print quality in the printer driver may give better results. Changing the Print Quality and Correcting Image Data (Windows) Changing the Print Quality and Correcting Image Data (Mac OS) - Page 202 Note • If printing problems remain even after step 4, turn the machine off, wait at least 24 hours, and perform deep print head cleaning again. Leave the machine plugged in after you turn it off. If the problem is still not resolved, the print head may be damaged. Contact the service center. To Correct Misalignment: Align the print head.
-
Page 203: Printing The Nozzle Check Pattern
Printing the Nozzle Check Pattern Print the nozzle check pattern to determine whether ink is being ejected correctly from the print head nozzles. Note • If ink runs out as the nozzle check pattern is printed, an error message appears on the LCD. Message Appears What you will need: one sheet of A4 or Letter-sized plain paper 1. - Page 204 7. Select Yes, and then press the OK button. After the nozzle check pattern is printed, two pattern confirmation screens are displayed. Examine the nozzle check pattern.
-
Page 205: Examining The Nozzle Check Pattern
Examining the Nozzle Check Pattern Examine the nozzle check pattern and clean the print head if necessary. 1. Check for any missing lines in pattern C or horizontal white streaks in pattern D. A: No missing lines or horizontal white streaks B: Some missing lines and horizontal white streaks E: Number of pages printed to date 2. - Page 206 The Maintenance screen is now displayed again. In the case of B (some missing lines or horizontal white streaks) in either pattern (C or D) or both patterns: Cleaning is required. Select Also B, and then press the OK button. A cleaning confirmation screen is displayed.
-
Page 207: Cleaning The Print Head
Cleaning the Print Head Clean the print head if the nozzle check pattern has missing lines or horizontal white streaks. Cleaning unclogs nozzles and restores the print head to a better condition. However, because print head cleaning consumes ink, this operation is advisable only when necessary. Note •... - Page 208 Afterward, a confirmation screen is displayed for printing a nozzle check pattern. 6. Load a sheet of A4 or Letter-sized plain paper in the cassette. Important • The screen for registering page size and media type is not displayed during any of the operations available in the Maintenance screen.
-
Page 209: Deep Print Head Cleaning
Deep Print Head Cleaning If standard print head cleaning does not improve print quality, try deep print head cleaning. However, because deep print head cleaning consumes more ink, this operation is advisable only when necessary. Note • Deep print head cleaning can also be performed from a computer. When using a computer, you can also select the ink group for deep cleaning. - Page 210 6. Load a sheet of A4 or Letter-sized plain paper in the cassette. Important • The screen for registering page size and media type is not displayed during any of the operations available in the Maintenance screen. Therefore, printing will be executed even if paper other than A4 or Letter-sized plain paper is loaded.
-
Page 211: Aligning The Print Head
Aligning the Print Head If printed images seem distorted, as when parallel lines are not printed parallel, align the print head. Note • If ink runs out as the print head alignment sheet is printed, an error message appears on the LCD. Message Appears What you will need: one sheet of A4 or Letter-sized plain paper (recycled paper is acceptable)* * Use white paper that is clean on both sides. - Page 212 7. Select Yes, and then press the OK button. The print head alignment sheet is printed, and the print head is aligned automatically. This process takes 3–4 minutes. Note • If automatic print head alignment fails, an error message appears on the LCD. Message Appears 8.
-
Page 213: Aligning The Print Head Manually
Aligning the Print Head Manually Try aligning the print head manually after automatic alignment if printing results are not as expected, as when parallel lines are not printed parallel. Note • For details on automatic print head alignment, see Aligning the Print Head. - Page 214 6. Pull out the output tray extension and open the paper output support. 7. Select Yes, and then press the OK button. The print head alignment pattern is printed. 8. Confirm that the pattern was printed correctly, and if so, select Yes after "Did the patterns print correctly?"...
- Page 215 A: Subtle vertical streaks B: Noticeable vertical streaks 10. Repeat these steps until you have finished entering pattern numbers for columns B to M, and then press the OK button. 11. Check the message, and then press the OK button. The second set of patterns is printed.
- Page 216 13. Repeat these steps until you have finished entering pattern numbers for columns O to T, and then press the OK button. For column P, choose the pattern in which vertical streaks are least noticeable. 14. Press the OK button when a message is displayed indicating that print head alignment is finished.
-
Page 217: Performing Maintenance Functions From Your Computer (Mac Os)
Performing Maintenance Functions from Your Computer (Mac OS) Cleaning the Print Heads Printing a Nozzle Check Pattern Aligning the Print Head Position Checking the Ink Status from Your Computer... -
Page 218: Cleaning The Print Heads
The procedure for cleaning the print head is as follows: Cleaning 1. Select Cleaning from the pop-up menu on the Canon IJ Printer Utility 2. Click the Cleaning icon When the dialog opens, select the ink group for which cleaning is to be performed. - Page 219 1. Select Cleaning from the pop-up menu on the Canon IJ Printer Utility 2. Click the Deep Cleaning icon When the dialog opens, select the ink group for which deep cleaning is to be performed.
-
Page 220: Printing A Nozzle Check Pattern
The procedure for printing a nozzle check pattern is as follows: Nozzle Check 1. Select Test Print from the pop-up menu on the Canon IJ Printer Utility 2. Click the Nozzle Check icon The confirmation message appears. Before printing the nozzle check pattern, check the following items: On some printer models, pressing the tank cover open button on the printer opens the tank cover. -
Page 221: Aligning The Print Head Position
The procedure for performing automatic print head alignment is as follows: Print Head Alignment 1. Select Test Print from the pop-up menu on the Canon IJ Printer Utility 2. Click the Print Head Alignment icon A message is displayed. 3. Load paper in the printer Load one sheet of A4 size or Letter size plain paper into the cassette. -
Page 222: Aligning The Print Head Position Manually
Check the Align heads manually check box. 3. Apply the settings Click Apply and when the confirmation message appears, click OK. 4. Select Test Print from the pop-up menu on the Canon IJ Printer Utility 5. Click the Print Head Alignment icon A message is displayed. - Page 223 Note • If it is difficult to pick the best pattern, pick the setting that produces the least noticeable vertical streaks. (A) Least noticeable vertical streaks (B) Most noticeable vertical streaks 9. Confirm the displayed message and click OK The second pattern is printed. Important •...
- Page 224 Note • If it is difficult to pick the best pattern, pick the setting that produces the least noticeable horizontal stripes. (A) Least noticeable horizontal stripes (B) Most noticeable horizontal stripes • If it is difficult to pick the best pattern, pick the setting that produces the least noticeable vertical streaks.
-
Page 225: Checking The Ink Status From Your Computer
You can check the detailed information such as the remaining ink level and the ink tank types of your model. 1. Select Ink Level Information from the pop-up menu on the Canon IJ Printer Utility An illustration of the ink types and their status is displayed. -
Page 226: Cleaning
Cleaning Cleaning Exterior Surfaces Cleaning the Platen Glass and Document Cover Cleaning the ADF (Auto Document Feeder) Cleaning Paper Feed Rollers Cleaning Inside the Machine (Bottom Plate Cleaning) Cleaning Cassette Pads... -
Page 227: Cleaning Exterior Surfaces
Cleaning Exterior Surfaces Using a soft, dry cloth such as an eyeglass cloth, gently wipe the surfaces clean. Smooth out any wrinkles in the cloth before you begin. Important • Before cleaning the machine, turn it off and unplug it. •... -
Page 228: Cleaning The Platen Glass And Document Cover
Cleaning the Platen Glass and Document Cover Important • Before cleaning the machine, turn it off and unplug it. • The power cannot be turned off while the machine is sending or receiving a fax, or when unsent faxes are stored in the machine's memory. Make sure the machine has finished sending or receiving faxes before turning it off. -
Page 229: Cleaning The Adf (Auto Document Feeder)
Cleaning the ADF (Auto Document Feeder) Use a soft, dry cloth that is clean and lint-free to clean the ADF (Auto Document Feeder). Important • Before cleaning the machine, turn it off and unplug it. • The power cannot be turned off while the machine is sending or receiving a fax, or when unsent faxes are stored in the machine's memory. - Page 230 4. When finished, push the document feeder cover closed until it clicks into place. 5. Close the document tray.
-
Page 231: Cleaning Paper Feed Rollers
Cleaning Paper Feed Rollers Dusty or dirty paper feed rollers may prevent correct feeding. In this case, clean the paper feed rollers. However, because cleaning causes roller wear, perform cleaning only when necessary. What you will need: three sheets of A4 or Letter-sized plain paper 1. - Page 232 Important • The screen for registering page size and media type is not displayed during any of the operations available in the Maintenance screen. Therefore, printing will be executed even if paper other than A4 or Letter-sized plain paper is loaded. 9.
-
Page 233: Cleaning Inside The Machine (Bottom Plate Cleaning)
Cleaning Inside the Machine (Bottom Plate Cleaning) Remove stains inside the machine as follows. Clean this way regularly, because any dust or excess ink in the machine may get on your printouts. What you will need: one sheet of A4 or Letter-sized plain paper* * Use a new sheet of paper. - Page 234 9. Load only this sheet in the cassette, with the ridges of the creases facing up and the edge of the uncreased half facing away from you. Important • The screen for registering page size and media type is not displayed during any of the operations available in the Maintenance screen.
- Page 235 • The power cannot be turned off while the machine is sending or receiving a fax, or when unsent faxes are stored in the machine's memory. Make sure the machine has finished sending or receiving faxes before turning it off. •...
-
Page 236: Cleaning Cassette Pads
Cleaning Cassette Pads If the pad in a cassette becomes dirty or covered with paper dust, multiple sheets of paper may be ejected at once. Clean cassette pads as follows. What you will need: cotton swab 1. Pull out the cassette and remove the paper. 2. -
Page 237: Overview
Overview Safety Safety Precautions Regulatory Information WEEE (EU & EEA) Main Components and Their Use Main Components Power Supply LCD and Operation Panel Entering Numbers, Letters, and Symbols Changing Settings Changing Printer Settings from Your Computer (Windows) Changing Printer Settings from Your Computer (Mac OS) Changing Settings from Operation Panel Changing Printer's Setting Using Web Browser Network Connection... - Page 238 Network Communication Tips Ensuring Optimal Printing Results Ink Tips Printing Tips Check Paper Settings Before Printing Set Cassette Paper Information After Loading Paper Canceling Print Jobs Keeping Print Quality High Transporting Your Machine Legal Restrictions on Scanning/Copying Specifications...
-
Page 239: Safety
Safety Safety Precautions Regulatory Information WEEE (EU&EEA) -
Page 240: Safety Precautions
Safety Precautions Choosing a location • Do not install the printer in a location that is unstable or subject to excessive vibration. • Do not install the printer in locations that are very humid or dusty, in direct sunlight, outdoors, or close to a heating source. -
Page 241: Regulatory Information
Regulatory Information IMPORTANT SAFETY INSTRUCTIONS SAVE THESE INSTRUCTIONS When using your telephone equipment, basic safety precautions should always be followed to reduce the risk of fire, electric shock and injury to persons, including the following: 1. Do not use this product near water, for example, near a bath tub, wash bowl, kitchen sink or laundry tub, in a wet basement or near a swimming pool. -
Page 242: Connection Of The Equipment
20cm between the radiator and persons body (excluding extremities: hands, wrists, feet and ankles) and must not be colocated or operated with any other antenna or transmitter. Canon U.S.A., Inc. One Canon Park Melville, New York 11747... -
Page 243: In Case Of Equipment Malfunction
Manual, disconnect the equipment from the telephone line cable, turn off the power and disconnect the power cord. The telephone line cable should not be reconnected or the main power switch turned ON until the problem is completely resolved. Users should contact their local authorized Canon Facsimile Service Dealer for the servicing of equipment. -
Page 244: Users In New Zealand
This equipment complies with IC radiation exposure limits set forth for an uncontrolled environment and meets RSS-102 of the IC radio frequency (RF) Exposure rules. This equipment should be installed and operated keeping the radiator at least 20cm or more away from person's body (excluding extremities: hands, wrists, feet and ankles). -
Page 245: Environmental Information
Please note when you connect an extension phone to this device, if you use an extension phone which has features such as "last number redial", redial memory numbers may be lost. The automatic calling functions of this equipment must not be used to a nuisance to other Spark customers. -
Page 246: Weee (Eu&Eea)
For more information about where you can drop off your waste equipment for recycling, please contact your local city office, waste authority, approved WEEE scheme or your household waste disposal service. For more information regarding return and recycling of WEEE products, please visit www.canon- europe.com/weee. - Page 247 U kunt ook het schema voor de afvoer van afgedankte elektrische en elektronische apparatuur (AEEA) raadplegen. Ga voor meer informatie over het inzamelen en recyclen van afgedankte elektrische en elektronische apparatuur naar www.canon- europe.com/weee.
- Page 248 Si desea más información acerca de la devolución y reciclado de RAEE, visite la web www.canon-europe.com/weee. Només per a la Unió Europea i a l’Espai Econòmic Europeu (Noruega, Islàndia i Liechtenstein) Aquest símbol indica que aquest producte no s’ha de llençar a les escombraries de la llar, d’acord amb la...
- Page 249 Yderligere oplysninger om, hvor du kan bortskaffe dit elektronikaffald med henblik på genanvendelse, får du hos de kommunale renovationsmyndigheder. Yderligere oplysninger om returnering og genanvendelse af affald af elektrisk og elektronisk udstyr får du ved at besøge www.canon- europe.com/weee.
- Page 250 Du kan få mer informasjon om hvor du kan avhende utrangert utstyr til resirkulering ved å kontakte lokale myndigheter, et godkjent WEEE-program eller husholdningens renovasjonsselskap. Du finner mer informasjon om retur og resirkulering av WEEE-produkter på www.canon-europe.com/weee. Vain Euroopan unionin sekä ETA:n (Norja, Islanti ja Liechtenstein) alueelle.
- Page 251 úřad vaší obce, správní orgán vykonávající dozor nad likvidací odpadu, sběrny OEEZ nebo služba pro odvoz komunálního odpadu. Další informace týkající se vracení a recyklace OEEZ naleznete na adrese www.canon-europe.com/weee. Csak az Európai Unió és az EGT (Norvégia, Izland és Liechtenstein) országaiban...
- Page 252 WEEE lub skontaktować się z przedsiębiorstwem zajmującym się wywozem odpadów domowych. Więcej informacji o zwracaniu i recyklingu zużytego sprzętu elektrycznego i elektronicznego znajduje się w witrynie www.canon-europe.com/weee. Platí len pre štáty Európskej únie a EHP (Nórsko, Island a Lichtenštajnsko) Tento symbol znamená, že podľa Smernice 2012/19/EÚ...
- Page 253 į savo miesto valdžios institucijas, atliekų tvarkymo organizacijas, patvirtintų EEĮ atliekų sistemų arba jūsų buitinių atliekų tvarkymo įstaigų atstovus. Išsamesnės informacijos apie EEĮ atliekų grąžinimo ir perdirbimo tvarką galite rasti apsilankę tinklalapyje www.canon- europe.com/weee. Samo za Evropsko unijo in EGP (Norveška, Islandija in Lihtenštajn)
- Page 254 OEEO. Če želite več informacij o vračanju in recikliranju izdelkov v skladu z direktivo OEEO, obiščite www.canon-europe.com/weee. Само за Европейския съюз и ЕИП (Норвегия, Исландия и Лихтенщайн) Този...
- Page 255 şi reciclarea produselor DEEE, vizitaţi www.canon-europe.com/ weee. Samo za Europsku uniju i EEZ (Norveška, Island i Lihtenštajn) Ovaj simbol pokazuje da se ovaj proizvod ne smije odlagati s kućnim otpadom sukladno WEEE Direktivi (2012/19/EC) i vašem nacionalnom zakonu. Ovaj proizvod je potrebno predati na posebno mjesto za sakupljanje otpada, npr.
-
Page 256: Main Components And Their Use
Main Components and Their Use Main Components Power Supply LCD and Operation Panel Entering Numbers, Letters, and Symbols... -
Page 257: Main Components
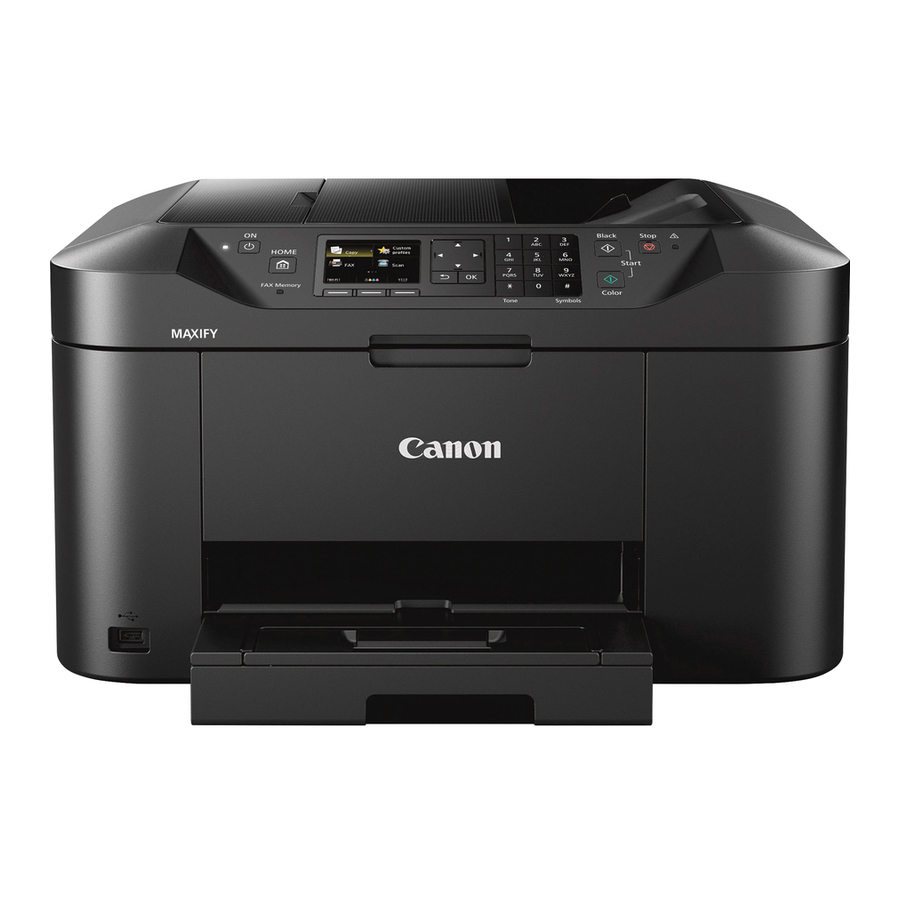
Main Components Front View Rear View Inside View Operation Panel... -
Page 258: Front View
Front View (1) operation panel Used to adjust settings or operate the machine. Operation Panel (2) ADF (Auto Document Feeder) Load documents here. Documents loaded in the document tray are scanned automatically, one page at a time. Loading Documents in the ADF (Auto Document Feeder) (3) document feeder cover Open to clear jammed documents. - Page 259 (11) paper output support Open to support ejected paper. (12) USB flash drive port Insert USB flash drives here. Warning • Do not connect any equipment other than USB flash drives to the machine's USB flash drive port. This may cause fire, electric shock, or damage to the machine. Important •...
-
Page 260: Rear View
Rear View (1) rear cover Open to clear paper jams. (2) power cord connector Connect the supplied power cord. (3) telephone line jack Connect the phone cord. (4) external device jack Connect a telephone or answering machine. (5) USB port Connect the USB cable for a direct connection with a computer. -
Page 261: Inside View
Inside View (1) ink tank eject lever Push up to remove ink tanks. (2) print head holder The print head is pre-installed. Note • For instructions on replacing ink tanks, see Replacing Ink Tanks. -
Page 262: Operation Panel
Operation Panel * Here, all operation panel indicators are shown lit for the purpose of illustration. (1) POWER lamp Remains lit after flashing when the machine is turned on. (2) ON button Turns the machine on or off. Turning the Machine On and Off (3) HOME button Used to display the HOME screen. - Page 263 (13) Back button Returns to the previous screen. (14) Function buttons Used to select function menu items on the bottom of the LCD. Using the Function Buttons (15) FAX Memory lamp When lit, indicates that there are received or unsent documents in the machine's memory.
-
Page 264: Power Supply
Power Supply Confirming that the Power Is On Turning the Machine On and Off Checking the Power Plug/Power Cord Unplugging the Machine... -
Page 265: Confirming That The Power Is On
Confirming that the Power Is On The POWER lamp is lit when the machine is on. Even if the LCD is off, as long as the POWER lamp is lit, the machine is on. Note • After you turn the machine on, it requires a warm-up period of about 20 seconds before any operations. Wait until the HOME screen is displayed. -
Page 266: Turning The Machine On And Off
Turning the Machine On and Off Turning the machine on 1. Press the ON button to turn the machine on. The POWER lamp flashes and then remains lit. Confirming that the Power Is On Note • After you turn the machine on, it requires a warm-up period of about 20 seconds before any operations. - Page 267 Note • Remember that faxes cannot be sent or received while the machine is off. • The power cannot be turned off while the machine is sending or receiving a fax, or when unsent faxes are stored in the machine's memory. •...
-
Page 268: Checking The Power Plug/Power Cord
Checking the Power Plug/Power Cord Check the power plug/power cord once a month to ensure that it is not affected by these problems. • Excessively hot • Corroded • Bent • Worn • Cracked or split Caution • If the power plug/power cord case is affected by these or other problems, unplug the machine request service. -
Page 269: Unplugging The Machine
Unplugging the Machine Always follow these steps when unplugging the machine. Important • Unplug the machine only after pressing the ON button and confirming that the POWER lamp is off. Unplugging the machine while the POWER lamp is still on may cause the print head to dry out or become clogged, which may affect print quality. -
Page 270: Lcd And Operation Panel
LCD and Operation Panel The operation panel features an LCD and buttons. Select icons on the HOME screen to choose menus for copying, faxing, or scanning. The HOME screen consists of three sections. Basic use of the operation panel Use the , or buttons (A) to select a menu or option on a screen, and then press the OK button (B). - Page 271 Press the left Function button (E) to display the Change LAN screen. From there, you can adjust wireless LAN settings. Press the center Function button (F) to display the Current estimated ink levels screen. From there, you can check current ink levels. Press the right Function button (G) to display the Register cassette paper info screen.
-
Page 272: Entering Numbers, Letters, And Symbols
Entering Numbers, Letters, and Symbols Use the Numeric button to enter or edit user or recipient names or other information. Switching the Input Mode The machine has input modes for lowercase letters, uppercase letters, and numbers. To switch modes, press the button (A). - Page 273 Entering Numbers, Letters, and Symbols Press the same Numeric button repeatedly until the desired character is displayed in the input field. Enter information as follows. • To move the insertion point (cursor position) in the input field Press the button (B). •...
- Page 274 wxyzý WXYZÝ . @ - _ SP*1 # ! " , ; : ^ ` = / | ' ? $ % & + ( ) [ ] { } < > \*2 ~*2 Switches the input mode *1 "SP": For entering a blank space. *2 Only available when network settings are entered.
-
Page 275: Changing Settings
Changing Settings Changing Printer Settings from Your Computer (Windows) Changing Printer Settings from Your Computer (Mac OS) Changing Settings from Operation Panel Changing Printer's Setting Using Web Browser... -
Page 276: Changing Printer Settings From Your Computer (Mac Os)
Changing Printer Settings from Your Computer (Mac OS) Registering a Changed Printing Profile Managing the Printer Power Reducing the Printer Noise Changing the Printer Operation Mode... -
Page 277: Registering A Changed Printing Profile
Registering a Changed Printing Profile You can name and register the printing profile you made in the Print Dialog. The registered printing profile can be called up from Presets to be used. You can also delete the unnecessary printing profile. The procedure for registering a printing profile is as follows: Registering a Printing Profile 1. - Page 278 Deleting Unnecessary Printing Profile 1. Select the printing profile to be deleted In the print dialog, select Show Presets... in the Presets section. Then in the dialog that appears, select the name of the printing profile to be deleted. 2. Delete the printing profile Click Delete, and click OK.
-
Page 279: Managing The Printer Power
The Power Off function turns off the printer. When you use this function, you will not be able to turn the printer on from the printer driver. 1. Select Power Settings from the pop-up menu on the Canon IJ Printer Utility 2. Execute power off Click Power Off, and when the confirmation message appears, click OK. -
Page 280: Reducing The Printer Noise
The procedure for using the quiet mode is as follows: 1. Select Quiet Settings from the pop-up menu on the Canon IJ Printer Utility Note • If the computer is unable to communicate with the printer, a message may be displayed because the computer cannot access the function information that was set on the printer. - Page 281 Important • You can set the quiet mode from the operation panel of the printer or the printer driver. No matter how you use to set the quiet mode, the mode is applied when you perform operations from the operation panel of the printer or printing and scanning from the computer. 3.
-
Page 282: Changing The Printer Operation Mode
Check this check box to prevent paper abrasion. Align heads manually Usually, the Print Head Alignment function of Test Print on the pop-up menu in the Canon IJ Printer Utility is set to automatic head alignment, but you can change it to manual head alignment. -
Page 283: Changing Settings From Operation Panel
Changing Settings from Operation Panel Changing Settings from Operation Panel Setting Items on Operation Panel FAX settings Print settings LAN settings Device user settings Language selection Firmware update Cassette settings Administrator password setting Operation restrictions Reset setting Web service setup System information ECO settings Quiet setting... -
Page 284: Changing Settings From Operation Panel
Changing Settings from Operation Panel This section describes the procedure to change the settings in the Device settings screen, taking the steps to specify Prevent paper abrasion as an example. Make sure printer is turned on. 2. Select Setup on HOME screen. LCD and Operation Panel 3. - Page 285 For more on setting items on the operation panel: Setting Items on Operation Panel...
-
Page 286: Setting Items On Operation Panel
Setting Items on Operation Panel Note • The administrator password is required to change some setting items if it is enabled for changing settings using the operation panel. For more on setting items which the administrator password is required: Setting Administrator Password on Operation Panel Items for Security Administrator password setting Operation restrictions... -
Page 287: Fax Settings
FAX settings Important • This setting item is for the administrator. This section describes the setting items in FAX settings. FAX user settings Advanced FAX settings Auto print settings Auto save setting Security control Easy setup Note • Before changing the settings, you can confirm the current settings by printing USER'S DATA LIST. Summary of Reports and Lists FAX user settings •... - Page 288 • Pause time settings Sets the length of pause time for each when you enter "P" (pause). • TTI position Selects the position of the sender information (outside or inside the image area). • Remote RX Enables/disables remote reception. If you select ON, you can specify the remote reception ID. Remote Reception •...
- Page 289 Auto print settings • Received documents Selects whether to print the received fax automatically when receiving a fax. If you select Do not print, the received fax is stored in the printer's memory. For details on the received fax stored in the printer's memory: Document Stored in Printer's Memory •...
-
Page 290: Easy Setup
• Check RX FAX information If you select ON, the printer checks whether the recipient's fax device information matches the dialed number. If it matches the number, the printer starts to send faxes. Preventing Mistransmission of Faxes • Hook key setting If you select Enable, you can use the on hook dial function. -
Page 291: Print Settings
Print settings Select this setting item from Device settings on Setup. • Prevent paper abrasion Use this setting only if the print surface becomes smudged. Important • Be sure to set this back to OFF after printing since it may result in lower printing speed or lower print quality. -
Page 292: Lan Settings
LAN settings Select this setting item from Device settings on Setup. Important • The administrator password is required to change settings if it is enabled for changing settings using the operation panel. • Change LAN Enables/disables either wireless LAN or direct connection. •... - Page 293 ◦ WLAN setting list The list of wireless LAN settings of this printer is displayed on the LCD. The following setting items are displayed. (Some setting items are not displayed depending on the printer settings.) Items Setting SSID XXXXXXXXXXXXXXXX XXXXXXXXXXXXXXXX (up to 32 characters) Wireless LAN security Inactive/WEP(64bit)/WEP(128bit)/WPA-PSK(TKIP)/WPA-PSK(AES)/ WPA2-PSK(TKIP)/WPA2-PSK(AES)
- Page 294 IPv4 address XXX. XXX. XXX. XXX (12 characters) IPv4 subnet mask XXX. XXX. XXX. XXX (12 characters) IPv4 default gateway XXX. XXX. XXX. XXX (12 characters) IPv6 address XXXX: XXXX: XXXX: XXXX: XXXX: XXXX: XXXX: XXXX (32 characters) MAC address XX:XX:XX:XX:XX:XX (12 characters) Printer name XXXXXXXXXXXXXXX (up to 15 characters)
- Page 295 Note • You cannot use the same printer name as that already used for other LAN connected devices. • You cannot use a hyphen for the initial or last character of the printer name. ◦ TCP/IP settings Performs IPv4 or IPv6 setting. ◦...
-
Page 296: Device User Settings
Device user settings Select this setting item from Device settings on Setup. Important • The administrator password is required to change settings if it is enabled for changing settings using the operation panel. • Date/time setting Sets the current date and time. For more on the procedure: Setting Sender Information •... - Page 297 LCD, setting the zoom ratio, etc. • Device info sending setting Selects whether you will send the printer usage information to Canon. The information sent to Canon will be utilized to develop better products. Select Agree to send the printer usage information to Canon.
- Page 298 ◦ Do not control power Disables the function to turn on/off the printer automatically. Note • You can also enter this setting menu by selecting ECO settings and Power control on the HOME screen. ECO settings...
-
Page 299: Timezone List
Timezone List Time zone Country or region (UTC-12:00) Baker Island, Howland Island (UTC-11:00) American Samoa, Niue (UTC-10:00) Hawaii, Western area of Aleutian Islands (UTC-9:00) Alaska (UTC-8:00) US/Canada/Mexico (Pacific Time) (UTC-7:00) US/Canada/Mexico (Mountain Time) (UTC-6:00) US/Canada/Mexico (Central Time) (UTC-5:00) US/Canada/Mexico (Eastern Time), Cuba, Peru (UTC-4:30) Venezuela (UTC-4:00) - Page 300 (UTC+11:00) Russia (Vladivostok), Solomon Islands, New Caledonia (UTC+12:00) Russia (Magadan), New Zealand, Fiji, Kiribati (Gilbert Islands) (UTC+12:45) New Zealand (Chatham Island) (UTC+13:00) Tonga, Kiribati (Phoenix Islands), Samoa (From 2011/12/31), Tokelau (From 2011/12/31) (UTC+14:00) Kiribati (Line Islands)
-
Page 301: Language Selection
Language selection Select this setting item from Device settings on Setup. Important • The administrator password is required to change settings if it is enabled for changing settings using the operation panel. Changes the language for the messages and menus on the LCD. -
Page 302: Firmware Update
Firmware update Select this setting item from Device settings on Setup. Important • The administrator password is required to change settings if it is enabled for changing settings using the operation panel. You can update the firmware of the printer, check the firmware version, or perform settings of a notification screen, a DNS server and a proxy server. -
Page 303: Cassette Settings
Cassette settings Select this setting item from Device settings on Setup. By registering the paper size and the media type loaded in the cassette, you can prevent the printer from misprinting by displaying the message before printing starts when the paper size or the media type of the loaded paper differs from the print settings. -
Page 304: Administrator Password Setting
Administrator password setting Select this setting item from Device settings on Setup. Important • The administrator password is required to change settings if it is enabled for changing settings using the operation panel. You can specify or disable the administrator password. If you specify the administrator password, select the range and specify the administrator password. -
Page 305: Setting Administrator Password On Operation Panel
Setting Administrator Password on Operation Panel You can specify or disable the administrator password. Specifying the administrator password requires you to enter the password to use the items or change the settings below. • Web service setup • FAX settings •... - Page 306 If you do not specify an administrator password, select Remove administrator password. Selecting Yes and pressing the OK button displays the message again. Press the OK button. 7. Select range where administrator password is valid and press OK button. Remote UI or other tools Entering the administrator password is required to change the setting items using Remote UI or some software.
-
Page 307: Operation Restrictions
Operation restrictions Select this setting item from Device settings on Setup. Important • The administrator password is required to change settings if it is enabled for changing settings using the operation panel. You can restrict printing, copying, or faxing operations or to use a USB flash drive or a shared folder on the computer. -
Page 308: Restricting Machine Operation
Restricting Machine Operation You can restrict printing, copying, or faxing operations or to use a USB flash drive or a shared folder on the computer. Restrictions can be disabled temporality. Disabling Operation Restriction Temporarily To enable this function, apply the administrator password for changing settings on the operation panel. Setting Administrator Password on Operation Panel Make sure printer is turned on. - Page 309 E-mail address book Restricts operations related to the printer's e-mail address book. FAX transmission Restricts to send a fax from the printer. (Sending a fax from the computer is not restricted.) FAX reception Restricts to receive a fax. Important • If the printer receives a fax while Restrict is selected, Not available. An operation restriction is set.
- Page 310 7. Select Yes on displayed screen and press OK button. 8. Press OK button on displayed screen. 9. Specify password. 10. Press OK button. 11. Enter password you specified again. 12. Press OK button. The override password is enabled. Note •...
-
Page 311: Reset Setting
LAN settings and the telephone/fax number are not returned back to the default. • Device info sending setting only Applies the setting not to send the device information to Canon. • E-mail address book entries only Deletes all registered e-mail addresses. - Page 312 • The country or region selected for Country or region • Total use of copying, scanning, and faxing recorded in Records of use • CSR (Certificate Signing Request) for encryption method (SSL/TLS) setting You can delete the registered user's name or telephone number following the procedure below. 1.
-
Page 313: Web Service Setup
◦ IJ Cloud Printing Center setup Registers/Deletes the printer to/from Canon Inkjet Cloud Printing Center. ◦ Check Web service setup Make sure whether the printer is registered to Google Cloud Print or Canon Inkjet Cloud Printing Center. • DNS server setup Performs settings for a DNS server. -
Page 314: System Information
System information Select this setting item from System information on Setup. • Current version Displays the current firmware version. • Printer name Displays the printer name currently specified. • Serial number Displays the printer serial number. • MAC address of wireless LAN Displays the MAC address of wireless LAN. -
Page 315: Eco Settings
ECO settings Select this setting item from HOME screen. This setting allows you to use following functions. • Using automatic duplex printing to save paper Using Duplex Printing • Turning on the printer automatically when printing or scanning from a device, or turning it off automatically during the specified elapsed time to save electricity Turning On/Off Printer Automatically •... - Page 316 1. Copy Sets two-sided copying as a default. 2. PDF file print Sets duplex printing of PDF files saved on a USB flash drive as a default. 3. FAX print Select two-sided printing of sent/received faxes, reports, or lists as a default. Note •...
- Page 317 1. Auto power off Specifies the length of time to turn the printer off automatically when no operation is made or no printing data is sent to the printer. 2. Auto power on Selecting ON enables the printer to turn on automatically when a scanning command from a computer or printing data is sent to the printer.
- Page 318 1. Select Auto ON timer settings and press OK button. 2. Select Enable on displayed screen and press OK button. The screen below is displayed. 3. Use Numeric buttons to specify time to turn on printer. You can specify the hour from 0 to 24 and specify the minute in increments of 10 minutes. 4.
- Page 319 5. Press OK button to confirm time to turn off printer. After confirming the time to turn the printer off, the screen to specify the day is displayed. Use the button to select the day, use the button to select Enable or Disable, and then press the OK button.
-
Page 320: Quiet Setting
Quiet setting Select this setting item from HOME screen. Enables this function on the printer if you want to reduce the operating noise, such as when printing at night. In addition, you can specify the time range to reduce the operating noise. Important •... - Page 321 The confirmation screen is displayed and the icon appears as the Quiet setting menu icon. Important • Operating speed is reduced compared to when Do not use quiet mode is selected. • This function may not be so effective depending on the printer's setting. Furthermore, certain noise, such as when the printer is preparing for printing, is not reduced.
-
Page 322: Registering Favorite Settings (Custom Profiles)
Registering Favorite Settings (Custom profiles) You can register the favorite copying, scanning, or faxing settings and call them up from the HOME screen. You can register up to 20 settings. Registering the Setting Calling Up the Registered Setting Editing/Deleting the Registered setting Registering the Setting Press the left Function button on each standby screen or on the screen displayed after the settings are specified. - Page 323 Editing/Deleting the Registered setting Follow the procedure below to edit or delete the registered setting. Make sure printer is turned on. 2. Select Custom profiles on HOME screen. LCD and Operation Panel 3. Press left Function button. You can change the order or name of the registered settings and delete the settings. •...
-
Page 324: Checking The Total Number Of Uses Of Machine
Checking the Total Number of Uses of Machine You can check the total number of uses of the printer (e.g. the total number of printing, copying, sending/ receiving faxes, or scanning). Make sure printer is turned on. 2. Select Records of use on HOME screen. LCD and Operation Panel The Records of use screen is displayed. -
Page 325: Changing Printer's Setting Using Web Browser
Changing Printer's Setting Using Web Browser Changing Settings Using Web Browser Changeable Setting Items Using Web Browser Setting Password Setting Mail Server Specifying Mail Setting for Sending Scanned Data Receiving Printer Status by E-mail... -
Page 326: Changing Settings Using Web Browser
Changing Settings Using Web Browser You can check the printer status and change the printer settings using the web browser on your smartphone, tablet, or computer. To check the printer status and to change the printer settings, display "Remote UI" on the web browser. Note •... - Page 327 3. Open web browser on your smartphone, tablet, or computer and enter IP address. Enter as following in the URL field of the web browser. http://XXX.XX.X.XXX Enter the IP address in "XXX.XX.X.XXX". When you access, "Remote UI" will be displayed on the web browser on your smartphone, tablet, or computer.
- Page 328 For changeable setting items, see below. Changeable Setting Items Using Web Browser 8. When you finish checking printer status and changing printer settings, select Log off. 9. Close web browser.
-
Page 329: Registering Printer's Root Certificate To Web Browser
Registering Printer's Root Certificate to Web Browser If the printer's root certificate has not been registered to the web browser, a message to warn you that the secure connection is not guaranteed may appear. When you display Remote UI for the first time on your smartphone, tablet, or computer, download the root certificate, and then register it to the web browser. - Page 330 8. Select Next on Certificate Import Wizard screen. 9. If Completing the Certificate Import Wizard appears, select Finish. Security Warning screen is displayed. 10. Make sure that thumbprint on Security Warning screen matches printer's thumbprint. For printer's thumbprint, press the HOME button, select Setup -> Device settings -> LAN settings -> Confirm LAN settings, check Root cert.
- Page 331 2. Specify certificate name, and then select OK. The root certificate registration is completed. Note • If PIN or password is not set as security type, the attention screen may appear. Select OK, and then set the security type to PIN or password. •...
- Page 332 3. Select Install. 4. Select Install on displayed dialog. The root certificate registration is completed.
-
Page 333: Changeable Setting Items Using Web Browser
Changeable Setting Items Using Web Browser Note • The items described here and the items displayed in the web browser may differ in display order. • The item which can be used is different in administrator mode or in standard user mode. Items for Security Security (Item for administrator) This function allows you to specify the password, the standard user mode settings, the operation... -
Page 334: Other Items
Specifying Mail Setting for Sending Scanned Data Receiving Printer Status by E-mail Note • Some of the menu is available only when you logged on in administrator mode. AirPrint settings This function allows you to specify the AirPrint settings, such as position information. Web service connection setup (Item for administrator) This function allows you to register to Google Cloud Print or IJ Cloud Printing Center, or delete a registration. -
Page 335: Setting Password
Setting Password Each of passwords for administrator and standard user can be set. When logging on with password for administrator, all settings can be changed. When logging on with password for standard user, some of the settings can be changed. When logging on with password for administrator, you can restrict the function for standard user. - Page 336 Important • The following character restrictions apply to the password: • Set the password by using 4 to 32 characters. • The allowed characters are single-byte alphanumeric characters. • For security reasons, we recommend you use 6 and more alphanumeric characters. 7.
-
Page 337: Setting Mail Server
Setting Mail Server To use mail function, specify the mail server settings. Note • If you did not specify the time zone setting using the printer's operation panel, a message to inform you that the correct time may not be reflected on the sent e-mail appears. We recommended that you set the time zone setting using the printer's operation panel. - Page 338 Enter the password for sending to perform the authentication. POP before SMTP Select if you send e-mail with POP before SMTP authentication. Next, you can specify the following settings. • Incoming mail server (POP3) Enter the address of your POP server. •...
-
Page 339: Specifying Mail Setting For Sending Scanned Data
Specifying Mail Setting for Sending Scanned Data You can specify the mail settings to send the scanned data from printer via e-mail. This section describes the mail settings such as the title of e-mail, initial body text, and file size. Note •... -
Page 340: Receiving Printer Status By E-Mail
Receiving Printer Status by E-mail You receive the printer status information such as the remaining ink level and the error from the printer. Note • Specify the mail server settings in advance. Setting Mail Server • If you did not specify the the date and time setting using the printer's operation panel, the date and time may not be reflected on the sent e-mail. - Page 341 The resending setting is completed.
-
Page 342: Network Connection
Network Connection Network Connection Tips... -
Page 343: Network Connection Tips
Network Connection Tips Default Network Settings Another Printer Found with Same Name Connecting to Another Computer via LAN/Changing from USB to LAN Connection Printing Network Settings Changing Wireless LAN Connection Method... -
Page 344: Default Network Settings
Enable/disable IPv6 Enable Enable/disable WSD Enable Timeout setting 1 minute Enable/disable Bonjour Enable Service name Canon MB2100 series LPR protocol setting Enable RAW protocol Enable LLMNR Active ("XX" represents alphanumeric characters.) * Default value depends on printer. To check value, use operation panel. - Page 345 *1 "ab" is specified at random and "XX" represents last two digits of printer's MAC address. (The value is specified when the printer is turned on for the first time.) *2 The password is specified automatically when the printer is turned on for the first time. *3 "ZZZZZZ"...
-
Page 346: Another Printer Found With Same Name
Another Printer Found with Same Name When the printer is found during setup, other printers with the same name may appear on the results screen. Select a printer with checking the printer settings against those on detection result screen. • For Windows: Check the printer's MAC address or serial to select the correct printer from the results. -
Page 347: Connecting To Another Computer Via Lan/Changing From Usb To Lan Connection
For Windows: To add a computer to connect to the printer on a LAN or to change from USB to LAN connection, perform setup using the Setup CD-ROM or follow the instructions on the Canon website. For Mac OS: To connect an additional computer to the printer via LAN, or to change from USB to LAN connection,... -
Page 348: Printing Network Settings
Printing Network Settings Use the operation panel to print the printer's current network settings. Important • The network settings printout contains important information about your network. Handle it with care. Make sure printer is turned on. Load two sheets of A4 or Letter-sized plain paper. 3. - Page 349 Infrastructure Infrastructure Enable/Disable Connection Connection status Active/Inactive SSID SSID Wireless LAN SSID Channel *1 Channel XX (1 to 11) Encryption Encryption method None/WEP/TKIP/AES WEP Key Length WEP key length (bits) Inactive/128/64 Authentication Authentication method None/auto/open/shared/WPA-PSK/WPA2- Signal Strength Signal strength 0 to 100 [%] TCP/IPv4 TCP/IPv4 Enable...
- Page 350 Stateless Prefix Length4 *2 Stateless prefix length 4 Default Gateway1 *2 Default gateway 1 XXXX:XXXX:XXXX:XXXX XXXX:XXXX:XXXX:XXXX Default Gateway2 *2 Default gateway 2 XXXX:XXXX:XXXX:XXXX XXXX:XXXX:XXXX:XXXX Default Gateway3 *2 Default gateway 3 XXXX:XXXX:XXXX:XXXX XXXX:XXXX:XXXX:XXXX Default Gateway4 *2 Default gateway 4 XXXX:XXXX:XXXX:XXXX XXXX:XXXX:XXXX:XXXX IPsec *3 IPsec setting Active...
- Page 351 Direct Conn. DevName Device name for direct connection Device name for direct connection (Up to 32 characters) WSD Printing WSD printing setting Enable/Disable WSD Timeout Timeout 1/5/10/15/20 [min] LPD Printing LPD printing setting Enable/Disable RAW Printing RAW printing setting Enable/Disable Bonjour Bonjour setting Enable/Disable...
-
Page 352: Changing Wireless Lan Connection Method
Follow either procedure below to change wireless LAN connection method (infrastructure or direct connection). • For Windows: ◦ Use the Setup CD-ROM or follow the instructions on the Canon website to redo setup. ◦ Perform settings on the Protocol Settings screen on IJ Network Device Setup Utility. Important •... -
Page 353: Network Communication (Mac Os)
Network Communication (Mac OS) Checking and Changing Network Settings Network Communication Tips... -
Page 354: Checking And Changing Network Settings
Checking and Changing Network Settings IJ Network Tool Canon IJ Network Tool Screen Canon IJ Network Tool Menus Changing Settings in Wireless LAN Sheet Changing WEP Detailed Settings Changing WPA or WPA2 Detailed Settings Changing Settings in Wired LAN Sheet... -
Page 355: Ij Network Tool
• Do not print when IJ Network Tool is running. • If the firewall function of your security software is turned on, a message may appear warning that Canon software is attempting to access the network. If the warning message appears, set the security software to always allow access. -
Page 356: Canon Ij Network Tool Screen
Canon IJ Network Tool Screen This section describes the items displayed on the Canon IJ Network Tool screen. 1. Utilities Modifies the settings of the printer. Select to change the network name (SSID) settings. Setup Sets up the printer. If you setup the printer from scratch, connect your computer and the printer with a USB cable. - Page 357 4. Configuration... Enabled when Utilities is selected. Click to display the Configuration screen to configure settings of the selected printer. Note • This item has the same function as Configuration... in the Settings menu.
-
Page 358: Canon Ij Network Tool Menus
• If the printer is being used from another computer, a screen is displayed informing you of this condition. Note • This item has the same function as Update in the Canon IJ Network Tool screen. Network Information Displays the Network Information screen to confirm the network settings of the printer. - Page 359 Set up printer's direct connection... You can change or check the direct connection (access point mode) settings. Changing Settings in Direct Connection Note • You can use this function only when you are using a computer compatible with the wireless LAN. •...
-
Page 360: Changing Settings In Wireless Lan Sheet
Changing Settings in Wireless LAN Sheet To change the wireless network settings of the printer, connect the printer and the computer with a USB cable temporarily. If you modify the wireless network settings of the computer over wireless connection without USB connection, your computer may not be able to communicate with the printer after modifying the settings. - Page 361 AirPort Network (Infra) Connects the printer to the wireless LAN with a wireless router. Direct Connection Connects external wireless communication devices (e.g. computers, smartphones, or tablets) to the printer using it as an access point (wireless router). Note • When Direct Connection is displayed on Network Type:, you cannot change the settings on the Wireless LAN sheet or the Admin Password sheet.
- Page 362 If a network password (WEP) has not been set, the WEP Details screen is displayed automatically. To change WEP settings set before, click Configuration... to display the screen. Changing WEP Detailed Settings Use WPA/WPA2 Transmission is encrypted using a network key you specified. The security has been strengthened more than WEP.
- Page 363 1. Detected Wireless Routers: The signal strength from the wireless router, encryption type, name of wireless router, and the radio channel can be confirmed. Important • If you connect to a network that is not protected with security measures, there is a risk of disclosing data such as your personal information to a third party.
-
Page 364: Changing Wep Detailed Settings
Changing WEP Detailed Settings Note • This function is not available depending on the printer you are using. To change the wireless network settings of the printer, connect the printer and the computer with a USB cable temporarily. If you modify the wireless network settings of the computer over wireless connection without USB connection, your computer may not be able to communicate with the printer after modifying the settings. - Page 365 Key Format ASCII 5 characters 13 characters Hexadecimal (Hex) 10 digits 26 digits 2. Key Length: Select either 64 bit or 128 bit. 3. Key Format: Select either ASCII or Hex. 4. Key ID: Select the Key ID (index) set to the wireless router. Note •...
-
Page 366: Changing Wpa Or Wpa2 Detailed Settings
Changing WPA or WPA2 Detailed Settings Note • This function is not available depending on the printer you are using. To change the wireless network settings of the printer, connect the printer and the computer with a USB cable temporarily. If you modify the wireless network settings of the computer over wireless connection without USB connection, your computer may not be able to communicate with the printer after modifying the settings. - Page 367 • If the printer cannot communicate with the computer after the encryption type of the printer was switched, make sure encryption types for the computer and the wireless router match that set to the printer. Note • This printer supports WPA/WPA2-PSK (WPA/WPA2-Personal) and WPA2-PSK (WPA2-Personal).
-
Page 368: Changing Settings In Wired Lan Sheet
Changing Settings in Wired LAN Sheet Note • This function is not available depending on the printer you are using. • Enable the wired LAN setting of the printer to change the settings in the Wired LAN sheet. Start up IJ Network Tool. 2. -
Page 369: Changing Settings In Admin Password Sheet
Changing Settings in Admin Password Sheet Note • You cannot change the settings when using the direct connection (access point mode). Start up IJ Network Tool. 2. Select printer in Printers:. 3. Click Configuration... button. 4. Click Admin Password button. The Admin Password sheet is displayed. - Page 370 6. Click OK. A screen is displayed asking you for confirmation before the settings are sent to the printer. If you click OK, the settings are sent to the printer and the Transmitted Settings screen is displayed. Enter Password Screen The following screen is displayed if an administrator password is set to the printer.
-
Page 371: Monitoring Wireless Network Status
Monitoring Wireless Network Status Note • This function is not available depending on the printer you are using. • When using the printer over the wired LAN, you cannot monitor network status. Start up IJ Network Tool. 2. Select printer in Printers:. 3. - Page 372 • Check that there are no sources of radio interference near the printer and the wireless router. The wireless connection may use the same frequency band as microwave ovens and other sources of radio interference. Try to keep the printer and the wireless router away from such sources.
-
Page 373: Changing Settings In Direct Connection
Changing Settings in Direct Connection Note • This function is not available depending on the printer you are using. • Depending on the printer you are using, "Direct connection" may be referred to as "Access point mode" in the manuals. •... - Page 374 Important • You cannot change the encryption method or password depending on the printer you are using. If you cannot change the settings from the screen above, you can update the SSID (access point name) and password at the same time using the operation panel (You cannot change the encryption method.).
-
Page 375: Initializing Network Settings
Canon website. Note • You can change the network settings of the printer using IJ Network Tool with USB connection after initializing the LAN settings. To change the network settings using Canon IJ Network Tool, enable wireless LAN in advance. -
Page 376: Viewing Modified Settings
Viewing Modified Settings The Confirmation screen is displayed after you modified the printer settings on the Configuration screen. When you click OK on the Confirmation screen, the following screen is displayed for confirming the modified settings. 1. Settings: A list of changes made in the Configuration screen is displayed. -
Page 377: Network Communication Tips
Network Communication Tips Using Card Slot over Network Technical Terms Restrictions... -
Page 378: Using Card Slot Over Network
Using Card Slot over Network Note • This function is not available depending on the printer you are using. To confirm whether this function is available with your printer, refer to List of Function for Each Model. Mounting Card Slot as Network Drive Restrictions on Card Slot Use over Network Mounting Card Slot as Network Drive The card slot must be mounted to use it over a network. - Page 379 Restrictions on Card Slot Use over Network • You cannot write data to a memory card in the card slot over a network. You can only read data from a memory card. • The card slot can be shared by multiple computers, if the printer is connected to a network. Multiple computers can read files from a memory card in the card slot at the same time.
-
Page 380: Technical Terms
Technical Terms In this section, technical terms used in the manual are explained. • • • • • • • • • • • • • • • • • Access point mode The printer is used as an access point to connect external wireless communication devices (e.g. computers, smartphones, or tablets) in an environment where no access point (wireless router) is available. - Page 381 The printer automatically changes its authentication method to match the wireless router. ◦ Open System In this authentication method, the communication partner is authenticated without using WEP key even if Use Password (WEP) is selected. ◦ Shared Key In this authentication method, the communication partner is authenticated using the WEP key that was set for encryption.
- Page 382 • IEEE802.11b International standard for wireless LAN using the 2.4 GHz frequency range with a throughput of up to 11 Mbps. • IEEE802.11g International standard for wireless LAN using the 2.4 GHz frequency range with a throughput of up to 54 Mbps.
- Page 383 • Link Quality The status of the connection between the wireless router and the printer excluding noise (interference) is indicated with a value from 0 to 100%. • LPR A platform-independent printing protocol used in TCP/IP networks. It does not support bidirectional communication.
- Page 384 • Router A relay device to connect to another network. • Signal Level The strength of the signal received by the printer from the wireless router is indicated with a value from 0 to 100%. • SSID Unique label for wireless LAN. It is often represented such as a network name or a wireless router name.
- Page 385 • USB Serial interface designed to enable you to "hot-swap" devices, i.e., by plugging and unplugging them without turning off the power. • WEP/WEP Key An encryption method employed by IEEE 802.11. Shared security key used to encrypt and decrypt data sent over wireless networks.
- Page 386 This printer supports WPA2 Personal. ◦ Passphrase This encrypted key is used to perform WPA2 Personal authentication. The passphrase should be a string of 8 to 63 alphanumeric characters or a 64-digit hexadecimal value. • WPS (Wi-Fi Protected Setup) WPS is a standard for easy and secure establishment of a wireless network. There are 2 primary methods used in the Wi-Fi Protected Setup: PIN entry: a mandatory method of setup for all WPS certified devices Push button configuration (PBC): an actual push button on the hardware or through a simulated push...
-
Page 387: Restrictions
Restrictions If you use a printer over the wireless LAN, the printer may recognize nearby wireless systems, you should set a network key (WEP or WPA/WPA2) to the access point to encrypt wireless transmission. Wireless communication with a product that does not comply with the Wi-Fi standard cannot be guaranteed. Connecting with too many computers may affect the printer performance, such as printing speed. -
Page 388: Ensuring Optimal Printing Results
Ensuring Optimal Printing Results Ink Tips Printing Tips Check Paper Settings Before Printing Set Cassette Paper Information After Loading Paper Canceling Print Jobs Keeping Print Quality High Transporting Your Machine... -
Page 389: Ink Tips
Ink is sometimes consumed for purposes other than printing. When you use the Canon printer for the first time after you install the bundled ink tanks, the printer consumes a small amount of ink in the amount to enable printing by filling the nozzles of the Print Head with ink. -
Page 390: Printing Tips
Printing Tips Check status before printing • Is the print head in good condition? Clogged print head nozzles make printing fainter, which affects print quality and wastes paper. To check the print head, print the nozzle check pattern. Maintenance Procedure •... -
Page 391: Check Paper Settings Before Printing
Check Paper Settings Before Printing Before printing, complete paper settings on the operation panel or from a computer. Paper comes in many varieties. Some is specially coated for high-quality photo printing, while other paper is designed for documents. Each type of paper has specific preset settings that determine details such as ink application and usage and the distance from nozzles, which ensures optimal print quality for the paper. -
Page 392: Set Cassette Paper Information After Loading Paper
Set Cassette Paper Information After Loading Paper When you insert a cassette after loading paper, a screen for setting the type and size of paper is displayed. Set the paper information for the cassette, indicating the type and size of paper loaded. To prevent incorrect printing, the machine can compare paper information entered for the cassette to print job paper settings to ensure they match. -
Page 393: Canceling Print Jobs
Canceling Print Jobs Do not press the ON button to cancel print jobs Pressing the ON button to turn off the machine during printing may prevent the machine from printing again if print jobs are not cleared internally. Press the Stop button to cancel printing. -
Page 394: Keeping Print Quality High
Keeping Print Quality High The key to maintaining optimal print quality is preventing the print head from drying out or becoming clogged. To ensure print quality, follow these tips. Note • On some paper, ink may run if you mark over it with a highlighter or water-based marker, or if water or sweat comes into contact with printed areas. -
Page 395: Transporting Your Machine
Transporting Your Machine Take these precautions when relocating the machine for changing your living place or repairing it. Important • Place the machine upright in a sturdy box and pack it with sufficient cushioning to protect it in transit. • With the print head and ink tank set still installed, press the ON button to turn off the machine. This enables automatic capping of the print head, which prevents it from drying out. -
Page 396: Legal Restrictions On Scanning/Copying
Legal Restrictions on Scanning/Copying Scanning, printing, copying, or modifying copies of the following may be punishable under law. This list is non-exhaustive. When in doubt, check with a local legal representative. • Paper money • Money orders • Certificates of deposit •... -
Page 397: Specifications
Specifications General Specifications Printing resolution (dpi) 600 (horizontal) x 1200 (vertical) Interface USB Port: Hi-Speed USB *1 USB Flash Drive Port: USB flash drive LAN Port: Wireless LAN: IEEE802.11n / IEEE802.11g / IEEE802.11b *2 *1 A computer that complies with Hi-Speed USB standard is required. Since the Hi-Speed USB interface is fully upwardly compatible with USB 1.1, it can be used at USB 1.1. -
Page 398: Copy Specifications
* With the Print Head and ink tanks installed. Print Head/Ink Total 4352 nozzles (BK 1280 nozzles, C/M/Y 512 x 6 nozzles) ADF capacity A4 or Letter size: max. 50 sheets (20 lb/75 g /m paper), up to 0.20 inch/5 mm in height Legal size: max. -
Page 399: Network Specifications
(Based on ITU-T No.1 chart for US specifications and Canon FAX Standard chart No.1 for others, both in standard mode.) Color: Approx. 1 minute/page at 33.6 kbps (Based on Canon COLOR FAX TEST SHEET.) Gradation Black: 256 levels Color: 24 bit Full Color (RGB each 8 bit) -
Page 400: Minimum System Requirements
The necessary amount of hard disk space may be changed without notice. Display XGA 1024 x 768 Other Supported OS Some functions may not be available with each OS. Refer to the Canon web site for details on operation with iOS, Android, and Windows RT. Mobile Printing Capability Apple AirPrint... - Page 401 Google Cloud Print MAXIFY Cloud Link • An internet connection is required to use Easy-WebPrint EX and all the Online Manual. • Windows: Operation can only be guaranteed on a computer with Windows 10, Windows 8.1, Windows 8, Windows 7 or Windows Vista pre-installed. •...
-
Page 402: Information About Paper
Information about Paper Supported Media Types Paper Load Limit Unsupported Media Types Handling Paper Print Area Print Area Standard Sizes Envelopes... -
Page 403: Supported Media Types
• For details on page sizes and media types, access the Canon website. • Genuine Canon paper is not available in some countries or regions. Note that in the United States, Canon paper is not sold by model number. Instead, purchase paper by name. -
Page 404: Paper Weight
• Maximum size: 8.50 x 14.00 inches (216.0 x 355.6 mm) Paper Weight You can use paper in the following weight range. • 17 to 28 lb (64 to 105 g /m ) (plain paper other than genuine Canon paper) -
Page 405: Paper Load Limit
Media Name <Model No.> Cassette Paper Output Tray Canon Red Label Superior <WOP111> Approx. 250 sheets Approx. 75 sheets Canon Océ Office Colour Paper <SAT213> Approx. 200 sheets Approx. 75 sheets High Resolution Paper <HR-101N> 65 sheets 65 sheets Paper for printing photos: Note •... - Page 406 *3 For best results in continuous printing, remove printed paper or envelopes from the paper output tray to avoid smearing or discoloration.
-
Page 407: Unsupported Media Types
Unsupported Media Types Do not use the following paper. Not only will print quality be poor, the paper may jam or cause the machine to malfunction. • Paper that is folded, curled, or wrinkled • Paper that is damp • Plain paper or notepad paper cut to a smaller size •... -
Page 408: Handling Paper
Handling Paper • Be careful not to rub or scratch the surfaces of any types of paper when handling. • Hold the paper as closely as possible to its edges and try not to touch the printing surface. The print quality may be degraded if the printing surface is smudged with sweat or oil that comes from your hands. -
Page 409: Print Area
Print Area Print Area Standard Sizes Envelopes... -
Page 410: Print Area
Print Area To maintain print quality, the machine leaves a margin around the edges of paper. The printable area is inside this margin. (recommended print area): Print within this area, when possible. (printable area): You can also print in this area. However, feeding precision or print quality may be affected. -
Page 411: Standard Sizes
Standard Sizes Size Print Area (width x height) Letter 8.00 x 10.69 inches (203.2 x 271.4 mm) Legal 8.00 x 13.69 inches (203.2 x 347.6 mm) Executive 6.98 x 10.19 inches (177.4 x 258.7 mm) 3.87 x 5.51 inches (98.2 x 140.0 mm) 5.56 x 7.95 inches (141.2 x 202.0 mm) 8.00 x 11.38 inches (203.2 x 289.0 mm) 6.90 x 9.80 inches (175.2 x 249.0 mm) - Page 412 Letter, Legal, Foolscap C: 0.12 inch (3.0 mm) D: 0.20 inch (5.0 mm) E: 0.25 inch (6.4 mm) F: 0.25 inch (6.3 mm) Legal (India) C: 0.12 inch (3.0 mm) D: 0.20 inch (5.0 mm) E: 0.23 inch (5.9 mm) F: 0.23 inch (5.9 mm) Oficio C: 0.12 inch (3.0 mm)
-
Page 413: Envelopes
Envelopes Size Recommended Print Area (width x height) Envelope Com 10 3.68 x 8.50 inches (93.5 x 215.9 mm) Envelope DL 3.88 x 7.67 inches (98.8 x 194.6 mm) Envelope C5 5.94 x 8.02 inches (150.8 x 203.6 mm) Envelope Monarch 3.43 x 6.50 inches (87.2 x 165.1 mm) Recommended print area A: 0.5 inch (12.7 mm) -
Page 414: Administrator Settings
Administrator Settings Sharing the Printer on a Network... -
Page 415: Administrator Password
Administrator Password Depending on the printer you are using, an administrator password is specified at the time of purchase. The password is either "canon" or the printer serial number if it is specified. Model whose administrator password is specified as "canon":... - Page 416 For more on initializing the printer, search for "UG067" or "UG505" on your printer's Online Manual and see the instructions shown.
-
Page 417: Password And Cookie
Password and Cookie Password Cookie Password Enter the password when the authentication screen is displayed. Administrator Password You need to enter the user name as well as the password depending on the printer you are using. For more on the user name, see the link above. Important •... - Page 418 OS: Windows Vista SP2 or later Browser: Internet Explorer 9 or later / Google Chrome 41.0.2272.118m or later / Mozilla Firefox 37.0.1 or later...
-
Page 419: How To Locate Your Printer's Serial Number
How to locate your printer's serial number The serial number is printed on a white sticker attached to each printer. The serial number will consists of 9 alphanumeric characters (4 letters followed by 5 numbers). Example: Note • Depending on the printer you are using, you can check the serial number by printing out the network setting information of the printer. -
Page 420: Registering Root Certificate To Web Browser
Registering Root Certificate to Web Browser When you display Remote UI for the first time on your smartphone, tablet, or computer, download the root certificate, and then register it to the web browser. The secure connection will be confirmed and a message will not appear. -
Page 421: Printing
Printing Printing from Computer Printing from Smartphone/Tablet Printing Using Operation Panel Paper Settings... -
Page 422: Printing From Computer
Printing from Computer Printing from Application Software (Windows Printer Driver) Printing from Application Software (Mac OS Printer Driver) Printing Using Canon Application Software Printing Using a Web Service Printing from an AirPrint-enabled Printer with Mac... -
Page 423: Printing From Application Software (Mac Os Printer Driver)
Printing from Application Software (Mac OS Printer Driver) Printing with Easy Setup Basic Various Printing Methods Changing the Print Quality and Correcting Image Data Overview of the Printer Driver Updating the Printer Driver... -
Page 424: Printing With Easy Setup
Printing with Easy Setup The simple setup procedure for carrying out appropriate printing on this printer is as follows: Printing with Easy Setup Check that the printer is turned on Load paper on the printer 3. Select the printer Select your model from the Printer list in the Print Dialog. - Page 425 5. Select Quality & Media from the pop-up menu 6. Select the media type For Media Type, select the same paper type loaded in the printer.
- Page 426 7. Select the print quality For Print Quality, select High or Standard according to your purpose. Important • The print quality settings that can be selected may differ depending on a printing profile. 8. Complete the setup Click Print. When you execute print, the document will be printed in accordance with the type and size of the media.
- Page 427 Important • In the Presets section, click Save Current Settings as Preset... to register the specified settings. Note • If the paper settings on the print dialog differ from the cassette paper information registered on the printer, an error may occur. For instructions on what to do if an error occurs, see "Paper Settings."...
-
Page 428: Paper Settings On The Printer Driver And The Printer (Media Type)
Canon Red Label Superior <WOP111> Plain Paper Plain paper Canon Océ Office Colour Paper <SAT213> Plain Paper Plain paper Canon genuine papers (Photo Printing) Paper information registered on the Media name <Model No.> Media Type in the printer driver printer Photo Paper Plus Glossy II <PP-201>... -
Page 429: Paper Settings On The Printer Driver And The Printer (Paper Size)
Paper Settings on the Printer Driver and the Printer (Paper Size) When you use this printer, selecting a paper size that matches the print purpose will help you achieve the best print results. You can use the following paper sizes on this printer. Paper Size in the printer driver Paper information registered on the printer US Letter... -
Page 430: Various Printing Methods
Various Printing Methods Setting the Number of Copies and Printing Order Setting the Stapling Margin Scaling the Printing to Fit the Paper Size Scaled Printing Page Layout Printing Duplex Printing Setting Up Envelope Printing Printing on Postcards Setting Paper Dimensions (Custom Size) -
Page 431: Setting The Number Of Copies And Printing Order
Setting the Number of Copies and Printing Order Collate pages + Reverse Collate pages + Normal Reverse The procedure for specifying the number of copies and printing order is as follows: 1. Specify the number of copies to be printed Specify the number of copies to print from the Copies in the Print Dialog. - Page 432 5. Complete the setup Click Print. When you execute print, the specified number of copies will be printed with the specified printing order. Important • When the application software that you used to create the document has the same function, specify the settings on the printer driver.
-
Page 433: Setting The Stapling Margin
Setting the Stapling Margin The procedure for setting the margin width and the staple side is as follows: 1. Select Margin from the pop-up menu on the Print Dialog 2. Set the margin width and the staple side If necessary, set the Margin width, and select a stapling position from the Stapling Side list. Note •... -
Page 434: Scaling The Printing To Fit The Paper Size
Scaling the Printing to Fit the Paper Size The procedure for printing a document that is automatically enlarged or reduced to fit the page size to be used is as follows: 1. Check the paper size Check that the Paper Size in the Print Dialog is the same as the paper size that you set in the application software. - Page 435 5. Complete the setup Click Print. When you execute print, the document will be enlarged or reduced to fit to the page size.
-
Page 436: Scaled Printing
Scaled Printing The procedure for printing a document with pages enlarged or reduced is as follows: 1. Select the printer In the Page Setup Dialog, select your model name from the Format For list. 2. Set scaled printing Specify the scaling factor in the Scale box, and click OK. Note •... -
Page 437: Page Layout Printing
Page Layout Printing The page layout printing function allows you to print more than one page image on a single sheet of paper. The procedure for performing page layout printing is as follows: 1. Select Layout from the pop-up menu in the Print Dialog 2. - Page 438 Flip horizontally Select this check box to reverse left and right of the document. 4. Complete the setup Click Print. When you execute print, the specified number of pages will be arranged on each sheet of paper in the specified order.
-
Page 439: Duplex Printing
Duplex Printing The procedure for printing data on both sides of one sheet of paper is as follows: 1. Set duplex printing Check the Two-Sided check box in the Print Dialog. 2. Select Layout from the pop-up menu on the Print Dialog... - Page 440 • After printing the front page, there is an ink drying wait time before starting to print the back page (Operation stops temporarily). Do not touch the paper during this time. You can change the ink drying wait time from Custom Settings in the Canon IJ Printer Utility. Note...
- Page 441 Related Topic Changing the Printer Operation Mode...
-
Page 442: Setting Up Envelope Printing
Setting Up Envelope Printing The procedure for performing envelope printing is as follows: Load envelope into printer 2. Select paper size in print dialog For Paper Size, select Envelope #10, Envelope C5, Envelope DL, Envelope Monarch, Envelope You4, or Envelope You6. 3. -
Page 443: Printing On Postcards
Printing on Postcards This section describes the procedure for postcard printing. Load postcard on the printer 2. Select paper size in the Print Dialog Select Postcard or Postcard Double from the Paper Size menu. Important • Return postcards can be used only when you print them from the computer. •... -
Page 444: Setting Paper Dimensions (Custom Size)
Setting Paper Dimensions (Custom Size) You can specify the height and width of paper when its size cannot be selected from the Paper Size menu. Such a paper size is called "custom size." The procedure for specifying a custom size is as follows: 1. - Page 445 To check the current printer settings, select Quality & Media and click Printer Media Information. For details about the cassette paper information to be registered on the printer, see the following: • Paper Settings on the Printer Driver and the Printer (Media Type) •...
-
Page 446: Changing The Print Quality And Correcting Image Data
Changing the Print Quality and Correcting Image Data Printing a Color Document in Monochrome Specifying Color Correction Optimal Photo Printing of Image Data Adjusting Colors with the Printer Driver Printing with ICC Profiles (Specifying an ICC Profile from the Application Software) Printing with ICC Profiles (Specifying an ICC Profile from the Printer Driver) Adjusting Color Balance... -
Page 447: Printing A Color Document In Monochrome
Printing a Color Document in Monochrome The procedure for printing a color document in monochrome is as follows: 1. Select Quality & Media from the pop-up menu on the Print Dialog 2. Set grayscale printing Check the Grayscale Printing check box. 3. -
Page 448: Specifying Color Correction
You can specify the color correction method suited to the type of document to be printed. Normally, the printer driver adjusts the colors by using Canon Digital Photo Color so that data is printed with color tints that most people prefer. - Page 449 Related Topics Optimal Photo Printing of Image Data Adjusting Colors with the Printer Driver Printing with ICC Profiles (Specifying an ICC Profile from the Application Software) Printing with ICC Profiles (Specifying an ICC Profile from the Printer Driver)
-
Page 450: Optimal Photo Printing Of Image Data
Adjusting Colors with the Printer Driver Describes the procedure for printing by using the color correction function of the printer driver. • To print using Canon Digital Photo Color The printer prints data with color tints that most people prefer, reproducing colors of the original image data and producing three-dimensional effects and high, sharp contrasts. -
Page 451: Adjusting Colors With The Printer Driver
You can specify the color correction function of the printer driver to print with color tints that most people prefer through the use of Canon Digital Photo Color. When printing from an application software that can identify ICC profiles and allows you to specify them, use a printing ICC profile in the application software, and select settings for color management. -
Page 452: Application Software
Printing with ICC Profiles (Specifying an ICC Profile from the Application Software) When you print from Adobe Photoshop, Canon Digital Photo Professional, or any application software that can identify input ICC profiles and allows you to specify such profiles, printer uses the color management system (ColorSync) built-into Mac OS when printing. - Page 453 Adjusting Color Balance Adjusting Brightness Adjusting Intensity Adjusting Contrast...
-
Page 454: Printer Driver
Printing with ICC Profiles (Specifying an ICC Profile from the Printer Driver) Print from an application software that cannot identify or specify input ICC profiles by using the color space of the input ICC profile (sRGB) found in the data. 1. -
Page 455: Adjusting Color Balance
Adjusting Color Balance You can adjust the color tints when printing. Since this function adjusts color balance of the output by changing the ink ratios of each color, it changes the total color balance of the document. Use the application software when you want to change the color balance significantly. - Page 456 3. Complete the setup Click Print. When you execute print, the document is printed with the adjusted color balance. Important • When the Grayscale Printing check box is checked for Quality & Media, the color balance (Cyan, Magenta, Yellow) appear grayed out and are unavailable. •...
-
Page 457: Adjusting Brightness
Adjusting Brightness You can change the brightness of the overall image data during printing. This function does not change pure white or pure black but it changes the brightness of the intermediate colors. The following sample shows the print result when the brightness setting is changed. Light is selected Normal is selected Dark is selected... - Page 458 Important • If you select ColorSync for Color Matching, then the Brightness appears grayed out and is unavailable. Related Topics Specifying Color Correction Adjusting Color Balance Adjusting Intensity Adjusting Contrast...
-
Page 459: Adjusting Intensity
Adjusting Intensity You can dilute (brighten) or intensify (darken) the colors of the overall image data during printing. The following sample shows the case when the intensity is increased so that all colors become more intense when the image data is printed. No adjustment Higher intensity The procedure for adjusting intensity is as follows:... - Page 460 Important • If you select ColorSync for Color Matching, then the Intensity appears grayed out and is unavailable. Related Topics Specifying Color Correction Adjusting Color Balance Adjusting Brightness Adjusting Contrast...
-
Page 461: Adjusting Contrast
Adjusting Contrast You can adjust the image contrast during printing. To make the differences between the light and dark portions of images greater and more distinct, increase the contrast. On the other hand, to make the differences between the light and dark portions of images smaller and less distinct, reduce the contrast. - Page 462 Important • If you select ColorSync for Color Matching, then the Contrast appears grayed out and is unavailable. Related Topics Specifying Color Correction Adjusting Color Balance Adjusting Brightness Adjusting Intensity...
-
Page 463: Overview Of The Printer Driver
Page Setup Dialog Print Dialog Quality & Media Color Options Margin Canon IJ Printer Utility Opening the Canon IJ Printer Utility Maintenance of this Printer Display the Printing Status Screen Deleting the Undesired Print Job Instructions for Use (Printer Driver) -
Page 464: Canon Ij Printer Driver
Canon IJ Printer Driver The Canon IJ printer driver (called printer driver below) is a software that is installed on your computer for printing data with this printer. The printer driver converts the print data created by your application software into data that your printer can understand, and sends the converted data to the printer. -
Page 465: How To Open The Printer Driver Setup Window
How to Open the Printer Driver Setup Window You can display the printer driver setup window from the application software you are using. Opening the Page Setup Dialog Use this procedure to set the page (paper) settings before printing. 1. Select Page Setup... from the File menu of the application software Page Setup Dialog opens. -
Page 466: Page Setup Dialog
Page Setup Dialog In the Page Setup dialog, you configure the basic print settings such as the size of paper loaded in the printer or the scaling ratio. To open the Page Setup dialog, you typically select Page Setup... from the File menu of your application software. -
Page 467: Print Dialog
Print Dialog In the Print dialog, you can set paper type and print quality to start printing. To open the Print dialog, you typically select Print... from the File menu of your application software. Printer Select the model to be used for printing. When you click Add Printer..., a dialog for specifying the printer opens. - Page 468 Layout You can set page layout printing. Use Reverse page orientation to change the paper orientation, and use Flip horizontally to print a mirror image of the document. You can also set duplex printing. Color Matching You can select the color correction method. Paper Handling You can set the pages to be printed on paper and the print order.
- Page 469 Quality & Media This dialog allows you to create a basic print setup in accordance with the paper type. Unless special printing is required, normal printing can be performed just by setting the items in this dialog. Media Type Select the type of media to be used. You must select the type of media actually loaded in the printer.
- Page 470 Related Topic Printing a Color Document in Monochrome...
-
Page 471: Color Options
Color Options This dialog allows you to adjust the print color as you like. If the color of the printed image is not as expected, adjust the properties in the dialog and retry printing. The adjustments made here do not affect the colors of the original print data unlike application software dedicated to image processing. - Page 472 between white and black. Select from Light, Normal, or Dark, if necessary. Intensity Select this method to adjust the overall density of your print. To increase the overall intensity, drag the slider to the right. To decrease the overall intensity, drag the slider to the left.
- Page 473 Margin This dialog allows you to set the stapling side and amount of margin for stapling multiple sheets of paper. Margin Specify the amount of margin space for stapling the paper. Enter a value between 0 inch (0 mm) to 1.2 inches (30 mm).
-
Page 474: Canon Ij Printer Utility
The Canon IJ Printer Utility allows you to perform printer maintenance or change the settings of the printer. What You Can Do with the Canon IJ Printer Utility You can switch between pages in Canon IJ Printer Utility by the pop-up menu. You can choose one of the following items from the pop-up menu. - Page 475 Opening the Canon IJ Printer Utility To open the Canon IJ Printer Utility, follow the steps below. 1. Open System Preferences, and select Printers & Scanners (Print & Scan) 2. Start the Canon IJ Printer Utility Select your model from the printer list, and click Options & Supplies..
- Page 476 Maintenance of this Printer Cleaning the Print Heads Use Your Computer to Print a Nozzle Check Pattern Aligning the Print Head Position Checking the Ink Status from Your Computer Managing the Printer Power Reducing the Printer Noise Changing the Printer Operation Mode...
-
Page 477: Display The Printing Status Screen
Display the Printing Status Screen Check the print progress according to the following procedure: 1. Launch the printing status screen • If the print data has been sent to the printer The printing status screen opens automatically. To display the printing status screen, click the (the printer icon) displayed on the Dock. -
Page 478: Deleting The Undesired Print Job
Deleting the Undesired Print Job If the printer does not start printing, canceled or failed print job data may be remaining. Delete unnecessary print jobs from the print status check screen. 1. Open System Preferences, and select Printers & Scanners (Print & Scan) 2. -
Page 479: Instructions For Use (Printer Driver)
If Bonjour is selected, remaining ink level messages may differ from those indicated by Canon IJ Network. • If you install a Canon printer driver to OS X El Capitan v10.11, OS X Yosemite v10.10 or OS X Mavericks v10.9 and use a USB connection, the Add dialog may display several selections for Use. -
Page 480: Updating The Printer Driver
Updating the Printer Driver Obtaining the Latest Printer Driver Delete the Unnecessary Canon IJ Printer from the Printer List Before Installing the Printer Driver Installing the Printer Driver... -
Page 481: Obtaining The Latest Printer Driver
Obtaining the Latest Printer Driver By updating the printer driver to the latest version of the printer driver, unresolved problems may be solved. You can access our website and download the latest printer driver for your model. Important • You can download the printer driver for free, but any Internet access charges incurred are your responsibility. -
Page 482: Delete The Unnecessary Canon Ij Printer From The Printer List
The procedure to delete the unnecessary Canon IJ Printer from the printer list is as follows: You cannot delete the Canon IJ Printer unless you are logged in as a user with the administrative right. For information about an administrative user, refer to the user's manual for the Mac OS. -
Page 483: Before Installing The Printer Driver
Before Installing the Printer Driver This section describes the items that you should check before installing the printer driver. You should also refer to this section if the printer driver cannot be installed. Checking the Personal Computer Settings • Terminate all running applications. •... -
Page 484: Installing The Printer Driver
• You can download the printer driver for free, but you are responsible for paying any connection fees to the Internet. Related Topics Obtaining the Latest Printer Driver Delete the Unnecessary Canon IJ Printer from the Printer List Before Installing the Printer Driver... -
Page 485: Printing Using A Web Service
Printing Using a Web Service Using PIXMA/MAXIFY Cloud Link Printing with Google Cloud Print... - Page 486 Using PIXMA/MAXIFY Cloud Link By using PIXMA/MAXIFY Cloud Link, you can connect your printer to a cloud service, such as CANON iMAGE GATEWAY, Evernote, or Twitter, and use the following functions without using a computer: • Print images from a photo-sharing service •...
-
Page 487: Printing With Google Cloud Print
Printing with Google Cloud Print The printer is compatible with Google Cloud Print™ (Google Cloud Print is a service provided by Google Inc.). By using Google Cloud Print, you can print from anywhere with applications or services supporting Google Cloud Print. Sending Print Data and Printing via Internet Once you register the printer to Google Cloud Print, you can print from applications or services supporting Google Cloud Print without internet connection. - Page 488 Deleting Printer from Google Cloud Print LAN connection with the printer and internet connection are required to delete the printer from Google Cloud Print. Internet connection fees apply.
-
Page 489: Getting Google Account
Getting Google Account To print with Google Cloud Print, you need to get Google account and register the printer with Google Cloud Print in advance. Note • If you already have Google account, register the printer to Google Cloud Print. Registering Printer with Google Cloud Print Access to Google Cloud Print with the web browser on the computer or the mobile device and register the required information. -
Page 490: Registering Printer With Google Cloud Print
(Chrome menu). 5. Select Show advanced settings... to display information. 6. Select Manage for Google Cloud Print. 7. When Canon MB2100 series and Add printers button are displayed, select Add printers. 8. When confirmation message for registering printer appears, select OK. - Page 491 Registration Using Printer Important • Entering the administrator password may be required depending on the range of administrator password. Make sure printer is turned on. 2. Select Setup on HOME screen. LCD and Operation Panel 3. Select Web service setup and press OK button. 4.
- Page 492 • If you exceed time limit of the authentication process, an error message is displayed on the LCD. Press the OK button. When the confirmation message to print the authentication URL is displayed, try again from step 7. Note • Perform the authentication process with your Google account which you have gotten in advance.
-
Page 493: Printing From Computer Or Smartphone With Google Cloud Print
Printing from Computer or Smartphone with Google Cloud Print When you send print data with Google Cloud Print, the printer receives the print data and prints it automatically. When printing from a smartphone, tablet, computer, or other external device by using Google Cloud Print, load paper into the printer in advance. - Page 494 2. Start Google Chrome browser on your computer. 3. Select Sign in to Chrome... from (Chrome menu). 4. Log in to your Google account. 5. Select Print... from (Chrome menu). 6. Select Change... next Destination. 7. Select Canon MB2100 series in Google Cloud Print. 8. Select Print.
- Page 495 When the preparation for printing with Google Cloud Print is complete, the printer receives the print data and prints it automatically. When you want to print from Google Cloud Print immediately When the printer cannot receive the print data, or you want to start printing immediately, you can check whether there is a print job on the Google Cloud Print and start printing manually.
- Page 496 5. Select Print... from (Chrome menu). 6. Select Change... next Destination. 7. Select Canon MB2100 series in Local Destinations. 8. Select Print. When the preparation for printing with Google Cloud Print is complete, the printer receives the print data and prints it automatically.
-
Page 497: Deleting Printer From Google Cloud Print
(Chrome menu). 5. Select Show advanced settings... to display information. 6. Select Manage for Google Cloud Print. 7. Select Manage next Canon MB2100 series on device list. 8. Select Delete. 9. When confirmation message for deleting printer appears, select OK. - Page 498 LCD and Operation Panel 3. Select Web service setup and press OK button. 4. Select Web service connection setup -> Google Cloud Print setup -> Delete from Google Cloud Print. 5. When confirmation screen to delete printer is displayed, select Yes and press OK button. 6.
- Page 499 Printing from an AirPrint-enabled Printer with Mac Using AirPrint to print from your iPhone, iPad, iPod touch, or Mac. AirPrint enables you to print photos, email, Web pages and documents from iPhone, iPad, iPod touch, and Mac without the need to install drivers, or download apps or software. Note •...
- Page 500 Note • If the printer's Auto Power On function is enabled, the printer is turned on automatically when it receives the print data. Load paper. 3. Perform printing on your application software. Print dialog appears. 4. Select your model name added as AirPrint printer from the Printer list in the Print Dialog. 5.
-
Page 501: Printing From A Device Equipped With Windows 10 Mobile
Printing from a Device Equipped with Windows 10 Mobile You can print from a device equipped with Windows 10 Mobile. This function enables you to print photos, email, Web pages and documents from Windows 10 without the need to install drivers, or download apps or software. Checking Your Environment First, check your environment. -
Page 502: Printing From Smartphone/Tablet
Printing from Smartphone/Tablet Printing Directly from Smartphone/Tablet Printing Using a Web Service... -
Page 503: Printing Directly From Smartphone/Tablet
Printing Directly from Smartphone/Tablet Android Print Printing from an AirPrint-enabled Printer with iOS Device Printing from a Device Equipped with Windows 10 Mobile Using Machine with Direct Connection... -
Page 504: Android Print
You can print to a Canon printer from your Android smartphone or tablet by installing a printing plug-in. Installing Printing Plug-in • Installing Canon Print Service Canon Print Service is a printing plug-in for Android 4.4.2 or later, and is available for free on Google Play. Install the plug-in and activate it. Printing Using Canon Print Service •... - Page 505 Printing Using Mopria Print Service Important • The operation may differ depending on your Android device or your application. • Activate the plug-in after installing it to your Android device. The service is not enabled immediately after installing. • You can print using Mopria Print Service with wireless LAN or with the printer's direct connection. Make sure printer is turned on.
- Page 506 Printing from an AirPrint-enabled Printer with iOS Device Using AirPrint to print from your iPhone, iPad, iPod touch, or Mac. AirPrint enables you to print photos, email, Web pages and documents from iPhone, iPad, iPod touch, and Mac without the need to install drivers, or download apps or software. Note •...
- Page 507 4. Tap Print from menu options. 5. Select your model name from Printer on Printer Options. Important • Because some applications do not support AirPrint, Printer Options may not be displayed. If an application does not let you use printer options, you cannot print from that application.
- Page 508 Note • Printer Options differ depending on the application that you are using. 6. When printing file type that has multiple pages, such as PDF file, tap Range and tap All Pages or select range of pages to be printed. 7.
- Page 509 Load the envelope in vertically with the address side facing down so that the folded flap of the envelope will be faced up on the right side. Checking Print Status During printing, a Print Center icon is displayed in the list of recently used applications and you can use it to check the print progress.
-
Page 510: Using Machine With Direct Connection
Using Machine with Direct Connection You can connect devices (e.g. smartphone, or tablet) to the printer by two methods below. • Wireless connection (connecting devices via a wireless router) • Direct wireless connection (connecting devices using direct connection) This section describes direct connection, which allows you to print or scan by connecting the devices to the printer directly. - Page 511 5. Select Change LAN and press OK button. 6. Select Activate direct connect. and press OK button. 7. Select Yes and press OK button. The identifier (SSID) for direct connection appears. The device detects the printer by the identifier (SSID). Note •...
- Page 512 • For more on printing or scanning from a device via wireless LAN, refer to the device's or application's instruction manual. • You can print/scan from your smartphone or tablet by installing Canon PRINT Inkjet/SELPHY. Download it from App Store and Google Play.
- Page 513 5. Select Activate wireless LAN and press OK button. If you do not use the printer over wireless LAN, select Disable LAN. Changing Direct Connection Setting Change the settings for the direct connection following the procedure below. Make sure printer is turned on. 2.
- Page 514 3. Press left Function button to finish entering device name. • To change the confirmation screen setting when a Wi-Fi Direct compatible device is connecting to the printer Selecting C and pressing the OK button displays the confirmation screen. If you want the printer to display the screen to inform you a Wi-Fi Direct device is connecting to the printer, select Yes and press the OK button.
-
Page 515: Printing Using A Web Service
Printing Using a Web Service Using PIXMA/MAXIFY Cloud Link Printing with Google Cloud Print... - Page 516 Using PIXMA/MAXIFY Cloud Link By using PIXMA/MAXIFY Cloud Link, you can connect your printer to a cloud service, such as CANON iMAGE GATEWAY, Evernote, or Twitter, and use the following functions without using a computer: • Print images from a photo-sharing service •...
- Page 517 Printing with Google Cloud Print The printer is compatible with Google Cloud Print™ (Google Cloud Print is a service provided by Google Inc.). By using Google Cloud Print, you can print from anywhere with applications or services supporting Google Cloud Print. Sending Print Data and Printing via Internet Once you register the printer to Google Cloud Print, you can print from applications or services supporting Google Cloud Print without internet connection.
- Page 518 Deleting Printer from Google Cloud Print LAN connection with the printer and internet connection are required to delete the printer from Google Cloud Print. Internet connection fees apply.
-
Page 519: Printing Using Operation Panel
Printing Using Operation Panel Printing Photo Data Printing Documents (PDF File) Saved on USB Flash Drive... -
Page 520: Printing Photo Data
Printing Photo Data Printing Photographs Saved on USB Flash Drive Setting Items for Photo Printing Using Operation Panel Using Useful Display Functions... -
Page 521: Printing Photographs Saved On Usb Flash Drive
Printing Photographs Saved on USB Flash Drive You can print the photograph saved on the USB flash drive easily. Make sure printer is turned on. Load photo paper. Insert USB flash drive into USB flash drive port. Important • If you already insert the USB flash drive to save the received faxes automatically, you cannot print the photographs even when the USB flash drive which contains the photo data is set. - Page 522 1. Number of copies Specify by using the Numeric buttons. 2. Selection photo Select the photo you want to print by using the button. 3. Print settings By pressing the right Function button, the print settings confirmation screen is displayed. On the print settings confirmation screen, you can change the settings of page size, media type, and print quality and so on.
- Page 523 • You can add the print job by pressing the right Function button while printing. Adding Print Job Adding Print Job You can add the print job (Reserve photo print) while printing photos. Follow the procedure below to add the print job. 1.
- Page 524 cancel printing all photos. If you select Cancel the last reservation and press the OK button, you can cancel the last printing job. • If there are many print jobs, Cannot reserve more print jobs. Please wait a while and redo the operation.
-
Page 525: Setting Items For Photo Printing Using Operation Panel
Setting Items for Photo Printing Using Operation Panel You can specify the setting of page size, media type, photo fix and so on to print the photos saved on the USB flash drive. Use the button to change the setting item and use the button to change the setting. -
Page 526: Using Useful Display Functions
Using Useful Display Functions You can change the method to display the photos saved on the USB flash drive and specify the date (last modified date of data) to select photos. Changing the Method to Display Specifying Date to Select Photo Changing the Method to Display By pressing the left Function button on the photo selection screen, the screen to select a display method is displayed. -
Page 527: Printing Documents (Pdf File) Saved On Usb Flash Drive
• PDF files saved on a USB flash drive when receiving faxes Saving Document in Printer's Memory to USB Flash Drive Saving Received Faxes Automatically on USB Flash Drive • PDF files made using Canon IJ Scan Utility For Windows: Scanning Documents... - Page 528 • Characters other than the printer name or IJ Scan Utility are displayed on Created with. • The PDF files made using application software other than Canon IJ Scan Utility (application software compatible with the printer) are not printable even if they are saved using Canon IJ Scan Utility.
- Page 529 • Files scanned using the operation panel of the printer and saved on a USB flash drive with Format set to other than PDF or Compact PDF • Files made using Canon IJ Scan Utility and one of the following conditions is applied -Encrypted data...
-
Page 530: Paper Settings
Paper Settings By registering the paper size and the media type loaded in the cassette, you can prevent the printer from misprinting by displaying the message before printing starts when the paper size or the media type of the loaded paper differs from the print settings. Note •... - Page 531 Paper Settings on the Printer Driver and the Printer (Media Type) Paper Settings on the Printer Driver and the Printer (Paper Size) Note • Depending on the registered cassette paper information, the screen to make sure whether you apply the registered information to the paper settings for copying is displayed. If you select Yes, the information is applied to the paper settings for copying.
- Page 532 Check the message and press the OK button. When the screen to select the operation is displayed, select one of the operations below. Note • Depending on the setting, the choices below may not be displayed. Print with the loaded paper. Select if you want to print on the paper loaded in the cassette without changing the paper settings.
- Page 533 Paper Settings on the Printer Driver and the Printer (Media Type) Paper Settings on the Printer Driver and the Printer (Paper Size) • For Mac OS: Paper Settings on the Printer Driver and the Printer (Media Type) Paper Settings on the Printer Driver and the Printer (Paper Size) Cancel Cancels printing.
-
Page 534: Copying
Copying Making Copies Basics Reducing/Enlarging Copies Two-Sided Copying Special Copy Menu... -
Page 535: Making Copies
Making Copies This section describes the procedure to copy with Standard copy. Make sure printer is turned on. Load paper. 3. Select Copy on HOME screen. LCD and Operation Panel The Copy standby screen is displayed. Load original document on platen glass or in ADF. 5. - Page 536 Registering Favorite Settings (Custom profiles) 6. Press Color button for color copying, or Black button for black & white copying. The printer starts copying. Remove the original on the platen glass or from the document output slot after copying is complete. Important •...
- Page 537 cancel copying all scanned data. If you select Cancel the last reservation and press the OK button, you can cancel the last copying job. • If you set a document of too many pages to add the copying job, Cannot add more copy jobs. Please wait a while and redo the operation.
-
Page 538: Displaying Preview Screen
Displaying Preview Screen Pressing the center Function button allows you to preview an image of the printout on the preview screen. Important • The preview screen is not available when you load the original in the ADF. • In the following conditions, you cannot use the center Function button when the Copy standby screen is displayed. -
Page 539: Setting Items For Copying
Setting Items for Copying The following screen is displayed by pressing the right Function button on the Copy standby screen. Use the button to change the setting item and use the button to change the setting. Note • Some settings cannot be specified in combination with the setting of other setting item or the copy menu. - Page 540 Note • Only the page sizes selectable from the operation panel are displayed. 4. Type (Media type) Select the media type of the loaded paper. Note • Only the media types selectable from the operation panel are displayed. 5. Print qlty (Print quality) Adjust print quality according to the original.
-
Page 541: Reducing/Enlarging Copies
Reducing/Enlarging Copies You can specify the magnification optionally or select the preset-ratio copying or fit-to-page copying. The screen below is displayed when you press the right Function button in the Copy standby screen. Select the reduction/enlargement method from Magnif.. Note •... - Page 542 If you select other than Fit to page and press the right Function button, Magnification screen is displayed. Use the button to specify the magnification. Note • 400% MAX (maximum copy ratio) and 25% MIN (minimum copy ratio) are selectable. •...
-
Page 543: Two-Sided Copying
Two-Sided Copying When you select 2-sided for 2-sidedPrintSetting in Standard copy, you can copy two original pages onto the both sides of a single sheet of paper. Press the right Function button to select the orientation and the stapling side. •... - Page 544 When Loading the Original on the platen glass: • Before scanning: When you select 2-sided for 2-sidedPrintSetting and the preview function is activated, the printer starts pre-scanning before scanning the original. When pre-scanning is finished, the screen below (preview screen) appears on the LCD. 1.
-
Page 545: Special Copy Menu
Special Copy Menu Copying Two Pages onto Single Page Copying Four Pages onto Single Page Copying Thick Originals Such as Books Copying ID Card to Fit onto Single Page Collated Copying... -
Page 546: Copying Two Pages Onto Single Page
Copying Two Pages onto Single Page When you select 2-on-1 copy for Layout in Standard copy, you can copy two original pages onto a single sheet of paper by reducing each image. Press the right Function button on the Copy standby screen to display the print settings screen and select 2-on-1 copy for Layout. - Page 547 For more on two-sided copy function: Two-Sided Copying When Loading the Original on the platen glass: • Before scanning: When the preview function is activated, the printer starts pre-scanning before scanning the original. When pre-scanning is finished, the screen below (preview screen) appears on the LCD. 1.
- Page 548 Adding Copying Job (Reserve copy) • If you use this function in combination with Two-sided copy, the screen above is displayed after scanning the second sheet of original is complete. Follow the on-screen instructions to scan the third and fourth sheet of original.
-
Page 549: Copying Four Pages Onto Single Page
Copying Four Pages onto Single Page When you select 4-on-1 copy for Layout in Standard copy, you can copy four original pages onto a single sheet of paper by reducing each image. Four different layouts are available. Press the right Function button to specify the orientation and the advanced layout. Note •... - Page 550 After selecting the layout and press the OK button, you can select whether you use the preview screen. If you select Yes, the preview screen is displayed so that you can check the orientation. Note • This function can be used in combination with Two-sided copy. If you use this function in combination, you can copy eight original pages on one sheet of paper.
- Page 551 Remove the first sheet of original from the platen glass and load the second sheet on the platen glass and press the OK button. The printer starts scanning the second sheet of original and copying. Note • If you do not need more scanning, press the left Function button. The printer starts copying. •...
-
Page 552: Copying Thick Originals Such As Books
Copying Thick Originals Such as Books When ON is selected for Frame erase copy in Standard copy, you can make a copy without black margins around the image and gutter shadows in copying thick originals such as books. Using this function, you can reduce unnecessary ink consumption. -
Page 553: Copying Id Card To Fit Onto Single Page
Copying ID Card to Fit onto Single Page When you select ID card copy for Layout in Standard copy, you can copy a card sized original such as an ID card onto a single sheet of paper. Press the right Function button on the Copy standby screen to display the print settings screen and select ID card copy for Layout. - Page 554 Using Preview Screen to Check Printing Result of Front Side Pressing the center Function button before loading the original on the platen glass displays how to load the original on the LCD. Loading the original following the on-screen instructions and pressing the OK button displays the preview screen to check the printing result of the front side.
-
Page 555: Collated Copying
Collated Copying You can obtain sorted printouts when making multiple copies of a multi-paged original. When you select ON for Collate in Standard copy, you can obtain sorted printouts when making multiple copies of a multi-paged original. In addition, you can copy originals on both sides of paper. •... - Page 556 Two-Sided Copying for two-sided copying.
-
Page 557: Copying From Smartphone/Tablet
Copying from Smartphone/Tablet Installing Canon PRINT Inkjet/SELPHY on your smartphone/tablet allows you to perform copy settings or operations from your smartphone/tablet. Canon PRINT Inkjet/SELPHY is a Canon-made application and can be downloaded from App Store and Google Play. For iOS For Android Make sure machine is turned on. - Page 558 10. If screen asking you to enter password is displayed, enter password and tap OK on application. The machine starts copying. Important • The password is set at the time of purchase. The password is the printer serial number. The printer serial number is printed on the sticker attached on the printer.
-
Page 559: Scanning
Scanning Scanning from Computer (Windows) Scanning from Computer (Mac OS) Scanning from Operation Panel Scanning Using Smartphone/Tablet... -
Page 560: Scanning From Computer (Windows)
Scanning from Computer (Windows) Using IJ Scan Utility Scanning Using Application Software (ScanGear) Other Scanning Methods IJ Network Scanner Selector EX2 Menu and Setting Screen Scanning Tips Positioning Originals (Scanning from Computer) Network Scan Settings... -
Page 561: Scanning From Computer (Mac Os)
Scanning from Computer (Mac OS) Using IJ Scan Utility Using Scanner Driver Scanning Tips Positioning Originals (Scanning from Computer) Network Scan Settings... -
Page 562: Using Ij Scan Utility
Using IJ Scan Utility What Is IJ Scan Utility (Scanner Software)? Starting IJ Scan Utility Scanning Documents Basics Scanning Photos Scanning with Favorite Settings Scanning Originals Larger than the Platen (Image Stitch) Adjusting Cropping Frames in the Image Stitch Window Extracting Text from Scanned Images (OCR) Sending Scanned Images via E-mail Scanning Multiple Originals at One Time... -
Page 563: What Is Ij Scan Utility (Scanner Software)
What Is IJ Scan Utility (Scanner Software)? IJ Scan Utility is an application that allows you to easily scan documents, photos, etc. You can complete from scanning to saving at one time by simply clicking the corresponding icon in the IJ Scan Utility main screen. - Page 564 Note • Refer to "Settings Dialog" for how to set the applications to integrate with.
-
Page 565: Starting Ij Scan Utility
IJ Scan Utility. Network Scan Settings From the Go menu of Finder, select Applications, then double-click the Canon Utilities folder, IJ Scan Utility folder, and then Canon IJ Scan Utility2 icon to start IJ Scan Utility. -
Page 566: Scanning Documents
Scanning Documents You can scan items placed on the platen with settings suitable for documents. 1. Place the item on the platen. Positioning Originals (Scanning from Computer) Start IJ Scan Utility. 3. Click Settings..., then set the paper size, resolution, etc. in the Settings (Document Scan) dialog as required. -
Page 567: Scanning Photos
Scanning Photos You can scan photos placed on the platen with settings suitable for photos. 1. Place the photo on the platen. Positioning Originals (Scanning from Computer) Start IJ Scan Utility. 3. Click Settings..., then set the paper size, resolution, etc. in the Settings (Photo Scan) dialog as required. -
Page 568: Scanning With Favorite Settings
Scanning with Favorite Settings You can scan items placed on the platen with your favorite settings saved beforehand. This is convenient for saving frequently used settings or when specifying scan settings in detail. Start IJ Scan Utility. 2. Click Settings..., then set the item type, resolution, etc. in the Settings (Custom Scan) dialog as required. -
Page 569: Scanning Originals Larger Than The Platen (Image Stitch)
Scanning Originals Larger than the Platen (Image Stitch) You can scan the left and right halves of an item larger than the platen and combine them back into one image. Items up to approximately twice as large as the platen are supported. Note •... - Page 570 5. Make sure that Scan from Left is selected in Scan Direction. 6. Place the item that is to be displayed on the left side of the screen face-down on the platen. 7. Click Start Scanning Image 1.
- Page 571 The first item is scanned and appears in 1. Note • Click Cancel to cancel the scan. 8. Place the item that is to be displayed on the right side of the screen face-down on the platen. 9. Click Start Scanning Image 2.
- Page 572 The second item is scanned and appears in 2. Note • Click Cancel to cancel the scan. 10. Adjust the scanned images as required. Use the Toolbar to rotate or zoom in/out, or drag the images to adjust their positions. Note •...
- Page 573 The combined image is saved. Note • Refer to "Image Stitch Window" for details on the Image Stitch window. • You can make advanced scan settings in the Settings (Scan and Stitch) dialog displayed by clicking Settings..
-
Page 574: Adjusting Cropping Frames In The Image Stitch Window
Adjusting Cropping Frames in the Image Stitch Window "Cropping" is the act of selecting the area you want to keep in an image and discarding the rest when scanning it. In the Image Stitch window, you can specify a cropping frame on the image displayed in the Preview area. Note •... -
Page 575: Extracting Text From Scanned Images (Ocr)
Extracting Text from Scanned Images (OCR) Click OCR in the IJ Scan Utility main screen to scan text in scanned magazines and newspapers and display it in a specified application. Note • You can also extract text from Document, Custom, or Driver. Start IJ Scan Utility. - Page 576 • Documents containing special fonts, effects, italics, or hand-written text • Documents with narrow line spacing • Documents with colors in the background of text • Documents containing multiple languages...
-
Page 577: Sending Scanned Images Via E-Mail
Sending Scanned Images via E-mail You can send scanned images via e-mail easily by simply clicking E-mail in the IJ Scan Utility main screen. Note • You can also send scanned images via e-mail from Document, Photo, Custom, or Driver. Start IJ Scan Utility. -
Page 578: Scanning Multiple Originals At One Time
Scanning Multiple Originals at One Time You can scan two or more photos (small items) placed on the platen at one time and save each image individually. Important • The following types of items may not be scanned correctly. In that case, adjust the cropping frames (selection boxes;... - Page 579 5. Select Select Source according to the items to be scanned. 6. Select Auto scan for Paper Size, then click OK.
- Page 580 The IJ Scan Utility main screen appears. Note • Refer to the following pages for details on the setting items in the Settings dialog. Settings (Document Scan) Dialog Settings (Photo Scan) Dialog Settings (Custom Scan) Dialog Settings (OCR) Dialog Settings (E-mail) Dialog 7.
- Page 581 • Scanned images are saved in the folder set for Save in in the corresponding Settings dialog displayed by clicking Settings..In each Settings dialog, you can also make advanced scan settings.
-
Page 582: Scanning Multiple Documents At One Time From The Adf (Auto Document Feeder)
Scanning Multiple Documents at One Time from the ADF (Auto Document Feeder) Place multiple documents on the ADF (Auto Document Feeder) and scan at one time. Note • You can scan multiple documents at one time from the ADF when scanning via Document, Custom, Driver, OCR, or E-mail. - Page 583 5. Select Select Source according to the documents to be scanned. To scan only the front side of each document, select Document (ADF/Platen) or Document (ADF Simplex). To scan the front side then the back side of each document, select Document (ADF Manual Duplex).
- Page 584 6. Set the color mode, document size, and scanning resolution as required. Click Document Scan Orientation Settings... to specify the orientation of the documents to be scanned. In the displayed dialog, you can specify the Orientation and Binding Side. How to place the documents when scanning the back sides depends on the Binding Side.
- Page 585 Scanning starts. Note • Click Cancel to cancel the scan. When Document (ADF Manual Duplex) is selected for Select Source, proceed to Step 8. 8. Follow the on-screen instructions to place the documents. Note • The screens for scanning with Orientation set to Portrait are used as examples in the following descriptions.
- Page 586 9. Click OK. Scanning starts. Note • Click Cancel to cancel the scan. • Scanned images are saved in the folder set for Save in in the corresponding Settings dialog displayed by clicking Settings..In each Settings dialog, you can also make advanced scan settings.
-
Page 587: Saving After Checking Scan Results
Saving after Checking Scan Results You can check the scan results, then save the images to a computer. Important • You cannot check the scan results before saving when scanned using the operation panel. Note • The screens for scanning photos are used as examples in the following descriptions. Start IJ Scan Utility. - Page 588 4. Select Check scan results and specify save settings checkbox, and then click OK. The IJ Scan Utility main screen appears. Note • Refer to the following pages for details on the setting items in the Settings dialog. Settings (Document Scan) Dialog Settings (Photo Scan) Dialog Settings (Custom Scan) Dialog Settings (Scan and Stitch) Dialog...
- Page 589 When scanning is completed, the Save Settings dialog appears. Note • Click Cancel to cancel the scan. 6. Change the image order or file save options as required. You can change the image order or file save options in the Save Settings dialog.
-
Page 590: Ij Scan Utility Screens
IJ Scan Utility Screens IJ Scan Utility Main Screen Settings Dialog Settings (Document Scan) Dialog Settings (Photo Scan) Dialog Settings (Custom Scan) Dialog Settings (Scan and Stitch) Dialog Settings (Driver) Dialog Settings (OCR) Dialog Settings (E-mail) Dialog Settings (Save to PC (Document)) Dialog Settings (Save to PC (Photo)) Dialog Settings (Attach to E-mail (Document)) Dialog Settings (Attach to E-mail (Photo)) Dialog... -
Page 591: Ij Scan Utility Main Screen
IJ Scan Utility Main Screen From the Go menu of Finder, select Applications, then double-click the Canon Utilities folder, IJ Scan Utility folder, and then Canon IJ Scan Utility2 icon to start IJ Scan Utility. You can complete from scanning to saving at one time by simply clicking the corresponding icon. - Page 592 Scan text in scanned magazines and newspapers and display it in a specified application. Scan/save settings and applications can be specified in the Settings (OCR) dialog. E-mail You can send scanned images via e-mail. Scan/save settings and applications can be specified in the Settings (E-mail) dialog.
-
Page 593: Settings Dialog
Settings Dialog There are three tabs in the Settings dialog: (Scanning from a Computer), (Scanning from the Operation Panel), and (General Settings). When you click a tab, the view in the red frame switches and you can make advanced settings to functions on each tab. (Scanning from a Computer) Tab You can specify how to respond when scanning from IJ Scan Utility. - Page 594 (Scanning from the Operation Panel) Tab You can specify how to respond when scanning from the operation panel. Settings (Save to PC (Document)) Dialog Settings (Save to PC (Photo)) Dialog Settings (Attach to E-mail (Document)) Dialog Settings (Attach to E-mail (Photo)) Dialog (General Settings) Tab You can set the product to use, file size restriction on e-mail attachment, language to detect text in images, and folder in which to save images temporarily.
- Page 595 Settings (Document Scan) Dialog Click Document Scan on the (Scanning from a Computer) tab to display the Settings (Document Scan) dialog. In the Settings (Document Scan) dialog, you can make advanced scan settings to scan items as documents. (1) Scan Options Area (2) Save Settings Area (3) Application Settings Area (1) Scan Options Area...
- Page 596 Note • When Document (ADF/Platen) is selected and documents are placed both on the platen and ADF, those placed on the ADF will be scanned. Color Mode Select the color mode in which to scan the item. Paper Size Select the size of the item to be scanned. When you select Custom, a screen in which you can specify the paper size appears.
- Page 597 Image Processing Settings Click (Right Arrow) to set the following. Note • The displayed items vary by Select Source and Color Mode. Apply Auto Document Fix Select this checkbox to sharpen text in a document or magazine for better readability. Important •...
- Page 598 Important • The following types of documents may not be corrected properly since the text cannot be detected correctly. • Documents in which the text lines are inclined more than 10 degrees or the angles vary by line • Documents containing both vertical and horizontal text •...
- Page 599 Data Format Select the data format in which to save the scanned images. You can select JPEG/Exif, TIFF, PNG, PDF, or PDF (Multiple Pages). Important • You cannot select JPEG/Exif when Color Mode is Black and White. • When Start OCR is selected in Application Settings, you cannot select PDF or PDF (Multiple Pages).
- Page 600 If this checkbox is not selected, files are saved directly in the folder specified in Save in. Check scan results and specify save settings Displays the Save Settings dialog after scanning. (3) Application Settings Area Open with an application Select this when you want to enhance or correct the scanned images. You can specify the application from the pop-up menu.
- Page 601 Settings (Photo Scan) Dialog Click Photo Scan on the (Scanning from a Computer) tab to display the Settings (Photo Scan) dialog. In the Settings (Photo Scan) dialog, you can make advanced scan settings to scan items as photos. (1) Scan Options Area (2) Save Settings Area (3) Application Settings Area (1) Scan Options Area...
- Page 602 Note • Click Defaults to restore the specified settings to the default settings. Resolution Select the resolution of the item to be scanned. The higher the resolution (value), the more detail in your image. Resolution Image Processing Settings Click (Right Arrow) to set the following. Important •...
- Page 603 Note • With network connection, scanning may take longer than usual when you set TIFF or PNG in Data Format. JPEG Image Quality You can specify the image quality of JPEG files. Important • This appears only when JPEG/Exif is selected in Data Format. Save to a subfolder with current date Select this checkbox to create a current date folder in the folder specified in Save in and save scanned images in it.
- Page 604 Defaults You can restore the settings in the displayed screen to the default settings.
- Page 605 Settings (Custom Scan) Dialog Click Custom Scan on the (Scanning from a Computer) tab to display the Settings (Custom Scan) dialog. In the Settings (Custom Scan) dialog, you can make advanced scan settings to scan according to your preference. (1) Scan Options Area (2) Save Settings Area (3) Application Settings Area (1) Scan Options Area...
- Page 606 • To scan the following types of items, specify the item type or size. You cannot scan correctly with Auto. • A4 size photos • Text documents smaller than 2L (5 inches x 7 inches) (127 mm x 178 mm), such as paperback pages with the spine cut off •...
- Page 607 Note • Only Auto is available when Select Source is Auto. • Only 300 dpi or 400 dpi can be set when Start OCR is selected in Application Settings. Document Scan Orientation Settings... This appears when you select ADF or Auto for Select Source. Click to display the Document Scan Orientation Settings dialog in which you can set the orientation and binding side of the documents to be scanned from the ADF.
- Page 608 • When Select Source is Magazine or Document: Note • The displayed items vary by Select Source and Color Mode. Apply Auto Document Fix Select this checkbox to sharpen text in a document or magazine for better readability. Important • The color tone may differ from the source image due to corrections. In that case, deselect the checkbox and scan.
- Page 609 • Documents in which the text lines are inclined more than 10 degrees or the angles vary by line • Documents containing both vertical and horizontal text • Documents with extremely large or small fonts • Documents with small amount of text •...
- Page 610 Important • You cannot select JPEG/Exif when Color Mode is Black and White. • When Start OCR is selected in Application Settings, you cannot select PDF or PDF (Multiple Pages). Note • Auto appears only when Auto is selected for Select Source. •...
- Page 611 Important • This does not appear when Select Source is Auto. (3) Application Settings Area Open with an application Select this when you want to enhance or correct the scanned images. You can specify the application from the pop-up menu. Send to an application Select this when you want to use the scanned images as they are in an application that allows you to browse or organize images.
- Page 612 Settings (Scan and Stitch) Dialog Click Scan and Stitch on the (Scanning from a Computer) tab to display the Settings (Scan and Stitch) dialog. In the Settings (Scan and Stitch) dialog, you can make advanced scan settings for scanning items larger than the platen.
- Page 613 Color Mode Select the color mode in which to scan the item. Resolution Select the resolution of the item to be scanned. The higher the resolution (value), the more detail in your image. Resolution Image Processing Settings Click (Right Arrow) to set the following. Available setting items vary by Select Source. Important •...
- Page 614 Data Format Select the data format in which to save the scanned images. You can select JPEG/Exif, TIFF, PNG, PDF, or PDF (Multiple Pages). Important • You cannot select JPEG/Exif when Color Mode is Black and White. Note • With network connection, scanning may take longer than usual when you set TIFF or PNG in Data Format.
- Page 615 (3) Application Settings Area Open with an application Select this when you want to enhance or correct the scanned images. You can specify the application from the pop-up menu. Send to an application Select this when you want to use the scanned images as they are in an application that allows you to browse or organize images.
- Page 616 Settings (Driver) Dialog Click Driver on the (Scanning from a Computer) tab to display the Settings (Driver) dialog. In the Settings (Driver) dialog, you can specify how to save images when scanning items by starting the scanner driver from IJ Scan Utility and how to respond after saving them. (1) Save Settings Area (2) Application Settings Area (1) Save Settings Area...
- Page 617 Note • When PDF or PDF (Multiple Pages) is selected, images up to 9600 pixels x 9600 pixels can be scanned. • When the Enable large image scans checkbox is selected in Save Settings, or when Start OCR is selected in Application Settings, you can select JPEG/Exif, TIFF, or PNG. •...
- Page 618 Note • When this checkbox is not selected, images up to 10208 pixels x 14032 pixels can be scanned. Check scan results and specify save settings Displays the Save Settings dialog after scanning. (2) Application Settings Area Open with an application Select this when you want to enhance or correct the scanned images.
- Page 619 Settings (OCR) Dialog Click OCR on the (Scanning from a Computer) tab to display the Settings (OCR) dialog. In the Settings (OCR) dialog, you can make advanced settings for extracting text from scanned images. (1) Scan Options Area (2) Save Settings Area (3) Application Settings Area (1) Scan Options Area Select Source...
- Page 620 When you select Custom, a screen in which you can specify the paper size appears. Select a Unit, then enter the Width and Height, and then click OK. Important • Custom cannot be selected depending on the Select Source setting. Note •...
- Page 621 Apply Auto Document Fix Select this checkbox to sharpen text in a document or magazine for better readability. Important • The color tone may differ from the source image due to corrections. In that case, deselect the checkbox and scan. Note •...
- Page 622 • Documents with small amount of text • Documents containing figures/images • Hand-written text • Documents containing both vertical and horizontal lines (tables) Note • Scanning takes longer than usual when you enable Correct slanted text document. Detect the orientation of text document and rotate image Automatically rotates the image to the correct orientation by detecting the orientation of text in the scanned document.
- Page 623 Note • With network connection, scanning may take longer than usual when you set TIFF or PNG in Data Format. JPEG Image Quality You can specify the image quality of JPEG files. Important • This appears only when JPEG/Exif is selected in Data Format. Save to a subfolder with current date Select this checkbox to create a current date folder in the folder specified in Save in and save scanned images in it.
- Page 624 Settings (E-mail) Dialog Click E-mail on the (Scanning from a Computer) tab to display the Settings (E-mail) dialog. In the Settings (E-mail) dialog, you can specify how to respond when attaching images to an e-mail after scanning them using the scanner button. (1) Scan Options Area (2) Save Settings Area (3) Application Settings Area...
- Page 625 • Reflective disc labels may not be scanned as expected. • Place items correctly according to the type of item to be scanned. Otherwise, items may not be scanned correctly. Refer to "Positioning Originals (Scanning from Computer)" for how to place items. •...
- Page 626 Important • Binding Side cannot be specified when scanning only the front side of each document. Image Processing Settings Click (Right Arrow) to set the following. Available setting items vary by Select Source. • When Select Source is Auto: Apply recommended image correction Applies suitable corrections automatically based on the item type.
- Page 627 Note • Scanning takes longer than usual when you enable this function. Sharpen outline Emphasizes the outline of the subjects to sharpen the image. Reduce show-through Sharpens text in an item or reduces show-through in newspapers, etc. Reduce moire Reduces moire patterns. Printed materials are displayed as a collection of fine dots.
- Page 628 Note • Scanning takes longer than usual when you enable Correct slanted text document. Detect the orientation of text document and rotate image Automatically rotates the image to the correct orientation by detecting the orientation of text in the scanned document. Important •...
- Page 629 JPEG Image Quality You can specify the image quality of JPEG files. Important • This appears only when JPEG/Exif or Auto is selected in Data Format. PDF Compression Select the compression type for saving PDF files. Standard It is recommended that you normally select this setting. High Compresses the file size when saving, allowing you to reduce the load on your network/server.
- Page 630 Note • To add an e-mail client to the pop-up menu, select Add... from the pop-up menu, then click (Plus) in the displayed dialog and specify the e-mail client. Instructions Opens this guide. Defaults You can restore the settings in the displayed screen to the default settings.
- Page 631 Settings (Save to PC (Photo)) Dialog Click Save to PC (Photo) on the (Scanning from the Operation Panel) tab to display the Settings (Save to PC (Photo)) dialog. In the Settings (Save to PC (Photo)) dialog, you can specify how to respond when saving images to a computer as photos after scanning them from the operation panel.
- Page 632 Save in Displays the folder in which to save the scanned images. To add a folder, select Add... from the pop- up menu, then click (Plus) in the displayed dialog and specify the destination folder. The default save folder is the Pictures folder. Data Format Set from the operation panel.
- Page 633 Settings (Save to PC (Document)) Dialog Click Save to PC (Document) on the (Scanning from the Operation Panel) tab to display the Settings (Save to PC (Document)) dialog. In the Settings (Save to PC (Document)) dialog, you can specify how to respond when saving images to a computer as documents after scanning them from the operation panel.
- Page 634 Note • Scanning takes longer than usual when you enable this function. Reduce gutter shadow (platen) Reduces gutter shadows that appear between pages when scanning open booklets. Important • This function is available only when scanning from the platen. Note •...
- Page 635 (2) Save Settings Area File Name Enter the file name of the image to be saved. When you save a file, the date and four digits are appended to the set file name in the "_20XX0101_0001" format. Note • When you select the Save to a subfolder with current date checkbox, the date and four digits are appended to the set file name.
- Page 636 You can specify the folder from the pop-up menu. Do not start any application Saves to the folder specified in Save in. Note • To add an application or folder to the pop-up menu, select Add... from the pop-up menu, then click (Plus) in the displayed dialog and specify the application or folder.
- Page 637 Settings (Attach to E-mail (Photo)) Dialog Click Attach to E-mail (Photo) on the (Scanning from the Operation Panel) tab to display the Settings (Attach to E-mail (Photo)) dialog. In the Settings (Attach to E-mail (Photo)) dialog, you can specify how to respond when attaching images to an e-mail as photos after scanning them from the operation panel.
- Page 638 Save in Displays the folder in which to save the scanned images. To add a folder, select Add... from the pop- up menu, then click (Plus) in the displayed dialog and specify the destination folder. The default save folder is the Pictures folder. Data Format Set from the operation panel.
- Page 639 Settings (Attach to E-mail (Document)) Dialog Click Attach to E-mail (Document) on the (Scanning from the Operation Panel) tab to display the Settings (Attach to E-mail (Document)) dialog. In the Settings (Attach to E-mail (Document)) dialog, you can specify how to respond when attaching images to an e-mail as documents after scanning them from the operation panel.
- Page 640 Note • Scanning takes longer than usual when you enable this function. Reduce gutter shadow (platen) Reduces gutter shadows that appear between pages when scanning open booklets. Important • This function is available only when scanning from the platen. Note •...
- Page 641 (2) Save Settings Area File Name Enter the file name of the image to be saved. When you save a file, the date and four digits are appended to the set file name in the "_20XX0101_0001" format. Note • When you select the Save to a subfolder with current date checkbox, the date and four digits are appended to the set file name.
- Page 642 Defaults You can restore the settings in the displayed screen to the default settings.
- Page 643 Settings (General Settings) Dialog Click the (General Settings) tab to display the Settings (General Settings) dialog. In the Settings (General Settings) dialog, you can set the product to use, file size restriction on e-mail attachment, language to detect text in images, and folder in which to save images temporarily. Product Name Displays the name of the product that IJ Scan Utility is currently set to use.
- Page 644 Instructions Opens this guide. Defaults You can restore the settings in the displayed screen to the default settings.
-
Page 645: Network Selection Screen
Network Selection Screen You can select the scanners or printers to be used for scanning or printing over a network from your computer or the operation panel. Network Selection Screen In Product Name in the Settings (General Settings) dialog, select an item with "Network" after the product name from the list, then click Select that appears to the right of the product name to display the network selection screen. - Page 646 • If you have changed the Bonjour service name after selecting your scanner or printer by Bonjour service name, reopen the network selection screen and select the new Bonjour service name from Scanners. Note • If the Bonjour service name of your scanner or printer does not appear or cannot be selected, check the following, click OK to close the screen, then reopen it and try selecting again.
-
Page 647: Save Settings Dialog
Save Settings Dialog Select the Check scan results and specify save settings checkbox in Save Settings of the Settings dialog to display the Save Settings dialog after scanning. You can specify the data format and destination while viewing the thumbnails of scan results. (1) Preview Operation Buttons (2) Scan Results Area (3) Save Settings Area... - Page 648 (3) Save Settings Area File Name Enter the file name of the image to be saved. When you save a file, the date and four digits are appended to the set file name in the "_20XX0101_0001" format. Note • When you select the Save to a subfolder with current date checkbox, the date and four digits are appended to the set file name.
- Page 649 Create a PDF file that supports keyword search Select this checkbox to convert text in images into text data and create PDF files that support keyword search. Important • This appears only when PDF or PDF (Multiple Pages) is selected in Data Format. Note •...
-
Page 650: Image Stitch Window
Image Stitch Window Click Stitch in the IJ Scan Utility main screen to display the Image Stitch window. You can scan the left and right halves of an item larger than the platen and combine them back into one image. You can scan items up to approximately twice as large as the platen. (1) Settings and Operation Buttons (2) Toolbar (3) Thumbnail View Area... - Page 651 Scan from Right Displays the first scanned image on the right side. Scan Image 1 Start Scanning Image 1 Scans the first item. Scan Image 2 Start Scanning Image 2 Scans the second item.
- Page 652 Adjust cropping frames You can adjust the scan area in preview. If no area is specified, the image of the size selected in Select Output Size will be saved. If an area is specified, only the image in the cropping frame will be scanned and saved. Adjusting Cropping Frames in the Image Stitch Window Save Save...
- Page 653 When no image has been scanned: After scanning the first item by clicking Start Scanning Image 1: The image is scanned in the direction specified in Scan Direction, and 2 appears next to it. After scanning the second item by clicking Start Scanning Image 2: The two scanned images appear.
- Page 654 Related Topic Scanning Originals Larger than the Platen (Image Stitch)
-
Page 655: Using Scanner Driver
Using Scanner Driver You can scan by starting the scanner driver from various applications. Refer to Help of Mac OS for how to scan. Note • Refer to "Image Corrections and Color Adjustments" for details on the setting procedures for image correction and color adjustment. -
Page 656: Image Corrections And Color Adjustments
Image Corrections and Color Adjustments You can correct images and adjust colors using the scanner driver. Important • When image correction or color adjustment is applied to items without moire, dust/scratches, or faded colors, the color tone may be adversely affected. •... - Page 657 Magazine Applies Image Adjustment suitable for magazines. Document Applies Image Adjustment suitable for text documents. Note • If the image is not adjusted properly with Auto, specify the item type. • The color tone may change from the source image due to the Image Adjustment. In that case, set Image Adjustment to None.
- Page 658 Grain Correction Use this function to reduce graininess (roughness) in photos taken with high-speed or sensitized film, etc. None Graininess will not be reduced. Select this when the photo is slightly grainy. Medium It is recommended that you normally select this setting. High Select this when the photo is very grainy.
- Page 659 • How to place the item depends on your model and the item to be scanned. Unsharp Mask Emphasizes the outline of the subjects to sharpen the image. Descreen Reduces moire patterns. Printed materials are displayed as a collection of fine dots. "Moire" is a phenomenon where uneven gradation or a stripe pattern appears when such photos or pictures printed with fine dots are scanned.
-
Page 660: General Notes (Scanner Driver)
General Notes (Scanner Driver) The scanner driver is subject to the following restrictions. Keep these points in mind when using the scanner driver. Scanner Driver Restrictions • If the computer is shared among multiple users or when you have logged out and back on, a message indicating that the scanner driver is in use may appear. -
Page 661: Updating The Scanner Driver
Updating the Scanner Driver Obtaining the Latest Scanner Driver Before Installing the Scanner Driver Installing the Scanner Driver... -
Page 662: Obtaining The Latest Scanner Driver
Obtaining the Latest Scanner Driver Upgrading your current scanner driver to the latest scanner driver may solve some problems you have experienced. To obtain the scanner driver, access our website and download the scanner driver for your model. Important • Scanner driver can be downloaded for free; however, Internet connection fees apply. Related Topic Before Installing the Scanner Driver Installing the Scanner Driver... -
Page 663: Before Installing The Scanner Driver
Before Installing the Scanner Driver Check the following points before installing the scanner driver. Check these also when you cannot install the scanner driver. Machine Status • If the machine and computer are connected with a USB cable, disconnect the USB cable from the computer. -
Page 664: Installing The Scanner Driver
Installing the Scanner Driver Access our website via the Internet to download the latest scanner driver. Follow these steps to install the downloaded scanner driver. 1. Mount the disk. Double-click the downloaded disk image file. The file is decompressed and the disk is mounted. 2. -
Page 665: Scanning Tips
Scanning Tips Resolution Data Formats... -
Page 666: Resolution
Resolution The data in the image you have scanned is a collection of dots carrying information about brightness and color. The density of these dots is called "resolution," and resolution will determine the amount of detail your image contains. The unit of resolution is dots per inch (dpi). Dpi is the number of dots per inch (2.5 cm). The higher the resolution (value), the more detail in your image;... - Page 667 Note • When you will be printing the scanned image by enlarging it, scan by setting a higher resolution than the recommended one above.
-
Page 668: Data Formats
Data Formats You can select a data format when saving scanned images. You should specify the most suitable data format according to how you want to use the image on which application. Available data formats vary by application and operating system (Windows or Mac OS). See below for the characteristics of each image data format. -
Page 669: Positioning Originals (Scanning From Computer)
Positioning Originals (Scanning from Computer) Learn how to place items on the platen or ADF (Auto Document Feeder) of your scanner or printer. Place items correctly according to the type of item to be scanned. Otherwise, items may not be scanned correctly. Important •... - Page 670 Important • For the portions in which items cannot be scan- ned, see Loading Originals. Important • Large items (such as A4 size photos) that cannot be placed away from the edges/arrow (alignment mark) of the platen may be saved as PDF files. To save in a for- mat other than PDF, scan by specifying the data for- mat.
- Page 671 2. Place the documents on the ADF, then adjust the document guides to the width of the documents. Insert the documents face-up until a beep sounds.
-
Page 672: Network Scan Settings
In the IJ Scan Utility main screen, select your scanner or printer that is connected to a network. Start IJ Scan Utility. 2. Select "Canon XXX series Network" (where "XXX" is the model name) for Product Name. You can scan via a network connection. - Page 673 3. Click the (General Settings) tab. The Settings (General Settings) dialog appears. 4. In Product Name, select an item with "Network" after the product name, then click Select that appears to its right. network selection screen appears. 5. Click Scan-from-Operation-Panel Settings. The Scan-from-Operation-Panel Settings screen appears.
-
Page 674: Scanning From Operation Panel
Scanning from Operation Panel Forwarding Scanned Data to Computer Using Operation Panel Basics Sending Scanned Data as E-Mail from Computer Sending Scanned Data as E-Mail from Machine Saving Scanned Data on USB Flash Drive Forwarding Scanned Data to Shared Folder on Computer Deleting Scanned Data on USB Flash Drive Setting Items for Scanning Using Operation Panel Setting Up Operation Panel with IJ Scan Utility (Windows) -
Page 675: Forwarding Scanned Data To Computer Using Operation Panel
Network Scan Settings • The destination and the file name are specified in Canon IJ Scan Utility. You can specify the destination and the file name in Canon IJ Scan Utility. For more on settings of Canon IJ Scan Utility: ◦... - Page 676 3. Select PC and press OK button. 4. Select computer to forward scanned data and press OK button. Select Local (USB) for a USB-connected computer, or select the computer to forward the scanned data for a network-connected computer. The Scan standby screen is displayed. Note •...
- Page 677 Document Scans the original on the platen glass or in the ADF as a document data applying the settings specified in Scan settings. Photo Scans the original on the platen glass as a photo data applying the settings specified in Scan settings.
- Page 678 If you do not continue scanning, press the left Function button. The scanned data is forwarded to the computer. Scanned data is forwarded to the computer according to the settings specified in Canon IJ Scan Utility. Remove the original on the platen glass or from the document output slot after scanning is complete.
-
Page 679: Sending Scanned Data As E-Mail From Computer
Network Scan Settings • The mail software and the file name are specified in Canon IJ Scan Utility. You can specify the destination and the file name in Canon IJ Scan Utility. For more on settings of Canon IJ Scan Utility: ◦... - Page 680 3. Select Attach to E-mail and press OK button. 4. Select E-mail from PC and press OK button. 5. Select computer to forward scanned data and press OK button. Select Local (USB) for a USB-connected computer, or select the computer to forward the scanned data for a network-connected computer.
- Page 681 Remove the original on the platen glass or from the document output slot after scanning is complete. If program selection screen appears (Windows): The program selection screen may be displayed after pressing the Color or Black button. In this case, select Canon IJ Scan Utility and click OK.
-
Page 682: Sending Scanned Data As E-Mail From Machine
Sending Scanned Data as E-Mail from Machine Sending Scanned Data as E-Mail from Machine Registering Recipients' E-Mail Address Registering Recipients in Group E-Mail Changing Registered Information Deleting Registered Information Importing/Exporting E-Mail Address Book... -
Page 683: Sending Scanned Data As E-Mail From Machine
Sending Scanned Data as E-Mail from Machine You can send scanned data as an e-mail from the printer. Before you use this function, check the following. • The printer is connected to a LAN. Make sure the printer is connected to a LAN correctly. •... - Page 684 A. Select the recipient(s) from the address book. Press the OK button to display the address book and select the recipient(s). B. Enter recipient's e-mail address. Press the OK button to display the input screen and enter the address. C. Select the recipient(s) from the input log. Press the OK button to display the input log and select the recipient(s).
- Page 685 4. Press the OK button twice to change to Bcc (blind carbon copy). Note • To change Cc or Bcc to To, press the OK button, select Change to To, and then press the OK button again. C. Press the right Function button to complete specifying the recipient. D.
- Page 686 • If you load the original on the platen glass: ◦ When you select JPEG for Format on the scan setting screen, the printer starts scanning and scanned data is sent as an e-mail. ◦ When you select PDF or Compact PDF for Format on the scan setting screen, the confirmation screen asking you if you continue scanning is displayed after scanning is complete.
-
Page 687: Registering Recipients' E-Mail Address
Registering Recipients' E-Mail Address Before you can use the printer's address book, you need to register the recipients' e-mail address. Follow the procedure below to register the recipients' e-mail address. Make sure printer is turned on. 2. Select Scan on HOME screen. LCD and Operation Panel The screen for selecting to which you save the data is displayed. - Page 688 Note • If you already registered the recipients, the recipients' name is displayed next to the ID number. If you already registered the group mail, the icon and the group name are displayed next to the ID number. 7. Select unregistered ID number. Note •...
- Page 689 1. Move cursor to entry field of name. 2. Enter recipient's name. 3. Press OK button. Note • You can enter the name up to 16 characters, including spaces. Entering Numbers, Letters, and Symbols 11. Enter recipient's e-mail address. If you select an e-mail address on Select from send log, the e-mail address is already entered. If you do not change the e-mail address, go to next step.
-
Page 690: Registering Recipients In Group E-Mail
Registering Recipients in Group E-Mail If you register two or more registered e-mail address to a group e-mail, you can send the same mail successively to all recipients registered to the group e-mail. Make sure printer is turned on. 2. Select Scan on HOME screen. - Page 691 Note • If you already registered the recipients, the recipients' name is displayed next to the ID number. If you already registered the group mail, the icon and the group name are displayed next to the ID number. 7. Select unregistered ID number. Note •...
- Page 692 10. Register the registered recipient as a member of the group e-mail. 1. Make sure Member is displayed. 2. Press left Function button. The address book is displayed. 3. Choose member to register. Display by name Display by ID number By entering the initial letter using the Numeric but- By entering the ID number using the Numeric but- tons, the registered recipients are sorted by name.
- Page 693 Repeat the procedure to register another member to the same group e-mail. 11. Press OK button to finalize registration. Note • To register another group, select an unregistered ID number and operate in the same procedure.
-
Page 694: Changing Registered Information
Changing Registered Information To change information registered for recipient and group e-mail, follow the procedure below. Make sure printer is turned on. 2. Select Scan on HOME screen. LCD and Operation Panel The screen for selecting to which you save the data is displayed. 3. - Page 695 • To change a group e-mail: When you want to change the group name, move the cursor to the entry field of group name and change the group name. After pressing the OK button, the cursor moves to the list of the members. To register the changed group name, press the OK button again.
-
Page 696: Deleting Registered Information
Deleting Registered Information To delete information registered for recipient and group e-mail, follow the procedure below. Make sure printer is turned on. 2. Select Scan on HOME screen. LCD and Operation Panel The screen for selecting to which you save the data is displayed. 3. -
Page 697: Importing/Exporting E-Mail Address Book
Importing/Exporting E-Mail Address Book You can import an e-mail address book saved on a USB flash drive, or export the e-mail address book saved on the printer to a USB flash drive. Importing E-Mail Address Book Exporting E-Mail Address Book Importing E-Mail Address Book Follow the procedure below to import the e-mail address book. - Page 698 Exporting E-Mail Address Book Follow the procedure below to export the e-mail address book. Make sure printer is turned on. 2. Select Scan on HOME screen. LCD and Operation Panel The screen for selecting to which you save the data is displayed. Insert USB flash drive into USB flash drive port.
-
Page 699: Saving Scanned Data On Usb Flash Drive
Saving Scanned Data on USB Flash Drive You can save scanned data on the USB flash drive directly. Important • Do not remove the USB flash drive from the printer under the following conditions: • While scanning is in progress •... - Page 700 Document Scans the original on the platen glass or the ADF as a document data applying the settings specified in Scan settings. Photo Scans the original on the platen glass as a photo data applying the settings specified in Scan settings.
- Page 701 • If you load the original on the platen glass: ◦ When you select JPEG for Format on the scan settings screen, the printer starts scanning and scanned data is saved on the USB flash drive. ◦ When you select PDF or Compact PDF for Format on the scan settings screen, the confirmation screen asking you if you continue scanning is displayed after scanning is complete.
-
Page 702: Forwarding Scanned Data To Shared Folder On Computer
Before forwarding scanned data on the shared folder on the computer, confirm the following: • MP Drivers and Canon Quick Utility Toolbox are installed. (Windows) If MP Drivers and Canon Quick Utility Toolbox are not yet installed, install them with the Setup CD-ROM or install them from our website. - Page 703 4. Select folder to save scanned data and press OK button. Note • When you specify a PIN code for a registered folder, a screen asking you to enter a PIN code is displayed. Entering the PIN code allows you to assign the shared folder as the destination. 5.
- Page 704 PDF file. Scanned data is forwarded to the shared folder on the computer according to the settings specified in Canon Quick Utility Toolbox. Remove the original on the platen glass or from the document output slot after scanning is complete.
-
Page 705: Deleting Scanned Data On Usb Flash Drive
Deleting Scanned Data on USB Flash Drive You can delete scanned data on the USB flash drive using the operation panel. Make sure printer is turned on. 2. Select Scan on HOME screen. LCD and Operation Panel The screen for selecting to which you save the data is displayed. Insert USB flash drive into USB flash drive port. - Page 706 When the format for PDF data is selected, only the first page of the PDF data is displayed on the LCD. 6. Select file to delete and press OK button. 7. Select Yes on confirmation screen and press OK button. The printer starts deleting the file.
-
Page 707: Setting Items For Scanning Using Operation Panel
Setting Items for Scanning Using Operation Panel You can change the scan settings such as the scan size, resolution, or data format. When the Scan standby screen is displayed, press the right Function button to select the setting item. Use button to select the setting item, use the button to specify the setting, and then press the OK button. -
Page 708: Unsharp Mask
2. Format Select the data format of the scanned data. 3. Scan res (Scan resolution) Select the resolution for scanning. 4. Preview Select to preview the scanned data or not when saving the data on a USB flash drive or forwarding to a shared folder. -
Page 709: Setting Up Operation Panel With Ij Scan Utility (Mac Os)
Setting Up Operation Panel with IJ Scan Utility (Mac OS) IJ Scan Utility allows you to specify how to respond when scanning from the operation panel. Note • The screens for scanning photos from the operation panel are used as examples in the following descriptions. - Page 710 Note • Refer to the following for details. Settings (Save to PC (Document)) Dialog Settings (Save to PC (Photo)) Dialog Settings (Attach to E-mail (Document)) Dialog Settings (Attach to E-mail (Photo)) Dialog 4. Set Scan Options. 5. Specify the file name and other settings in Save Settings.
- Page 711 6. Select the application you want to start after scanning in Application Settings. 7. Click OK. The responses will be executed according to the specified settings when you start scanning from the operation panel.
-
Page 712: Scanning Using Smartphone/Tablet
This machine supports the following scan functions. PIXMA/MAXIFY Cloud Link PIXMA/MAXIFY Cloud Link is a web service provided by Canon. Save scanned images to data storage services through integration with various cloud services without using a computer. Using PIXMA/MAXIFY Cloud Link... - Page 713 Using PIXMA/MAXIFY Cloud Link By using PIXMA/MAXIFY Cloud Link, you can connect your printer to a cloud service, such as CANON iMAGE GATEWAY, Evernote, or Twitter, and use the following functions without using a computer: • Print images from a photo-sharing service •...
-
Page 714: Faxing
Faxing Preparing for Faxing Sending Faxes Using Operation Panel of Printer Registering Recipients Receiving Faxes Sending Faxes from Computer (Windows) Other Useful Fax Functions Sending Faxes from Computer (Mac OS) -
Page 715: Preparing For Faxing
Preparing for Faxing Connect the printer to the telephone line and set up the printer before using the faxing functions. Then specify the basic setting such as sender information, date/time, and daylight saving time. Important • If the Power Disconnects: If there is a power failure or if you accidentally unplug the power cord, the date/time settings will be reset. -
Page 716: Connecting Telephone Line
Connecting Telephone Line The connection method differs depending on your telephone line. • If you connect the printer to wall telephone line directly/If you connect the printer with the xDSL splitter: Basic Connection • If you connect the printer to another line such as an xDSL: Connecting Various Lines If the connection is incorrect, the printer cannot send/receive faxes. - Page 717 Important • Be sure to connect the telephone line before the printer is turned on. If you connect the telephone line when the printer is turned on, turn the printer off and unplug the power cord. Wait for 1 minute, and then connect the telephone line and power plug. Note •...
- Page 718 E. Telephone or answering machine F. WAN (Wide Area Network) port G. LAN (Local Area Network) port H. TEL port I. LINE port * Port configurations and names may vary depending on the product. Note • When connecting to the xDSL line, select the same line type as you are subscribing to in Telephone line type.
-
Page 719: Setting Telephone Line Type
Setting Telephone Line Type Before using your printer, make sure you set the correct telephone line type for your telephone line. If you are unsure of your telephone line type, contact your telephone company. For xDSL or ISDN connections, contact the telephone company or service provider to confirm your line type. Note •... -
Page 720: Setting Receive Mode
Setting Receive Mode Set the receiving operation (receiving mode). For details on how to set the receive mode: Setting Receive Mode You can select the appropriate mode. For details on the selectable receive mode: About Receive Mode For details on the advanced settings of the receive mode: Advanced Settings of Receive Mode Note •... -
Page 721: About Receive Mode
Advanced Settings of Receive Mode • For details on the receive mode: About Receive Mode • DRPD is available only in the US and Canada. • Network switch may not be available depending on the country or region of purchase. •... - Page 722 ◦ Manual/auto switch If you select ON, the printer automatically receives faxes after the external device rang a specified length of time. You can specify the length of time until automatic reception is started. ◦ User-friendly reception If you select ON, the printer automatically switches from telephone calling to fax reception by detecting the fax signal (CNG signal) when you lift the handset of the telephone or the answering machine answers.
- Page 723 You can specify the number of times the external device rings when incoming. Setting DRPD Ring Pattern (US and Canada only) If you have subscribed to a Distinctive Ring Pattern Detection (DRPD) service provided by your telephone company, your telephone company will assign two or more telephone numbers with distinctive ring patterns to your single telephone line, allowing you to have different numbers for fax calls and voice calls using only one telephone line.
- Page 724 9. Press Back button. The Receive mode settings screen is displayed. 10. Press OK button. The Function list screen is displayed.
-
Page 725: Setting Sender Information
Setting Sender Information You can set the sender information such as date/time, unit name, and unit fax/telephone number. About Sender Information Setting Date and Time Setting Daylight Saving Time (Summer Time) Registering User Information About Sender Information If the unit name and unit fax/telephone number are registered, they are printed with date and time as sender information on the recipient's fax. -
Page 726: Setting Date And Time
Setting Date and Time This section describes the procedure to set the date and time. Make sure that printer is turned on. 2. Select Setup on HOME screen. Using the Operation Panel 3. Select Device settings, and then press OK button. 4. - Page 727 Important • Not all the latest information of all countries or regions is applied for Daylight saving time setting by default. You need to change the default setting according to the latest information of your country or region. Note • This setting may not be available depending on the country or region of purchase. Make sure that printer is turned on.
- Page 728 8. Set date and time when summer time ends. 1. Set date when summer time ends. Use the button to change the setting item, use the button to change the setting, and then use the OK button to confirm the selection. 2.
- Page 729 Note • Before sending a fax, be sure to enter your name and fax/telephone number in Unit name and Unit TEL on the User information settings screen (for US only). Make sure that printer is turned on. 2. Select Setup on HOME screen. Using the Operation Panel 3.
- Page 730 Note • You can enter the name up to 24 characters, including spaces. • For details on how to enter or delete characters: Entering Numbers, Letters, and Symbols 8. Enter unit fax/telephone number. 1. Move cursor to Unit TEL. 2. Enter unit fax/telephone number. Note •...
-
Page 731: Sending Faxes Using Operation Panel Of Printer
Sending Faxes Using Operation Panel of Printer Sending Faxes by Entering Fax/Telephone Number Resending Faxes (Redialing Busy Number) Setting Items for Sending Faxes Sending Faxes Using Useful Functions... -
Page 732: Sending Faxes By Entering Fax/Telephone Number
Sending Faxes by Entering Fax/Telephone Number This section describes dialing and sending faxes directly by entering the fax/telephone numbers. Important • It may be possible that faxes will reach unintended recipients due to the misdialing or incorrect registration of fax/telephone numbers. When you send important documents, we recommend that you send them after speaking on the telephone. - Page 733 C. Entry field of fax/telephone numbers The entered numbers are displayed. D. Function list You can use the each fax function and change the setting for the fax. E. Redial Select to send faxes with redialing. Resending Faxes (Redialing Busy Number) F.
- Page 734 Left Function button: You can register the current print settings as a custom setting. Registering Favorite Settings (Custom profiles) 5. Press Color button for color transmission, or Black button for black & white transmission. The printer starts scanning the document. Important •...
- Page 735 • Do not unplug the power cord until all documents are sent. If you unplug the power cord, all unsent documents stored in the printer's memory are lost.
-
Page 736: Resending Faxes (Redialing Busy Number)
Resending Faxes (Redialing Busy Number) There are two methods of redialing: Automatic redialing and Manual redialing. • Automatic Redialing If you send a document and the recipient's line is busy, the printer will redial the number after a specified interval. Automatic Redialing •... - Page 737 Make sure that printer is turned on. Load documents on platen glass or in ADF. 3. Select FAX on HOME screen. Using the Operation Panel The Fax standby screen is displayed. 4. Change send settings as necessary. Setting Items for Sending Faxes 5.
-
Page 738: Setting Items For Sending Faxes
Setting Items for Sending Faxes You can change the send settings such as the scan contrast or the scan resolution on the Fax standby screen. Use the button to change the setting item and use the button to change the setting. •... -
Page 739: Sending Faxes Using Useful Functions
Sending Faxes Using Useful Functions Sending Fax after Speaking on Telephone Sending Fax to Registered Recipient Sending Same Document to Several Recipients (Sequential Broadcasting) Preventing Mistransmission of Faxes Using On Hook Dial Function... -
Page 740: Sending Fax After Speaking On Telephone
Sending Fax after Speaking on Telephone If you want to speak to the recipient before sending a fax, or if the recipient does not have a fax device that can receive faxes automatically, send a fax manually after speaking to the recipient on the telephone to check whether the recipient can receive faxes. - Page 741 When you hear a high-pitched signal instead of the recipient's voice, you cannot check whether the recipient can receive faxes. If you want to stop sending the fax, replace the handset. If you want to send the fax, go to step 8. 8.
-
Page 742: Sending Fax To Registered Recipient
Sending Fax to Registered Recipient Registering recipient's fax/telephone number and name in the printer's directory enables you to send faxes easily. Important • It may be possible that faxes will reach unintended recipients due to the misdialing or incorrect registration of fax/telephone numbers. When you send important documents, we recommend that you send them after speaking on the telephone. - Page 743 By entering the initial letter using the Numeric buttons, By entering the ID number using the Numeric buttons, the registered recipients are sorted by name. the registered recipients are searched by ID number. Select a recipient, and then press the OK button. Select a recipient, and then press the OK button.
-
Page 744: Sending Same Document To Several Recipients (Sequential Broadcasting)
Sending Same Document to Several Recipients (Sequential Broadcasting) This printer allows you to prepare for sending the same document to a maximum of 101 recipients in one operation. The recipients can be specified by entering the fax/telephone numbers and selecting the registered recipients (the particular recipient's number and the group dial) in combination. - Page 745 Specify the first recipient with the one of the following methods. • By specifying with the recipient registered to the printer: Press the left Function button and specify the recipient. Sending Fax to Registered Recipient • By entering the fax/telephone numbers: Use the Numeric buttons to enter the recipient's fax/telephone number.
- Page 746 A. You can add the recipient from the registered recipients by the left Function button. B. You can add the recipient by entering the fax/telephone numbers after pressing the center Function button if you specified a first recipient from the registered recipients. C.
- Page 747 When you press the Stop button, fax transmission to all the recipients specified will be canceled. You cannot cancel a fax transmission to only one recipient. • If documents remain in the ADF after the Stop button is pressed while scanning is in progress, Document in ADF.
-
Page 748: Preventing Mistransmission Of Faxes
Preventing Mistransmission of Faxes This printer has two functions for preventing the mistransmission of faxes. • Sending faxes after entering the fax/telephone number twice This function requires you to re-enter the fax/telephone number after entering the number, so that the printer prevents you from misdialing. - Page 749 Enter the recipient's fax/telephone number again. Sending Faxes after Checking Information (Checking Recipient's Information) Set Check RX FAX information to ON following the procedure below. Important • This function is not available when you send a fax manually. Sending Fax after Speaking on Telephone Make sure that printer is turned on.
-
Page 750: Using On Hook Dial Function
Using On Hook Dial Function Follow the procedure below to send faxes with the on hook dial function. Important • It may be possible that faxes will reach unintended recipients due to the misdialing or incorrect registration of fax/telephone numbers. When you send important documents, we recommend that you send them after speaking on the telephone. - Page 751 • By entering the fax/telephone numbers: Use the Numeric buttons to enter the recipient's fax/telephone number. Sending Faxes by Entering Fax/Telephone Number • Manual redialing: Press the left Function button and select a number in the outgoing call logs. Manual Redialing 7.
-
Page 752: Registering Recipients
Registering Recipients Registering Recipients Using Operation Panel of Printer Registering Recipients Using Speed Dial Utility2 (Windows) Registering Recipients Using Speed Dial Utility2 (Mac OS) -
Page 753: Registering Recipients Using Operation Panel Of Printer
Registering Recipients Using Operation Panel of Printer Registering recipients in the printer's directory in advance allows you to dial fax/telephone numbers simply. The following methods to register are available: • Recipient registration Registering the recipient's fax/telephone number and name allows you to send a fax by selecting a registered recipient in the printer directory. -
Page 754: Registering Fax/Telephone Number Of Recipients
Registering Fax/Telephone Number of Recipients Before you can use the printer's directory, you need to register the recipients' fax/telephone numbers. Follow the procedure below to register the recipients' fax/telephone numbers. Make sure that printer is turned on. 2. Select FAX on HOME screen. Using the Operation Panel The Fax standby screen is displayed. - Page 755 7. Select Recipient, and then press OK button. 8. Select a registration method, and then press OK button. 9. Register recipients' fax/telephone number. Register the recipients' fax/telephone number depending on the registration method selected. • Direct entry The screen to register the recipient's fax/telephone number and name is displayed. Go to next step.
- Page 756 Selecting a fax/telephone number or name and pressing the OK button, the screen to register the recipient's fax/telephone number and name is displayed. Go to next step. Note • This registration method may not be available depending on the country or region of purchase. 10.
- Page 757 Entering Numbers, Letters, and Symbols • When Telephone line type in FAX user settings under FAX settings is set to Rotary pulse, you can enter a tone ("T") by pressing the Tone key. 12. Press OK button to finalize registration. Note •...
-
Page 758: Registering Recipients In Group Dial
Registering Recipients in Group Dial If you register two or more registered recipients to a group dial, you can send the same document successively to all recipients registered to the group dial. Make sure that printer is turned on. 2. Select FAX on HOME screen. - Page 759 7. Select Group dial, and then press OK button. The screen to register the group name and the member of the group is displayed. 8. Enter group name. 1. Move cursor to entry field of group name. 2. Enter group name. 3.
- Page 760 By entering the initial letter using the Numeric but- By entering the ID number using the Numeric but- tons, the registered recipients are sorted by name. tons, the registered recipients are searched by ID number. Select a member, and then press the OK button. Select a member, and then press the OK button.
- Page 761 Repeat the procedure to register another member to the same group dial. 10. Press OK button to finalize registration. Note • To register another group, select an unregistered ID number and operate in the same procedure. • You can check the recipients you have registered to the group dial by printing GROUP DIAL TELEPHONE NO.
-
Page 762: Changing Registered Information
Changing Registered Information To change information registered for recipient and group dial, follow the procedure below. Make sure that printer is turned on. 2. Select FAX on HOME screen. Using the Operation Panel The Fax standby screen is displayed. 3. Select Function list, and then press OK button. The Function list screen is displayed. -
Page 763: Deleting Registered Information
Deleting Registered Information To delete information registered for recipient and group dial, follow the procedure below. Make sure that printer is turned on. 2. Select FAX on HOME screen. Using the Operation Panel The Fax standby screen is displayed. 3. Select Function list, and then press OK button. The Function list screen is displayed. -
Page 764: Printing List Of Registered Destinations
Printing List of Registered Destinations You can print a list of the fax/telephone numbers and can keep it near the printer to refer to when dialing. Make sure that printer is turned on. Load paper. 3. Select FAX on HOME screen. Using the Operation Panel The Fax standby screen is displayed. -
Page 765: Registering Recipients Using Speed Dial Utility2 (Mac Os)
Registering Recipients Using Speed Dial Utility2 (Mac OS) About Speed Dial Utility2 Speed Dial Utility2 is a utility for forwarding the telephone directory registered on the printer to a computer and registering/changing it on the computer. In addition, you can register the telephone directory edited on the computer to the printer. -
Page 766: Starting Up Speed Dial Utility2
Follow the procedure below to start up Speed Dial Utility2. 1. Select Applications on Go menu of Finder. 2. Double-click Canon Utilities folder. 3. Double-click Speed Dial Utility2 folder. 4. Double-click Speed Dial Utility2. Speed Dial Utility2 starts up. -
Page 767: Speed Dial Utility2 Dialog
Speed Dial Utility2 Dialog The following items are on the Speed Dial Utility2 dialog. 1. Printer Name: Selects the printer for editing the telephone directory using Speed Dial Utility2. Behind printer name, printer's MAC address is displayed. Note • For checking printer's MAC address, refer to "Checking Network Information" for your model from Home of the Online Manual. - Page 768 Note • By clicking on the item name, you can sort the display order. 5. Edit.../Select All/Delete Edits the item that selected for Setting Item List:, or deletes the item, or selects all the items. When multiple items on the registered information list are selected, you cannot use the Edit... button. 6.
-
Page 769: Saving Registered Telephone Directory On Printer To Your Computer
Saving Registered Telephone Directory on Printer to Your Computer Follow the procedure below to save the telephone directory (includes recipients' name, recipients' fax/ telephone number, group dial, user's name, user's fax/telephone number, and rejected numbers) that registered on the printer to the computer. Start up Speed Dial Utility2. -
Page 770: Registering A Fax/Telephone Number Using Speed Dial Utility2
Registering a Fax/telephone Number Using Speed Dial Utility2 Follow the procedure below to register fax/telephone numbers. Note Before you register fax/telephone numbers using Speed Dial Utility2, make sure that no fax operations are in progress. Start up Speed Dial Utility2. 2. - Page 771 Note • You can only add the numbers that have already been registered. 6. Click OK. To continue registering fax/telephone numbers or a group dial, repeat steps 4 to 6. • To save the registered information on the computer. 1. Click Save to PC..2.
-
Page 772: Changing A Fax/Telephone Number Using Speed Dial Utility2
Changing a Fax/telephone Number Using Speed Dial Utility2 Follow the procedure below to change fax/telephone numbers. Note • Before you change fax/telephone numbers using Speed Dial Utility2, make sure that no fax operations are in progress. Start up Speed Dial Utility2. 2. - Page 773 To delete a member: Select a code to delete from group dial, and then click << Delete. 5. Click OK. To continue changing fax/telephone numbers or group dials, repeat steps 4 and 5. • To save the edited information on the computer. 1.
-
Page 774: Deleting A Fax/Telephone Number Using Speed Dial Utility2
Deleting a Fax/telephone Number Using Speed Dial Utility2 Follow the procedure below to delete fax/telephone numbers. Note • Before you delete fax/telephone numbers using Speed Dial Utility2, make sure that no fax operations are in progress. Start up Speed Dial Utility2. 2. -
Page 775: Changing Sender Information Using Speed Dial Utility2
Changing Sender Information Using Speed Dial Utility2 Follow the procedure below to change the user's name or fax/telephone number. Start up Speed Dial Utility2. 2. Select a printer from Printer Name: list box, and then click Display Printer Settings. 3. Click User Information Setting from Setting Item List:. The user's information is displayed. -
Page 776: Registering/Changing Rejected Number Using Speed Dial Utility2
Registering/Changing Rejected Number Using Speed Dial Utility2 Follow the procedure below to register, change, or delete rejected numbers. Start up Speed Dial Utility2. 2. Select a printer from Printer Name: list box, and then click Display Printer Settings. 3. Click Rejected Number Setting from Setting Item List:. The list of rejected numbers is displayed. -
Page 777: Registering Telephone Directory Has Been Saved On Your Computer To Printer
Registering Telephone Directory Has been Saved on Your Computer to Printer You can load the data of the telephone directory (RSD file, *.rsd) and register it to your printer. The data of the telephone directory (RSD file, *.rsd) that is exported from other printer can be loaded and registered to your printer. -
Page 778: Receiving Faxes
Receiving Faxes Receiving Faxes Changing Paper Settings Memory Reception Receiving Faxes Using Useful Functions... -
Page 779: Receiving Faxes
Receiving Faxes This section describes the preparation necessary for receiving a fax and how to receive a fax. Preparing for Receiving Fax Prepare for receiving a fax according to the following procedure. Make sure that printer is turned on. 2. Select FAX on HOME screen. - Page 780 Note • For details on the receive mode: Setting Receive Mode • You can specify the advanced settings of each receive mode. For details on the advanced settings of the receive mode: Advanced Settings of Receive Mode • If the printer was not able to print a received fax, the printer stores the unprinted fax temporarily in its memory (memory receiving).
- Page 781 • If you have subscribed to Duplex Ringing service in Hong Kong, the telephone will ring a specified number of times when there is an incoming call with a fax distinctive ring pattern. Then, the printer will switch to fax reception automatically without the handset being picked up. The number of times to ring the telephone until switching to fax reception can be changed.
- Page 782 When FAX only mode is selected: • When the call is a fax: The printer will receive the fax automatically. Note • If a telephone is connected to the printer, the telephone will ring when a call incomes. • You can change the number of times to ring the telephone with Incoming ring in Advanced. When DRPD or Network switch is selected: •...
- Page 783 Note • To use this feature, you need to subscribe to a compatible service provided by your telephone company. • For DRPD You need to select the appropriate ring pattern on the printer. Setting DRPD Ring Pattern (US and Canada only) •...
-
Page 784: Changing Paper Settings
Changing Paper Settings This printer prints received faxes to paper loaded in the printer beforehand. You can use the operation panel to change the paper settings for printing faxes. Make sure that the settings are appropriate for the loaded paper. Important •... - Page 785 A. Page size Select the page size from A4, Letter, or Legal. B. Type (Media type) The paper type is set to Plain paper. C. 2-sidedPrintSetting Select two-sided printing or single-sided printing. Two sided printing is available for black & white faxes. Color faxes are printed on the single-side of paper regardless of this setting.
-
Page 786: Memory Reception
Memory Reception If the printer was not able to print the received fax, the received fax is stored in the printer's memory. The FAX Memory lamp is lit and Received in memory. is displayed at the Fax standby screen. Important •... - Page 787 Auto print settings ◦ Paper has run out: Load the paper and press the OK button. ◦ A different size of paper from that specified by Page size in FAX paper settings is loaded: Load the same size of paper as that specified by Page size in FAX paper settings, and then press OK button.
-
Page 788: Receiving Faxes Using Useful Functions
Receiving Faxes Using Useful Functions Saving Received Faxes Automatically on USB Flash Drive Forwarding Received Faxes Automatically to Shared Folder on Computer Remote Reception Rejecting Fax Reception Using Caller ID Service to Reject Calls... -
Page 789: Saving Received Faxes Automatically On Usb Flash Drive
Saving Received Faxes Automatically on USB Flash Drive You can save received faxes on a USB flash drive as PDF files automatically when receiving a fax. This section describes the procedure to enable the printer to save received faxes on a USB flash drive automatically. - Page 790 • If the USB flash drive is removed or becomes full while saving faxes is in progress, the error message is displayed on the LCD. Press the OK button to dismiss the error. • The folder and file name of faxes saved on the USB flash drive is as follows: •...
-
Page 791: Forwarding Received Faxes Automatically To Shared Folder On Computer
Forwarding Received Faxes Automatically to Shared Folder on Computer You can forward received faxes to the shared folder on the computer as PDF files automatically. This section describes the procedure to enable the printer to forward received faxes to the shared folder on the computer automatically. - Page 792 7. Select ON, and then press OK button. 8. Select Destination folder, and then press OK button. 9. Select a shared folder, and then press OK button. Note • When you specify a PIN code for a registered folder, a screen asking you to enter a PIN code is displayed.
-
Page 793: Remote Reception
Remote Reception If the printer is located away from the telephone, pick up the handset of the telephone connected to the printer and dial 25 (the remote reception ID) to receive faxes (remote reception). • If you use a rotary pulse line, temporarily switch your telephone to tone dialing. For details on how to switch to tone dialing, refer to your telephone's instruction manual. -
Page 794: Rejecting Fax Reception
Rejecting Fax Reception You can set the printer to reject faxes with no sender information or those from specific senders. Select one of the following conditions to reject faxes. • Faxes with no caller identification. • Faxes from senders not registered in the printer's directory. •... - Page 795 1. When confirmation screen to register rejected number is displayed, select Yes, and then press OK button. 2. Select a registration number, and then press OK button. 3. Select a registration method, and then press OK button. 4. Register rejected number. Register the rejected number depending on the registration method.
- Page 796 Select a fax/telephone number or a name, and then press the OK button. Note • This registration method may not be available depending on the country or region of purchase. Note • To register another rejected number, select another registration number, and then register the rejected number.
-
Page 797: Using Caller Id Service To Reject Calls
Using Caller ID Service to Reject Calls If you subscribe to the Caller ID service, the printer detects the sender's Caller ID. If the sender's ID matches the condition specified in this setting, the printer rejects the phone call or fax reception from the sender. Note •... - Page 798 Note • Even if you select Reject, the printer rings once. (The printer may not ring depending on the country or region of purchase.)
-
Page 799: Other Useful Fax Functions
Other Useful Fax Functions Using Information Services Transmission/Reception of Faxes Using ECM Document Stored in Printer's Memory Summary of Reports and Lists... -
Page 800: Using Information Services
Using Information Services You can use various information services such as provided by banks, and make airline reservations or hotel reservations. Since these services require tone dialing to use their services, you need to temporarily switch to tone dialing if your printer is connected to a rotary pulse line. Using Touch Tone Line Using Rotary Pulse Line Important... - Page 801 6. Hang up handset to finish using service. Using Rotary Pulse Line • Dialing by Using the On Hook Dial Function Note • You can use the on hook dial function only when Hook key setting in Security control under FAX settings is set to Enable.
-
Page 802: Transmission/Reception Of Faxes Using Ecm
Transmission/Reception of Faxes Using ECM This printer is set to send/receive faxes in Error Correction Mode (ECM). If the recipient's fax device is compatible with ECM, ECM automatically corrects errors and resends the fax. Note • If the sender's or recipient's fax device is not compatible with ECM, the fax will be sent/received without automatic error correction. -
Page 803: Document Stored In Printer's Memory
Document Stored in Printer's Memory If the sending faxes is not complete or the printer was not able to print the received faxes, these faxes are stored in the printer's memory. If an error occurred during a fax transmission, the document is not stored in the printer's memory. In the following cases, the printer is not able to print the received fax and will automatically store the fax in its memory. -
Page 804: Printing Document In Printer's Memory
Printing Document in Printer's Memory You can print a specified document in the printer's memory or print all the received documents in its memory at a time. When printing a specified document, you specify it by its transaction number. If you do not know the transaction number for your target document, print the list of documents (MEMORY LIST) first. - Page 805 A. Date and time of transaction and fax/telephone number B. Transaction number (TX/RX NO.) A transaction number from "0001" to "4999" indicates a document being sent. A transaction number from "5001" to "9999" indicates a document being received. C. Color information Color is displayed for color transmission/reception.
-
Page 806: Deleting Document In Printer's Memory
Deleting Document in Printer's Memory You can delete a specified document in the printer's memory or delete all the documents in its memory at a time. Note • When deleting a specified document, you specify it by its transaction number. If you do not know the transaction number for your target document, print the list of documents (MEMORY LIST) first. - Page 807 A. Date and time of transaction and fax/telephone number B. Transaction number (TX/RX NO.) A transaction number from "0001" to "4999" indicates a document being sent. A transaction number from "5001" to "9999" indicates a document being received. C. Color information Color is displayed for color transmission/reception.
-
Page 808: Saving Document In Printer's Memory To Usb Flash Drive
Saving Document in Printer's Memory to USB Flash Drive You can save the received faxes stored in the printer's memory to the USB flash drive as PDF files LCD and Operation Panel of the printer. You can save a specified document in the printer's memory to the USB flash drive or save all the documents in its memory to the USB flash drive at a time. - Page 809 • To specify a document to save on the USB flash drive: If you select Save specified document, you can specify the document to save on the USB flash drive. When the Specify the storage medium screen is displayed, select USB flash drive and press the OK button.
- Page 810 • File date: The date and time of saving as set in the printer. For details on how to set the date and time: Setting Date and Time...
-
Page 811: Forwarding Document In Printer's Memory To Shared Folder On Computer
Forwarding Document in Printer's Memory to Shared Folder on Computer You can forward the received faxes stored in the printer's memory to the shared folder on the computer as PDF files LCD and Operation Panel of the printer. You can forward a specified document in the printer's memory to the shared folder on the computer or forward all the documents in its memory to the shared folder on the computer at a time. - Page 812 5. Select Memory reference, and then press OK button. Note • If no document is stored in the printer's memory, There is no document in memory. is displayed. Press the OK button to return to the previous screen. 6. Select a forward menu, and then press OK button. •...
- Page 813 If you select Save all RX documents, you can forward all documents to the shared folder on the computer. When the confirmation screen is displayed, select Yes and press the OK button. When the Specify the storage medium screen is displayed, select Destination folder and press the OK button.
-
Page 814: Summary Of Reports And Lists
Summary of Reports and Lists The printer prints the report of sending or receiving a fax automatically. You can print the list of the fax/ telephone number or the current settings. Type of Reports and Lists Printing Report or List Type of Reports and Lists Report or List Description... - Page 815 • At the time of purchase, ERROR TX REPORT is set to be printed only when a transmis- sion error occurred. You can set the printer to print TX REPORT each time it sends a document, or disable printing of the report by selecting TX report in Auto print settings under FAX settings. You can also specify the print setting so that the first page of the fax is printed along with the report.
- Page 816 Note • CALLER HISTORY may not be supported depending on the country or region of purchase. Make sure that printer is turned on. Load paper. 3. Select FAX on HOME screen. Using the Operation Panel The Fax standby screen is displayed. 4.
- Page 817 #003 Document is too You attempted to send a document longer than 15.75 inches / 400 mm. long. You cannot send a document longer than 15.75 inches / 400 mm from the ADF. "#003" is also printed if it takes time to send a page. Divide the document or set the image quality (Fax resolution) to a lower setting, and then resend it.
- Page 818 cord before automatic redialing is complete, all faxes stored in the printer's memory are deleted and not sent. Resend the document. Errors When You Receive Fax If an error occurs when you receive a fax, the error number is printed on RX REPORT or ACTIVITY REPORT (there are some errors for which the cause is also printed).
-
Page 819: Sending Faxes From Computer (Mac Os)
Sending Faxes from Computer (Mac OS) Sending a Fax General Notes... -
Page 820: Sending A Fax
2. Open document you want to fax with an application. 3. Open Print dialog. To open the Print dialog, you typically select Print... from the File menu of your application software. 4. Select Canon XXX series - Fax (where "XXX" is your printer's name) from Printer list. - Page 821 5. Specify fax paper settings as needed. 6. Enter fax/telephone numbers in To:.
-
Page 822: Automatic Redialing
Enter the dialing prefix and specify the cover page settings as needed. 7. Select Fax. The printer dials automatically and sends the fax. Note • To cancel sending the fax, press the printer's Stop button. Automatic Redialing The printer redials automatically according to the automatic redialing setting of the printer. You can enable or disable automatic redialing. -
Page 823: General Notes
General Notes Sending faxes from Mac is subject to the following restrictions. • Enter the characters in To: and Dialing Prefix: so that the total number of characters is within 60 characters. If the total number of characters exceeds 60, the printer dials only the first 60 characters. •... -
Page 824: Troubleshooting
Troubleshooting Frequently Asked Questions • Cannot Find Machine on Network • Cannot Find Machine while Using Wireless LAN • Printing Does Not Start • Paper Is Blank/Printing Is Blurry/Colors Are Wrong/White Streaks Appear • An Error Occurs • Print Results Are Unsatisfactory •... - Page 825 Print/Scan Results Are Unsatisfactory • Printing Does Not Start • Printing Is Slow • Copying/Printing Stops • Print Results Are Unsatisfactory • No Ink Comes Out • Paper Jams • Paper Does Not Feed Properly/"No Paper" Error • Automatic Duplex Printing Problems •...
-
Page 826: Network Communication Problems
Network Communication Problems Cannot Find Machine on Network Network Connection Problems Other Network Problems... -
Page 827: Cannot Find Machine On Network
Cannot Find Machine on Network While performing printer setup: Cannot Find Machine on Check Printer Settings Screen Cannot Find Machine after Searching it on Printer Detection Screen During Setup Searching Machine by IP Address or Host Name During Setup (Windows) Cannot Proceed beyond Printer Connection Screen/Connect Cable Screen While using printer: Cannot Find Machine while Using Wireless LAN... -
Page 828: Cannot Find Machine On Check Printer Settings Screen
Cannot Find Machine on Check Printer Settings Screen • For Windows: If the printer cannot be found and the Check Printer Settings screen appears after searching the printer by Automatic search on the Search for Printers screen, click Redetect and search for the printer again by the IP address on the Search for Printers screen. -
Page 829: Check 1: Cannot Find Machine On Check Printer Settings Screen During Wireless Lan Setup
Check 1: Cannot Find Machine on Check Printer Settings Screen During Wireless LAN Setup Are printer and network device (router, etc.) turned on? Make sure the printer is turned on. Confirming that the Power Is On Make sure network device (router, etc.) is turned on. If printer or network device is off: Turn on printer or network device. -
Page 830: Check 2: Cannot Find Machine On Check Printer Settings Screen During Wireless Lan Setup
Check 2: Cannot Find Machine on Check Printer Settings Screen During Wireless LAN Setup Is printer set to allow wireless communication? Make sure the icon is displayed on the LCD. If icon is not displayed: • For Windows: The printer is not set to allow wireless communication. Click Wireless LAN Setup Information on the Check Printer Settings screen to check the status and turn on wireless communication on the printer. -
Page 831: Check 3: Cannot Find Machine On Check Printer Settings Screen During Wireless Lan Setup
Check 3: Cannot Find Machine on Check Printer Settings Screen During Wireless LAN Setup Is printer connected to wireless router? Use the icon on the LCD to make sure the printer is connected to the wireless router. icon is displayed: •... -
Page 832: Check 4: Cannot Find Machine On Check Printer Settings Screen During Wireless Lan Setup
For more on the wireless router, refer to the instruction manual supplied with the wireless router or contact its manufacturer. After taking measures above, click Redetect on the Check Printer Settings screen to redetect the printer. If the printer is found, follow the instructions on the screen to continue to set up network communication. If the printer cannot be detected, the printer is not connected to the wireless router. -
Page 833: Check 4: Cannot Find Machine On Check Printer Settings Screen During Wireless Lan Setup
Check 4: Cannot Find Machine on Check Printer Settings Screen During Wireless LAN Setup Is printer's IP address specified correctly? If printer's IP address is not specified correctly, the printer may not be found. Make sure whether printer's IP address is not used for another device. To check the printer's IP address, print out the network settings information or use the operation panel to display it. -
Page 834: Check 5: Cannot Find Machine On Check Printer Settings Screen During Wireless Lan Setup
If the printer is found, follow the instructions on the screen to continue to set up the network communication. • If no message appears: Cancel the setup, and then set the security software to allow Canon software below to access the network. ◦ For Windows: Setup.exe or Setup64.exe in the win >... -
Page 835: Check 6: Cannot Find Machine On Check Printer Settings Screen During Wireless Lan Setup
Check 6: Cannot Find Machine on Check Printer Settings Screen During Wireless LAN Setup Check wireless router settings. Check wireless router network connection settings, such as IP address filtering, MAC address filtering, and DHCP function. Make sure the same radio channel is assigned to the wireless router and the printer. To check the settings of the wireless router, see the instruction manual supplied with the wireless router or contact the manufacturer. -
Page 836: Cannot Find Machine After Searching It On Printer Detection Screen During Setup
Cannot Find Machine after Searching it on Printer Detection Screen During Setup • For Windows: The printer could not be detected with the current setup method. Select Set up the network connection according to the guide radio button and click Next. The screen to show another setup method is displayed. - Page 837 Perform setup following the instructions on the screen.
-
Page 838: Searching Machine By Ip Address Or Host Name During Setup (Windows)
Searching Machine by IP Address or Host Name During Setup (Windows) If the printer cannot be found on the Select Printer screen, search for the printer by an IP address or host name. Select Specify the IP address and run the search radio button and click Next. The screen to select searching criteria appears. - Page 839 Select to search for printers by IPv6 address. 3. Search by host name Select to search for printers by host name. A host name is referred to as LLMNR host name or Bonjour name. 3. Enter IP address or host name and click Next. Printer search starts.
- Page 840 If firewall interferes with printer search: • If message appears: If a message appears warning that Canon software is attempting to access the network, set the security software to allow access. After allowing the software to access, specify the IP address or host name and search for printers again.
-
Page 841: Cannot Proceed Beyond Printer Connection Screen/Connect Cable Screen
Cannot Proceed beyond Printer Connection Screen/Connect Cable Screen If you cannot proceed beyond the Printer Connection screen or the Connect Cable screen, check the following. Make sure USB cable is securely plugged in to printer and computer. Check1 Connect the printer and the computer using a USB cable as the illustration below. The USB port is located at the back of the printer. - Page 842 3. Turn off printer. 4. Restart computer. 5. Make sure you have no application software running. 6. Redo setup according to instructions on Canon website. Note • You can use the Setup CD-ROM to redo setup. • For Mac OS: 1.
-
Page 843: Cannot Find Machine While Using Wireless Lan
Make sure printer setup is complete. Check3 If it is not, perform setup. • For Windows: Use the Setup CD-ROM or follow the instructions on the Canon website. • For Mac OS: Follow the instructions on the Canon website. Look for printer again. - Page 844 Make sure security software's firewall is off. Check10 If your security software's firewall is on, a message may appear warning you that Canon software is attempting to access the network. If this warning message appears, set security software to always allow access.
-
Page 845: Network Connection Problems
Network Connection Problems Machine Suddenly Cannot Be Used Network Key Unknown Administrator Password Set for Machine Unknown Machine Cannot Be Used After Replacing Wireless Router or Changing Its Settings Printing Is Slow Cannot Access to Internet on Wireless LAN from Communication Device Ink Level Not Shown on Printer Status Monitor (Windows) -
Page 846: Machine Suddenly Cannot Be Used
Machine Suddenly Cannot Be Used Cannot Communicate with Printer Following Network Settings Change Cannot Communicate with Printer via Wireless LAN Cannot Communicate with Printer Using Direct Connection Cannot Print, Scan, or Fax from a Computer Connected to the Network Cannot Communicate with Printer Following Network Settings Change It may take a while for the computer to obtain an IP address, or you may need to restart your computer. - Page 847 Make sure security software's firewall is off. Check8 If your security software's firewall is on, a message may appear warning you that Canon software is attempting to access the network. If this warning message appears, set security software to always allow access.
- Page 848 Cannot Communicate with Printer Using Direct Connection Make sure the printer is turned on. Check1 Is the icon displayed on the LCD? Check2 If the icon is not displayed, select Activate direct connect. on Change LAN in LAN settings under Device settings.
- Page 849 If MP Drivers are not installed, install them. Check2 • For Windows: Install the MP Drivers using the Setup CD-ROM or install them from the Canon website. • For Mac OS: Install the MP Drivers from the Canon website. Make sure wireless router does not restrict which computers can access it.
-
Page 850: Network Key Unknown
Network Key Unknown WPA/WPA2 or WEP Key Set for Wireless Router Unknown, Cannot Connect Setting an Encryption Key WPA/WPA2 or WEP Key Set for Wireless Router Unknown, Cannot Connect For more on setting up a wireless router, see the instruction manual provided with the wireless router or contact its manufacturer. - Page 851 To communicate with a wireless router that uses automatically generated WEP keys, you must set the printer to use the key generated by the wireless router, entering it in hexadecimal format. ◦ For Windows: When the WEP Details screen appears after you click Search... on the Protocol Settings (Wireless LAN) screen in IJ Network Device Setup Utility, follow the on-screen instructions to set the WEP key length, format, and the number.
-
Page 852: Administrator Password Set For Machine Unknown
Select Reset all to restore administrator password to default. Reset setting After initializing the printer settings, redo setup. • For Windows: Use the Setup CD-ROM or follow the instructions on the Canon website. • For Mac OS: Follow the instructions on the Canon website. -
Page 853: Machine Cannot Be Used After Replacing Wireless Router Or Changing Its Settings
Changing Its Settings When you replace a wireless router, redo the network setup for the printer. • For Windows: Use the Setup CD-ROM or follow the instructions on the Canon website. • For Mac OS: Follow the instructions on the Canon website. - Page 854 With Encryption On, Cannot Communicate with Printer After Changing Encryption Type at Wireless Router If you change the encryption type for the printer and it subsequently cannot communicate with the computer, make sure the encryption type for the computer and the wireless router matches the type set for the printer.
-
Page 855: Printing Is Slow
Printing Is Slow Printer may be printing or scanning a large job from another computer. Check1 Make sure the printer is not placed too far away from the wireless router. Check2 Place the wireless router and printer where there are no obstacles between them. Wireless communication between different rooms or floors is generally poor. -
Page 856: Cannot Access To Internet On Wireless Lan From Communication Device
Cannot Access to Internet on Wireless LAN from Communication Device Is your device connected to printer using direct connection? Check1 If your device is connected to the printer using direct connection, you cannot access to the Internet. Turn off direct connection and connect your device to the wireless router. For details, see the instruction manual provided with your device and wireless router. -
Page 857: Ink Level Not Shown On Printer Status Monitor (Windows)
Ink Level Not Shown on Printer Status Monitor (Windows) Use the printer driver with bidirectional communication. Select Enable bidirectional support in the Ports sheet of the properties dialog box of the printer driver. How to Open the Printer Driver Setup Window... -
Page 858: Other Network Problems
Other Network Problems Message Appears on Computer During Setup Packets Are Sent Constantly (Windows) Checking Network Information Restoring to Factory Defaults... -
Page 859: Message Appears On Computer During Setup
Message Appears on Computer During Setup Screen to Enter Password Appears During Setup Encryption Settings Screen Appears When Wireless Router Selected "You have connected the printer to the non encrypted wireless network" Appears Screen to Enter Password Appears During Setup The following screen appears if the printer is set up for use with a network and an administrator password has been set. - Page 860 Encryption Settings Screen Appears When Wireless Router Selected This screen appears automatically if the selected wireless router is encrypted. Set the same encryption settings as those set for the wireless router. • For Windows: For more on encryption settings, see Performing/Changing Wireless LAN Settings. •...
-
Page 861: Packets Are Sent Constantly (Windows)
IJ Network Scanner Selector EX2. To disable IJ Network Scanner Selector EX2, right-click the icon on the notification area on the desktop and select Disable Canon IJ Network Scanner Selector EX2. -
Page 862: Checking Network Information
You can check the network setting information on the computer screen. • For Windows: IJ Network Device Setup Utility Screen • For Mac OS: Canon IJ Network Tool Menus You can display the printer's MAC address on the LCD. System information Checking Computer IP Address or MAC Address To check the IP Address or MAC address of your computer, follow the instructions below. - Page 863 The IP address and MAC address of your computer appear. If your computer is not connected to a network, the IP address does not appear. • For Mac OS: 1. Select System Preferences from Apple menu, and then click Network. 2.
- Page 864 3. Make sure Send only XX pings (XX are numbers) is selected. 4. Enter IP address of target printer or target wireless router in Enter the network address to ping. 5. Click Ping. "XXX.XXX.XXX.XXX" is the IP address of the target device. A message such as the following appears.
-
Page 865: Restoring To Factory Defaults
Initialization erases all network settings on the printer, making printing, scanning, or faxing operation from a computer over a network impossible. To use the printer over a network again after restoring it to the factory defaults, use the Setup CD-ROM or follow the instructions on the Canon website to redo setup. -
Page 866: Problems While Printing/Scanning From Smartphone/Tablet
Problems while Printing/Scanning from Smartphone/Tablet Cannot Print/Scan from Smartphone/Tablet... -
Page 867: Cannot Print/Scan From Smartphone/Tablet
Cannot Print/Scan from Smartphone/Tablet If you cannot print/scan from your smartphone/tablet, it is possible that your smartphone/tablet cannot communicate with the printer. Check the cause of your problem according to the connection method. Cannot Communicate with Printer over Wireless LAN Cannot Communicate with Printer while It Is in Direct Connection Note •... - Page 868 Make sure the network settings of your smartphone/tablet (e.g. wireless router name, SSID, network key, etc.) are identical with those of the wireless router. To check the settings of your smartphone/tablet, refer to the instruction manual provided with it. If the network settings of your smartphone/tablet are not identical with those of the wireless router, change the network settings of it to match with those of the wireless router.
- Page 869 Make sure printer is not too far away. Check6 Locate your smartphone/tablet close enough to communicate with the printer. Check for obstructions. Check7 Wireless communication between different rooms or floors is generally poor. Move the printer as necessary. Make sure there is no source of radio wave interference nearby. Check8 If a device like a microwave oven that emits radio waves of the same frequency bandwidth as a wireless router is nearby, it may cause interference.
-
Page 870: Printing Problems
Printing Problems Printing Does Not Start Paper Jams Print Results Are Unsatisfactory No Ink Comes Out Paper Does Not Feed Properly/"No Paper" Error Automatic Duplex Printing Problems Copying/Printing Stops Cannot Print Using AirPrint... -
Page 871: Printing Does Not Start
Printing Does Not Start Make sure printer is securely plugged in and press ON button to turn it on. Check1 The POWER lamp flashes while the printer is initializing. Wait until the POWER lamp stops flashing and remains lit. Note •... - Page 872 The printer will not print properly if you are using a printer driver for a different printer. • For Windows: Make sure "Canon XXX series Printer" (where "XXX" is your printer's name) is selected in the Print dialog box. Note •...
- Page 873 Printer, Canon My Printer, and then select Diagnose and Repair Printer. Follow the on-screen instructions to set the correct printer port, and then select your printer's name. If the problem is not resolved, reinstall the MP Drivers from the Setup CD-ROM or the Canon website. Is print data extremely large? (Windows) Check8 Click Print Options on Page Setup sheet of the printer driver.
-
Page 874: Paper Jams
Paper Jams When paper jams, a troubleshooting message appears automatically. Take the appropriate action described in the message. • When a Support Code and a Message Are Displayed on Computer Screen: ◦ For Windows: ◦ For Mac OS: * The screen differs depending on the OS you are using. - Page 875 • When a Support Code and a Message Are Displayed on LCD: To remove the jammed paper, see List of Support Code for Error (Paper Jams). Note • You can also search for details on resolving the errors indicated by the support code shown. Search...
-
Page 876: Print Results Are Unsatisfactory
Print Results Are Unsatisfactory If the print results are unsatisfactory due to white streaks, misaligned lines, or uneven colors, check the paper and print quality settings first. Do page size and media type settings match size and type of loaded paper? Check1 If these settings do not match, it is not possible to obtain the proper result. - Page 877 Back of Paper Is Smudged Uneven or Streaked Colors...
-
Page 878: Cannot Complete Printing
Cannot Complete Printing Select setting not to compress printing data. (Windows) Check1 If you select the setting not to compress the printing data with an application software you are using, the printing result may be improved. Click Print Options on Page Setup sheet of the printer driver. Select Do not allow application software to compress print data check box and click OK. -
Page 879: Part Of Page Is Not Printed (Windows)
Part of Page Is Not Printed (Windows) Are you using automatic duplex printing? Check If you are using automatic duplex printing, the printable area at the top of the page will be 0.08 inches / 2 mm shorter than usual. Therefore, the bottom of the page may not be printed. -
Page 880: Paper Is Blank/Printing Is Blurry/Colors Are Wrong/White Streaks Appear
Paper Is Blank/Printing Is Blurry/Colors Are Wrong/White Streaks Appear Paper Is Blank Printing Is Blurry Colors Are Wrong... - Page 881 • If problem is not resolved after performing print head deep cleaning twice: If print head deep cleaning does not resolve the problem, the print head may be damaged. Contact your nearest Canon service center to request a repair. When using paper with one printable surface, make sure paper is loaded with Check4 printable side facing down.
- Page 882 • When copying, see also the sections below: Is platen glass or glass of ADF dirty? Check5 Clean the platen glass or the glass of ADF. Cleaning the Platen Glass and Document Cover Note • If the glass of ADF is dirty, black streaks appear on the paper as shown below. Make sure original is loaded correctly on platen glass or in ADF.
-
Page 883: Lines Are Misaligned
Lines Are Misaligned Check paper and print quality settings. Check1 Print Results Are Unsatisfactory Perform print head alignment. Check2 If printed lines are misaligned or print results are otherwise unsatisfactory, adjust the print head position. Aligning the Print Head Note •... -
Page 884: Lines Incomplete Or Missing (Windows)
Lines Incomplete or Missing (Windows) Are you using Page Layout Printing or Binding Margin function? Check1 When the Page Layout Printing or Binding margin function is in use, thin lines may not be printed. Try thickening the lines in the document. Is print data extremely large? Check2 Click Print Options on Page Setup sheet of the printer driver. -
Page 885: Images Incomplete Or Missing (Windows)
Images Incomplete or Missing (Windows) Select setting not to compress printing data. Check1 If you select the setting not to compress the printing data with an application software you are using, the printing result may be improved. Click Print Options on Page Setup sheet of the printer driver. Select Do not allow application software to compress print data check box and click OK. -
Page 886: Ink Blots / Paper Curl
Use Photo Paper to print photos. Check3 To print data with high color saturation such as photographs or images with dark colors, we recommend that you use Photo Paper Plus Glossy II or other Canon specialty paper. Supported Media Types... -
Page 887: Paper Is Smudged / Printed Surface Is Scratched
Paper Is Smudged / Printed Surface Is Scratched Paper Is Smudged Smudged Edges Smudged Surface Printed Surface Is Scratched Check paper and print quality settings. Check1 Print Results Are Unsatisfactory Check paper type. Check2 Make sure you are using the right paper for what you are printing. Supported Media Types Correct curl before loading paper. - Page 888 1. Roll up paper in opposite direction to paper curl as shown below. 2. Check that paper is now flat. We recommend printing curl-corrected paper one sheet at a time. Note • Depending on paper type, the paper may smudge or may not feed properly even if it is not curled inward. Follow the instructions below to curl the paper outward up to 0.1 inch / 3 mm (B) in height before printing.
- Page 889 ◦ For Mac OS: In the Canon IJ Printer Utility, select Custom Settings in the pop-up menu, select Prevent paper abrasion check box, and then click Apply. To open the Canon IJ Printer Utility, see Opening the Canon IJ Printer Utility.
- Page 890 5. Check message and click OK. • For Mac OS: 1. Make sure printer is turned on. 2. Open Canon IJ Printer Utility. Opening the Canon IJ Printer Utility 3. Select Custom Settings in pop-up menu. 4. Drag Ink Drying Wait Time: slide bar to set wait time and click Apply.
-
Page 891: Back Of Paper Is Smudged
Back of Paper Is Smudged Check paper and print quality settings. Check1 Print Results Are Unsatisfactory Perform bottom plate cleaning to clean inside of printer. Check2 Cleaning Inside the Machine (Bottom Plate Cleaning) Note • During duplex printing or too much printing, ink may stain the inside of the printer. -
Page 892: Uneven Or Streaked Colors
Uneven or Streaked Colors Uneven Colors Streaked Colors Check paper and print quality settings. Check1 Print Results Are Unsatisfactory Print nozzle check pattern and perform any necessary maintenance operations Check2 such as print head cleaning. Print the nozzle check pattern to determine whether the ink ejects properly from the print head nozzles. For details on printing the nozzle check pattern, print head cleaning, and print head deep cleaning, see If Printing Is Faint or... - Page 893 • If problem is not resolved after performing print head deep cleaning twice: If print head deep cleaning does not resolve the problem, the print head may be damaged. Contact your nearest Canon service center to request a repair. Perform print head alignment.
-
Page 894: No Ink Comes Out
24 hours later. When you turn the printer off, do not unplug it. • If problem is not resolved after performing print head deep cleaning twice: If print head deep cleaning does not resolve the problem, the print head may be damaged. Contact your nearest Canon service center to request a repair. -
Page 895: Paper Does Not Feed Properly/"No Paper" Error
Paper Does Not Feed Properly/"No Paper" Error Make sure paper is loaded. Check1 Loading Paper When loading paper, consider the following. Check2 • When loading two or more sheets of paper, flip through the paper before loading it. In addition, when you load paper with some paper remaining in the cassette, flip through the remaining paper and the newly loaded paper before loading. - Page 896 If two or more sheets of paper feed from cassette at once, clean inside of Check7 cassette. For information on cleaning the inside of the cassette, see Cleaning Cassette Pads. If the measures above do not solve the problem, contact your nearest Canon service center to request a repair.
-
Page 897: Automatic Duplex Printing Problems
Automatic Duplex Printing Problems Is automatic duplex printing selected? Check1 • For Windows: Make sure Duplex Printing and Automatic check boxes are selected on Page Setup sheet in the printer driver setup window. Duplex Printing • For Mac OS: Make sure Two-Sided check box is selected on the Print dialog. Duplex Printing Make sure loaded paper size is suitable for automatic duplex printing. - Page 898 Note • For Windows: To switch to manual duplex printing, follow the procedure below. Open the printer driver setup window, clear Automatic check box on Page Setup sheet, and reprint. When performing manual duplex printing, note the following. • If you are printing three or more pages of a document with manual duplex printing, one side of each sheet is printed first.
-
Page 899: Copying/Printing Stops
Copying/Printing Stops Is paper loaded? Check1 Make sure paper is loaded. If necessary, load paper. Do documents to be printed have many photographs or illustrations? Check2 It takes time for the printer and the computer to process large data such as photos or other graphics, so it may seem that the printer is not working. -
Page 900: Cannot Print Using Airprint
Cannot Print Using AirPrint Make sure printer is turned on. Check1 If the printer is turned on, turn it off and back on, and then check whether the issue is resolved. Make sure printer is connected by LAN to same network subnet as AirPrint Check2 compliant device when printing over LAN. -
Page 901: Scanning Problems (Mac Os)
Scanning Problems (Mac OS) Scanning Problems Scan Results Are Unsatisfactory IJ Scan Utility Error Messages Scanner Driver Error Messages... -
Page 902: Scanning Problems
Scanning Problems Scanner Does Not Work Scanner Driver Does Not Start Error Message Appears and the Scanner Driver Screen Does Not Appear Cannot Scan Multiple Originals at One Time Slow Scanning Speed "There is not enough memory." Message Is Displayed Computer Stops Operating during Scanning Scanned Image Does Not Open... -
Page 903: Scanner Does Not Work
Scanner Does Not Work Make sure that your scanner or printer is turned on. Check 1 Connect the USB cable to a different USB port on the computer. Check 2 If the USB cable is connected to a USB hub, remove it from the USB hub and Check 3 connect it to a USB port on the computer. -
Page 904: Scanner Driver Does Not Start
Scanner Driver Does Not Start Make sure that the scanner driver is installed. Check 1 If not installed, install the scanner driver from our website. Select your scanner or printer on the application's menu. Check 2 Note • The operation may differ depending on the application. Make sure that the application supports the ICA (Image Capture Architecture) Check 3 driver. -
Page 905: Error Message Appears And The Scanner Driver Screen Does Not Appear
Error Message Appears and the Scanner Driver Screen Does Not Appear Make sure that your scanner or printer is turned on. Check 1 Turn off your scanner or printer, then reconnect the USB cable and replug the Check 2 power cord. Connect the USB cable to a different USB port on the computer. -
Page 906: Cannot Scan Multiple Originals At One Time
Cannot Scan Multiple Originals at One Time Make sure that the items are placed correctly. Check 1 Positioning Originals (Scanning from Computer) Check if you can properly scan one item. Check 2 Some applications do not support multiple image scanning. In that case, scan each item individually. -
Page 907: Slow Scanning Speed
Slow Scanning Speed To view the image on a monitor, set the output resolution to around 150 dpi. To Check 1 print, set it to around 300 dpi. Resolution Set Fading Correction, Grain Correction, etc. to None. Check 2 Refer to "Image Corrections and Color Adjustments"... -
Page 908: There Is Not Enough Memory." Message Is Displayed
"There is not enough memory." Message Is Displayed Exit other applications and try again. Check 1 Reduce the resolution or output size and scan again. Check 2 Resolution... -
Page 909: Computer Stops Operating During Scanning
Computer Stops Operating during Scanning Restart the computer, reduce the output resolution and scan again. Check 1 Resolution Delete unnecessary files to obtain sufficient free hard disk space, then scan Check 2 again. Error message may appear if there is not enough hard disk space to scan and save, when the image size is too large (such as when scanning a large item at high resolution). -
Page 910: Scanned Image Does Not Open
Scanned Image Does Not Open If the data format is not supported by the application, scan the image again and Check select a popular data format such as JPEG when saving it. Refer to the application's manual for details. If you have any questions, contact the manufacturer of the application. -
Page 911: Scan Results Are Unsatisfactory
Scan Results Are Unsatisfactory Moire Appears in Scan Results Scan Quality (Image Displayed on the Monitor) Is Poor Scanned Image Is Surrounded by Extra White Areas Cannot Scan at the Correct Size Position or Size of the Image Cannot be Detected Correctly When Scanning from the Operation Panel Original Is Placed Correctly, but the Scanned Image Is Slanted Scanned Image Is Enlarged (Reduced) on the Computer Monitor... -
Page 912: Moire Appears In Scan Results
Moire Appears in Scan Results Increase the scanning resolution. Check 1 Resolution Take the following measures and scan again. Check 2 • Set one of the following settings in the Settings (Document Scan) dialog, Settings (Custom Scan) dialog, Settings (Scan and Stitch) dialog, Settings (OCR) dialog or Settings (E-mail) dialog of IJ Scan Utility, then scan from the IJ Scan Utility main screen. -
Page 913: Scan Quality (Image Displayed On The Monitor) Is Poor
Scan Quality (Image Displayed on the Monitor) Is Poor If the image is jagged, increase the scanning resolution, or select TIFF or PNG Check 1 in Data Format of the Settings dialog. Resolution Settings Dialog Set the display size to 100 %. Check 2 Some applications do not display images clearly if the display size is too small. -
Page 914: Scanned Image Is Surrounded By Extra White Areas
Scanned Image Is Surrounded by Extra White Areas Specify the scan area. Check Manually specify the scan area when there are white margins or unwanted areas along the edges of the scanned images in the Image Stitch window. Adjusting Cropping Frames in the Image Stitch Window... -
Page 915: Cannot Scan At The Correct Size
Cannot Scan at the Correct Size Make sure that the items are placed correctly. Check Positioning Originals (Scanning from Computer) -
Page 916: Panel
Position or Size of the Image Cannot be Detected Correctly When Scanning from the Operation Panel Make sure that the items are placed correctly. Check 1 Positioning Originals (Scanning from Computer) Check that the settings match the item to be scanned. Check 2 If you cannot scan properly by automatically detecting the item type, specify the item type and size. -
Page 917: Original Is Placed Correctly, But The Scanned Image Is Slanted
Original Is Placed Correctly, but the Scanned Image Is Slanted When Document or Magazine is selected for Select Source, deselect the Check Correct slanted text document checkbox and scan the item again. Settings (Document Scan) Dialog Settings (Custom Scan) Dialog... -
Page 918: Scanned Image Is Enlarged (Reduced) On The Computer Monitor
Scanned Image Is Enlarged (Reduced) on the Computer Monitor Change the display setting in the application. Check 1 Refer to the application's manual for details. If you have any questions, contact the manufacturer of the application. Click Driver in the IJ Scan Utility main screen, then change the resolution Check 2 setting and scan again. -
Page 919: Ij Scan Utility Error Messages
IJ Scan Utility Error Messages If an error message for IJ Scan Utility appears, check the error code and follow the corresponding solution. Error Code Error Message Solution There is not enough memory. Exit other applications to increase • The memory required to available memory. - Page 920 This scan function is not supported by the selected model. Select • Select a different scan a different scan function. function. Cannot write file. • Check the access permis- sion on the folder in Fold- er to Save Temporary Files in the Settings (General Settings) dialog or Save in in the corre- sponding Settings dialog .
-
Page 921: Scanner Driver Error Messages
Scanner Driver Error Messages Error Message Solution Error in scanner. See the manual for solutions. • Make sure that your scanner or printer and the computer are con- nected correctly. • Your scanner or printer may be damaged. Restart the computer, then recon- nect your scanner or printer. -
Page 922: Faxing Problems
Faxing Problems Problems Sending Faxes Problems Receiving Faxes Cannot Send a Fax Clearly Telephone Problems... -
Page 923: Problems Sending Faxes
Problems Sending Faxes Cannot Send a Fax Cannot Perform Sequential Broadcasting by Redialing, or Cannot Dial by Entering Numbers Errors Often Occur When You Send a Fax... -
Page 924: Cannot Send A Fax
Cannot Send a Fax Is power turned on? Check1 • You cannot send faxes if the power is turned off. Press the ON button to turn the power on. • If you unplugged the power cord without turning off the power (the POWER lamp is lit), reconnecting it turns on the power automatically. - Page 925 FAX settings Is Dial tone detect set to ON? Check6 Resend the fax after a while. If you still cannot send the fax, select OFF for Dial tone detect in Advanced FAX settings under FAX settings. FAX settings Is fax number registered correctly in printer's directory? Check7 Check the recipient's fax/telephone number, correct the fax/telephone number registered in the printer's directory, and then send the document again.
-
Page 926: Cannot Perform Sequential Broadcasting By Redialing, Or Cannot Dial By Entering Numbers
Cannot Perform Sequential Broadcasting by Redialing, or Cannot Dial by Entering Numbers Have you already selected recipient from redial history, or already dialed a Check number by entering the fax/telephone numbers? You can dial one recipient by selecting from the redial history or by entering the fax/telephone numbers as the recipient of sequential broadcasting. -
Page 927: Errors Often Occur When You Send A Fax
Errors Often Occur When You Send a Fax Check telephone line condition or connection. Check If the telephone line or connection is poor, reducing the transmission start speed may correct the error. Reduce the transmission start speed on TX start speed in Adv. communication settings in Advanced FAX settings under FAX settings. -
Page 928: Problems Receiving Faxes
Problems Receiving Faxes Cannot Receive a Fax, Cannot Print a Fax Printer Does Not Switch Automatically between Voice and Fax Calls Quality of Received Fax is Poor Cannot Receive a Color Fax Errors Often Occur When You Receive a Fax... -
Page 929: Cannot Receive A Fax, Cannot Print A Fax
Cannot Receive a Fax, Cannot Print a Fax Is the power turned on? Check1 • You cannot receive faxes if the power is turned off. Press the ON button to turn the power on. • If you unplugged the power cord without turning off the power (the POWER lamp is lit), reconnecting it turns on the power automatically. - Page 930 Connecting Telephone Line Is a different size of paper from that specified by Page size in FAX paper Check5 settings loaded? If a different size of paper from that specified by Page size is loaded for printing faxes, the received faxes will not be printed and will be stored in the printer's memory (Memory Reception).
- Page 931 If you select Reject for any setting items in Caller rejection in Security control under FAX settings, the printer rejects calls for setting item selected Reject. For details on how to set, see Using Caller ID Service to Reject Calls.
-
Page 932: Printer Does Not Switch Automatically Between Voice And Fax Calls
Printer Does Not Switch Automatically between Voice and Fax Calls Is receive mode set to FAX only mode? Check If FAX only mode is selected for Receive mode settings, there will be no automatic switching between voice and fax calls. Set the receive mode to TEL priority mode, DRPD*1, or Network switch*2. -
Page 933: Quality Of Received Fax Is Poor
Quality of Received Fax is Poor Check scan settings of sender's fax device. Check1 Ask the sender to adjust the scan settings of the fax device. Is ECM RX set to OFF? Check2 Select ON for ECM RX in Adv. communication settings in Advanced FAX settings under FAX settings. If ECM RX is enabled, the sender's fax device resends the fax after correcting errors automatically. -
Page 934: Cannot Receive A Color Fax
Cannot Receive a Color Fax Is ECM RX set to OFF? Check If OFF is select for ECM RX in Adv. communication settings in Advanced FAX settings under FAX settings, the printer cannot receive color faxes. The printer will disconnect the telephone line or receive color faxes in black &... -
Page 935: Errors Often Occur When You Receive A Fax
Errors Often Occur When You Receive a Fax Check telephone line condition or connection. Check1 If the telephone line or connection is poor, reducing the reception start speed may correct the error. Reduce the reception start speed on RX start speed in Adv. communication settings in Advanced FAX settings under FAX settings. -
Page 936: Cannot Send A Fax Clearly
Cannot Send a Fax Clearly Is document loaded correctly? Check1 Remove the document, and then reload it on the platen glass or in the ADF. Loading Originals Is platen glass and/or inner side of document cover and/or glass of ADF dirty? Check2 Clean the platen glass and/or the inner side of the document cover and/or the glass of ADF, and then reload the document. -
Page 937: Telephone Problems
Telephone Problems Cannot Dial Telephone Disconnects During a Call... -
Page 938: Cannot Dial
Cannot Dial Is telephone line cable connected correctly? Check1 Check that the telephone line cable is connected correctly. Connecting Telephone Line Is telephone line type of printer or external device set correctly? Check2 Check the telephone line type setting and change it as necessary. Setting Telephone Line Type... -
Page 939: Telephone Disconnects During A Call
Telephone Disconnects During a Call Is telephone line cable or telephone (or a peripheral device such as an external Check telephone, an answering machine, or a computer modem) connected correctly? Check that the telephone line cable and the telephone (or a peripheral device such as an external telephone, an answering machine, or a computer modem) are connected correctly. -
Page 940: Mechanical Problems
Mechanical Problems Power Does Not Come On USB Connection Problems Cannot Communicate with Machine via USB LCD Is Off LCD Shows Wrong Language Print Head Holder Does Not Move to Replacement Position Printer Status Monitor Not Displayed (Windows) -
Page 941: Power Does Not Come On
Make sure power plug is securely connected to printer, and then turn it back on. Check2 Unplug printer, leave it for at least 2 minutes, and then plug it back in and turn it Check3 on again. If this does not solve the problem, contact your nearest Canon service center to request a repair. -
Page 942: Usb Connection Problems
USB Connection Problems Printing or Scanning Is Slow/Hi-Speed USB Connection Does Not Work/"This device can perform faster" Message Appears (Windows) If your system environment does not support Hi-Speed USB, the printer operates at the slower speed of USB 1.1. In this case, the printer works properly but printing or scanning speed may slow down due to the communication speed. -
Page 943: Cannot Communicate With Machine Via Usb
Cannot Communicate with Machine via USB Make sure printer is turned on. Check1 Connect USB cable properly. Check2 As the illustration below, the USB port is at the back of the printer. Do not start IJ Network Tool while printing. (Mac OS) Check3 Do not print while IJ Network Tool is running. -
Page 944: Lcd Is Off
LCD Is Off • If POWER lamp is off: The printer is not on. Check that the power cord is connected and press the ON button. • If POWER lamp is lit: The LCD may be in screen-saver mode. Press any button on the operation panel. -
Page 945: Lcd Shows Wrong Language
LCD Shows Wrong Language Follow the instructions below to select your language. 1. Press HOME button and wait for about 5 seconds. 2. Select Setup on HOME screen. LCD and Operation Panel 3. Select Device settings and press OK button. 4. -
Page 946: Print Head Holder Does Not Move To Replacement Position
Print Head Holder Does Not Move to Replacement Position Important • The print head holder moves to the position for replacing only when an ink tank runs out of ink. If no ink tanks run out of ink, the print head holder does not move even though you open the front cover. Is POWER lamp off? Check1 Check if the POWER lamp is lit. -
Page 947: Printer Status Monitor Not Displayed (Windows)
Printer Status Monitor Not Displayed (Windows) Is printer status monitor enabled? Check1 Make sure Enable Status Monitor is selected on the Option menu of the printer status monitor. 1. Open printer driver setup window. How to Open the Printer Driver Setup Window 2. -
Page 948: Installation And Download Problems
Installation and Download Problems Cannot Install MP Drivers Easy-WebPrint EX Does Not Start or Easy-WebPrint EX Menu Does Not Appear (Windows) Updating MP Drivers in Network Environment (Windows) -
Page 949: Cannot Install Mp Drivers
2. Double-click CD-ROM icon in the window that appears. If the contents of the CD-ROM appear, double-click MSETUP4.EXE. If you cannot install the MP Drivers with the Setup CD-ROM, install them from the Canon website. Note • If the CD-ROM icon does not appear, try the following: •... -
Page 950: For Mac Os
MP Drivers. Deleting the Unnecessary MP Drivers Reinstall the MP Drivers with the Setup CD-ROM or install them from the Canon website. Note • If the installer was stopped due to a Windows error, Windows operation may be unstable, and you may not be able to install the drivers. -
Page 951: Easy-Webprint Ex Does Not Start Or Easy-Webprint Ex Menu Does Not Appear (Windows)
Is Canon Easy-WebPrint EX displayed on Toolbars menu in Internet Check1 Explorer's View menu? If Canon Easy-WebPrint EX is not displayed, Easy-WebPrint EX is not installed on your computer. Install the latest version of Easy-WebPrint EX from the Canon website. Note •... -
Page 952: Updating Mp Drivers In Network Environment (Windows)
Updating MP Drivers in Network Environment (Windows) Download the latest MP Drivers. The latest MP Drivers for your model are available for download on the Canon website. Uninstall the existing MP Drivers and follow the installation instructions to install the latest MP Drivers that you downloaded. -
Page 953: Errors And Messages
Errors and Messages An Error Occurs A Message for Faxing Is Displayed on Fax Standby Screen Message Appears... -
Page 954: An Error Occurs
An Error Occurs If an error occurs in printing, for example if the paper runs out or jams, a troubleshooting message appears automatically. Take the appropriate action described in the message. If an error occurs, a support code (error number) appears on the computer screen or the LCD. When a Support Code and a Message Are Displayed on Computer Screen: •... - Page 955 For more on resolving errors with support codes, see List of Support Code for Error. Note • You can also search for details on resolving the errors indicated by the support code shown. Search To resolve errors that do not have support codes, see An Error Occurs.
-
Page 956: A Message For Faxing Is Displayed On Fax Standby Screen
A Message for Faxing Is Displayed on Fax Standby Screen If a message is displayed on the Fax standby screen, take the corresponding action described below. Message Action Auto re- The printer is waiting to redial the recipient's number because the line was busy or the recipient did not dial answer when you tried to send a document. - Page 957 Set Print when out of ink in Auto print settings under FAX settings to Print. However, part or all of the fax may not be printed since the ink has run out. Also, the contents of the fax will not be stored in the printer's memory. If the ink has already run out, we recommend that Do not print be selected for Received docu- ments in Auto print settings under FAX settings to store the received fax in the printer's mem- ory.
- Page 958 Memory The printer's memory is full because it has sent/received too many documents, or a detailed document. is full. Print the faxes stored in the printer's memory or save them on the USB flash drive, and delete them from the printer's memory. Document Stored in Printer's Memory When sending a fax, resend it.
-
Page 959: Message Appears
Message Appears This section describes some of the errors and messages that may appear. Note • A support code (error number) is displayed on the computer or on the LCD for some errors. For details on errors that have support code, see List of Support Code for Error. -
Page 960: Turning Power Off
• "?" is displayed on the preview screen. ◦ Data edited or processed on a computer must be printed from the computer. • The specified PDF file contains unprintable data. Some portions may not be printed. PDF file which contain lot of graphics or hi-resolution images may lose that data or stop before printing is completed. - Page 961 • In Windows Vista, select Start menu > Control Panel > Hardware and Sound > Printers. 3. Open printer driver properties. • In Windows 10, Windows 8.1, Windows 8, or Windows 7, right-click "Canon XXX series Printer" icon (where "XXX" is your printer's name), and then select Printer properties.
- Page 962 Printer, Canon My Printer, and then select Diagnose and Repair Printer. Follow the on-screen instructions to set the correct printer port, and then select your printer's name. If the problem is not resolved, reinstall the MP Drivers from the Setup CD-ROM or the Canon website.
- Page 963 • "Printer driver could not be found" Uninstall the MP Drivers following the procedure described in Deleting the Unnecessary MP Drivers and reinstall them from the Setup CD-ROM or the Canon website. • "Could not print Application name - File name"...
- Page 964 • If you agree to participate in survey program: Click Agree and follow the on-screen instructions. The printer usage information is sent via the Internet. Once you have completed the procedure, the information is subsequently sent automatically and the confirmation screen does not reappear. Note •...
- Page 965 If you are logged in on an account with administrator privileges, follow the on-screen instructions. 2. Select Canon Inkjet Printer/Scanner/Fax Extended Survey Program. 3. Select Change. If you select Yes after you have followed the on-screen instructions, the confirmation screen will appear at the time of the next survey.
- Page 966 • If you agree to participate in survey program: Click Agree and follow the on-screen instructions. The printer usage information is sent via the Internet. Once you have completed the procedure, the information is subsequently sent automatically and the confirmation screen does not reappear. Note •...
- Page 967 2. Select Applications from Go menu of Finder, double-click Canon Utilities folder and Inkjet Extended Survey Program folder. 3. Move Canon Inkjet Printer/Scanner/Fax Extended Survey Program.app file to Trash. 4. Restart computer. Empty Trash and restart your computer. • Changing setting: To display the confirmation screen every time the printer usage information is sent or to resume surveying, follow the procedure below.
-
Page 968: If You Cannot Solve A Problem
If You Cannot Solve a Problem If there is a problem that you cannot solve following the instructions in this chapter, contact Canon through the Support page of the Canon website or contact your nearest Canon service center. Canon support staff are trained to be able to provide technical support to satisfy customers. -
Page 969: List Of Support Code For Error
List of Support Code for Error Support code appears on the LCD and your computer screen when errors occur. A "support code" is an error number, and appears along with an error message. When an error occurs, check the support code displayed on the LCD and computer screen and take the appropriate action in response. - Page 970 • 6000 to 6ZZZ 6000 6500 6502 6800 6801 6900 6901 6902 6910 6911 6930 6931 6932 6933 6936 6937 6938 6939 693A 6940 6941 6942 6943 6944 6945 6946 • 7000 to 7ZZZ 7100 7200 7201 7203 7204 7205 •...
- Page 971 List of Support Code for Error (Paper Jams) If paper jams, remove it following the appropriate procedure as shown below. • If the paper is jammed inside the front cover: 1300 • If the paper is jammed inside the rear cover: 1303 •...
- Page 972 1300 Cause Paper is jammed inside front cover. What to Do If the paper is jammed inside the front cover, remove the paper by following these steps. Important • The printer cannot be turned off while it is sending or receiving a fax, or when the received fax or the unsent fax are stored in the printer's memory.
- Page 973 3. Hold jammed paper firmly in both hands. If the paper is rolled up, pull out it. 4. Pull paper out slowly, so as not to tear it. 5. Make sure all jammed paper is removed.
- Page 974 If the paper tears when you pull out it, a bit of paper may remain in the printer. Check the following and remove any remaining paper. • Any paper left under the print head holder? • Any small bits of paper left in the printer? •...
- Page 975 • We recommend using paper sizes other than A5/A6 to print documents with photos or graphics. A5/A6 paper may curl and jam as it leaves the printer. If the measures above do not solve the problem, contact your nearest Canon service center to request a repair.
- Page 976 1303 Cause Paper is jammed inside rear cover. What to Do If the paper is jammed inside the rear cover, follow these steps to remove the paper. Important • The printer cannot be turned off while it is sending or receiving a fax, or when the received fax or the unsent fax are stored in the printer's memory.
- Page 977 4. Pull out paper slowly. Note • Do not touch the inner parts of the printer. • If you cannot pull the paper out, try the following. • Turn the printer off and turn it back on. The paper may be ejected automatically. •...
- Page 978 • We recommend using paper sizes other than A5/A6 to print documents with photos or graphics. A5/A6 paper may curl and jam as it leaves the printer. If the measures above do not solve the problem, contact your nearest Canon service center to request a repair.
- Page 979 1313 Cause Paper is jammed inside rear cover as printer pulled in printed paper. What to Do If the paper is jammed inside the rear cover as the printer pulled in the printed paper, remove the paper by following these steps. Important •...
- Page 980 3. Open rear cover. Slide the rear cover to the left then open it. 4. Pull out paper slowly. Note • Do not touch the inner parts of the printer. • If you cannot pull the paper out, try the following. •...
- Page 981 • When reloading the paper, make sure you are using suitable paper and loading it correctly. Align the paper guides with the both edges of the paper when you load paper. If the measures above do not solve the problem, contact your nearest Canon service center to request a repair.
- Page 982 1314 Cause Paper is jammed inside rear cover during automatic duplex printing. What to Do If the paper is jammed inside the rear cover when performing automatic duplex printing, remove the paper by following these steps. Important • The printer cannot be turned off while it is sending or receiving a fax, or when the received fax or the unsent fax are stored in the printer's memory.
- Page 983 4. Pull out paper slowly. Note • Do not touch the inner parts of the printer. • If you cannot pull the paper out, try the following. • Turn the printer off and turn it back on. The paper may be ejected automatically. •...
- Page 984 • When reloading the paper, make sure you are using suitable paper and loading it correctly. Align the paper guides with the both edges of the paper when you load paper. If the measures above do not solve the problem, contact your nearest Canon service center to request a repair.
- Page 985 2801 Cause Document is jammed in ADF. What to Do Remove the document following the procedure below. Important • The printer cannot be turned off while it is sending or receiving a fax, or when the received fax or the unsent fax are stored in the printer's memory.
- Page 986 When rescanning the document after clearing the error, rescan it from the first page. If you cannot remove the document or the document tears inside the printer, or if the document jam error continues after removing the document, contact your nearest Canon service center to request a repair.
-
Page 987: Other Cases
Other Cases Check the following: Is anything blocking paper output slot? Check1 Is rear cover attached properly? Check2 Is paper curled? Check3 Correct curl before loading paper. - Page 988 1003 Cause Possible causes include the following. • There is no paper in the cassette. • Paper is not loaded in the cassette properly. What to Do Take the corresponding actions below. • Load paper in the cassette. • Align the paper guides with the both edges of the paper when you load paper in the cassette. After carrying out the above measures, press the OK button.
- Page 989 1200 Cause Front cover is open. What to Do Close the front cover and wait for a while. Do not close it while you are replacing an ink tank.
- Page 990 1309 Cause Paper size that is not compatible with automatic duplex printing is specified. What to Do The sizes of media suitable for auto duplex printing are A4 and Letter. Press the printer's Stop button to cancel printing. Then change the print settings and retry printing.
- Page 991 1310 Cause Size of paper may not be compatible with automatic duplex printing. What to Do The sizes of media suitable for auto duplex printing are A4 and Letter. Make sure paper of the correct size is loaded. Press the OK button to eject the paper and restart printing from the front of the next piece of paper.
- Page 992 1319 Cause Size of paper is not compatible with automatic duplex printing. What to Do The sizes of media suitable for auto duplex printing are A4 and Letter. Press the printer's Stop button to cancel printing. Then change the print settings and retry printing.
- Page 993 If an ink tank becomes empty, replace it. An ink tank cannot be replaced until it becomes empty. Please be advised that Canon shall not be liable for any malfunction or trouble caused by continuation of printing under the ink out condition.
- Page 994 1600 Cause Ink may have run out. What to Do Replacing the ink tank is recommended. If printing is in progress and you want to continue printing, press the machine's OK button with the ink tank installed. Then printing can continue. Replacing the ink tank is recommended after the printing. The machine may be damaged if printing is continued under the ink out condition.
- Page 995 1660 Cause An ink tank is not installed. What to Do Install the ink tank.
- Page 996 Press and hold the machine's Stop button for at least 5 seconds, and then release it. With this operation, disabling the function for detecting the remaining ink level is memorized. Please be advised that Canon shall not be liable for any malfunction or trouble caused by continuation of printing under the ink out condition.
- Page 997 1700 Cause Ink absorber is almost full. What to Do Press the printer's OK button to continue printing. Contact your nearest Canon service center to request a repair.
- Page 998 1701 Cause Ink absorber is almost full. What to Do Press the printer's OK button to continue printing. Contact your nearest Canon service center to request a repair.
- Page 999 Then push the ink tank. After installing the ink tank properly, close the front cover. If this does not solve the problem, contact your nearest Canon service center to request a repair. Important • The ink tank that was once installed cannot be removed until the ink runs out.
- Page 1000 1755 Cause The ink has run out. What to Do To maintain both machine and print quality, the machine cannot continue printing under the ink out condition. Cancel printing and replace the ink tank before printing again. Important • Do not remove an ink tank until a new one is prepared to be installed. •...