
Related Manuals for Yamaha DVR-S60


Summary of Contents for Yamaha DVR-S60
- Page 1 DVD HOME THEATER SOUND SYSTEM DVX-S60 FM MODE STANDBY/ON VOLUME TUNING PRESET MEMORY PHONES SURROUND BASS MUSIC INPUT DVX-S60: DVR-S60 + NX-S60S + NX-S60C + SW-S60 OWNER’S MANUAL...
-
Page 2: Important Safety Instructions
IMPORTANT SAFETY INSTRUCTIONS Power Sources – This product should be operated only from the type of CAUTION power source indicated on the marking label. If you are not sure of the type of power supply to your home, consult your product dealer or local RISK OF ELECTRIC SHOCK power company. - Page 3 FCC requirements. Modifications the unit “OFF” and “ON”, please try to eliminate the problem by not expressly approved by Yamaha may void your authority, granted using one of the following measures: by the FCC, to use the product.
-
Page 4: Checking The Accessories
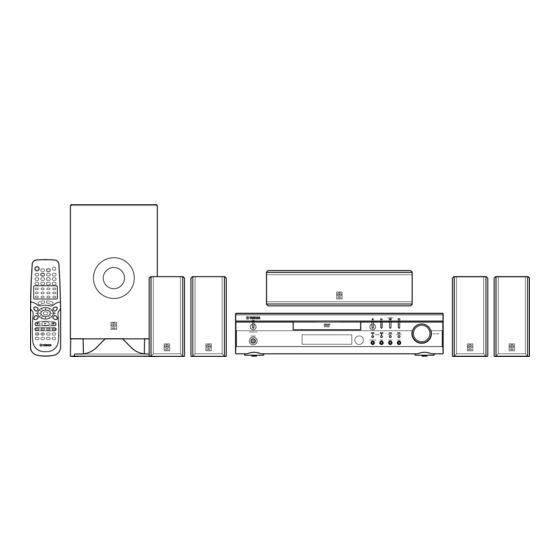
CHECKING THE ACCESSORIES G Check your package to make sure it contains the following items. DVR-S60 NX-SW60 (NX-S60S x 4, NX-S60C, SW-S60) G Speaker cables G Remote control [15m] [5m] G Mounting brackets (for NX-S60S) G Batteries (size AA, UM/SUM-3, R6, HP-7) -
Page 5: Caution
IMPORTANT to dripping or splashing, and never put any objects filled with Please record the serial number of DVR-S60 in the space below. liquids, such as vases, on the top of the system. Do not expose this system to sudden temperature changes from... -
Page 6: Table Of Contents
CONTENTS IMPORTANT SAFETY INSTRUCTIONS ....... VARIOUS DISC PLAYING FUNCTIONS ..... 18 Selecting a DVD menu [DVD] ........... 18 CHECKING THE ACCESSORIES ....... Selecting a title menu [DVD] ..........18 CAUTION ............... Return button (RETURN) [Video CD] ....... 18 CONTROLS ..............Chapter (Track) skip ............ -
Page 7: Controls
CONTROLS Front panel 4 5 6 7 FM MODE STANDBY/ON VOLUME TUNING PRESET MEMORY PHONES SURROUND BASS MUSIC INPUT 1. STANDBY/ON button, Standby indicator 10. c/MEMORY button 2. Disc tray 11. INPUT button 3. f/TUNING – button, e/TUNING + button 12. -
Page 8: Remote Control
REMOTE CONTROL Note: In this instruction manual, any operation of pressing a button while pressing the SHIFT button is described as follows. Example: “Press SHIFT + 2 ANGLE buttons.” Controls POWER POWER SET UP SET UP SHIFT SHIFT ANGLE REPLAY ZOOM ANGLE REPLAY... -
Page 9: Installing Batteries In The Remote Control
Installing batteries in the remote control Using the remote control Insert the batteries in the correct direction by aligning the + and – marks on the batteries with the polarity markings (+ and –) inside the battery compartment. FM MODE Press the tab. -
Page 10: Speaker Placement
SPEAKER PLACEMENT Before making connections, place all speakers in their respective positions. The positioning of the speakers is important because it controls the whole sound quality of this system. Place the speakers depending on your listening position by following the instructions below. Note: - In this speaker package, the same speakers (NX-S60S) are used for the front and surround speakers. -
Page 11: Mounting The Front And Surround Speakers
Screw Using the Yamaha Speaker Stand SPS-80 (option) 2. Mount the speaker on the speaker stand by using the screw holes on By using the Yamaha Speaker Stand SPS-80, speakers can be placed on the bracket. the floor. Note: The mounting bracket is provided for each speaker. -
Page 12: Basic Connections
Front right speaker Front left speaker Black Black Center speaker Black White Green FRONT R CENTER White Green DVR-S60 (U.S.A. model) VIDEO 1 VIDEO 2 COMPONENT MONITOR OUT VIDEO OUT SELECT VIDEO OUT S-VIDEO VIDEO (DVD ONLY) (DVD ONLY) VIDEO... -
Page 13: Antenna Connections
Connecting to a TV with the video pin cable Connect the included or commercially available video pin cable between the MONITOR OUT VIDEO jack of the unit and the video input jack of the TV. Video pin cable DVR-S60 (U.S.A. model) TUNER VIDEO 1... -
Page 14: Additional Connection Examples
ADDITIONAL CONNECTION EXAMPLES For connections, use the included or commercially available connection cables suitable for respective connections. DVR-S60 (U.S.A. model) Connecting to a TV with an S video cable MONITOR OUT VIDEO OUT SELECT S-VIDEO VIDEO (DVD ONLY) (DVD ONLY) Please follow the steps below before turning on the power. -
Page 15: Progressive-Scan Tv Connections
Progressive-scan TV connections (for U.S.A., Canada and Korean models only) Your TV must be capable of handling progressive scanning and have component video input capability. Component video cable Green DVR-S60 (U.S.A. model) TUNER VIDEO 1 VIDEO 2 COMPONENT MONITOR OUT... -
Page 16: Basic Operation
BASIC OPERATION ADJUSTING THE CLOCK (Using the remote control) Turning the power on and off Example: To set “PM 6:30” Press the STANDBY/ON button. The STANDBY indicator goes out. (After 1. Press the STANDBY/ON button to turn the power on. connecting the power cable, when you press the STANDBY/ON button for 2. -
Page 17: Selecting The Surround Mode
SURR OFF: Normal stereo sound SELECTING THE SURROUND MODE Using only the Front left, Front right and Subwoofer speakers (Fig. C) Front Front Center left right speaker Press the SURROUND button to select the surround mode. Each time the speaker speaker button is pressed, the surround mode changes as follows: Subwoofer... -
Page 18: Playable Discs
PLAYABLE DISCS The following types of discs can be played on this unit. Recorded Disc type and logo mark Disc size Maximum playing time content Approx. 4 hours (Single sided disc) 12 cm Audio Approx. 8 hours (Double sided disc) DVD Video Video Approx. -
Page 19: Disc Play
If a menu appears on the TV screen... DISC PLAY Press the 4, a, 5 or b button (or the number buttons), then press the ENTER button to select ENTER the desired menu. Playback of the selected menu Important note: will start. -
Page 20: Settings On The Set Up Menu
SETTINGS ON THE SET UP MENU Once the following settings have been completed, the unit can always be operated under the same conditions. The settings will be retained in the memory until they are changed, even if the power is turned off. Common procedures of settings 1. -
Page 21: Speaker
These are originally set suitable for the supplied speakers. However, you can also change the settings as you prefer. Make the settings as follows: Speaker D-RANGE CONTROL (Dynamic range control): It limits a big sound. Select “ON” or “OFF”. D-RANGE CONTROL: OFF, ON FRONT SPEAKER: SMALL, LARGE... -
Page 22: Various Disc Playing Functions
Chapter search [DVD] VARIOUS DISC PLAYING FUNCTIONS 1. Press the SEARCH MODE buttons twice during play. “CHAPTER SEARCH...” screen appears. 2. Press the number button(s) to enter the chapter number. Play starts “ ” may appear on the TV screen during operation. This icon means from the selected chapter. -
Page 23: Picture Zoom [Dvd] [Video Cd]
Picture zoom [DVD] [Video CD] Programmed play [Video CD] [CD] 1. Press the SHIFT + 4 ZOOM buttons during play. The central part of the Up to 32 selections can be programmed. picture is magnified. Programming procedure 1. Press the PROGRAM button in the stop mode. “PROGRAM” screen appears. -
Page 24: Selecting Subtitle Language [Dvd]
Selecting subtitle language [DVD] Example for DVD: 1. Press the ON SCREEN button. This operation works only with discs on which multiple subtitle languages are recorded. Current title’s elapsed playing time 1. Press the SUBTITLE button during play. “SUBTITLE CHANGE” screen appears. -
Page 25: Mp3 Cd Operation
MP3 CD Play MP3 CD OPERATION 1. Load an MP3 CD. A table of contents in the root directory appears on the TV screen. This player can play back CD-R/RWs that have recorded music data or Example: (the root directory) MP3 files. -
Page 26: Language Code List
LANGUAGE CODE LIST Enter the appropriate code number for the settings “AUDIO”, “SUBTITLE” and “DVD MENU” on the SET UP MENU. Abbreviation of Abbreviation of Abbreviation of Code Language Code Language Code Language the language the language the language 6565 Afar 7369 Interlingue... -
Page 27: Listening To Video Sources
Listening to preset stations LISTENING TO VIDEO SOURCES 1. Press the INPUT or TUNER button to select FM or AM. 2. Press the PRESET button briefly to select the desired channel. The number buttons on the remote control can also be used. 1. -
Page 28: Timer Operation
Using the sleep timer TIMER OPERATION (Using the remote control) The sleep timer automatically switches off the power after a preset time has elapsed. The volume will gradually be reduced (faded-out) from 1- minute before the unit turns off. There are 9 time periods available: 90, 80, Using the timer 70, 60, 50, 40, 30, 20, and 10 minutes. -
Page 29: Troubleshooting Guide
TROUBLESHOOTING GUIDE If you have followed the instructions and are having difficulty in operating the unit, locate the SYMPTOM in the left column below. Check the corresponding POSSIBLE CAUSE and CORRECTIVE ACTION columns to locate and remedy the problem. SYMPTOM POSSIBLE CAUSE CORRECTIVE ACTION No picture. -
Page 30: Specifications
DVR-S60 ..................... 1.8 W EURO AV • Dimensions (W x H x D) [U.K. and Europe models] DVR-S60 ................435 x 90 x 381 mm AUDIO ....................Analog (17-1/8” x 3-9/16” x 15”) VIDEO ............RGB (DVD only) & Composite SW-S60 ................ - Page 31 YAMAHA ELECTRONICS (UK) LTD. YAMAHA HOUSE, 200 RICKMANSWORTH ROAD WATFORD, HERTS WD1 7JS, ENGLAND YAMAHA SCANDINAVIA A.B. J A WETTERGRENS GATA 1, BOX 30053, 400 43 VASTRA FRÖLUNDA, SWEDEN YAMAHA MUSIC AUSTRALIA PTY, LTD. 17-33 MARKET ST., SOUTH MELBOURNE, 3205 VIC., AUSTRALIA...
Need help?
Do you have a question about the DVR-S60 and is the answer not in the manual?
Questions and answers