
Related Manuals for SUNFLOWER SR81


Summary of Contents for SUNFLOWER SR81
- Page 1 Operation Instruction SR81 Intelligent Controller for Split Pressurized Solar Hot Water System Please read this instruction carefully!
-
Page 2: Table Of Contents
Instruction of SR81 Split Pressurized Solar Hot Water System Contents 1.Safety information ......................3 1.1 Installation and commissioning ..................3 1.2 About this manual ......................3 1.3 Liability waiver ......................... 3 1.4 Important information....................... 4 1.5 Signal description ......................4 1.6 Button and HMI description ..................... - Page 3 Instruction of SR81 Split Pressurized Solar Hot Water System 8.6 MAN Manual operation ....................36 8.7 BLPR Blocking protection ....................37 8.8 OTDI Thermal Sterilization Function ................38 8.9 FS Flow rate monitoring and pump dry-running protection ..........39 8.10 UNIT C-F Switch ......................41 8.11 RET Reset ........................
-
Page 4: Safety Information
Instruction of SR81 Split Pressurized Solar Hot Water System 1. Safety information 1.1 Installation and commissioning When laying wires, please ensure that no damage occurs to any of the constructional fire safety measures presented in the building. The controller must not be installed in rooms where easily inflammable gas mixtures are present or may occur. -
Page 5: Important Information
Instruction of SR81 Split Pressurized Solar Hot Water System data or installation and operation instructions without prior notice. As soon as it becomes evident that safe operation is no longer possible (e.g. visible damage). Please immediate take the device out of operation. Note: ensure that the device can’t be accidentally placed into operation. -
Page 6: Overview
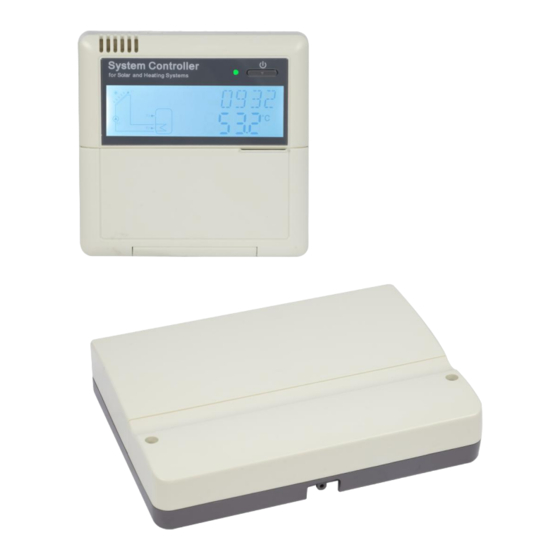
Instruction of SR81 Split Pressurized Solar Hot Water System Button Power indication lamp “On/Off” “Clock” “Holiday” “Manual Heating” “Manual Circuit” “Eco Mode” “Exit” “Adjust” Upwards adjust “+” Downwards adjust “-” LCD Display screen Status Description Code Lighting Blinking Exceed the maximum temperature... -
Page 7: Delivery List
Instruction of SR81 Split Pressurized Solar Hot Water System Protection type: IP40 1500W or 3000W/4000W of electrical heater should be remarked in the purchased order Dimension of display: 120*120*18mm Dimension of controller board with 1500W output: 200*140*43mm ... -
Page 8: Mounting The Board Of Controller
Instruction of SR81 Split Pressurized Solar Hot Water System 3.2 Mounting the board of controller Follow the below steps to mount the controller on the wall. ► Select the proper place to install main board of controller ► Put the hung housing plate on the wall and mark the upper fastening point. -
Page 9: Terminal Connection
Instruction of SR81 Split Pressurized Solar Hot Water System 3.5 Terminal connection Note: before opening the housing! Always disconnect the controller from power supply and obey the local electrical supply regulation. 3.5.1 Terminal allocation of controller for electrical heater of 1500W ... -
Page 10: Terminal Allocation Of Controller For Electrical Heater Of 3000W/4000W
Instruction of SR81 Split Pressurized Solar Hot Water System 1500W Output ports Input Ports L, N: for power connection, L: live wire, N: zero wire, protective wire, with 10A power plug. Output R1: Electromagnetic relays, Max. Current: 2A ... -
Page 11: System Description (Standard Solar System With 1 Tank, 1 Collector Field)
Instruction of SR81 Split Pressurized Solar Hot Water System @110VAC, for 2000W electrical heater) Advice regarding the installation of temperature sensors: Only original factory equipped Pt1000 temperature sensors are approved for using with the controller, it is equipped with 1.5m silicon cable and suitable for all weather... -
Page 12: Time Setup
Instruction of SR81 Split Pressurized Solar Hot Water System Sensor Relay Description Description ports outputs Collector temperature For solar circuit pump sensor PT1000 Temperature sensor on the 1. for DHW circuit function (CIRC) bottom part tank. NTC10K 2.OHDP ( Thermal energy... -
Page 13: Function's Parameters And Options
Instruction of SR81 Split Pressurized Solar Hot Water System 6. Function’s parameters and options 6.1 Overview of menu structure Digital flow Timing heating Cool Function DHW Circuit Aux. Function C-F Unit Reset Password Manual Mode Tank loading Block protect Password setup... -
Page 14: Value Checking And Function Checking
Instruction of SR81 Split Pressurized Solar Hot Water System ►Press “+/-” button to select submenu, ►Press “SET” button to enter the value adjust interface ►Press “+/-” to adjust value ►Press “SET” or “ESC” to confirm the value you set ►Press “ESC”, exit the submenu. - Page 15 Instruction of SR81 Split Pressurized Solar Hot Water System the switch-on temperature of heating is 40 C,switch-off temperature is 50 C。 The second time section: default at 10:00 to start heating, and at 10:00 to stop heating, The Third time section: default at 17:00 to start heating, and at 22:00 to stop heating, and the switch-on temperature of heating is 50 C,switch-off temperature is 55...
- Page 16 Instruction of SR81 Split Pressurized Solar Hot Water System 2. Please remark the power of electrical heater and the voltage used. Menu Structure Step Main Subm Factory Adjustable Description menu range adjust THET Timing heating function Select desired sensor of heated THTS S2.
- Page 17 Instruction of SR81 Split Pressurized Solar Hot Water System ►Press “SET” button, “S3” blinks ►Press “+/-” button to select desired sensor ►Press “SET” or “ESC” button to save the setting. ► Press “+” button to access submenu of the intelligent heating, “SMT OFF” displays on the screen ►Press “SET”...
-
Page 18: Circ Dhw Circulation Pump Controlled By Temperature And Time
Instruction of SR81 Split Pressurized Solar Hot Water System Within the preset time section, if timing heating is working, heating sign blinks on the screen. Out of the preset time section, heating sign doesn’t display on the screen. 7.2 CIRC DHW circulation pump controlled by temperature and time... - Page 19 Instruction of SR81 Split Pressurized Solar Hot Water System Temperature controlled DHW pump within the preset 3 time sections within a time section, when the DHW circulation pump is controlled by temperature, as default set, pump is triggered when return temperature T4 is below 40...
- Page 20 Instruction of SR81 Split Pressurized Solar Hot Water System Menu Structure Main Subme Subm Factory Adjustable Step per Description menu nu 1 enu 2 range adjust CIRC DHW circuit function TCYC ON/OFF Activate / deactivate the DHW circuit function TEMP...
- Page 21 Instruction of SR81 Split Pressurized Solar Hot Water System t C2O 11:00 00:00-23:59 Switch-on time for the second time section t C2F 13:00 00:00-23:59 Switch-off time for the second time section t C3O 17:00 / 00:00-23:59 / Switch-on time for the...
- Page 22 Instruction of SR81 Split Pressurized Solar Hot Water System as example) ► Press “SET”, “40 C” blinks ► Press “+/-” button to adjust the switch-on temperature (adjustable range 0 C ~ (OFF-2 ► Press “SET” or “ESC” button to save the setting.
-
Page 23: Function Operation And Parameter Setup (Engineer)
Instruction of SR81 Split Pressurized Solar Hot Water System 8. Function operation and parameter setup (engineer) 8.1 PWD Password Menu Structure Access main menu, select “PWD 0000” to enter password ► Press “SET” button, the left digital blinks, enter password, factory set is “0000”... - Page 24 Instruction of SR81 Split Pressurized Solar Hot Water System temperature difference. The set temperature difference must be at least 0.5 K higher than the switch-on temperature difference. SMX Maximum tank temperature protection set If the tank temperature reaches the adjusted maximum temperature, the tank will no longer be loaded in order to avoid damage caused by overheating.
-
Page 25: Col Collector Function
Instruction of SR81 Split Pressurized Solar Hot Water System ► Press “SET”, “6K” blinks ► Press” +/-”, to adjust the switch-on temperature of the solar circuit pump ► Press “SET” or “ESC” to save the setting ► Press “+”, “DTF 4K” displays on the screen ►... - Page 26 Instruction of SR81 Split Pressurized Solar Hot Water System OCCO Collector cooling The collector cooling function keeps the collector temperature rising within the operating range by heating the tank. If the tank temperature reaches 95° C the function will be switched off for safety reasons.
- Page 27 Instruction of SR81 Split Pressurized Solar Hot Water System Menu structure Main Subme Subme Factory Adjust Step per Description menu nu 1 nu 2 able adjust range Collector function OCEM Collector emergency shutdown function on/ff 80-200 Temperature of collector 130℃...
- Page 28 Instruction of SR81 Split Pressurized Solar Hot Water System Function setting: OCEM (Collector emergency shutdown function) setup ►Select “COL” function menu ►Press “SET”, “OCEM” displays on the screen ►Press “SET” again, “OCEM ON” displays on the screen ►Press “SET”, “ON” blinks on the screen (If it is necessary to shut down this function, press “+/-“to deactivate it)
-
Page 29: Cool Collector Function
Instruction of SR81 Split Pressurized Solar Hot Water System OCFR (Antifreeze function) setup ►Select OCFR submenu, “OCFR” displays on the screen ►Press “SET”, “OCFR OFF” displays on the screen ►Press “SET”, “OFF” blinks on the screen ►Press “+/-”, to activate this function, “OCFR ON” displays on the screen ►Press “+”, “CFRO 4... - Page 30 Instruction of SR81 Split Pressurized Solar Hot Water System coil); the purpose is to keep the collector’s or tank’s temperature within the operating range. For this function, an extra output should be added (R2 or R3 as option) Heat transferring by external radiator function can control either an additional pump or a valve (OTPM ON = pump logic, OTPM OFF = valve logic).
- Page 31 Instruction of SR81 Split Pressurized Solar Hot Water System Menu structure Main Subm Subm Facto Adjustable Step Description enu 1 range adjust Cooling function OSTC ON/OFF Tank cooling function DTCO 1-30K 0.5K Switch-on temperature difference of cooling function DTCF 0.5-29.5K 0.5K...
-
Page 32: Aux Auxiliary Function
Instruction of SR81 Split Pressurized Solar Hot Water System ►Press “SET”, “OFF” blinks on the screen ►Press “+/-”, to activate this function ►Press “+”, “DTCO 20K” displays on the screen ►Press “SET”, “20K” blinks on the screen ►Press “+/-”, to adjust the switch-on temperature difference of tank cooling function ►Press “SET”... - Page 33 Instruction of SR81 Split Pressurized Solar Hot Water System Timer function can trigger controller’s output port at the preset time; therefore, an available output (R3) is needed. AH Thermostat function The thermostat function works independently from the solar operation and can be used for using surplus energy to reduce tank temperature or for using after heating to rise tank temperature.
- Page 34 Instruction of SR81 Split Pressurized Solar Hot Water System Menu Structure Subm Facto Adjustab Step Description enu 1 le range adjust Auxiliary functions Timer function TIME ON/OFF Start time of the first time section t 1O 00:00 00:00-23: Close time of the first time section...
- Page 35 Instruction of SR81 Split Pressurized Solar Hot Water System Switch-on temperature 40℃ 0.0-95℃ 0.5℃ Switch-off temperature 45℃ 0.0-94.5 0.5℃ ℃ Start time of the first time section t A1O 00:00 00:00-23: Close time of the first time section t A1F...
- Page 36 Instruction of SR81 Split Pressurized Solar Hot Water System ►Press “SET”, minute “00” blinks ►Press “+/-” to adjust the minute of the close time of the first time section ►Press “SET” or “ESC” to save the setting ►Press “+”, access the setting of the second time section, repeat above steps to set time of second and third sections.
-
Page 37: Man Manual Operation
Instruction of SR81 Split Pressurized Solar Hot Water System ►Press “SET”, “23” blinks ► Press “+/-”, to adjust the hour of close time of the first time section ►Press “SET”, “59” blinks ► Press “+/-”, to adjust the minute of close time of the first time section ►Press “SET”... -
Page 38: Blpr Blocking Protection
Instruction of SR81 Split Pressurized Solar Hot Water System Main Subm Factory Adjustabl Description Menu e range Manual mode ON/OFF R1 on and off ON/OFF R2 on and off ON/OFF R3 on and off ON/OFF HR on and off Function setup ►Select “MAN”... -
Page 39: Otdi Thermal Sterilization Function
Instruction of SR81 Split Pressurized Solar Hot Water System ►Press “+/-”, to activate this function, “BLPR ON” displays on the screen ►Press “SET” or “ESC” to save the setting 8.8 OTDI Thermal Sterilization Function Function description: This function helps to prevent the spread of Legionella in DHW tanks by systematically activating the after-heating. -
Page 40: Fs Flow Rate Monitoring And Pump Dry-Running Protection
Instruction of SR81 Split Pressurized Solar Hot Water System Function setting ►Select OTDI main menu ►Press “SET”, “OTDI OFF” display ►Press “SET”, “OFF” blinks ►Press “+/-”, to activate this function, “OTDI ON” displays ►Press “SET” or “ESC” to save the setting ►Press “+”, “PDIS 7”... - Page 41 Instruction of SR81 Split Pressurized Solar Hot Water System button for 3 seconds to switch-off FS function, and after the fault is removed, then monitoring function is activated again. Flow monitoring function is designed to detect whether flow exists in the solar system and therefore to switch-off the corresponding pump in case of no flow, If “OFF”...
-
Page 42: Unit C-F Switch
Instruction of SR81 Split Pressurized Solar Hot Water System ►Press “SET”, “OFF” blinks ►Press “+/-”, to activate this function, “FS ON” displays ►Press “SET” or “ESC” to save the setting 8.10 UNIT C-F Switch Under this menu, below unit can be set:... -
Page 43: Pass Password Set
Instruction of SR81 Split Pressurized Solar Hot Water System ►Press “SET”, “YES” blinks ►Press “SET” for 3 seconds, beeper sounds “di” 3 times, “YES” lighting, and it indicates system is recovered to factory set. ►Press “ESC” return to the submenu ►Press “ESC”... -
Page 44: Manual Heating
Instruction of SR81 Split Pressurized Solar Hot Water System Switch-off the power to controller Hold down “ESC” button Reconnect the power supply, when beeper sounds 3 di di di, and then release “ESC” button, Controller recovers to the factory set password (factory set possword is 0000), 8.13 Manual heating... -
Page 45: Dhw Circuit Pump Triggered Manually
Instruction of SR81 Split Pressurized Solar Hot Water System indicates Eco mode is on. ►Press “ECO Mode” button again, sign closed, it indicates the ECO mode is off. 8.15 DHW circuit pump triggered manually Note: Only when function of DHW circuit pump CIRC is activated, it is just possible to trigger the output R2 manually for running the DHW circuit pump. -
Page 46: Manual Circuit Function
Instruction of SR81 Split Pressurized Solar Hot Water System 8.18 Manual circuit function ►Press “Manual Circuit” button, circuit pump R1 is triggered and runs for 1 hour. ►Press “Manual Circuit” button, to switch- off the circuit pump During the running of circuit pump R1, if you don’t press “Manual circuit” button, then R1 will run for 1 hour, then it is stopped automatically. - Page 47 Instruction of SR81 Split Pressurized Solar Hot Water System On the screen, sensor sign and warning sign blinks Sensor failure, press “ ▲/▼” button, an error code instead of temperature displays on the corresponding sensor place ---- -88.8 Wire is broken, Check wire...
-
Page 48: Quality Guarantee
Instruction of SR81 Split Pressurized Solar Hot Water System 11. Quality Guarantee Manufacturer provides following quality responsibilities to end-users: within the period of quality responsibilities, manufacturer will exclude the failure caused by production and material selection. A correct installation will not lead to failure. When a user takes incorrect handling way, incorrect installation, improper or crude handling, and wrong connection of Warm water outflow upwards, we don’t take the responsibilities caused by before mentioned...
Need help?
Do you have a question about the SR81 and is the answer not in the manual?
Questions and answers