Table of Contents
Advertisement
Quick Links
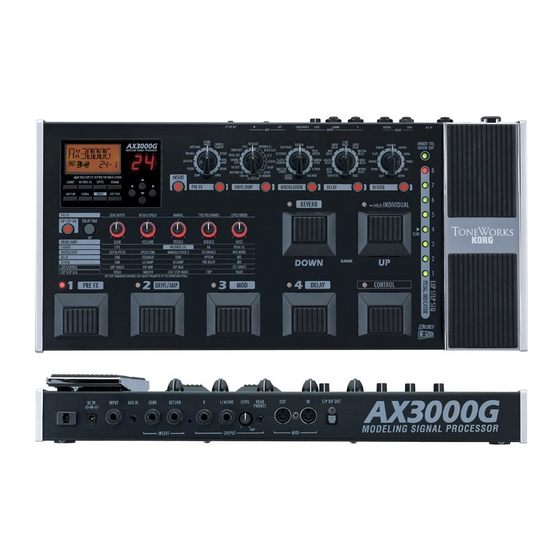
AX3000G / AX3000B
CONTENTS
Block Diagram
Circuit Diagrams
Test Mode Instruction : Page 6 - 13
Parts List
S S
e e
r r
v
i i
c c
e e
M M
v
S
e
r
v
i
c
e
M
: Page 2
: Page 3 - 5
: Page 14 - 17
an
u u
a a
l l
a
n
a
n
u
a
l
Issued date: February 3
Issued by: KORG Inc.
1st Edition
rd
, 2006
Advertisement
Table of Contents

Summary of Contents for Korg AX3000G
- Page 1 AX3000G / AX3000B CONTENTS Block Diagram : Page 2 Circuit Diagrams : Page 3 - 5 Test Mode Instruction : Page 6 - 13 Parts List : Page 14 - 17 1st Edition Issued date: February 3 , 2006 Issued by: KORG Inc.
- Page 2 X-3570_BLK.sch-1 - Thu Dec 08 14:53:38 2005...
- Page 6 AX3000G / 3000B TEST MODE instructions How to start Turn the power on by pressing following switches for each operation as follows. LCD shows AX3000G (or AX3000B) and software version number. Each checking mode starts when you release from those switches. Switches (to press) Modes Internal check →...
- Page 7 1. 2217.461047Hz (C#7) TUNER HI 6. TUNER 2. 25.9565436Hz (G#0) TUNER LO After NG occurred on INTERNAL CHECK, you can resume by pressing AMP/LINE switch and the following switch for each case; Switch How to resume INTERNAL CHECK CUR_LEFT Reexamine the NG step CUR_RIGHT Skip the NG step and proceeds to next step.
- Page 8 2. L->L , RETURN SW On DSP So1L (0.031(=1/2*16)) ---> DSP Si1L (0.338713 +-30%) INSERT(*1/2) +-----> PHONE L ¦ ¦ CODEC (AK4522) ¦ +---> PHONE R ¦ ¦ +-------+-------+ ¦ ¦ IN ---+(-->)+-- *16 -->¦ Ain L ¦ AoutL ¦----+-¦-----> OUT-L ↑...
- Page 9 INTERNAL CHECK - 6.TUNER Output sine wave from AX1L of DSP2 Internal Check 6. TUNER ( PHONE-->INPUT is needed to be connected by the testing cable. When the error occured, "TUNER HI", "TUNERLO"(LCD) will be shown. Operation Check Initial Item Initial Display(LED) Display(LCD) 1.
- Page 10 LED BANK LED SW All Lighting 1 CABINET All Lighting 2 NR/PROG LVL All Lighting 3 EXP/CTL All Lighting 4 RENAME All Lighting 5 AMP/LINE All Lighting 6 GLOBAL All Lighting 7 WRITE All Lighting 8 EXIT/TUNER All Lighting 9 CUR_LEFT All Lighting 10 CUR_UP All Lighting 11 CUR_RIGHT All Lighting 12 CUR_DOWN...
- Page 11 When hold down #AMP/LINE Switch and press WRITE, EXIT/TUNE, it is possible to move the step. Operation Check 5. VOLUME A/D "VOL KNOB"(LCD) 1. GAIN: Turn the knobs of AX3000G(or VOLUME:AX300B) to MAX(Most Right) and check that the DOT of BANK LED can be lighting. 2. Turn it to Minimum(Most Left).
- Page 12 Try the same test following the process below. 2. VOLUME:AX3000G(GAIN/MID FREQ:AX3000B) 3. TREBLE:AX3000G(BASS/DIRECT:AX3000B) 4. MIDDLE:AX3000G(MIDDLE:AX3000B) 5. BASS:AX3000G (TREBLE/TONE:AX3000B) When hold down #AMP/LINE Switch and press WRITE, EXIT/TUNE, it will be able to move the step. Operation Check 6. Pedal Calibration "PEDAL"(LCD) 1_1.
- Page 13 MIDI Check(Internal check item 7) Just before start checking, connect "MIDI IN" and "MIDI OUT". Hold down AMP/LINE Switch and WRITE Switch and turn on(?). If there is no problem, the display shows "b1"(BANK LED). Testing Cable -------------------------------------------------------------------------------- (Testing Cable 1) PHONES Jack -> INPUTJack [PHONES] (mini stereo) [INPUT](mono phone) PHONE R --(100Ω)--+...
- Page 14 PART CODE PART NAME NOTE Q'TY 500304000070 TRANSISTOR 2SA812-T1B M5-7 M6 RANK (S) KLM-2569/70 AX-3000G 500304020150 TRANSISTOR 2SC1623-T1B AL6 (S) KLM-2569/70 AX-3000G 500304050220 TRANSISTOR DTC114ESA TP (S) KLM-2568 AX-3000G 500304050240 TRANSISTOR DTA114ESA TP (LEAD) (D) KLM-2568 AX-3000G 500304050250 TRANSISTOR DTC114EUA T106 (SC-70) (S) KLM-2569/70 AX-3000G 500314001800 DIODE 1SS355 TE17 (S)
- Page 15 PART CODE PART NAME NOTE Q'TY 510374520002 TACT SWITCH SKHHDTA010 13MM (D) KLM-2568 AX-3000G 510374520008 TRIMER RH0614CN4J (33K) (D) KLM-2569/70 AX-3000G 510374522010 TACT SW TC-0408T-A00 (D) KLM-2568 AX-3000G 510402511508 EMI BEADS BLM18AG102SN1 (1608) (S) KLM-2569/70 AX-3000G 510405500013 LCD A77A009X AX-3000G 510450520502 PHONE JACK EJS-5-1035B (MINI STEREO) (D) KLM-2569/70 AX-3000G...
- Page 16 PART CODE PART NAME NOTE Q'TY 500304000070 TR 2SA812-T1B (M5-7) (TS) KLM-2569/70 AX-3000B 500304020150 TR 2SC1623-T1B (L7) (TS) KLM-2569/70 AX-3000B 500304050220 TR DTC114ESA TP (TR) KLM-2568 AX-3000B 500304050240 TR DTA114ESA TP KLM-2568 AX-3000B 500304050250 TR DTC114EUA T106 (TS) KLM-2569/70 AX-3000B 500314001800 DIODE 1SS355 TE-17 (TS) KLM-2569/70 AX-3000B...
- Page 17 PART CODE PART NAME NOTE Q'TY 510360522510 VR R0913N1RA1-B10K L=25F KLM-2568 AX-3000B 510374520002 TACT SWITCH SKHHDTA010 13MM(D) KLM-2568 AX-3000B 510374520008 TRIMER RH0614CN4J (33K) (D) KLM-2569/70 AX-3000B 510374522010 TACT SW TC-0408T-A00 (D) KLM-2568 AX-3000B 510402511508 EMI BEADS BLM18AG102SN1 KLM-2569/70 AX-3000B 510405500013 LCD A77A009X AX-3000B 510450520016 DIN JACK DIN-520BX2(D) KLM-2569/70 AX-3000B...


Need help?
Do you have a question about the AX3000G and is the answer not in the manual?
Questions and answers