Table of Contents
Advertisement
Quick Links
Advertisement
Table of Contents

Summary of Contents for Aosenma CG035
- Page 1 (Not so) Basic guide for the Aosenma CG035...
- Page 2 Any modifications or procedures based on my advice which are carried out by you are done at your own risk! I am providing this document in an attempt to help the community of CG035 owners and it is no way funded or produced in an attempt for renumeration.
- Page 3 Before use charge all batteries and use 4 fresh, good quality AA type Alkaline batteries in the controller. On the main charger for the cg035 battery there are 3 lights, they refer to each cell of the battery, the first 2 will initially be red and will change to green when the battery is fully charged.
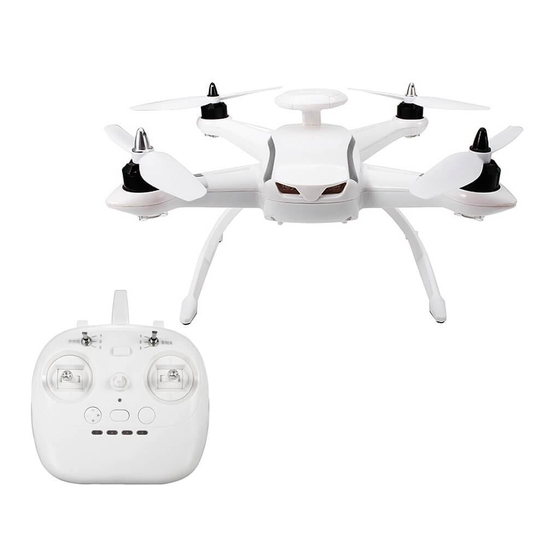
- Page 4 Controller setup: There are 4 LED’s across the bottom of the controller, these indicate (from left to right) GPS lock on the drone, GPS lock on the controller, drone out of range, and low battery warning. Once all lights are off this means the internal checks confirm ready to fly status. Changing mode 1/2 If you want to change from mode two (the default left stick throttle) to mode one (right stick throttle):...
- Page 5 The led will now be solid red. Switch controller off. As simple as that. To calibrate the drone: Switch controller and drone on. Flick SWB from position 1 to position 2 four times. The rear white LED’s on the drone will come on. On a flat level surface rotate the drone 6 times clockwise (mine seems to only need 3 rotations but the original manual says 6).
- Page 6 Flight controls: For those new to the CG035 and the world of drone flight in particular there are listed below the instructions on the use of the controller as well as details of all the buttons and switches. Mode 1 and Mode 2...
- Page 7 Ready to fly: This term will refer to the CG035 and controller being switched on with a full gps lock on both as outlined previously. Starting and stopping the motors: Note: Occasionally this can initiate a partial auto take off, (in either fully manual mode or GPS mode on mine anyway) so if the props are on make sure to only do this outdoors! To do this you can, from ready to fly, pull both sticks down and in or down and out.
- Page 8 (without a 3d/4d camera gimbal with full controls, and no you're not going to be getting that on the CG035), while the quad moves sideways.
- Page 9 SWC: The outer button (furthest right). Binding. (Aka ‘Internal fequency’) Normally only used in the factory as this involves disassembling the quadcopter to access the binding button inside the chassis on the receiver/transmitter board there. I have never personally had to do this but from reports it is accomplished by holding down the bind button inside the quadcopter then inserting the battery and then pressing the Binding button on the controller while...
- Page 10 Camera Switch: This is to the right of the auto take off button. And thats about all I can tell you about it without completely reverse engineering the whole quad. Ok? Yes. Well..Anyway your guess is as good as mine, no-one seems to know what this does and it appears to perform no discernible function.
- Page 11 The Gimbal/Camera. Ok, you have charged the battery on the camera. There is one external switch on it controlling the power, it is either on, or off. You can change the internal transmitter channel if you really want or have to by removing the 4 screws and taking the plate off the top, this gives access to the internal...
- Page 12 The gimbal is clipped onto the CG035 by a simple slide clip on it's belly. Electrically it is connected with 3 sets of wires plugged into the quad, their use outlined below. Number 3 supplies power to and controls the roll remote function of the gimbal.
- Page 13 The FPV Monitor: Simple in the extreme in operation. Screw the antenna into the available SMA socket on top before use. There is one slide switch on the right hand side to switch the power on. Up is on and down is off. The other button is on the front of the monitor, also at the right hand side, press this button once the monitor is switched on to start scanning all it's available channels to receive the the camera transmission.
- Page 14 Some other items and procedures that I would recommend: Try all the functions as soon as you can (probably during the second flight after you are familiar with the normal flight controls) to be sure they work. As i think most will agree, this little bird has more than it's fair share of issues.
- Page 15 Spare landing gear. Spare batteries. Spare motor caps/prop nuts. Spare Electronic Speed Controllers (a particularly soft point on the cg035). TF (aka micro sd) card, class 10 for HD recording. Better balance charger to more precisely and quickly charge the LiPo(s) Cellmeter and battery tester for quick testing of all batteries.
- Page 16 Trouble Shooting This section assumes you have at least a passing familiarity with electronics, though I have tried to simplify things wherever possible to open the process to as many as I can. OK. Time for some fun and games. Let’s start with something simple.
- Page 17 Test this with a cell meter as shown or a multimeter set to the 0-20 Volts DC range, (all measurements from here on out will be done using this range and setting unless otherwise stated) measured across the Deans T connector. The stock battery is a 2 cell (2s) 7.4 Volt with an alleged 3200mAh capacity, though in practice it is usually nearer 2800mAh or less.
- Page 18 If the battery and charger check out as ok then the issue is within the drone, look inside the battery bay and if you can see a damaged Deans T connector then that is probably the issue. If looking inside the battery bay you see nothing untoward then you may wish to open the chassis of the quad for further inspection.
- Page 19 Constant beeping from the controller. Low voltage indication The right most led on the controller is flashing and the quad refuses to move. In this situation the lights may flash on the quad for a time and even the start up tones may sound though it goes no further.
- Page 20 Controller has became unbound from the quadcopter An all too common problem, this is annoying as hell to fix because it is so simple yet complicated at the same time. You will know if this is an issue as the quad will accept no input from the controller at all and the red LED above the auto take off button will be flashing.
- Page 21 Motor is not turning, or is erratic Again, a few options here and several test options: Calibration needed, Faulty wiring, faulty Electronic Speed Controller, faulty motor or faulty main flight board. The flight board is the least probable cause of the problem unless all motors are affected. Thankfully.
- Page 22 You can desolder the motor from the ESC and test each phase (wire windings inside the motor) in turn to see if they have a short to the stator (the bit of the motor that the wires come out of which stays stationary when on the quad) to determine if there is a short circuit.
- Page 23 this test you can swap if out with the diagonally positioned motor and working ESC assembly to see if it will function with another set in this position. If this does not isolate the issue then this would determine that the main flight board is the problem meaning it will need replaced.
- Page 24 Camera/Gimbal/FPV Transmitter unit Ok, is this actually worth mentioning? Right…. I suppose a few words of warning…? It is a diabolical contrivance and should be sentenced to death by fire. The tiny servo’s almost universally fail after a few flights, they never stay where they are pointed, the video quality is middling at best, especially as it is claimed to be 1080p and there are charging issues where the internal battery fails or has a poor connection.
- Page 25 If there are no lights on the camera/transmitter (usually one red and one blue) this usually indicates the battery has either failed or is not charging correctly via the USB charger which should output 5.2V when plugged into a suitable power supply. If not, this needs replaced with a lipo usb charger, not just a straight through power supply from a usb cable as it needs a dedicated charger to sense the voltage in the battery in order to cut off supply to it.
- Page 26 Weak or ‘snowy’ picture at close (10meter or so) range Usually indicative of a faulty antenna, sma connector or transmitter. An internally broken antenna can be annoying as it is essentially unfixable, having to buy a new one is the only realistic solution, however a couple of basic tests can usually determine where the fault lies.
- Page 27 Insert it onto the hole being careful not contact the outer ground connection. Re test the range, and if there is a marked improvement it confirms the antenna was the issue and needs replaced. If these tests show no improvement in signal then it will be an internal issue of the monitor or camera/transmitter.
- Page 28 A note for those beginners/intermediates interested in the Controller, Monitor and CG035 antenna mods: The stock antenna is pointing straight out inside the controller which is slightly the wrong orientation during normal use for the greatest range, the antenna in the controller is quite poor, essentially just a bare piece of wire for the signal to come out of.
- Page 29 The next step up could be getting a hobby grade transmitter that you can programme for the CG035 frequencies and codes, but I personally don't know if anyone has been able to do that..yet, and a diversity receiver for FPV.
Need help?
Do you have a question about the CG035 and is the answer not in the manual?
Questions and answers