
Related Manuals for Tork DTS400B


Summary of Contents for Tork DTS400B
-
Page 1: Instruction Manual
INSTRUCTION MANUAL DTS400B DZS400BP DIGITIAL TIME SWITCH 888.500.4598 FOR TECHNICAL SUPPORT: 888.500.4598 www.nsiindustries.com 04.14 MLI-181 (C) -
Page 2: Table Of Contents
TORK MODELS DTS400B/DZS400BP 4 CHANNEL DIGITAL TIME SWITCH TABLE OF CONTENTS CAPABILITIES AND FUNCTIONS CAPABILITIES: Section Page • 365 Day Advance, Single Day Holiday and Seasonal Capabilities & Features ......1 Scheduling Installation Instructions. -
Page 3: Installation Instructions
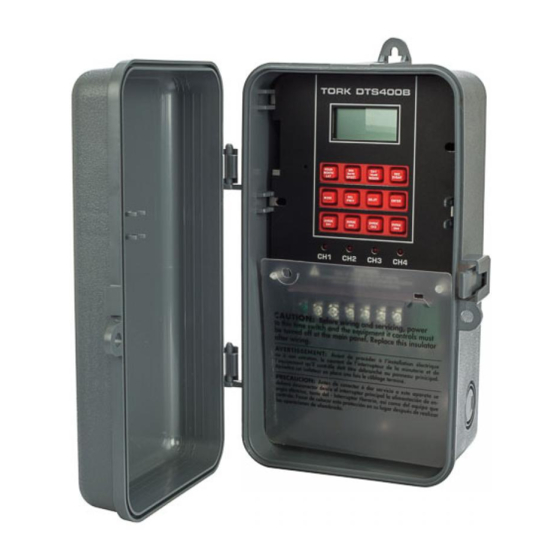
INSTALLATION INSTRUCTIONS: INSTRUCTIONS FOR SETTING THE UNIT 1. Remove unit from enclosure by pushing the inside tab Connect unit to main power source prior to entering the set- (located near the outside hasp) to the right. Swing unit tings. When powering up the unit for the first time, allow 1-2 to left and remove. minutes to charge the supercap and the display will show 2. Five combination 1/2” and 3/4” knockouts are pro- 12 HOUR. -
Page 4: To Set The Clock
1.0 TO SET CLOCK c. If daylight savings time (DST) is NOT required, press DEL Press HOUR and MIN to advance to the present and the display will show: hour and mins. Check AM/PM, and press ENTER. 1.1 TO MODIFY CLOCK Press MODE until the display shows: CLK. Press HOUR and MIN. to modify clock and press ENTER. 2.0 TO SET DATE Press ENTER then go to step 4.0. If you are setting date for the first time, display will show: 3.1 MODIFY STANDARD DAYLIGHT SAVINGS DATES NOTE: The first two digits represent the month and the sec- ond set of digits represents the week in the month. Choices for the week are 01 (1st), 02 (2nd), 03 (3rd) or L (Last) SIG1 SIG2 CL K DATE week of the month. The default day is Sunday (SU). Once the... -
Page 5: To Set Signal Durations
4.0 SEASON DURATION SET Press MONTH and DATE to set holiday 1 then press ENTER. Up to 4 different season durations can be set by entering the The display will show: START and END dates. NOTE: 1. If season durations are not set, they will not appear on the schedule or astronomic mode. 2. Each season can be set up to 364 days. 3. Any season can cross the year boundary, i.e. the current year and end the next year. To delete any holiday press DEL then press ENTER. 4. When any two or more seasons overlap, the higher NOTE: numbered season has priority. a. A total of 24 holidays can be set, all following the same schedule. Press MODE until display shows: b. For any holiday to be used, the MONTH and DATE must be preset. 6.0 TO SET SIGNAL DURATION FOR EACH CHANNEL Press MODE until the display shows: Press MONTH and DATE to set the entering period of season... -
Page 6: To Set Astronomic Schedule
7.1 SETTING HOURS AND MINUTES Display will show: a. Press HOUR and MIN to set desired time. b. Press EVENT to set desired event. 7.2 SETTING DAYS, HOLIDAY AND SEASONS Press SELCT to select the flashing desired days, holiday and/ or seasons, otherwise press DAY to skip and then press EN- NOTE: Sunset Time will be based on DATE and LATITUDE TER. To delete an entry, press DAY until previously selected entered. Press ENTER. The display will show: entry flashes, press SELCT and then press ENTER. The display will show: If an offset to sunset time is required, press HOUR and MIN. Offset can be set to 4 hours and 59 minutes max. Press Follow the same procedures above to set more schedule en- EVENT to select + or -- then press ENTER. tries for channel 1. At the next blank screen press SELCT to NOTE: A + sign will turn load ON that many hours and/or select the desired channel and proceed with the steps above to set more schedule entries. -
Page 7: Astronomic On And Time Off
8.2 ASTRONOMIC ON AND TIME OFF 8. ASTRO MODE: Press SELCT to select desired channel. Set astronomic ON per sections 8.0 and 8.1. Press LAT to change latitude. Press ENTER. Press DAY TIME OFF: Press MODE until “SCH01” appears. Press ENTER and SELCT to add or delete days in the sunset mode. until a blank schedule appears then press SELCT to select de- Press ENTER. Press HOUR and/or MIN to change offset sired channel. Press HOUR and MIN to set desired OFF time. -
Page 8: Clear All Memory
10.1 NOTES - The unit will display the model # and the revision #, fol- 1. Unit will go to RUN MODE automatically if no key is lowed by: pressed for 5 minutes. 2. Unit has a look back feature. If you have just finished setting the unit and an output is to be updated, press the EVENT key. Unit will automatically pick up the last schedule. 3. Clear all memory. To clear all memory, while in the RUN NOTE: Make sure Memory Module with program is inserted mode, press ENTER, and display will show: in the unit. - Page 9 Press ENTER. The display will show: To copy another Memory Module, take the existing one out, insert the next module to be copied, and press EVENT. This will turn ON the write function. Press ENTER and the second module should be copied. Repeat this procedure to copy more modules. After completing all copies: - Insert original Memory Module. - Turn OFF AC power to the unit. - Remove unit from enclosure. - Locate the copy switch and set it to OFF (red switch la- beled BP01). - Put unit back in enclosure. - Put back insulator that covers the terminal block. - Make sure no terminals are exposed to the operator. - Apply AC power to unit. - Insert the pin in the small pinhole (located in the upper right hand corner) to reset the unit. - Set the time and date. CAUTION: DO NOT REMOVE MEMORY MODULE WHILE UNIT IS ACTIVE. THE UNIT MUST BE RESET; TIME AND DATE MUST BE RE-ENTERED TO MAKE SCHEDULE SET- TIGNS EFFECTIVE ON THE MEMORY MODULE.
Need help?
Do you have a question about the DTS400B and is the answer not in the manual?
Questions and answers