Table of Contents
Advertisement
Quick Links
Advertisement
Table of Contents

Summary of Contents for Dimatix DMP-2800 Series
- Page 1 Dimatix Materials Printer Dimatix Materials Printer DMP-2800 Series User Manual...
-
Page 2: Warnings
This symbol identifies where there may be risk of damage to the product due to Electrostatic Discharge. (Dieses Symbol kennzeichnet Punkte an denen das Produkt durch elektrostatische Entladung beschädigt werden könnte.) Doc. # PM000040 Rev. 01 FUJIFILM Dimatix, Inc. Confidential Information March 26, 2008... -
Page 3: Wheelie Bin Symbol
Umgang mit dem Gerät, wesentliche Hinweise.) Notes Note: Used for emphasizing additional information that aids in the understanding and use of the product. Important Safety Information (Wichtige Sicherheitshinweise) Safety (Sicherheit) FUJIFILM Dimatix, Inc. Confidential Information Doc. # PM000040 Rev. 01 March 26, 2008... - Page 4 (Veränderungen oder Missbrauch des Produkts, oder Veränderungen oder Missbrauch von Komponenten können den Benutzer oder Dritte schädigen und führen zum Garantieverlußt.) Doc. # PM000040 Rev. 01 FUJIFILM Dimatix, Inc. Confidential Information March 26, 2008...
- Page 5 2831-0646-XXXX-XXXXXXXXX: Fluid used in this product must have a fire point greater than 125 °C. (Beachten sie bei Dimatix Material Druckern (DMP- 2800) mit einer Seriennummer kleiner als 2831-0646- XXXX-XXXXXXXXX: Fluide die in diesem Produkt benutzt werden müssen einen Flammpunkt grösser als 125 °C aufweisen.)
- Page 6 Diese Temperatur kann Materialien zum schmelzen bringen, wenn diese auf die Platte gestellt werden. Ausserdem verdampfen flüchtige Materialien schneller wenn sie auf die heisse Platte gestellt werden.) Doc. # PM000040 Rev. 01 FUJIFILM Dimatix, Inc. Confidential Information March 26, 2008...
-
Page 7: Important (Wichtig)
(Die austauschbaren Absorberkissen können fast alle Tinten aufnehmen. In vielen Fällen gilt dies ehr als „Fester Abfall“ und nicht als „Flüssiger Abfall“, bitte entsorgen sie diesen fachgerecht.) FUJIFILM Dimatix, Inc. Confidential Information Doc. # PM000040 Rev. 01 March 26, 2008... - Page 8 Note: This product complies with the radio interference requirements of the European Union. Doc. # PM000040 Rev. 01 FUJIFILM Dimatix, Inc. Confidential Information March 26, 2008...
-
Page 9: Table Of Contents
Dimatix Drop Manager ........ - Page 10 Fiducial Camera ............68 Doc. # PM000040 Rev. 01 FUJIFILM Dimatix, Inc. Confidential Information March 26, 2008...
- Page 11 Dimatix Model Fluid MFL-002 ........
- Page 12 Index............. 125 Doc. # PM000040 Rev. 01 FUJIFILM Dimatix, Inc. Confidential Information March 26, 2008...
-
Page 13: Chapter 1 Introduction
Chapter Introduction The Dimatix Materials Printer (DMP) is a laboratory and limited production tool that enables researchers, scientists, and engineers to evaluate the use of ink jetting technology for new manufacturing and analytical processes. It is designed to be convenient and easy to use to carry out “proof of concept”... -
Page 14: System Accessories
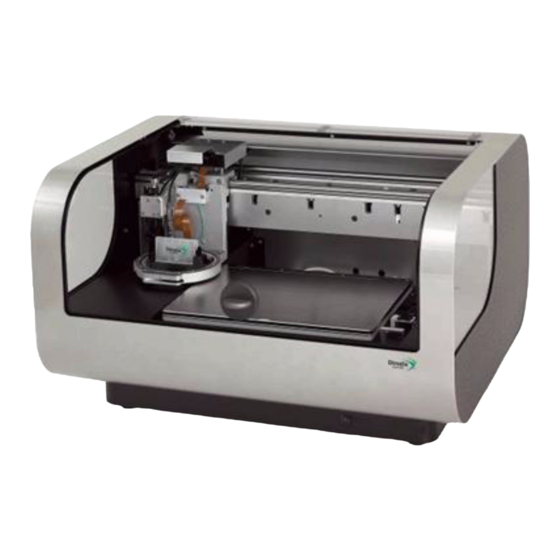
Operating: – Temperature range 15 to 40°C – Humidity range 5-95% RH, non-condensing System Identification The following diagram shows the major components of the Dimatix Materials Printer. Doc. # PM000040 Rev. 01 FUJIFILM Dimatix, Inc. Confidential Information March 26, 2008... - Page 15 Chapter 1 - Introduction Lid Closed Sensor Print Carriage Drop Watcher Platen Power Switch Maintenance Station Blotting Pad Indicator Light Figure 1 - 1 DMP 2800 FUJIFILM Dimatix, Inc. Confidential Information Doc. # PM000040 Rev. 01 March 26, 2008...
- Page 16 Cartridge Cable Cartridge Cable Skew Plate Skew Plate Skew Plate Holder Latch Holder Latch Holder Latch Cartridge Holder Cartridge Holder Cartridge Holder Figure 1 - 2 Print Carriage Doc. # PM000040 Rev. 01 FUJIFILM Dimatix, Inc. Confidential Information March 26, 2008...
-
Page 17: Chapter 2 Set-Up And Installation
• Cartridges • User Manual • Cables Figure 2 - 1 DMP items in box 2. Verify contents with checklist 3. Place DMP on an appropriate surface. FUJIFILM Dimatix, Inc. Confidential Information Doc. # PM000040 Rev. 01 March 26, 2008... - Page 18 Remove packing material from under carriage assembly b. Remove packing material from front and side of platen The PC system is shipped in its original boxes. Doc. # PM000040 Rev. 01 FUJIFILM Dimatix, Inc. Confidential Information March 26, 2008...
- Page 19 S-video cable from DMP to PC. d. Monitor video cable to PC. Do not use video cables longer than 2 meters. CAUTION e. Keyboard and mouse cables. FUJIFILM Dimatix, Inc. Confidential Information Doc. # PM000040 Rev. 01 March 26, 2008...
-
Page 20: Pc Start Up
Do not change the Regional Settings in the Windows CAUTION XP Operating System. The software will not operate properly. Starting Your DMP 1. Make sure DMP lid is closed and all shipping foam is removed Doc. # PM000040 Rev. 01 FUJIFILM Dimatix, Inc. Confidential Information March 26, 2008... - Page 21 2. Select the DMP 2800 icon on the screen. Dimatix Drop Manager Figure 2 - 7 DMP icon 3. Double click to initiate the Dimatix Drop Manager application. FUJIFILM Dimatix, Inc. Confidential Information Doc. # PM000040 Rev. 01 March 26, 2008...
-
Page 22: Dimatix Drop Manager
4. After initiating the program, click OK to allow the DMP to run through its initialization sequence. Figure 2 - 8 Drop Watcher icon on PC screen Doc. # PM000040 Rev. 01 FUJIFILM Dimatix, Inc. Confidential Information March 26, 2008... -
Page 23: Chapter 3 Initial Start-Up Operation
Initial Start-Up Operation Install Cartridge The following steps tell you how to install the Dimatix Model Fluid Cartridge. Figure 3 - 1 Install cartridge - Open Lid 1. Prepare the Dimatix Model Fluid Cartridge from the Starter Kit. See Cartridge Filling instructions in Chapter 9. - Page 24 4. Pull the cartridge holder latch forward and down until you hear it click and locks into place. Check to see that the cartridge is sitting flat in the holder. Doc. # PM000040 Rev. 01 FUJIFILM Dimatix, Inc. Confidential Information March 17, 2008...
- Page 25 6. The following window displays. Figure 3 - 4 Confirm load cartridge settings window 7. Click Yes to load the settings for Dimatix Model Fluid 2. 8. After clicking Yes, the screen advances to the Select Pattern Screen. FUJIFILM Dimatix, Inc. Confidential Information Doc.
-
Page 26: Select Pattern
The Select Pattern window lets you select a pattern for printing. Figure 3 - 5 Select Pattern screen 1. The Dimatix test pattern is auto-selected. This is a general use pattern which lets you see that the system is operating correctly. -
Page 27: Load/Unload Substrate
The Load/Unload Substrate tab is where you set the platen temperature and vacuum. It is also where you must enter the thickness for the intended substrate. Figure 3 - 6 Load/Unload Substrate screen FUJIFILM Dimatix, Inc. Confidential Information Doc. # PM000040 Rev. 01 March 17, 2008... -
Page 28: Print Set-Up
“no- temperature.” 5. Click on the Next button to go to the Print Set-Up tab. Doc. # PM000040 Rev. 01 FUJIFILM Dimatix, Inc. Confidential Information March 17, 2008... - Page 29 Figure 3 - 7 Print Set-Up screen Now you are finally ready to start jetting. The pattern has been selected, the Substrate Settings have been entered, and the Cartridge Settings have been entered. FUJIFILM Dimatix, Inc. Confidential Information Doc. # PM000040 Rev. 01 March 17, 2008...
-
Page 30: Nozzle Test Pattern
2. Hold down the Ctrl key on the keyboard while clicking on the Print button at the bottom right of the screen. You have successfully completed a print sequence. Doc. # PM000040 Rev. 01 FUJIFILM Dimatix, Inc. Confidential Information March 17, 2008... -
Page 31: Chapter 4 Screen Descriptions
Chapter Screen Descriptions Main Screen The Main Menu screen has three pull-down menus: File, Tools, and Help. Figure 4 - 1 Main screen FUJIFILM Dimatix, Inc. Confidential Information Doc. # PM000040 Rev. 01 March 26, 2008... -
Page 32: File Menu
Help menu • Printer Information – The following screen, Printer Configuration Information, is accessed from the Help tab on the Dimatix Drop Manager (DDM) window. It provides information regarding the FPGA and Firmware version on the DMP, its serial number, as well as actual cartridge and platen temperature and nozzle meniscus pressure. -
Page 33: Fujifilm Dimatix, Inc. Confidential Information Doc. # Pm000040 Rev
• System Diagnostics – This item opens a window that helps you trouble shoot different errors that might occur during operation of the printer, as described in the System Diagnostic section later in this manual. FUJIFILM Dimatix, Inc. Confidential Information Doc. # PM000040 Rev. 01 March 26, 2008... -
Page 34: Cartridge Settings
An additional program feature is a link to the FUJIFILM Dimatix Web site. If your PC is connected to the internet, click on the Dimatix logo on the bottom right of the various DDM screens to automatically connect to the Web site. -
Page 35: Waveform Tab
So during one print job, the printer repeatedly switches between the two pulses. FUJIFILM Dimatix, Inc. Confidential Information Doc. # PM000040 Rev. 01 March 26, 2008... -
Page 36: Cartridge Tab
The software automatically compensates for the number of nozzles used but the nozzles selected can only be one series of adjacent nozzles. Doc. # PM000040 Rev. 01 FUJIFILM Dimatix, Inc. Confidential Information March 26, 2008... -
Page 37: Cleaning Cycles Tab
Some fluids do not need periodic maintenance, while others need a high amount of maintenance to keep nozzles clear and functioning properly. Figure 4 - 6 Cartridge Settings – Cleaning Cycles tab FUJIFILM Dimatix, Inc. Confidential Information Doc. # PM000040 Rev. 01 March 26, 2008... -
Page 38: Cleaning Cycle Editor
Cleaning group in the Drop Watcher window. From this editor you can create sequences of operations that can be saved as a cleaning cycle file. Doc. # PM000040 Rev. 01 FUJIFILM Dimatix, Inc. Confidential Information March 26, 2008... - Page 39 A cleaning cycle can be very simple, such as a “2 second blot” or they can consist of several combinations of actions (spitting, purging, and blotting) with varying times. FUJIFILM Dimatix, Inc. Confidential Information Doc. # PM000040 Rev. 01 March 26, 2008...
- Page 40 Save As from the File menu. If desired you can run the cleaning cycle you just created by clicking on the Run Now button in the DDM main window. Doc. # PM000040 Rev. 01 FUJIFILM Dimatix, Inc. Confidential Information March 26, 2008...
-
Page 41: Waveform Editor
The Waveform Basics chapter, later in this manual, describes how changing the waveform affects drop ejection. There is an application note available through E-Commerce on the FUJIFILM Dimatix home page that elaborates on this topic. FUJIFILM Dimatix, Inc. Confidential Information Doc. -
Page 42: Individual Segment Controls
Jetting Frequency Maximum in the Drop Watcher window. After the user has established the maximum sustainable jetting frequency in the drop watcher it is essential to ensure the maximum Doc. # PM000040 Rev. 01 FUJIFILM Dimatix, Inc. Confidential Information March 26, 2008... -
Page 43: Non-Jetting Waveform
FUJIFILM Dimatix, Inc. Confidential Information Doc. # PM000040 Rev. 01 March 26, 2008... - Page 44 DO NOT open the printer lid until told to do so. Opening the lid while the printer is in motion IMPORTANT IMPORTANT necessitates a re-initialization of the printer. Doc. # PM000040 Rev. 01 FUJIFILM Dimatix, Inc. Confidential Information March 26, 2008...
- Page 45 Figure 4 - 10 DDM – Open the lid screen Open the lid and replace the pad. Figure 4 - 11 DDM – replace cleaning pad screen FUJIFILM Dimatix, Inc. Confidential Information Doc. # PM000040 Rev. 01 March 26, 2008...
- Page 46 Do not touch the top of the new maintenance pad with your fingers. When the lid is closed the carriage moves back to the cleaning station. Doc. # PM000040 Rev. 01 FUJIFILM Dimatix, Inc. Confidential Information March 26, 2008...
-
Page 47: Chapter 5 Pattern Printing
The following screen allows you to pick a print pattern file that has already been created, or to create a new one. Figure 5 - 1 Select Pattern screen FUJIFILM Dimatix, Inc. Confidential Information Doc. #PM000040 Rev. 01 March 26, 2008... -
Page 48: Predefined Standard Patterns
In all cases, X increases to the right, and Y increases toward the front of the printer. All dimension parameters are in millimeters except for the Drop Spacing, which is in micrometers. All dimensions entered into the pattern generator are rounded onto the Drop Spacing. Doc. #PM000040 Rev. 01 FUJIFILM Dimatix, Inc. Confidential Information March 26, 2008... -
Page 49: Substrate
The Leader Bar is a vertical bar that can be jetted to the left of your pattern by checking the Enable box. This is a commonly used procedure in ink jet printing to pre-jet nozzles to FUJIFILM Dimatix, Inc. Confidential Information Doc. #PM000040 Rev. 01... - Page 50 Note: For the first print outs of Dimatix Model Fluid 2 on ink jet paper a drop spacing of about 20 μm usually gives good printing results. The Layers box feature allows you to reprint the same pattern over itself automatically.
-
Page 51: Pattern Block Array
The Pitch is the distance from the start of one pattern to the next. Enter the number of patterns (X count) to print in the horizontal direction, and the number of patterns (Y count) to print in the vertical direction. FUJIFILM Dimatix, Inc. Confidential Information Doc. #PM000040 Rev. 01 March 26, 2008... -
Page 52: Pattern Block Drop Position
Ctrl button on the keyboard and point and drag the right mouse button on your feature of interest you can zoom in and it stays centered on the screen. You can Doc. #PM000040 Rev. 01 FUJIFILM Dimatix, Inc. Confidential Information March 26, 2008... - Page 53 Chapter 5 -Pattern Printing also draw new features into the pattern by holding down the Shift button and dragging a rectangle with the mouse. Figure 5 - 5 Preview Drops screen FUJIFILM Dimatix, Inc. Confidential Information Doc. #PM000040 Rev. 01 March 26, 2008...
- Page 54 The Show All Patterns feature enables you to see all the patterns on the substrate when checked. The 1x button displays the pattern on the screen very close to its actual size. Doc. #PM000040 Rev. 01 FUJIFILM Dimatix, Inc. Confidential Information March 26, 2008...
-
Page 55: Drop Spacing
(amount of jetted ink per area) of lines and rectangles, or it may be used to create rows of individual drops which are spaced closer together than 254 μm. FUJIFILM Dimatix, Inc. Confidential Information Doc. #PM000040 Rev. 01 March 26, 2008... -
Page 56: Bitmap And Gerber File Printing
If you change the drop spacing you must then save IMPORTANT IMPORTANT the file for it to be processed at the new drop spacing. Doc. #PM000040 Rev. 01 FUJIFILM Dimatix, Inc. Confidential Information March 26, 2008... -
Page 57: 3.1.1 Substrate Tab
• Layers – this is the same as for pattern files and allows re-printing the same pattern over itself several times (Count) with or without a delay (Interlayer Delay) between. FUJIFILM Dimatix, Inc. Confidential Information Doc. #PM000040 Rev. 01 March 26, 2008... -
Page 58: 3.1.2 Placement
X Start, Y Start is the position relative to the print origin that the pattern starts. X Width, and Y Height is the calculated size of the pattern. Doc. #PM000040 Rev. 01 FUJIFILM Dimatix, Inc. Confidential Information March 26, 2008... -
Page 59: 3.1.3 Tiling
The X Ref, Y Ref, Locate Ref Point, and Set Ref Point provide an additional way to position the image by aligning a point in the image to a specific point on the substrate (a FUJIFILM Dimatix, Inc. Confidential Information Doc. #PM000040 Rev. 01... - Page 60 A status bar at the bottom shows the current zoom factor, the location of the upper left of the preview, and the image size. The current cursor position is also displayed. Doc. #PM000040 Rev. 01 FUJIFILM Dimatix, Inc. Confidential Information March 26, 2008...
-
Page 61: Print Preview
The preview is sizable so it can be made full screen for more detail. Remember, the platen area is not the substrate. The user has to make sure the substrate is placed correctly on the FUJIFILM Dimatix, Inc. Confidential Information Doc. #PM000040 Rev. 01... - Page 62 The reference image used in this example is the lower right one of the array and there is a leader bar: Figure 5 - 12 Print Preview – Reference point Doc. #PM000040 Rev. 01 FUJIFILM Dimatix, Inc. Confidential Information March 26, 2008...
- Page 63 Chapter 5 -Pattern Printing This example shows a tiled array, using a print origin, without a leader bar. Figure 5 - 13 Print Preview – Print Origin without leader bar FUJIFILM Dimatix, Inc. Confidential Information Doc. #PM000040 Rev. 01 March 26, 2008...
- Page 64 Before you jet your pattern, the system calculates the angle to set the cartridge determined by the drop spacing specified in the pattern. This angle adjustment is what lets you modify the drop spacing in the Y axis. Doc. #PM000040 Rev. 01 FUJIFILM Dimatix, Inc. Confidential Information March 26, 2008...
-
Page 65: Cartridge Mounting Angle
There is a notch on the 0 point of the inner vernier scale is lined up with the 0 on the outer cartridge angle scale. Inner Notch Figure 5 - 17 Cartridge Alignment scale FUJIFILM Dimatix, Inc. Confidential Information Doc. #PM000040 Rev. 01 March 26, 2008... - Page 66 11° mark on outer ring. Second – Count up four marks from the notch on the inner ring. Figure 5 - 18 Setting the cartridge angle to 11.4° Doc. #PM000040 Rev. 01 FUJIFILM Dimatix, Inc. Confidential Information March 26, 2008...
- Page 67 211.67 28.2 101.60 79.8 203.20 29.5 100.00 195.38 30.8 Note: You may want to copy the above table and place it next to the DMP for future reference. FUJIFILM Dimatix, Inc. Confidential Information Doc. #PM000040 Rev. 01 March 26, 2008...
- Page 68 Chapter 5 -Pattern Printing Doc. #PM000040 Rev. 01 FUJIFILM Dimatix, Inc. Confidential Information March 26, 2008...
-
Page 69: Chapter 6 Drop Watcher
If you want to do a maintenance cycle to improve jetting, you can do that by clicking on the Run Now button on the Cleaning box in the upper left corner of the window. FUJIFILM Dimatix, Inc. Confidential Information Doc. # PM000040 Rev. 01... -
Page 70: Drop Watcher Pad
To replace the pad simply pull out the holder and insert a new one. Doc. # PM000040 Rev. 01 FUJIFILM Dimatix, Inc. Confidential Information March 26, 2008... - Page 71 • The Image/Movie Title button allows you to put a title at the bottom of the screen in the image after Dimatix DMP2800 – Your Title Here. The nozzle number that you are viewing, the jetting voltage, the cartridge temperature, the waveform file name, and the date and time are automatically stored on the image.
- Page 72 Video editing tool like the standard Windows Movie Maker to compress the video. This way more advanced compression methods result in higher quality videos. This initially creates huge .avi files. Figure 6 - 3 Properties – Settings screen Doc. # PM000040 Rev. 01 FUJIFILM Dimatix, Inc. Confidential Information March 26, 2008...
- Page 73 A good velocity to set is between 7 – 9 m/sec. FUJIFILM Dimatix, Inc. Confidential Information Doc. # PM000040 Rev. 01 March 26, 2008...
-
Page 74: Tools Tab
• View Cartridge settings – this allows you to open the cartridge settings form if they were closed. • Drop Volume Measurement - this is a procedure that lets you measure drop volume by using an average drop weight technique. Doc. # PM000040 Rev. 01 FUJIFILM Dimatix, Inc. Confidential Information March 26, 2008... - Page 75 For this procedure it is important that you open the lid only if the dialogue tells you to. Figure 6 - 6 Drop Volume Measurement screen FUJIFILM Dimatix, Inc. Confidential Information Doc. # PM000040 Rev. 01 March 26, 2008...
- Page 76 It is best to use one that is shallow so the carriage can be lowered close to the container (this prevents the loss of drops due to air motion or other influences around the print head). Figure 6 - 8 Drop Volume Measurement Screen Doc. # PM000040 Rev. 01 FUJIFILM Dimatix, Inc. Confidential Information March 26, 2008...
- Page 77 1 million drops for then the conversion to the expected drop weight in nanograms gets very easy. Adjust the time to change the number of drops jetted. Figure 6 - 10 Drop Volume Measurement screen – Jetting Time FUJIFILM Dimatix, Inc. Confidential Information Doc. # PM000040 Rev. 01 March 26, 2008...
- Page 78 Chapter 6 - Drop Watcher Figure 6 - 11 Drop Volume Measurement screen – Jetting to pan Figure 6 - 12 Drop Volume Measurement – Wait Doc. # PM000040 Rev. 01 FUJIFILM Dimatix, Inc. Confidential Information March 26, 2008...
- Page 79 Chapter 6 - Drop Watcher Once it finishes jetting you are ready to calculate the drop mass after weighing the pan. Figure 6 - 13 Drop Volume Measurement – Finish FUJIFILM Dimatix, Inc. Confidential Information Doc. # PM000040 Rev. 01 March 26, 2008...
-
Page 80: Fiducial Camera
Chapter 6 - Drop Watcher Fiducial Camera On the main Dimatix DDM window go into the Tools menu and select Fiducial Functions or click on the Fiducial Camera button. Figure 6 - 14 Fiducial Camera screen The above image is a sample screen shot of the main Fiducial Camera window. The... - Page 81 The Bright Field mode (switch position 1) works after the same principle as a regular microscope. The light shines on the object FUJIFILM Dimatix, Inc. Confidential Information Doc. # PM000040 Rev. 01...
-
Page 82: Features
Platen box and click on a location and then click the Move button and the camera moves to that point and its coordinates are displayed in the boxes. Doc. # PM000040 Rev. 01 FUJIFILM Dimatix, Inc. Confidential Information March 26, 2008... - Page 83 Note: A reference point can only be used for imported .BMP and Gerber images; not for Dimatix Patterns generated with the Pattern Generator. See .BMP printing for more information. • Use Reference Point – By checking this box the DMP positions the pattern’s reference point to the Image Reference Point.
-
Page 84: Alignment Procedures
• Set Print Origin – This feature is to set the origin of your pattern. • When you click on the Set Print Origin the following window pops up. Doc. # PM000040 Rev. 01 FUJIFILM Dimatix, Inc. Confidential Information March 26, 2008... - Page 85 • When you click on the Set Reference Point the following window pops up. Figure 6 - 19 Set Reference Point screen FUJIFILM Dimatix, Inc. Confidential Information Doc. # PM000040 Rev. 01 March 26, 2008...
- Page 86 To start you must have the cartridge set to the angle required by your pattern. At the first screen click Next. Figure 6 - 20 Set Drop Offset screen Doc. # PM000040 Rev. 01 FUJIFILM Dimatix, Inc. Confidential Information March 26, 2008...
- Page 87 Note: The fiducial camera usually comes to a point somewhere below the line so you only have to move in negative y direction to find the line. FUJIFILM Dimatix, Inc. Confidential Information Doc. # PM000040 Rev. 01 March 26, 2008...
- Page 88 Chapter 6 - Drop Watcher Figure 6 - 23 Set Drop Offset – Click on drop It should look similar to the following image. Figure 6 - 24 Fiducial Camera screen Doc. # PM000040 Rev. 01 FUJIFILM Dimatix, Inc. Confidential Information March 26, 2008...
- Page 89 This can be a single drop pattern (which may be difficult to find or see) or maybe a square of 5 drops (X and Y) or a + pattern that you can find with the camera. FUJIFILM Dimatix, Inc. Confidential Information Doc. # PM000040 Rev. 01...
- Page 90 To calibrate: • Click on the feature in the Tools menu and the following window pops up. Figure 6 - 29 Theta Calibration – Reference Start Point Doc. # PM000040 Rev. 01 FUJIFILM Dimatix, Inc. Confidential Information March 26, 2008...
- Page 91 Move button. You may also enter the coordinates in the Move Controls box and click move. • After clicking on the second point the following window pops up. Click OK. Figure 6 - 31 Theta Calibration – Set points FUJIFILM Dimatix, Inc. Confidential Information Doc. # PM000040 Rev. 01 March 26, 2008...
- Page 92 • Locate your first fiducial mark with the fiducial camera. • Click on the Start X Measurement (or Y if you have only Y direction marks). Doc. # PM000040 Rev. 01 FUJIFILM Dimatix, Inc. Confidential Information March 26, 2008...
- Page 93 Click on your fiducial mark. The button turns green and says Cancel if you want to cancel and start over. Figure 6 - 33 Calculate Thermal Scaling – Cancel X Measurement FUJIFILM Dimatix, Inc. Confidential Information Doc. # PM000040 Rev. 01 March 26, 2008...
- Page 94 If you don’t see the feature in the image area move the camera with the x & y motion controls to locate it. Doc. # PM000040 Rev. 01 FUJIFILM Dimatix, Inc. Confidential Information March 26, 2008...
- Page 95 When you have completed the calibration click the Save button and you are ready to jet your pattern that is corrected to the new size of your substrate. FUJIFILM Dimatix, Inc. Confidential Information Doc. # PM000040 Rev. 01 March 26, 2008...
- Page 96 This may be a result of not setting the cartridge angle precisely enough and it may need adjusting. This is the procedure to tell you how much you are off and which way to correct it. Doc. # PM000040 Rev. 01 FUJIFILM Dimatix, Inc. Confidential Information March 26, 2008...
- Page 97 Figure 6 - 37 Measure Cartridge Angle This feature uses the outer most nozzles selected in the Cartridge Settings file. Figure 6 - 38 Measure Cartridge Angle – Print location FUJIFILM Dimatix, Inc. Confidential Information Doc. # PM000040 Rev. 01 March 26, 2008...
- Page 98 Figure 6 - 40 Measure Cartridge Angle – Select top line Doc. # PM000040 Rev. 01 FUJIFILM Dimatix, Inc. Confidential Information March 26, 2008...
-
Page 99: 3.1.1 Options Menu In The Fiducial Camera Window
2x or 4x magnification of the zoomed-in area. The zoom box automatically avoids being in the way of your mouse cursor. FUJIFILM Dimatix, Inc. Confidential Information Doc. # PM000040 Rev. 01 March 26, 2008... - Page 100 • Print Pattern – This feature allows you to print the pattern selected on the main DDM main Window while in the fiducial mode. • Exit – Clicking on this allows you to exit the Fiducial Camera window. Doc. # PM000040 Rev. 01 FUJIFILM Dimatix, Inc. Confidential Information March 26, 2008...
-
Page 101: Chapter 7 Fluid Requirements
• Filtration – If particle size allows, it is recommended to filter all fluids to 0.2µm. • Acidity or Alkalinity – A pH-value between 4 and 9 is recommended. Refer to FUJIFILM Dimatix Application Notes in E-commerce at www.dimatix.com more information. -
Page 102: Drop Formation
Figure 7 - 2 Single Pulse Waveform The following picture shows a captured frame of a video taken during the testing of Dimatix Model Fluid. You can see that after the drop leaves the nozzle it has a Doc. # PM000040 Rev. 01 FUJIFILM Dimatix, Inc. -
Page 103: Performance
These drops were jetted with 25V. Figure 7 - 3 Capture frame Refer to FujiFilm Dimatix Application Notes in E-Commerce at www.dimatix.com for more information on drop tuning. Performance The following are typical jetting results that the user may get from jettable fluids. -
Page 104: Drop Velocity Vs. Frequency
To maintain a given drop velocity, higher jetting voltages are required for higher viscose fluids. 11 c P 13 c P 15.5 c P 18 c P V oltage [V ] Figure 7 - 5 Velocity vs. Voltage Doc. # PM000040 Rev. 01 FUJIFILM Dimatix, Inc. Confidential Information March 26, 2008... -
Page 105: Voltage Vs. Drop Mass
The following chart shows that jetting at higher voltages leads to faster drops. Jetting at higher voltages also leads to bigger drops. Voltage [V] Figure 7 - 6 Drop Mass vs. Voltage FUJIFILM Dimatix, Inc. Confidential Information Doc. # PM000040 Rev. 01 March 26, 2008... - Page 106 Chapter 7 - Fluid Requirements Doc. # PM000040 Rev. 01 FUJIFILM Dimatix, Inc. Confidential Information March 26, 2008...
-
Page 107: Chapter 8 Waveform Basics
Waveform Basics The DMP Drop Manager software has a standard waveform that has been found to work very well with the Dimatix Model Fluid. This can be used as a starting point to understand the jetting process. The typical basic waveform is divided into four segments. Each segment has three properties: duration, level and slew rate. -
Page 108: Waveform Editor Window Explanation
Once the peak velocity is obtained, your fluid is matched to the acoustics of the pumping chamber. Now you can start adjusting the segments to optimize the drop formation. Doc. # PM000040 Rev. 01 FUJIFILM Dimatix, Inc. Confidential Information March 26, 2008... - Page 109 At the beginning of the jetting pulse the decrease in voltage to zero volts brings the piezo back to a neutral straight or relaxed position with the chamber at its maximum volume. In FUJIFILM Dimatix, Inc. Confidential Information Doc. # PM000040 Rev. 01...
- Page 110 Phase 2 Increase in voltage deflects PZT. Drop formation is initiated PZT/Si Bimorph Fluid flow Nozzle/meniscus Figure 8 - 5 Waveform – Phase 2 Doc. # PM000040 Rev. 01 FUJIFILM Dimatix, Inc. Confidential Information March 26, 2008...
- Page 111 Changed Value Velocity Side Effects Segment 1: slew rate possible tails duration possible tails Segment 2: slew rate possible tails Segment 3: slew rate Segment 4: slew rate FUJIFILM Dimatix, Inc. Confidential Information Doc. # PM000040 Rev. 01 March 26, 2008...
- Page 112 Chapter 8 - Waveform Basics Doc. # PM000040 Rev. 01 FUJIFILM Dimatix, Inc. Confidential Information March 26, 2008...
-
Page 113: Chapter 9 Cartridge
The following diagram shows the major parts of the Cartridge. Fluid Module Fluid Case Fluid Bag Fill Port Pressure Port Jetting Module Nozzles Electrical Connector Figure 9 - 1 Cartridge Components FUJIFILM Dimatix, Inc. Confidential Information Doc. # PM000040 Rev. 01 March 26, 2008... -
Page 114: Fluid Module Filling
1. Pull fluid into syringe (1.5 mL). 2. Install filter onto syringe. If the fluid is known to be filtered properly and not have agglomerates, you may not need to use a filter. Dimatix Model Fluid does not need a filter. - Page 115 Syringes are typically manufactured with a lubricant (often silicon oil) on the plunger. If your fluid is aggressive or cannot be associated with a small amount of this fluid, then syringes such as glass may be required. FUJIFILM Dimatix, Inc. Confidential Information Doc. # PM000040 Rev. 01 March 26, 2008...
-
Page 116: Assembly
Do not dispose of this product as unsorted municipal waste. Collection of such waste separately for special treatment is necessary. (Entsorgen sie dieses Produkt nicht als unsortierten Hausmüll. Eine Fachgerechte Entsorgung ist nötig.) Doc. # PM000040 Rev. 01 FUJIFILM Dimatix, Inc. Confidential Information March 26, 2008... -
Page 117: Cartridge Maintenance
• Meniscus Control is a low level vacuum applied to the ink reservoir to prevent ink from flowing out of the cartridge nozzles. FUJIFILM Dimatix, Inc. Confidential Information Doc. # PM000040 Rev. 01 March 26, 2008... -
Page 118: Cleaning Function Definitions
Used while head is capped, or for lo use nozzles during printing. Doc. # PM000040 Rev. 01 FUJIFILM Dimatix, Inc. Confidential Information March 26, 2008... -
Page 119: Failure Modes, Prevention And Recovery
Pumping force is not Some or all nozzles do not Decrease meniscus control Decrease meniscus control enough to overcome fire. vacuum level. vacuum level. meniscus control vacuum. FUJIFILM Dimatix, Inc. Confidential Information Doc. # PM000040 Rev. 01 March 26, 2008... - Page 120 Pumping force is not Some or all nozzles do Decrease meniscus Decrease meniscus enough to overcome not fire. control vacuum level. control vacuum level. meniscus control vacuum. Doc. # PM000040 Rev. 01 FUJIFILM Dimatix, Inc. Confidential Information March 26, 2008...
-
Page 121: Chapter 10 Print Quality Troubleshooting
This indicates that debris is lodged just inside the nozzle and is forcing the drop to eject at an angle. FUJIFILM Dimatix, Inc. Confidential Information Doc. # PM000040 Rev. 01 March 26, 2008... - Page 122 Figure 10 - 2 Misdirected nozzles Figure 10 - 3 Multiple nozzles firing off axis Doc. # PM000040 Rev. 01 FUJIFILM Dimatix, Inc. Confidential Information March 26, 2008...
-
Page 123: Corrective Actions
#15 is showing no drop ejection. Figure 10 - 4 Non-firing nozzles FUJIFILM Dimatix, Inc. Confidential Information Doc. # PM000040 Rev. 01 March 26, 2008... -
Page 124: Corrective Actions
Cartridge Settings window to map around that specific nozzle. Remember to degas and filter your fluids before loading the fluid module. Doc. # PM000040 Rev. 01 FUJIFILM Dimatix, Inc. Confidential Information March 26, 2008... -
Page 125: Non-Matched Velocities
Watcher window. In the following figure you see that nozzle #1 is indeed running slow. When the drop velocities are mismatched the result is vertical lines that have uneven edges. Figure 10 - 6 Nozzle #1 running slow FUJIFILM Dimatix, Inc. Confidential Information Doc. # PM000040 Rev. 01 March 26, 2008... -
Page 126: Corrective Action
The following figure is an example of a cartridge alignment that is off by an angle of -2 degrees with nozzle #16 off speed. Doc. # PM000040 Rev. 01 FUJIFILM Dimatix, Inc. Confidential Information March 26, 2008... - Page 127 In Figure 10-9 you can see the result when the cartridge is off by an angle of +2 degrees. Figure 10 - 9 Alignment off by +2 degrees FUJIFILM Dimatix, Inc. Confidential Information Doc. # PM000040 Rev. 01 March 26, 2008...
-
Page 128: Corrective Action
• Whenever a print cartridge is replaced the saber angle needs to be checked and a drop offset adjustment has to be performed again, in this particular order. The nozzle velocities have to be re-adjusted. Doc. # PM000040 Rev. 01 FUJIFILM Dimatix, Inc. Confidential Information March 26, 2008... -
Page 129: System Faults
DMP and then power it back on. If the problem is not remedied by turning the DMP off (leave off for 5 seconds minimum) and then back on, the system has to be returned to FUJIFILM Dimatix for service. Faults •... - Page 130 • The printer's 5 volt power supply has malfunctioned. This is a failure of the logic level power. Turn the DMP off and wait 5 seconds then turn back on. If condition persists call Dimatix Customer Support @ (408) 565- 7474 •...
-
Page 131: System Diagnostics
Simply place the mouse cursor on the Test Control block that you wish to test and follow the instructions. Figure 10 - 11 Platen Pump screen FUJIFILM Dimatix, Inc. Confidential Information Doc. # PM000040 Rev. 01 March 26, 2008... - Page 132 Chapter 10 - Troubleshooting Figure 10 - 12 Set Meniscus screen Figure 10 - 13 Purge Pressure screen Doc. # PM000040 Rev. 01 FUJIFILM Dimatix, Inc. Confidential Information March 26, 2008...
-
Page 133: Preventative Maintenance
Grease the Y-axis lead screw with Tri-Gel 1200SCas required. Inspect the encoder strips for obstructions, clean with soft cloth as required. Reference Information Please visit the FUJIFILM Dimatix Web site and E-Commerce at for the www.dimatix.com latest application and ink jet usage information in the deposition field. - Page 134 If you have not setup your E-Commerce access yet, send an email to or send a fax to +1-408-565-9151 asking for E- info@dimatix.com Commerce access and stating that you are a DMP customer. Doc. # PM000040 Rev. 01 FUJIFILM Dimatix, Inc. Confidential Information March 26, 2008...
-
Page 135: Appendix A Specifications
• Power 100-120 / 200-240 VAC 50/60Hz 375W maximum – Fuse @ 250 V 2A SLO-BLO 5 x 20 mm – Fuse @ 110 V 4A SLO-BLO 5 x 20 mm FUJIFILM Dimatix, Inc. Confidential Information Doc. # PM000040 Rev. 01 March 26, 2008... -
Page 136: Cartridge
• Print cartridge with one-time user-fillable reservoir • Cleaning station nozzle blotting pad • Drop watcher fluid absorbing pad Options • Fiducial camera for substrate alignment and measurement • Gerber (RS-274X) file import Doc. # PM000040 Rev. 01 FUJIFILM Dimatix, Inc. Confidential Information March 26, 2008... -
Page 137: Index
Camera Field of View Cartridge dark field mode Cleaning Cycle switch position create Features cleaning cycle Center X- Position Center Y-Position default Cursor X-Position Cleaning Cycle Editor FUJIFILM Dimatix, Inc. Confidential Information Doc. # PM000040 Rev. 01 March 26, 2008... - Page 138 Install filter onto syringe Misdirected Nozzles Fluid Requirements Corrective actions Degassing Model Fluid Density Movie Mode Filtration Low Volatility Non-Firing Nozzles Surface Tension Corrective actions Viscosity Non-Jetting Nozzles Fluid Requirements Doc. # PM000040 Rev. 01 FUJIFILM Dimatix, Inc. Confidential Information March 26, 2008...
- Page 139 Mechanical System Specifications screen Spit window Preview Drops button Spitting Spot Size Print Enable Use Reference Point Preview Print Origin Print Preview Strobe Delay Substrate Leader Bar FUJIFILM Dimatix, Inc. Confidential Information Doc. # PM000040 Rev. 01 March 26, 2008...
- Page 140 Cleaning Function Definitions Temperature Drop Spacing Power Faults Gerber Files Things to remember Placement Tickle Control 23, 31 Tools menu Placement / Tiling Cleaning Cycle Editor Tools Tab Doc. # PM000040 Rev. 01 FUJIFILM Dimatix, Inc. Confidential Information March 26, 2008...
- Page 142 Back Cover Product status and specifications are subject to change. Please confirm latest data with a Dimatix representative. Corporate Office: New Hampshire Facility: Japan Office: European Office: Korean Office: FUJIFILM Dimatix, Inc. FUJIFILM Dimatix, Inc. Advanced Marketing Business Div. Tel: +44 7739 863 505...
Need help?
Do you have a question about the DMP-2800 Series and is the answer not in the manual?
Questions and answers