Table of Contents
Advertisement
Quick Links
APD909 Manual
Index
1. Intended use
2. Safety
o
2.1. Labels in this manual
o
2.2. General safety instructions
3. Preparations for use
o
3.1. Unpacking
o
3.2. Package contents
4. Installation
o
4.1. Connections
o
4.2. Connecting to the mains
o
4.3. Positioning the system
o
4.4. Change the battery
5. Functions
o
5.1. Remote control
o
5.2. APD909 Portable DVD
6. Operation
o
6.1. Turning the device on and off.
o
6.2. General setup menu operation
o
6.3. DVD/CD functions
o
6.4. USB functions
7. Cleaning and maintenance
o
7.1. Handle and care of a disc
8. Technical data
9. Disposal of used electrical and electronic equipment
Advertisement
Table of Contents

Related Manuals for Akai APD909


Summary of Contents for Akai APD909
- Page 1 4.2. Connecting to the mains 4.3. Positioning the system 4.4. Change the battery 5. Functions 5.1. Remote control 5.2. APD909 Portable DVD 6. Operation 6.1. Turning the device on and off. 6.2. General setup menu operation 6.3. DVD/CD functions 6.4.
-
Page 2: Intended Use
1.Intended use The appliance functions as a portable media player. The screen of the appliance can be folded up and down as well as rotated. This appliance lets you open music files (MP3/WMA), video files (MPEG-4) and photo files (JPEG). These files can be accessed via DVD, CD and USB. -
Page 3: Safety
2.Safety 2.1. Labels in this manual WARNING A warning means that injury or death is possible if the instructions are not obeyed. CAUTION A caution means that damage to the equipment is possible. A note gives additional information, e.g. for a procedure. 2.2. -
Page 4: Preparations For Use
3.2. Package contents The following items are included in the received package: 1 x APD909 Portable DVD 1 x Remote control 1 x Button cell 1 x Quick start guide... -
Page 5: Installation
4.Installation 4.1. Connections 1. USB 2.0 slot 2. Headphone jack 3. AV OUT input 4. DC IN input 4.2. Connecting to the mains Connect the female plug of the AC adapter to the DC IN jack Connect the mains plug to a wall socket. - Page 6 4.3. Positioning the system Open the display Rotating the screen...
- Page 7 4.4. Change the battery Remote control Pull out the battery holder Insert 1 lithium battery, type CR2025 3V battery When inserting the battery observe the (+) and (-) polarity markings. Insert the battery tray into the remote control.
-
Page 8: Functions
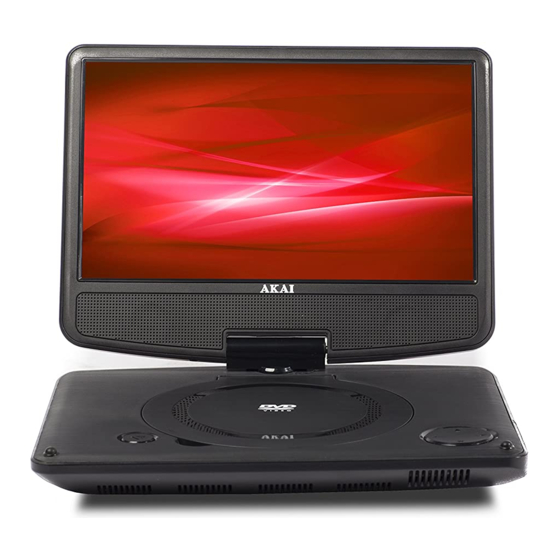
5.Functions 5.1. Remote control 1. SEARCH button 2. ZOOM button 3. Digit buttons 4. ANGLE button 5. SUBTITLE button 6. TITLE button 7. ENTER button 8. Arrow buttons 9. SETUP button 10. AB button 11. REPEAT button 12. PROGRAM button 13. - Page 9 5.2. APD909 Portable DVD 1. PLAY/PAUSE, RETURN button 2. SETUP button 3. SOURCE button 4. On / Off key (POWER) 5. Screen 6. PLAY/PAUSE button 7. DVD compartment 8. Navigation button...
-
Page 10: Operation
6.Operation 6.1. Turning the device on and off. Set the switch in the ON position to turn the equipment on. Set the switch in the OFF position to switch off the device. 6.2. General setup menu operation This chapter explains a complete setup of the appliance: settings of screen display, audio setup and video setup. - Page 11 The following actions have to be carried out with the remote control. Press the SETUP button (9). Press the arrow buttons (left and right) (8) to select a menu. The submenu is displayed directly. Press the arrow buttons (up and down) (8) to scroll through the submenu. ...
- Page 12 RATING Set a rating for movies played by the appliance. Movies rated higher than the level set for the parental lock can not be viewed. DEFAULT Restore the default settings of the appliance. LANGUAGE SETUP In the OSD LANG section, press the arrow buttons to choose the language. ...
- Page 13 6.3. DVD/CD functions Control After the disc has been loaded, a content menu will display on the screen. Press the arrow buttons (8) to select a menu item. Press the ENTER button (7) to enter the selected menu item. ...
- Page 14 To mute or restore sound, press the MUTE button (14). SUBTITLE (5): select the subtitles for the VIDEO file that is playing (if available) DVD: To select the audio language of a DVD, press the AUDIO button (17) repeatedly until the desired language is set.
- Page 15 Please note: DVDs and DVD appliances are manufactured under the worldwide agreed DVD regional code system that the appliance will operate only with corresponding disc of the same regional code. If the code number on the label of a DVD does not match that on the label alongside, the DVD will not play on this appliance.
- Page 16 During playback, the following functions are available: To select a track, press the PREV button (23) or the NEXT button (8) until the desired track is set. To pause playback, press the PLAY/PAUSE button (20) once; to resume playback, press the button again.
-
Page 17: Cleaning And Maintenance
7.Cleaning and maintenance WARNING Before performing any cleaning or maintenance, switch off and unplug the appliance. Clean the outside of the appliance with a soft cloth. When the appliance is very dirty, dampen the cloth slightly with water and a neutral solution. 7.1. -
Page 18: Technical Data
8.Technical data APD909 Portable DVD Voltage: 100 - 240VAC / 50/60 Hz Power consumption: 10W Frequency response: 20Hz ~20KHz (1dB) Speaker output: 2 x 1 Watt Appliance features 16:9 aspect ratio with 22.8 cm screen (9") USB 2.0 slot Headphone jack... -
Page 19: Disposal Of Used Electrical And Electronic Equipment
For more detailed information about recycling of this product, please contact your local city office, your household waste disposal service or the shop where you purchased the product. For more information and warranty conditions, please visit: www.akai.eu Do not dispose of batteries as household waste but take them to a battery recycling facility.
Need help?
Do you have a question about the APD909 and is the answer not in the manual?
Questions and answers