Advertisement
Quick Links
Advertisement

Related Manuals for Technical Pro PRE50


Summary of Contents for Technical Pro PRE50
- Page 1 Technical Pro Professional Pre - Amplifier with USB & SD Card Inputs User Manual for: PRE50...
- Page 2 , it is recommended that you review all of the information provided in this instruction manual before operating this equipment. If you've spent any time at all in professional audio, you know the name Technical Pro and what it stands for — incredible performance &...
-
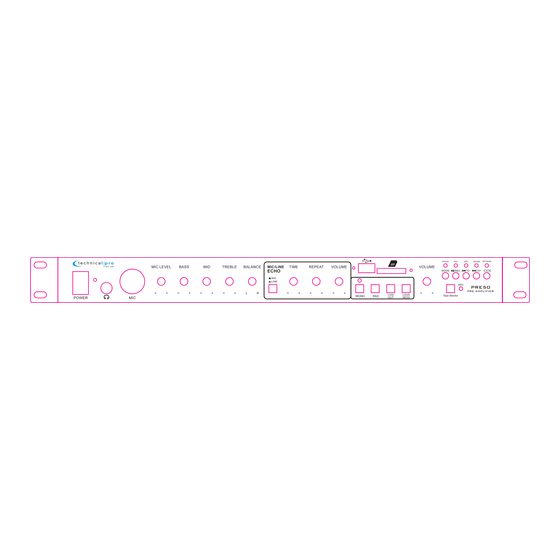
Page 3: Front Panel
18.Tape Monitor: Press this button to activate the tape monitor function. Press it again to turn it off. Once the tape monitor function is enabled, connect the REC- OUT of PRE50 to another recording device and connect the output of this recording device to the PLAY- IN to monitor the recording. There must be a signal coming from the PLAY-IN once the tape monitor function is enabled. - Page 4 PRE50 21.USB Input: Insert your USB flash drive or iPod™(Classic and Nano) into this slot. The unit will only read .mp3, .wav, .wma files from the USB flash drive or iPod™(Classic and Nano).The maximum storage size of the USB flash drive cannot exceed 32GB. Make sure to press the input selector button (23) to play the signal from the USB flash drive or iPod™(Classic and Nano).
- Page 5 Please note that if the tape monitor function is enbled, there must be a signal coming into the PRE50 from the PLAY- IN jacks.
- Page 6 In the typical setup, a user should wire from the output of the signal source directly to one of the RCA inputs on the rear of the PRE50. Once the input signal source is connected to the PRE50, connect the amplifier to the PRE50’s unbalanced outputs. Pictured above is a CD player connected to the PRE50’s AUX input.
- Page 7 Left Right Use particular cables to connect the balanced output on the rear panel of PRE50 to another amplifier’s balanced singal input. It’s important to make sure that the PRE50’s left output is connected to the amplifier’s left input and PRE50’s right output is connected to the amplifier’s right input.
- Page 8 Nano) There are also SD Card and USB flash drive inputs on the front panel of the PRE50 which is compatible with iPod™ (Classic and Nano) via the USB input. The maximum size of the SD Card or USB flash drive is 32GB. If your memory card exceeds 32GB, the unit will not be able to read the files from the memory cards.
-
Page 9: Ac Power Cord Connection
AMPLIFIER IN THE SIGNAL PATH. There are also input jacks for USB flash drive and SD card on the front panel of the PRE50 which is compatible with iPod™(Classic and Nano) via the USB input. Just plug the USB flash driver,SD card or iPod™(Classic and Nano) into their respective input jacks and set the PRE50 to the corresponding input.
Need help?
Do you have a question about the PRE50 and is the answer not in the manual?
Questions and answers