
Summary of Contents for Diener femto
- Page 1 OPERATING INSTRUCTIONS Type: Femto Please read this manual carefully before installing the machine. - 1 -...
- Page 2 Customer: Date of delivery: Please note, that for the handling with your machine, it is only neccesary to read the marked chapters! 1.1.1 1.1.2 1.1.3 1.1.4 1.1.5 1.1.6 1.1.7 1.1.8 Cabinet/ Basic Unit 1.2.1 1.2.2 1.2.3 1.2.4 1.2.5 1.2.6 1.2.7 Gas supply 3.
-
Page 3: Options 1
Special Options: 12. Remarks: Specify Connections: - 3 -... -
Page 4: Table Of Contents
Copyright: Diener electronic GmbH + Co. KG All rights reserved. This publication may be reproduced or transmitted only with permission in writing form from the publisher (Diener electronic GmbH + Co. KG) Technical modifications are subject to change. © Diener electronic GmbH + Co. KG... - Page 5 Checkliste 1. Schaltplan geprüft 2. Baratron Datenblatt dabei 3. MFC Datenblatt dabei 4. Generatordoku dabei 5. Pumpendoku dabei Dies wird dem Kunden nicht ausgeliefert. Datenblätter in jedes Kapitel gleich dazuheften. - 5 -...
-
Page 6: Delivered Components And Description
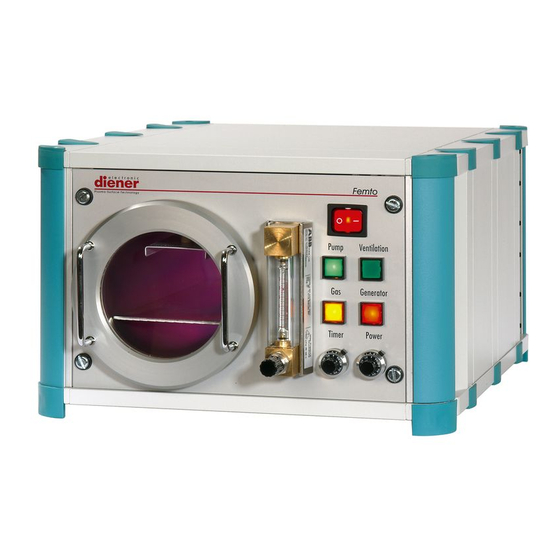
1.1 Delivered Components and Description 1.1 Cabinet / Basic Unit 1.1.1 BASIC UNIT TYPE A • Dimensions: Width approx. 345 mm Depth approx. 420 mm (570 mm incl. plugs) Height approx. 211 mm 1.1.2 BASIC UNIT TYPE B • Dimensions: Width approx. - Page 7 1.1.6 BASIC UNIT TYPE F • Dimensions: Width approx. 500 mm Depth approx. 550 mm (700 mm incl. plugs) Height approx. 600 mm 1.1.7 BASIC UNIT TYPE G • Dimensions: Width approx. 350 mm Depth approx. 600 mm (750 mm incl. plugs) Height approx.
- Page 8 SELECTION TYPE TYPE TYPE TYPE TYPE GAS SUPPLY Qty. of gas channels stainless steel stainless steel stainless steel stainless steel stainless steel Material needle valve needle valve Description Vögtlin Vögtlin Manufacturer Available on request on request on request on request on request flow values in sccm...
- Page 9 There are two variations of MFC’s (Mass Flow Controller) Variation 1: manual control, which has to be controlled like the needle valve And Variation 2: PC – controlled MFC. Detailed Information according the handling of PC – controlled MFC’s you will find in chapter 1.7 Controls, section PC- Control.
- Page 10 1.3.1 Connections for basic unit type A • Gas: 6mm Swagelok • Voltage / Power: 230 V / 16 A • Exhaust Air: tube, inner diameter approx. 10 mm Type label Ventilator Timer Connection pump Evacuation tube for Main power vacuum chamber supply (220 –...
- Page 11 1.3.3 Connections for basic unit type H • Gas: 6mm Swagelok • Voltage / Power: 400 V / 16 A • Exhaust Air: tube, inner diameter approx. 10 mm Main power switch Gas connection 2 Evacuation tube for vacuum chamber Gas connection 1 Ventilation Power supply...
- Page 12 SELECTION 1.4.1 1.4.2 1.4.3 1.4.4 1.4.5 1.4.6 VACUUM TYPE TYPE TYPE TYPE TYPE TYPE CHAMBER Chamber round round round round round rectangular configuration stainless borosilicate borosilicate Material: quartz glass quartz glass stainless steel steel glass glass vacuum chamber hinged door hinged door hinged door Chamber cover...
- Page 13 SELECTION 1.5.1 1.5.2 1.5.3 1.5.4 1.5.5 1.5.6 1.5.7 1.5.8 TRAYS TYPE TYPE TYPE TYPE TYPE TYPE TYPE TYPE quartz glass quartz flat tray flat tray flat tray flat tray flat tray flat tray Description boat glass boat stainless borosilicate stainless quartz aluminium quartz glass...
- Page 14 Selection Of 1.6.1 1.6.2 1.6.3 1.6.4 1.6.5 1.6.6 Type Type Type Type Type Type Electrodes RIE-electrode standard standard multi level multi level RIE-electrode with gas Title electrode electrode electrode electrode shower Suitable For round square round square round / square square Following Vacuum Chambers...
- Page 15 At all machines, without reference to the type of control, there are 5 process steps: Recipient is evacuating to lower pumping down 1. Pumping down: pressure Gas is feeding in and pressure stabilize automatic 2. Gas stabilization time: HF-Generator is turned on 3.
- Page 16 1.7.1 Control type A: semi - automatic • The controlling of the process happens semi automatic • Pump, gas flow, plasma process and venting have to be started manual. • Selectable parameters: process time, power, kind of gas, gas flow The single process steps are selected manual by user: 1.
- Page 17 Choose the time range accordingly the process: Example: Process duration 5 minutes Pre chosen time range ½ - 10 minutes: At the potentiometer on the front of the machine the time can be varied between ½ und 10 minutes via the scale division parts 0 – 10. b) Version with digital timer: control timer settings For more Information see chapter 10 ‘Information According Plasma Processes’...
- Page 18 Documentation for the control-software of the plasma machine (PRS) Femto-Nano-Pico-Tetra V 4.0 - 18 -...
- Page 19 3.2.1.1.2 RF-Generator ________________________________________________________________________26 3.2.1.1.3 RF-Generator with DC-Bias _____________________________________________________________27 3.2.1.1.4 RF-Generator with pulse width modulation __________________________________________________28 3.2.1.2 Matching _____________________________________________________________________________30 3.2.1.2.1 Diener eletronic Auto Matching___________________________________________________________30 3.2.1.2.2 Hüttinger Matching ____________________________________________________________________31 3.2.1.3 Pressure______________________________________________________________________________32 3.2.1.3.1 Pressure control with gases _____________________________________________________________32 3.2.1.3.2 Pressure control with gases or vapor ______________________________________________________32 3.2.1.4 Recipient _____________________________________________________________________________33...
- Page 20 5. Settings __________________________________________________________________ 58 5.1.1 Gas types ______________________________________________________________________________59 5.1.2 Mass-Flow-Controller _____________________________________________________________________59 5.1.3 Pressure Controller _______________________________________________________________________60 5.1.4 RF generator____________________________________________________________________________60 5.1.5 Rotary drive_____________________________________________________________________________60 5.1.6 Heating ________________________________________________________________________________60 5.1.7 Vaporizer with two valves __________________________________________________________________61 5.1.8 Controller ______________________________________________________________________________61 5.1.9 System ________________________________________________________________________________62 5.1.10 Password _____________________________________________________________________________64 5.1.11 Save _________________________________________________________________________________64 5.1.12 Load factory settings_____________________________________________________________________64 6.
-
Page 21: General
1. General The software ‚Plasma Reaktor Steuerung PRS’ is for the control of a plasma machine. PRS allows the input of all necessary parameters, and shows all interesting process parameters during the process (process picture and diagram). There are two operating facilities: •... -
Page 22: Operating Modes
3. Operating modes 3.1.1 Login / Logout If the button ‘Login…’ (F9) is pressed the following mask appears: If the right password is entered and OK is pressed the main picture is shown in the following way: - 22 -... - Page 23 - 23 -...
-
Page 24: Operating Modes
3.2 Operating Modes There are two operation modes, automatic and manual. The manual mode is only for inauguration and service and is protected by password. - 24 -... -
Page 25: Manual Mode
3.2.1 Manual Mode The manual mode is only available if the right password is entered. Now the manual mode can be used (CTRL+ M Manual). In the manual mode all operating parameters in the process figure can be entered. For example the edge valve can be switched manual, the flows of the mass-flow-controllers can be entered singled etc.. -
Page 26: Generators
3.2.1.1 Generators 3.2.1.1.1 LF-Generator Set power value can be entered, the actual power value will be displayed. The generator must be enabled, if the generator is enabled, the display field next to the button will be switch to green. 3.2.1.1.2 RF-Generator The operating mode must be chosen (normal or pulse). -
Page 27: Rf-Generator With Dc-Bias
3.2.1.1.3 RF-Generator with DC-Bias The operating mode must be chosen (normal or pulse). Set power value can be entered, the actual forward and backward power values will be displayed. The actual value of DC-Bias will also be displayed. The generator must be enabled, is the generator enabled, the display field next to the button will be switch to green. -
Page 28: Rf-Generator With Pulse Width Modulation
3.2.1.1.4 RF-Generator with pulse width modulation Operating mode (normal or pulsed) can be chosen. Set power value can be entered, the actual forward and backward power values will be displayed. The generator must be enabled, is the generator enabled, the display field next to the button will be switch to green. - Page 29 If operating mode “pulsed” is chosen, the period duration and the pulse width can be set. - 29 -...
-
Page 30: Matching
3.2.1.2 Matching 3.2.1.2.1 Diener eletronic Auto Matching Manual can be switched on or off. Set values for C-Load and C-Tune can be entered, the actual values will be displayed. If the button “Manual” is pressed, the set values will be used for the whole process. -
Page 31: Hüttinger Matching
3.2.1.2.2 Hüttinger Matching Set values for C-Load and C-Tune can be entered, the actual values will be displayed. If an error will be detected, the “ERR”-led blinks red, errors can be reseted by the reset- button. DC-Bias will be displayed. If the button “Auto”... -
Page 32: Pressure
3.2.1.3 Pressure 3.2.1.3.1 Pressure control with gases Input of set pressure and display of actual pressure. Further the pressure controller can be chosen. Pressure will be controlled by gases. 3.2.1.3.2 Pressure control with gases or vapor Input of set pressure and display of actual pressure. Further the pressure controller can be chosen. -
Page 33: Recipient
3.2.1.4 Recipient The state of the door switch, the overtemperature recipient switch, the interlock vacuum switch and the interlock pirani will be displayed. As soon as vacuum is in the chamber, the vacuum switch switches and the display field of the switch will be green. -
Page 34: Pump Stand
3.2.1.5 Pump stand 3.2.1.5.1 Pump stand with rotary vane pump In the manual mode the edge valve can be switched on/or off. The roots pump switches on automatically 10 seconds after switching the edge valve. If motor safety device for pump released the LED "Q2" will blink red and an alarm appears in Alarmlist. -
Page 35: Rotary Drive
3.2.1.6 Rotary drive If the button „Postioning“ is pressed, the rotary drive drives until he reaches the limit switch. “Enable” enables the moving of the rotary drive. If the supervisory time will be exceeded ( Settings) the alarm light “Error” is blinking red. - 35 -... -
Page 36: Vaporizer
3.2.1.7 Vaporizer 3.2.1.7.1 Vaporizer with Cycle time and On time The vaporizer valve can be enabled. Cycle time and ON time can be entered. The vaporizer will be operated pulse-width modulated. Tcycle means time of a periode, which consist of Ton and Toff, in wich Ton will be entered as a percentages of Tcycle. -
Page 37: Temperature
3.2.1.8 Temperature Input of set temperature and display of actual temperature (actual temperature is sometimes displayed in recipient visualization). Further the temperature controller can be chosen. If the temperature controller is switched off, the heating can be switched on or off manually. (Button for manual use of the heating is placed in the recipient visualization). -
Page 38: Gas Supply
3.2.1.9 Gas supply The set value for each MFC can be entered, the actual values will be displayed. The input will be made in sccm, as long as the pressure controller is switched off. If the pressure controller will be switched on, the share of the gas flows will be entered in %. Notice: The sum of the shares of the gas flows have to be 100%. -
Page 39: Automatic Mode
3.2. Automatic mode For the automatic mode the software PRS offers the opportunity to program different processes through the process parameters. With the function F3 Programs these processes will be created. Creating processes is only possibly, if the user is logged in (password). 100 program places are prepared, in which each program number is belonging to a program name. -
Page 40: Pumping Down
3.2.1. Pumping down At this point the input of the Pumping down pressure and the maximum pumping down time will be made. If this time will be exceeded an error message and an entry in the Alarm list appears. 3.2.2. Gas supply time 3.2.2.1 Gas supply time without vaporizer Duration means that time, which will be waited between the first open of the mass-flow- controllers and the switching on of the LF-generator. -
Page 41: Gas Supply Time With Vaporizer With Cycle Time And On Time
3.2.2.2 Gas supply time with vaporizer with Cycle time and On time Duration means that time, which will be waited between the first open of the mass-flow- controllers and the switching on of the generator. This time should be chosen as long as the desired process pressure needs to stabilize. -
Page 42: Gas Supply Time With Vaporizer With Two Valves
3.2.2. 3 Gas supply time with vaporizer with two valves Duration means that time, which will be waited between the first open of the mass-flow- controllers and the switching on of the generator. This time should be chosen as long as the desired process pressure needs to stabilize. -
Page 43: Plasma Process Time
3.2.3. Plasma process time 3.2.3.1 Plasma process time with LF-Generator without heating At this point the entry for the duration of plasma process in hours, minutes and seconds will be made. The set power and its maximum absolute deviation will be entered. If this value will be exceeded an error message and an entry in the Alarm list appears. -
Page 44: Plasma Process Time Mit Lf-Generator Or Rf-Generator Mit Puls Width Modulation And Heating
3.2.3.2 Plasma process time mit LF-Generator or RF-Generator mit Puls width modulation and heating At this point the entry for the duration of plasma process in hours, minutes and seconds will be made. The used generator must be chosen. The set power and its maximum absolute deviation will be entered. If this value will be exceeded an error message and an entry in the Alarm list appears. -
Page 45: Plasma Process Time With Lf-Generator And Rotary Drive
3.2.3.3 Plasma process time with LF-Generator and rotary drive At this point the entry for the duration of plasma process in hours, minutes and seconds will be made. The set power and its maximum absolute deviation will be entered. If this value will be exceeded an error message and an entry in the Alarm list appears. - Page 46 The error active time min means, the time which the respectively value has to be out of ranges before an alarm will be generated. - 46 -...
-
Page 47: Plasma Process Time With Rf-Generator With Matching And With Heating
3.2. 3.4 Plasma process time with RF-Generator with matching and with heating At this point the entry for the duration of plasma process in hours, minutes and seconds will be made. The operating mode for the RF-generator must be chosen. The set power and its maximum absolute deviation will be entered. -
Page 48: Flushing Period
3.2.4. Flushing period At this point the time of pumping down and time of flushing the chamber will be entered. 3.2.5. Venting period At this point the venting time will be entered. The venting time should be chosen in that way, that in the vessel is atmospheric pressure and the chamber door can be opened. -
Page 49: Operating
4. Operating 4.1. Start of the automatic mode After creating the process in the picture F3 Programs it can be changed back in the main picture (F1). A program can be chosen by the program number; the corresponding program name will be shown. - Page 50 If an automatic program should be started, the button “start” must be pressed and the following dialogue appears: If F2 “Yes” is chosen, the comment input mask appears: Rank and operator must be filled out, then the button F2”OK” can be pressed and the chosen program will be started.
- Page 51 If the machine is build up with a heating and the actual temperature is too low, the following dialogue appears: After using a heat on program the process can be started with If F2 “Yes”, then the comment input mask appears. - 51 -...
- Page 52 Under the heading „process stage” the actual process step is displayed by green blinking. Near the actual process step the actual passed step time is displayed. Stop stops the actual process, it stops exactly at the point the stop-button is pressed. If a possible evacuated chamber should be vented, it is necessary to change to the manual mode.
-
Page 53: Error Messages/Alarmlist
4.2. Error messages/Alarmlist In the alarm list (to reach with F5 Alarm list) all appeared alarms/errors will be listed with date and time of its appearing. With red letters the incoming alarm/error will be shown and in green letters the gone of the alarm/error. -
Page 54: New List
4.2.1 New list In the new list are all new and not acknowledged alarms listed. The new list can be displayed with the button in the menu bar of the alarm list. The following alarms can appear: • Internal error occured! Please inform service! •... - Page 55 • Motor safety device for rotary drive released! • Rotary drive doesn't rotate! • Matching signals an error! • Chamber door switch open and vacuum switch on! Please check! • Chamber door switch open and actual pressure less than 1 mbar! Please check! •...
-
Page 56: Old List
4.2.2 Old list In the old list all alarms listed, which are acknowledged but still activ. The old list can be displayed with the button in the menu bar of the alarm list. - 56 -... -
Page 57: Chronicle
4.2.3 Chronicle The chronicle contents the last 100 alarms (came, gone and acknowledged) in chronological order. The chronicle can be displayed with the button in the menu bar of the alarm list. - 57 -... -
Page 58: Settings
5. Settings At the point F7 Settings there will be made the settings, which not depend on the process but depend on the machine and the customer. - 58 -... -
Page 59: Gas Types
5.1.1 Gas types The for the mass-flow-controllers necessary correction factors for the gases will be entered at this point. 5.1.2 Mass-Flow-Controller The maximum gas flows for the installed mass-flow-controllers have to be entered. These settings will be done by the supplier and should not be changed in normal case. Another setting for the mfc’s is the warm up time. -
Page 60: Pressure Controller
5.1.3 Pressure Controller The input of the parameters of the pressure controller will be done by the supplier and should not be changed in normal case. 5.1.4 RF generator The ignition power and ignition duration can be set. 5.1.5 Rotary drive Supervisory time for rotary drive can be set. -
Page 61: Vaporizer With Two Valves
5.1.7 Vaporizer with two valves The input of the clock times will be done by the supplier and should not be changed in normal case. 5.1.8 Controller The interface, where the controller is connected, must be chosen. - 61 -... -
Page 62: System
5.1.9 System At this point it can be chosen, if the data should be saved after the end of process and in which directory it should be written. Also the automatic data export, which allows reading the exported data with other programs like Excel, can be chosen. - Page 63 Also the option “monthly saving in sub directory (JJJJ-MM) can be chosen. If this option is chosen, a file with the format JJJJ-MM (e.g. 2004-10 for October 2004) will be monthly created. In this file all exported data of one month are saved. The automatic protocol printout of end of process can also be activated.
-
Page 64: Password
5.1.10 Password The interface where the controller is connected can be set. 5.1.11 Save All settings can be saved with F9 save. 5.1.12 Load factory settings If the settings have been changed and saved inadvertently, the factory settings (delivery state) can be loaded any time. - 64 -... -
Page 65: Diagram
6. Diagram 6.1. Settings All process parameter are shown over the process time, each parameter has its own Y-axis. The displayed channels and Y-axes can be adapted arbitrary, there are different dialogues avaiable: - 65 -... -
Page 66: Channel Dialogue
6.1 Channel dialogue The channel dialogue could be displayed in following ways: Double-click on the area of the diagram, where the channels appears (cursor changes) or right mouse button in an empty space in the legend area of „Properties“ or click the symbol in the diagram The following dialog appears: Channel: The displayed signals are listed. - Page 67 Color: Every signal assigns its own colour. To change the colour double click on the colour area. The colour dialog opened and you can assign the colours to the signal. Style: The style of the lines will be chosen at this point. Line style: The line style can also be changed in the same way.
-
Page 68: Y-Axis Dialogue
6.2 Y-axis dialogue The single Y-axis dialogue could be displayed in following ways: Double-click on the area of the diagram, where the Y-axis appears (cursor changes) or right mouse button „Properties“. The following dialog appears: Label: Name of the Y-axis. Display value min/max: Minimum value and maximum value of the indicating range of the y-axis can changed arbitrary. - Page 69 - 69 -...
-
Page 70: Axes Alignment
6.3.1 Axes alignment: The digital channels can be displayed either overlaid side by side or separately one above the other. The analog channels can be displayed either overlaid side by side or separately one above the other. The analog and digital channels can be arranged in the following ways: Digital axes above and analog axes below Analog axes above and digital axes below Digital axes left and anlog axes right... -
Page 71: Precision
6.3.6 Precision Number of fractional digit, which are displayed. 6.3.7 Colour Every axis assigns its own colour. To change the colour double click on the colour area. The colour dialog opened and you can assign the colours to the signal. 6.3.8 Y-Axis The label y-axis allows the choice of displaying each signal in the diagram. -
Page 72: Function Of The Diagram
6.3.12 Function of the diagram At the lower range of the diagram there is a function bar. In this function bar there are 10 buttons and 1 scrollbar. This button is used for auto scroll on/off. Is this button pressed, the diagram is automatically scrolled, and always the actual record is shown in the visible area. - Page 73 The visible range will be adjusted with this dialog, every possible time range can be displayed. This button is used for the y-axes-dialogue (see above). This button is used for free zooming on/off. With pressed left mouse key an arbitrary range can be dragged. If the mouse button will be let off, this range will be displayed maximized.
- Page 74 This button is used for ruler on/off. If this button is pressed, two rulers appear in the diagram (at the left and right margin). As well a table is shown where the actual values of the signals between the two rulers are displayed.
-
Page 75: Functions Of The Diagram In The Manual Mode
For all signals, which will be achieved, it will be made a legend automatically. If one signal should be hidden or shown, the mouse cursor has to be moved above the corresponding signal name until the cursor changes and then double clicking the left mouse button. 6.3.13 Functions of the diagram in the manual mode These functions of the diagram are only available in the manual mode. -
Page 76: Archive
7. Archive In the archive all saved processes including file info can be shown each time. - 76 -... -
Page 77: Load
7. 1 Load... F9 Load... the „File open dialog“ appears and a file can be chosen and loaded. If a file is very large (Process time <= 24 h) the loading time could be longer (>= 5 minutes). At this time the software PRS do not react on inputs, but the active process is still running. It will be better to load large files only if the process is stopped. -
Page 78: Export Process Data
7.3 Export Process data At this point all process data or some single process data can be exported. A file name must be entered for the exported data. The data will be exported in the *.tsv-format. This format can be imported e.g. in EXCEL or ORIGIN. -
Page 79: Maintenance
8. Maintenance The maintenance parameters can be entered in this mask and the current values will be displayed. As soon as maintenance must be done (maintenance of the whole plant or oil change of a pump) a red flashing text appears in the main picture. - 79 -... -
Page 80: General
8.1. General The most important general parameter is the maintenance interval (input in months). The date of the next maintenance is displayed. If the maintenance is done, it must be confirmed by the button “maintenance done” and the date of the next necessary maintenance will be calculated and displayed. - Page 81 If the button „Restore data…“ is pressed the same dialog appears, to select the directory in which the backup data should be loaded and the data will be restored. - 81 -...
-
Page 82: Leakage Rate Measuring
8.4 Leakage rate measuring To do a leakage rate measuring the button “Leakage rate measuring” has to be pressed. The following mask appears: The pumping down pressure, the duration of measuring and the chamber volume must be input. Then the measuring can be started. During the measuring the actual duration is displayed, after the measuring the leakage rate will be displayed. - Page 83 SELECTION 1.8.3 1.8.4 1.8.5 1.8.6 1.8.1 1.8.2 GENERATOR TYPE TYPE TYPE TYPE TYPE TYPE 40 kHz 40 kHz 13.56 MHz 13.56 MHz 13.56 MHz 2.45 GHz Frequency 0 - 100 W 0 – 1,000 W 0 - 50 W 0 - 100 W 0 –...
- Page 84 Manual matching: The handling of the manual matching takes a certain extent of patience and sensitivness. The display ‘Forward’ shows the forward power of the generator (that means the power which is sent into the chamber). The display ‘Reflected’ shows the reflected power of the generator (that means the power which is sent back to the generator).
- Page 85 Automatching: The capacitors will be automatic adjusted and if changes appear automatic readjusted at the automatching. In case that the operating conditions (pressure, temperature, etc.) change dramatically it might be necessary to restart the adjusting process, therefore press the ‘Reset’ button. Press the button ‘Retuning’...
- Page 86 LFG - 40 - Generator Front 5. Green Indicator Lamp „LF on“ 3. Power Display 4. Red Main Power Signal Lamp Switch with „Overheat“ Indicator Lamp 2. Power (potentiometer for desired value) 1. Main Power Switch with Control Lamp 2. Power (potentiometer for desired value) With this potentiometer the desired HF-power value can be adjusted in manual operating mode.
- Page 87 LFG - 40 - Generator 2. LF-output 4. Sub-D-connector 1. Ventilator 6. Power supply line 3. Type label 5. Fuses 1. Ventilator 2. LF-output (electrode-connections) 3. Type label 4. Sub-D-connector for automatic operation mode resp. with dummy plug for manual operating mode.
- Page 88 RFG 13,56 / 100 Generator: Front 1. Ventilator 2. “DC on” 3. Green indicator lamp „RF on“ RFG 13,56 / 100 Generator: Back 4. Sub-D- connector for 6. Power control supply 5. HF-output 1. Ventilator 2. LED „DC on“ Status power supply 3.
- Page 89 RFG 13,56 / 300 Generator: Front 3. Power display 3. Power display ‚Reflected Power’ ‚Forward Power’ 2. Power 1. Main power switch (set point with potentiometer) control lamp 5. LED overheat 6. LED max. power 8. LED overload 7. LED +50 V 4.
- Page 90 RFG 13.56 / 300 Generator: Back Oscillator Ventilator Control plug Ventilator HF output Fuses Protection conductor / grounding Power supply - 90 -...
- Page 91 Vacuum pumps are necessary to produce a vacuum in the plasma machine’s recipient. SELECTION 1.9.1 1.9.2 1.9.3 1.9.4 VACUUM PUMPS TYPE TYPE TYPE TYPE S1.5 D2.5E PK2DC SC5D Description rotary vane rotary vane rotary vane dry pump Description pump pump pump Exhaust filter Leybold...
- Page 92 SELECTION 1.9.5 1.9.6 1.9.7 1.9.8 VACUUM PUMPS TYPE TYPE TYPE TYPE D16BCS D16B N62 D16BCS N62 D16BCS PFPE Description PFPE-Al rotary vane rotary vane rotary vane rotary vane Description pump pump pump pump Exhaust filter oil filter 3— Leybold Leybold Leybold Leybold Manufacturer...
-
Page 93: Vacuum Pump 1
SF Purge gas valve for pump By the factory made installation (by Diener electronic) of a purge gas valve, a save working method is guaranteed. The rotary slide pump compress the gas, therefore a oil mist can arise and in worst case it may happen, that a explosive mixture of oil mist and oxygen gas arises. - Page 94 Connect vacuum pump with chamber. Place pump below the machine (on the floor) to avoid that in case of malfunction pump oil flows back to the chamber. Femto Pump Femto Pump Connect exhaust pipe. Exhausts have to be directed to fresh air or a professional exhaust system.
- Page 95 Pump – Connections Connection vacuum pump Pump S 1.5: Purge gas valve On / Off switch Connection vacuum pipe Exhaust pipe Power supply pump Power supply machine Connection for power supply pump Connection Pump 2.5: vacuum pipe Exhaust pipe with filter Vacuum pipe Exhaust filter Power supply...
- Page 96 Pump PK2DC: Connection vacuum pipe to pump Exhaust filter Connection vacuum pipe Exhaust pipe Power supply machine Power supply pump Pump SC5D: Connection vacuum pipe Connection pump with vacuum tube Power supply Connection for power machine supply of pump - 96 -...
- Page 97 Pump D16B; D16BCS; D16BCS PFPE; D16BCS PFPE-Al2O3 Exhaust tube Connection vacuum pipe Power supply machine Connection power supply pump - 97 -...
- Page 98 1.10.1 Spare Part Set – Standard • 1 clamping ring + 1 seal • 1 glass window • 1 door seal • 10 pcs. fuses for plasma machine • 1 litre mineral oil for vacuum pump 1.10.2 Spare Part Set – PFPE •...
- Page 99 1.10.4 Pressure Regulatores • For connection to the gas bottle - 200 bar • Available / pressure: 200 bar • Different gases require different pressure regulators • Pressure regulators for noble gases, H , CF • Pressure regulator for NH connector no.
- Page 100 1.10.5 Hot Plate • The parts will be placed on the hot plate. • The hot plate can be heated up to a max. temperature of 150°C • For defined process conditions, higher etching rates equipped with Temperature Monitor • A thermo sensor will be mounted in the vacuum chamber •...
- Page 101 1.10.6 Heatable Chamber • The chamber can be heated up to approx. 80 °C • The temperature is adjustable. • For defined process conditions, higher etching rates 1.10.7 Faraday Box / Cage • For electric sensitive parts • The parts will be placed at the inside of the box. •...
-
Page 102: Carrier 1
1.10.9 Bubbler Bottle: • Accessory for polymerization • To connect liquid monomeres with the vacuum chamber • Works with carrier gas instead of a simple monomere bottle • Carrier gas (e.g. Argon) is flushed through the monomere. figure: Connection bubbler bottle with needle valve Safety valve (Kalrez) - Page 103 1.10.11 Oxygen Generator • Oxygen will be produced out of air. • Type: Kroeber O • Oxygen power: 3 - 6 l/min For more information see data sheet of manufacturer. 1.10.12 Pressure Measurement • Pirani Sensor 1. The pirani sensor measures the pressure in the vacuum chamber at a process pressure below 10 mbar.
- Page 104 Pirani Measurement 2. Test of Pirani-Sensor: To test the sensor, the resistor should be tested with an ohmmeter. Before the testing, the plug for the pirani sensor has to be disconnected. The resistance has to be between 2.2 and 2.6 Ω. Plug for Pirani Sensor Relais...
- Page 105 3.10. The PCB is a window comparator, the machine works with a pressure between 0.3 and 4 mbar. Prozess- Process druck Pressure 4 mbar 0,3 mbar Time Zeit © Diener electronic GmbH + Co. KG - 105 -...
- Page 106 10.13 Pressure Measuring Instrument • Baratron • Manufacturer: MKS (www.mksinstruments.de) • Designated use: mainly for processes with CF 1.10.14 Power Display • Shows the actual power of the generator. • Analog display 1.10.15 Timer LT4H – Instead Of Standard Timer •...
- Page 107 1.10.16 Process Gas Bottle • Oxygen – gas bottle as process gas • Hydrogen – gas bottle as process gas • Argon – gas bottle as process gas Purity Of Gases: In general gases with technical purity are used. Do you want to treat parts with a very high demand on the surface purity so choose a gas with high purity.
- Page 108 10.18 Safety Valve • Safety valve for operating with H To guarantee a safe operating with hydrogen, we offer a safety valve, which will be mounted between MFC and chamber. This safety valve prevents, that the chamber might sucks air when the machine is off and therefore might an explosive mixture of air and hydrogen arises.
- Page 109 10.22 Laundry Bag • For the precleaning of small parts in a washing machine. • Dimensions: 500 mm x 300 mm • Minimum order: 20 pieces 10.23 Washing Machine / Dryer • For the first cleaning of small parts before the plasma treatment. •...
- Page 110 10.27 OES – Optic Emission Spectrometer • Supervising of plasma processes for quality assurance. • Detection of plasma process endpoint. • OES only in combination with PC – controlled machine. The optic emission spectroscopy offers a possibility for online process supervising of low pressure plasma processes.
- Page 111 10.28 Further Software Features • The Software can be upgraded anytime for further features. • Please tell us your requirements. 10.29 Maintenance Quote for Your Plasma Machine • oil change • control of all connections, seals, plugs,… • leak rate test •...
-
Page 112: Connecting Of The Machine
1. Place machine on table or on the place you supposed for it. Femto 2. Place pump on the floor. Pump 3. Remove protective caps from pump and machine. 4. Place seals between vacuum tube and junctions (1x machine, 1x vacuum exit of pump), before mounting the clamp to fix the tube with the junctions. - Page 113 10. The operating mode of machine is according to installed control (semi-automatic, automatic or PC – control). Find more information to the controls in chapter 1.7 Controls. As a matter of principle read following procedure for the plasma treatment: a) Load chamber. b) Press cover / door against chamber opening.
- Page 114 Hardware: __________________________________________________________________ __________________________________________________________________ __________________________________________________________________ __________________________________________________________________ __________________________________________________________________ __________________________________________________________________ __________________________________________________________________ __________________________________________________________________ __________________________________________________________________ __________________________________________________________________ Software: __________________________________________________________________ __________________________________________________________________ __________________________________________________________________ __________________________________________________________________ __________________________________________________________________ __________________________________________________________________ __________________________________________________________________ __________________________________________________________________ __________________________________________________________________ __________________________________________________________________ __________________________________________________________________ - 114 -...
- Page 115 The machine has to be connected with a power supply system, which voltage is conformable with specification on type label. • Diener electronic GmbH & Co. KG does not grants liability for defects caused by incorrect usage (e.g. short circuit caused by unsuitable power supplies)! Damp Rooms •...
- Page 116 Bromine, chlorine, iodine, bortrichlorine, tetrachloromethane and all other chlorine containing and high corrosive materials. The company Diener electronic GmbH & Co. KG will not grant liability for damages on the machine which are caused by using those materials (corrosive gases on standard machines...
- Page 117 Power Plug • Do not pull out power plug on wire. • In case that the power plug of the plasma system is damaged it has to be replaced, to avoid endanger. • Before open the cabinet, pull power plug. Animals •...
- Page 118 Maintenance and Repair • The maintenance has to be done on demand by Diener electronic GmbH + Co. KG. • Only mineral oil from Diener electronic must be refilled into the pump. We don’t use fluorine containing oil. Therefore the pumps can be used for oxygen processes.
-
Page 119: Maintenance
4.1. Pump • Check oil level daily. • Please follow manual of pump manufacturer. • For oil change interval see manual. The oil change has to occur every 3 months. 4.2. Safety Components • Check following components semi-annual (see circuit diagram): 6.2.1. - Page 120 Fault Possible cause Remedy gas line is not opened open gas line plasma system running, needle valve is closed open needle valve plasma not burning short circuit, caused by place conductive parts in that conductive parts touching the way, that they don’t touch the electrode electrode door can not be opened...
-
Page 121: Spare Part List
O-ring seal for ignition coil – 29037 ? EUR silicone Electrode bushing (ceramic) 30182 39.00 EUR (ignition coil) KF-seals (set) 10511 30.00 EUR Glass seal Femto 29355 ? EUR Door seal Femto 29356 ? EUR O-ring 130x5mm 27108 ? EUR O-ring 130x5mm, silicone red 30725 2.00 EUR... - Page 122 Description Order no. Price / piece MFC Viton 10sccm 27513 1550.00 EUR MFC Viton 20sccm 26283 1550.00 EUR MFC Viton 50sccm 26548 1550.00 EUR MFC Viton 100sccm 26618 1550.00 EUR MFC Viton 200sccm 26549 1550.00 EUR MFC Viton 500sccm 26550 1550.00 EUR MFC Viton 1.000sccm 27514...
- Page 123 Description Order no. Price / piece needle valves of manufacturer Vögtlin float-type flow meter 31191 155.00 EUR 40-430 sccm, stainless steel float-type flow meter 31190 155.00 EUR 10-100 sccm, stainless steel float-type flow meter 31192 155.00 EUR 200-2200 sccm, stainless steel float-type flow meter 31193 155.00 EUR...
- Page 124 D-72202 Nagold We hereby declare that our plasma systems in the Production series: Femto, Pico, Nano, Tetra 30, Tetra 100 und Tetra 150 in the versions that we placed on the market, meet the following fundamental safety requirements. This declaration loses its validity where a modification is made without our agreement.
-
Page 125: Warranty
The warranty is invalidated if the device is misused or handled incorrectly, if excessive force is applied, or in the case of intervention by anyone other than ourselves. For repair purposes, please pack the plasma system carefully and send it to: Diener electronic GmbH + Co. KG Talstr. 5 D-72202 Nagold Germany Tel.: 00 49 74 52 888 07 0... -
Page 126: Information According Plasma Processes
Directory Plasma Process: 10.1 Parameters………………………………………………………………………………… 10.2 Materials….…………………………………………………………………….………….. 10.3 Spread of plasma………………………………….…………………….……………….. 10.4 Pressure of gas bottle…..……………………………………………………………… 10.5 Selection of gases………………………………………………………………………… 10.5.1 Purity of gases…………………………………………………………………………… 10.5.2 Selection of pressure regulator………………………….……………………………… 10.6 Gas piping………………………………………………………………………………… 10.7 Gas bottle safety guidelines……..……………………………………………………… 10.8 Gas consumption…………………………………………………………………………. 10.9 Gas correction factor (GKF)……………………………………………………………... - Page 127 In the following chapter you will find some information, which shall help you to find the right process parameters. 10.1 Parameters: These parameters are not exact specifications, which refer to our standard systems. For the parameters it doesn’t matter what kind of generator is installed. 10.2 Materials: Regard the product attributes concerning sensitivity to heat, UV or single process gases, by choosing the process parameters.
- Page 128 10. 5 Selection of gases To select the right gases for the different plasma processes, look for information in the chapters cleaning, activation, etching and coating according to your application. 10.5.1 Purity of gases: Most commonly used are gases with technical purity, if you want to treat parts with very high requirements to the surface purity, choose a gas with ultra high purity.
- Page 129 Find following table as an overview to select the right pressure regulator for your gas bottle. For special gases ask your local gas supplier. Gas connections according to DIN 477: Connection- Allowed gases Threads methane, silane, hydrogen W 21,80 x 1/14" LH acetylene Anschluss für Spannbügel carbon monoxide...
- Page 130 10.6 Gas piping Our machines are equipped with swageloks of the size 6 mm, therefore you need stainless steel tubes with an inner diameter of 4 mm and an outer diameter of 6 mm to observe the regulation TRGS (no. 220) for gas piping.
- Page 131 = t [minutes] Gas flow in cm³ 3. t [minutes] = t [hours] Calculation example Femto (first line of table) 2 l x 200 bar = 400 l (at 1 bar) 400 l x 1000 = 20.000 minutes 20 cm³...
- Page 132 10.9 Gas correction factor (GKF) The gas correction factor (GKF) has to be typed in at computer controlled machines. This setting can be changed in the software ‘PRS’ in the table ‘settings’. Changing the gas correction factor: 1. First you have to login (password: PRS) 2.
- Page 133 10.10 Process parameters in general: Following parameters can be adjusted: • Process duration • • Pressure (process pressure) • Power (is shown in %) • (Temperature, only if chamber heating is installed) At computer controlled machines, the single parameters can be adjusted more detailed. The software is customized according to the machine design.
- Page 134 Detailed process parameters: 10.10.1 Cleaning Pressure Power Time Application Group Material [mbar] [min.] Aluminium 0,2-0,5 50-100 1-60 Copper 0,3-0,8 50-100 1-60 Metal Gold 0,2-0,5 50-100 1-60 Silver 0,3-0,8 50-100 1-60 Stainless steel 0,2-0,5 50-100 1-60 0,2-0,5 30-70 1-20 0,2-0,5 70-100 1-30 0,2-0,5 50-100...
- Page 135 There are two methods to measure the cleaning effect: 1. Measuring the surface energy with test inks (see also brochure ’Plasma Technology’) 2. Perform a LABS –Test (german: Lack Benetzungs Stoerung; english: lacquer wetting fault) LABS-Test performance: Place the sample parts on a clean glass plate and flush the part with acetone. After evaporating of the acetone paint the glass plate with a silicone free lacquer.
- Page 136 Example of program (valid for PC controlled machines): Reduction of Oxides on Copper: Machine: Femto LF PC Program step: Introduction Value last Subprogram don't change Subprogram1 Pumping Off Period 1. Pumping off pressure 0,2 mbar 2. max. Pumping off time 30 min.
- Page 137 10.10.1.2 Cleaning of plastic parts At the cleaning of plastic parts there is always an activation of the surface at the same time included. As process gas oxygen with technical purity is used, sometimes air as process gas is enough. The plasma treatment can be repeated.
- Page 138 10.10.2 Activation General Parameters: Pressure Time Application Group Material [mbar] Power [%] [min.] Aluminium 0,2-0,5 50-100 1-10 Copper 0,3-0,8 50-100 1-10 Metal Gold 0,2-0,5 50-100 1-10 Silver 0,3-0,8 50-100 1-10 Stainless st. 0,2-0,5 50-100 1-10 0,2-0,5 30-70 1-20 0,2-0,5 70-100 1-30 0,2-0,5 50-100...
- Page 139 10.10.2.2 Acitivation of plastics Plastics like polypropylene or PTFE are covalent. That means, that those materials have to be pretreated before printing, painting and bonding. The common process gas for this application is oxygen with technical purity. Exceptions are fluorine containing plastics like PTFE, FEP, …...
- Page 140 Example for process with rotary drum: Activation of polyamide-parts Machine: Femto LF PC, rotary drum Program step: Introduction Value last Subprogram don't change Subprogram1 Pumping Off Period 1. Pumping off pressure 0,2 mbar 2. max. Pumping off time 30 min.
- Page 141 Example for process with standard electrode: Activation of polyethylene Machine: Tetra 30 LF PC, multi tray electrode Program step: Introduction Value last Subprogram check off Subprogram1 Pumping Off Period 1. Pumping off pressure 0,2 mbar 2. max. Pumping off time 30 min.
- Page 142 10.10.2.3 Activation of glasses and ceramics: Glasses and ceramics have similar activation attributes as metals (see chapter above) and are not easy to activate (long-term durable), but be etched. (See chapter ’Etching of glasses and ceramics’.) Pressure Time Group Material [mbar] Power [%] [min.]...
- Page 143 10.10.3.1 Etching of metals It is possible as a matter of principle to etch metals, though only with high corrosive gases, which might cause corrosion on the metal. To enhance the etch effect, the parts can be preheated, or if the plasma system has a heater, be heated continuous.
- Page 144 Example for process with standard electrode: Etching of POM Machine: Femto LF PC, standard electrode Program step: Introduction Value last Subprogram don't change Subprogram1 Pumping Off Period 1. Pumping off pressure 0,2 mbar 2. max. Pumping off time 30 min.
- Page 145 10.10.3.3 Etching of glasses and ceramics: The plasma etching of glasses in vacuum is time-consuming and expensive. Glass will be slowly removed by the ionised gas particles. Glass is mainly made of SiO which can only be etched with fluorinated hydrocarbon (under addition of oxygen). The low denudation rate and the long process time are responsible for the high cost of such processes.
- Page 146 10.10.4 Coating via plasma polymerization For coating processes in low pressure plasma monomers (as gas or as liquid) will be fed into the machine to polymerize under plasma influence. The thickness of the plasma polymer coatings is anywhere in the range of 1 micrometer. The adhesion of the coatings to the surface is very good.
- Page 147 10.10.4.1 Coating of metals via plasma polymerization By coating metals via plasma polymerization different effects can be reached. E.g.: a long term stable activation, functional and decorative coatings. In general, the usage of a sputter machine is the best way to create metal coatings. This machine is explained in detail in the chapter ‘Coating via sputtering’.
- Page 148 Example for mulit layer coating process: Coating of metals (permanent hydrophilic) Machine: Femto LF PC, multi layer carrier Program step: Introduction Value last Subprogram clear hook / inaktive Subprogram1 Pumping Off Period 1. Pumping off pressure 0,2 mbar 2. max. Pumping off time 30 min.
- Page 149 last Subprogram clear hook / inaktive Subprogram2 Pumping Off Period 1. Pumping off pressure 0,2 mbar 2. max. Pumping off time 30 min. Gas Supply Period 3. select gas Gas1: free Gas2: free 4. Gas supply period 30 sek. 5. select process gas no. none, because monomer (HMDSO) is selected 6.
- Page 150 last Subprogram clear hook / inaktive Subprogram3 Pumping Off Period 1. Pumping off pressure 0,2 mbar Gas Supply Period 2. max. Pumping off time 30 min. 3. select gas Gas1: O2 Gas2: free Plasma Process Period 4. Gas supply period 30 sek.
- Page 151 last Subprogram clear hook / inaktive Subprogram4 Pumping Off Period 1. Pumping off pressure 0,2 mbar Gas Supply Period 2. max. Pumping off time 30 min. 3. select gas Gas1: free Gas2: free Plasma Process Period 4. Gas supply period 30 sek.
- Page 152 last Subprogram check off Subprogram5 Pumping Off Period 1. Pumping off pressure 0,2 mbar Gas Supply Period 2. max. Pumping off time 30 min. 3. select gas Gas1: O2 Gas2: free Plasma Process Period 4. Gas supply period 30 sek. 5.
- Page 153 10.10.4.2 Coating of plastics via plasma polymerization Plastics are mostly easy to coat via plasma polymerization. So e.g. can CD’s and DVD’s be coated with an anti-scratch coating without a reduction of their quality. PTFE-like coatings can be created to enhance the slippage of the sample parts / products. It is also possible to create functional groups on the surface (e.g.
- Page 154 10.10.4.3 Coating of glasses and ceramics via plasma polymerization The main problem in coating glasses and ceramics is to prepare the surface (see chapter activation and etching). As soon as this problem is solved, there is no limit in the variety of coating applications. The particular bonding adhesion of the coating has to be tested in individual case.
- Page 155 Aggressive Liquids......................chap. 3 Animals .........................chap. 3 Carrier ........................chap. 1.7 Ceramic isolator for electrode..................chap. 6 Chamber volume .......................chap. 1.4 Chamber seals......................chap. 6 Circuit diagram....................... Attachment Cleaning........................chap. 4 Connections ....................chap. 1.3, 1.9, 2 Connecting the machine……………………………………………………………………..chap. 2 Damp rooms .........................chap. 3 Description of parts.....................chap. 1.3, 1.7 Door ........................chap.
- Page 156 Safety guide lines ......................chap. 3 Fuses ............................Clamp............................Voltage............................Voltage connection ........................Control ............................Sealing ........................chap. 4, 6 Suction pipe for vacuum chamber ................chap. 1.3 Suction sifter .........................chap. 6 Technical data .......................... Thermal danger ......................chap. 3 Timer........................chap. 1.3, 1.7 Type label ......................chap. 1.3, 3 Troubleshooting .....................chap.
Need help?
Do you have a question about the femto and is the answer not in the manual?
Questions and answers