Table of Contents
Advertisement
Advertisement
Table of Contents

Related Manuals for Optelec clearview speech


Summary of Contents for Optelec clearview speech
-
Page 3: Table Of Contents
1.2 What’s in the box ......................4 Setup ............................. 4 2.1 To install the ClearView+ Speech to the Optelec ClearView+ ........4 Getting to know your ClearView+ Speech ................. 6 3.1 Switching the ClearView+ Speech on and off .............. 6 3.2 Resetting the ClearView+ Speech ................ - Page 4 Optelec ClearView Speech User Manual Version 0.1 © 2013 Optelec, the Netherlands All rights reserved Optelec P.O. Box 399 2990 AJ Barendrecht The Netherlands Phone: +31 (0)88 678 34 44 E-mail: info@optelec.nl Internet: www.optelec.com Page 2...
- Page 5 Optelec ClearView Speech WEEE Notice The directive on Waste Electrical and Electronic Equipment (WEEE), which entered into force as European law on February 13, 2003, resulted in a major change in the treatment of electrical equipment at end-of-life. The purpose of this Directive is, as a first priority, the prevention of WEEE, and in addition, to promote the reuse, recycling and other forms of recovery of such wastes so as to reduce disposal.
-
Page 6: Introduction
The ClearView+ Speech monitor arm SD card to save documents This user manual If any of these items are missing from your package, please contact your Optelec distributor. Setup To install the ClearView+ Speech to the Optelec ClearView+ Install the ClearView+ Speech arm onto the ClearView+... - Page 7 Optelec ClearView Speech B) Place the ClearView+ Speech monitor on the arm C) Connect the VGA, power and USB cable to the monitor and to the ClearView+ D) Insert the SD card at the right side of the monitor Page 5...
-
Page 8: Getting To Know Your Clearview+ Speech
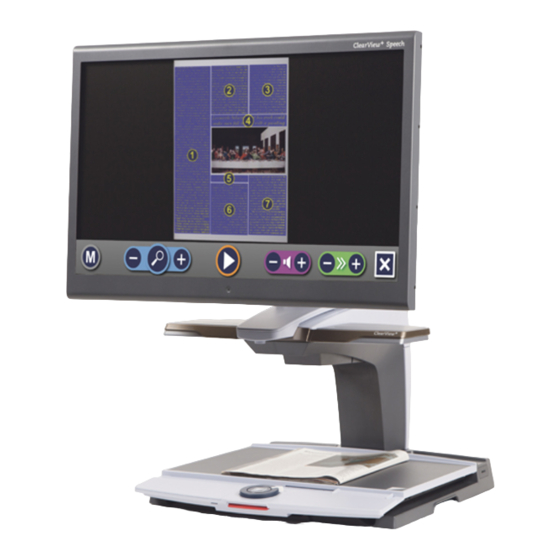
ClearView Speech Getting to know your ClearView+ Speech This chapter will familiarize you with the operation of the Optelec ClearView+ Speech. 3.1 Switching the ClearView+ Speech on and off To switch on both the ClearView+ and ClearView+ Speech module, press the ON / OFF button located right above the magnification button on the reading table. - Page 9 Optelec ClearView Speech Step 4: Tap the screen to activate the document capture process and start the speech. This can take approximately 15 to 20 seconds. Step 5: The speech will start reading the document and the document zones will be marked on the screen with large blue numbered bullets.
-
Page 10: The Button Bar
Optelec ClearView Speech 3.4 The Button Bar The following figure shows the ClearView+ Speech button bar. Use the button bar to start and pauze the speech, adjust the magnification, adjust the volume, adjust the reading speed, activate the menu and to exit Speech mode and return to ClearView+ mode. -
Page 11: Reading Modes
Optelec ClearView Speech 3.5 Reading modes The ClearView+ Speech has two modes: ClearView and Speech mode. When in ClearView mode, the ClearView+ operation is not changed. All ClearView+ buttons, located on the reading table function exactly the same as with a ClearView+ without the ClearView+ Speech module. -
Page 12: Magnifying A Document
Optelec ClearView Speech Magnifying a document To leave the full page Overview with navigation bullets, and magnify your document, tap the blue “+” button on the left hand side of the Button Bar right of the magnifying glass. To decrease the magnification, tap the blue “–”... -
Page 13: The Clearview+ Speech Menu
Optelec ClearView Speech The ClearView+ Speech Menu This chapter will familiarize you with the ClearView+ Speech Menu. Save Open Delete documents documents saved documents Change Change viewing Change voice mode settings Activating and closing the menu To activate the menu, tap on the grey Menu button. The Menu button is the most left button on the Button Bar marked with the character “M”. -
Page 14: Open
Optelec ClearView Speech If you wish to save a document without a voice label, select “No”. The document will be saved using the first line of the document as the name of the document. If you would like to add a voice label, select “Yes”. -
Page 15: Delete
Optelec ClearView Speech Scroll the list of documents or pictures using the scroll bar on the right side of the screen. If you touch the screen and slowly move your finger over the documents, the title of the document will be read aloud. -
Page 16: Voice
Optelec ClearView Speech Voice This menu item lets you select your reading voice and language. To select another reading voice, tap the “Voice” button. The ClearView+ Speech will switch to the next configured voice. If by adjusting the reading voice results in a change of language, the menus will automatically change to the same language. -
Page 17: Contrast
Optelec ClearView Speech • Black – Purple • White – Blue • Purple – Black • Black – Amber • Blue – White • Amber – Black 4.7.2 Contrast Tap the “Contrast” button to enable or disable high contrast text colors. Pictures will always be displayed in their original colors. -
Page 18: Options
Optelec ClearView Speech 4.8.2 Options The “Options” button in the settings menu opens 3 options that you can change: Text Recognition Quality Activate Speech Automatic Language Detection 4.8.2.1 Text Recognition Quality The ClearView+ Speech offers 2 options when capturing text. Use the “Optimal” setting (default) when reading complex documents with photos and columns to get the most accurate speech. -
Page 19: About
Optelec ClearView Speech Default settings: View High Contrast On Color Black on White Highlight Word - Red Tex Recognition Quality Optimal Activate Speech Tap Bottom Right Corner The volume and reading speed settings are also set to the defaults. The Voices and Automatic Language Detection settings are not changed. -
Page 20: Appendix A: Safety
Warning – To avoid risk of electric shock, this equipment must only be connected to a grounded power outlet. The ClearView+ Speech may only be used with the UL listed Optelec ClearView+. Caution: Please be aware of the risk of explosion if the battery is replaced by an incorrect battery type. - Page 21 Optelec ClearView Speech WARNING: The use of accessories, transducers and cables, with the exception of transducers and cables sold by the manufacturer of the ClearView+ Speech as replacement parts for components, may result in increased emissions or decreased immunity of the ClearView+ Speech.
-
Page 22: Appendix B: Operating, Storage & Transportation Conditions
Optelec distributor. Optelec is not responsible for any uses of this device other than those described in this manual. Use of the ClearView+ Speech other than described in this manual will exclude it from warranty conditions. - Page 23 United Kingdom T: +44 1923 23 13 13 T: +32 (0)50 35 75 55 T: +49 6691 9617-0 www.optelec.co.uk www.optelec.be www.optelec.de Optelec Corporate Headquarters Breslau 4 – 2993 LT Barendrecht – The Netherlands – T: +31 (0)88 678 3444 – www.optelec.com...
- Page 24 UDC-02130 Rev: A...
Need help?
Do you have a question about the clearview speech and is the answer not in the manual?
Questions and answers
How do you adjust the tension of the sliding table on a Optelec ClearView C Speech.