Advertisement
Quick Links
Advertisement

Related Manuals for LuxaFlex PowerView


Summary of Contents for LuxaFlex PowerView
- Page 1 PowerView Motorisation ™ Smart shades that simplify your life Quickstart guide...
- Page 2 A brilliant evolution in The Art of Window Styling.
- Page 3 This guide will help you get started with your Powerview™ purchase. STEP 1 INSTALL YOUR SHADES Make sure you have properly installed your shades and that they are connected to a power source (battery pack or power supply). Wall Surface STEP 2 YOUR POWERVIEW™...
- Page 4 If you only have one remote, please proceed to Step 4. By pairing PowerView™ remotes you make all your remotes part of the same PowerView™ Network. This is important for seamless installation of the PowerView™ system. For this instruction you use the STOP button on your Remote.
- Page 5 REMOTE 2: REMOVE BACK COVER (Keep batteries in place). REMOTE 2: PRESS THE RESET BUTTON FOR SIX SECONDS The group button will flash on the press of the Reset button, then again at six seconds.
-
Page 6: Close The Cover
REMOTE 2: CLOSE THE COVER REMOTE 1: PRESS STOP FOR 6 SECONDS (Keep pressing until the remote lights start blinking). REMOTE 2: PRESS STOP AND HOLD REMOTE 1: PRESS STOP AND HOLD RELEASE STOP ON BOTH REMOTE 1 AND REMOTE 2 (As confirmation remote 2 will flash the group buttons). - Page 7 STEP 4 ADDING A SHADE TO A REMOTE Open A Remote can control 6 individual groups of shades (which are Group 1 the buttons 1 to 6). Stop The instructions below assign a shade to group 1. Depending on your preference you can choose your own group. This instruction will make use of the OPEN, GROUP 1, and STOP buttons on your remote.
- Page 8 PRESS STOP FOR 6 SECONDS (Keep pressing until the remote lights start blinking). PRESS GROUP1 (This will activate the group 1 on the remote). PRESS AND HOLD THE SHADE BUTTON PRESS THE OPEN BUTTON (You will see the shade move up and down shortly). RELEASE THE SHADE BUTTON IF YOUR REMOTE IS STILL FLASHING: PRESS STOP...
- Page 9 STEP 5 INSTALL REPEATERS Installation of a repeater is necessary when your shade is not responding to a command from your remote control. Preferably put the repeater halfway between the unresponsive shade and the remote control location. Stop This instruction will make use of the STOP button on your remote and the button on the repeater.
- Page 10 STOP FOR 6 SECONDS AND HOLD (Keep pressing until the Remote lights start blinking). HOLD THE REMOTE WITHIN 20 CM FROM THE REPEATER PRESS STOP (The repeater light will turn off. The repeater is now part of your personal Powerview™ Network).
- Page 11 STEP 6 CONNECT AND SETUP THE HUB If you have not purchased a Hub please proceed to ‘Additional Actions’ on page 15 to proceed with your installation. CONNECT THE HUB TO YOUR HOME NETWORK ROUTER CHECK THE RANGE OF THE HUB Your Hub should be able to reach each shade in the house.
- Page 12 WAIT APPROX. 2 MINUTES AND OBSERVE THE HUB LIGHT - Blue/Red blinking: All ok. Proceed with the installation. - Red Blinking: Hub is downloading updates. Please wait (approx. 5-15 minutes). - Continuous blue: Hub is already connected to a network. If you have previously setup your hub you can continue.
- Page 13 STEP 7 CONNECT THE POWERVIEW™ PowerView APP TO THE HUB ™ MOTORISATION Take your remote control. DOWNLOAD THE POWERVIEW™ New Hub found APP FROM THE APP STORE OR PLAY SET UP STORE START THE APP (The app will start looking for an available Hub).
- Page 14 PowerView (For further instructions please go to ™ www.luxaflex.co.uk/powerview-installation). PowerView Network ™ MOTORISATION Please locate the PowerView Remote that has been paired with your window treatments and place it next to the Hub. I don’t have a remote Next Step...
- Page 15 ADDITIONAL ACTIONS Your PowerView™ Network is now setup and ready to be Open further adjusted to your preferences. Follow the steps in this Group 1 chapter or go to www.luxaflex.co.uk/powerview-installation for more information. Stop OPERATE A SHADE Close This instruction will make use of the OPEN, GROUP 1, STOP, ALL and...
- Page 16 SET A FAVOURITE POSITION This instruction will make use of the STOP and FAVOURITE buttons on your remote. Stop Favourite Find the shade button on your shade. (Different shade types have different shade buttons. Consult the shade documentation for the exact location of the shade button).
- Page 17 MOVE YOUR SHADE TO THE DESIRED FAVORITE POSITION (Use your OPEN, CLOSE and STOP buttons to move the shade). PRESS STOP FOR 6 SECONDS (Keep pressing until the Remote lights start blinking). PRESS AND HOLD THE SHADE BUTTON PRESS THE FAVOURITE BUTTON (You will see the shade move up and down briefly).
- Page 18 MOVE A SHADE TO A FAVOURITE POSITION This instruction will make use of the GROUP 1, FAVOURITE and ALL button on the Remote. Group 1 Move shades assigned to group 1 to their favourite Favourite position. PRESS GROUP 1 (Group 1 will light up). PRESS FAVOURITE (Shades assigned to group 1 will move to their favourite...
- Page 19 REMOVE A SHADE FROM A GROUP This will remove a shade from a group on your remote control. It will not remove the shade from the Powerview™ network. Group 1 This instruction will make use of the GROUP 1, STOP and Stop CLOSE buttons on the Remote.
- Page 20 The following instruction removes a product from group 1. PRESS STOP FOR 6 SECONDS (Keep pressing until the remote lights start blinking). BRIEFLY PRESS ON GROUP 1 (This will activate the group 1 on the remote). PRESS AND HOLD THE SHADE BUTTON BRIEFLY PRESS ON CLOSE (You will see the shade move up and down shortly).
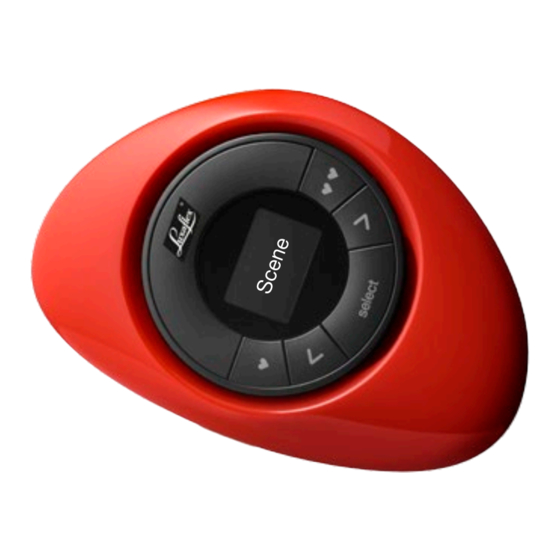
- Page 21 INSTALL A SCENE CONTROLLER The Scene Controller works in combination with the App and can activate scenes which are created in the App. START THE APP AND OPEN THE MENU SELECT SCENE CONTROLLERS AND FOLLOW THE INSTRUCTIONS IN THE APP ERASE HUB DATA Find the following button on the back of the hub.
- Page 22 Smart design makes the difference.
- Page 24 A revolutionary new system that automatically moves your shades throughout the day, so you don’t have to. All rights reserved. Unauthorised copying is prohibited. Technical data subject to change without notice. No rights can be derived from copy, text pertaining to illustrations or samples.
Need help?
Do you have a question about the PowerView and is the answer not in the manual?
Questions and answers