Advertisement
Quick Links
USER MANUAL AND ASSEMBLY INSTRUCTIONS
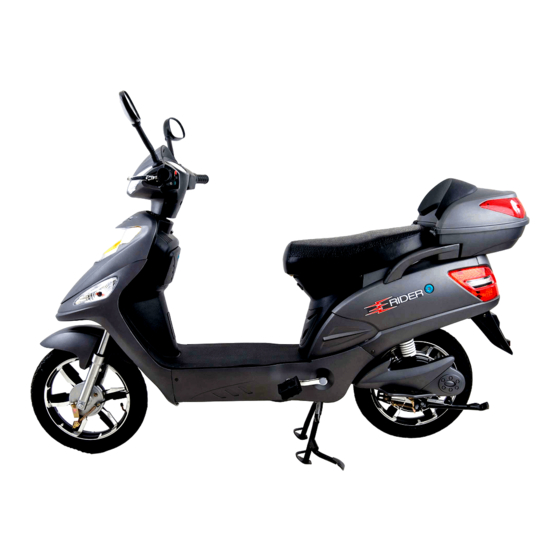
Congratulations, once again, on buying an
E
RIDER Model 15!!!!
USER MANUAL
We are sure you will be excited by the delivery of your brand new bike
and you will be eager to start using your
E
RIDER as soon as possible.
However you will need to be a little patient as there are some
important things to be done before you can ride it.
Firstly, the bike cannot be fully assembled for safe delivery so please
refer to our Assembly Instructions below and follow them closely to
put your bike together safely.
Secondly, during the time your
E
RIDER has been in transport and
storage, its battery will have lost some charge.
Before using the bike you must put the battery on charge. Plug the
charger to a power socket and you should get a green light on the
transformer. Attach the charger to the battery and this should turn
red. Wait until it turns green again and it is now fully charged.
The other important thing you must do is inflate your tyres to the
correct pressure of 40psi. This can be done with any pump or
compressor fitted with a Schrader fitment (same as for a car tyre).
Advertisement

Related Manuals for E Rider Model 15


Summary of Contents for E Rider Model 15
-
Page 1: User Manual
USER MANUAL AND ASSEMBLY INSTRUCTIONS Congratulations, once again, on buying an RIDER Model 15!!!! USER MANUAL We are sure you will be excited by the delivery of your brand new bike and you will be eager to start using your RIDER as soon as possible. -
Page 2: General Usage
Finally, in case your RIDER is lost or stolen please record this information to identify it: Frame Number:…..................Date of Purchase:…................... The frame number can be found behind the small grey plastic extrusion on the inside front panel of the bike. General Usage: With proper use and care your RIDER will give many years of... -
Page 3: Operation
If you wish to remove the battery from the bike for charging, first remove the foot mat. Unlock the battery locking strut with the ignition key and lift up the case. Remove the internal plug from the underside of the battery. After charging, replace the battery in the bike making sure you plug it in once again and lock the battery in place. - Page 4 On the left handlebar handle you will find three control buttons: Top: Red button operating the lights Middle: Slider switch to operate the indicators Bottom: Warning horn When riding downhill you must have the RIDER switched on even if you are not using the throttle and even if the battery is not in the bike.
-
Page 5: Assembly Instructions
ASSEMBLY INSTRUCTIONS For its safe transit, your RIDER has been secured to a wooden base and enclosed in sturdy packaging. It will be necessary to fit together those parts which could not be in their working position during transit. You will need the following tools: A pair of scissors A pair of sturdy pliers or wire cutters A large, cross head screwdriver... - Page 6 Carefully remove the cardboard packaging and unwrap all of the parts from their protective covering. When cutting the adhesive tape take care not to damage paintwork. Identify the parts and ensure that none of the smaller items are discarded with the packing.
- Page 7 Use the wire cutters to remove the bike from its wooden base. The front forks are attached to a wooden block by the front wheel axle. Undo the axle bolt and withdraw it from the block to release the bike fully from the base.
- Page 8 Unpack all the other components. This is what you should have.
- Page 9 You should also have the following bolts and screws.
- Page 10 Assembly Handlebars: Locate the securing bolt at the top of the handlebar stem and remove it, taking care not to drop the nut. Turn the front wheel to the side to assist access. Slide the handlebars onto the stem and manipulate them until the bolt hole lines up. Put the bolt through the assembly and hand tighten with two 10mm spanners.
- Page 11 Front Wheel: Identify the front mudguard. Locate the mudguard between the front forks and secure in place with four short bolts into the forks. Hand tighten then fully tighten with a spanner.
- Page 12 Take the front wheel and ease the brake mechanism into the drum. Line up the wheel centre with the end of the forks. Feed the axle bolt through the fork end and the wheel until you can locate larger aluminium spacer inside the forks. Push the axle through the wheel. (Click text for video) Put the smaller spacer onto the axle then push it fully through the left fork.
- Page 13 Nose Cone: Before fitting the nose cone you need to connect the indicator connector block. Then select four smaller self tapping screws and your screwdriver. Line up the front fascia so that the screw holes match to their securing points. Half tighten each of the screws. Ease the fascia all round to ensure it is correctly aligned and then fully tighten.
- Page 14 Back Rest Open the back box with the ignition key and fit the back rest with the four larger self tapping screws...
- Page 15 Pedals: Take a 15mm open ended spanner. Locate one pedal to its fixing point on the crank. Ensure that the thread is engaged correctly without cross threading and tighten with the spanner. Please note that the left pedal will tighten anti-clockwise and the right pedal clockwise. Mirrors: Identify the mirror securing holes.
- Page 16 Footrest Trim: It is not essential to fit the rear trim, however it adds to the finish and style of your RIDER. Select four short bolts with crosshead screw tops. Identify the rear foot rests. Line up the trim over the fixing holes with the circular part towards the rear wheel.
Need help?
Do you have a question about the Model 15 and is the answer not in the manual?
Questions and answers