Table of Contents
Advertisement
Available languages
Available languages
Advertisement
Chapters
Table of Contents

Subscribe to Our Youtube Channel
Related Manuals for Fracarro VENEZIA 4


Summary of Contents for Fracarro VENEZIA 4
- Page 1 Quick Reference DVR VENEZIA 4 DVR VENEZIA 8 1/35...
- Page 2 Specifiche tecniche / Technical Specifications / Caractéristiques téchniques Características técnicas / Características técnica / Τεχνικά χαρακτηριστικά/ Specyfikacja techniczna/ Technische Daten DVR VENEZIA 4 (918139) DVR VENEZIA 8 (918140) Input 4 BNC 8 BNC n° Output VGA / 2 BNC (monitor and spot)
- Page 3 Protection Multilevel Password (3) and multi-user (18) Frontal keyboard, USB mouse (included), remote control (included), optional Local control keyboard with 3-axis joystick for DVR and speed dome Fracarro (DVR-SPEED-KB) Interactive Graphic Full management, monitoring and control (up to 10 DVR) with interactive...
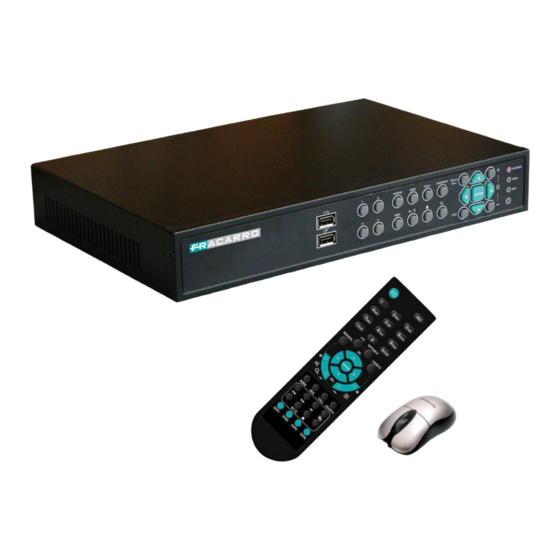
- Page 4 Pannello frontale - Frontal Panel - Panneau frontal Panel delantero - Painel dianteiro - Πρόσοψη - Panel Czołowy - Frontplatte Pannello posteriore - Back Panel - Panneau arrière Panel trasero - Painel traseiro - Πίσω όψη - Panel Tylny - Rückseite Telecomando –...
-
Page 5: Table Of Contents
Guida rapida DVR VENEZIA 4 / 8 ATTENZIONE: Questo manuale rappresenta una guida rapida alla prima installazione del DVR, fare riferimento al manuale utente per la descrizione completa di tutte le singole funzioni. Indice: 1-... Avvertenze di sicurezza .........................pag.6 1.1 –... -
Page 6: Contenuto Della Confezione
Guida rapida DVR VENEZIA 4 / 8 1. Avvertenze per la sicurezza: L’installazione del prodotto deve essere eseguita da personale qualificato in conformità alle leggi e normative locali sulla sicurezza. Il prodotto è di Classe II, secondo la norma EN 60950-1. -
Page 7: 2- Descrizione Del Prodotto
Guida rapida DVR VENEZIA 4 / 8 2. Descrizione prodotto: La nuova serie di dvr entry level Fracarro, DVR VENEZIA 4 e 8 è stata progettata per realizzare sistemi di videosorveglianza affidabili, sicuri e interfacciabili con diversi tipi di monitor, PC e telefoni cellulari. - Page 8 Guida rapida DVR VENEZIA 4 / 8 3.3 Telecomando (vedi figura 3): Il telecomando è un accessorio che semplifica notevolmente la gestione e la programmazione del DVR. Si consiglia di non superare la distanza massima di 10m da telecomando a DVR.
-
Page 9: 4- Installazione
Guida rapida DVR VENEZIA 4 / 8 4 Installazione: 4.1 Installazione disco fisso: Seguire fedelmente i passi riportati di seguito per eseguire una corretta installazione di uno o più dischi fissi o del masterizzatore DVD all’interno del DVR. Nْ Istruzioni... -
Page 10: Prima Configurazione Del Dvr
Guida rapida DVR VENEZIA 4 / 8 4.2 Prima configurazione del DVR: Autenticazione: Una volta acceso il DVR premere il tasto “MENU” quindi muovere il cursore sull’icona denominata “ACCEDI/DISCONNETTI” e premere il tasto “ENTER”. A questo punto inserire il nome e la password dell’utente. Da parametri di fabbrica l’ installatore dispone di un nome utente: “aa”... - Page 11 Guida rapida DVR VENEZIA 4 / 8 4. Utilizzando le frecce direzionali muovere il cursore sulla voce “GIORNO” e, utilizzando i tasti “+/-” impostare l’anno, il mese e il giorno; 5. Utilizzando le frecce direzionali muovere il cursore sulla voce “ORA” e, utilizzando i tasti “+/-” impostare l’ora;...
-
Page 12: 5- Utilizzo Basico Del Dvr
Guida rapida DVR VENEZIA 4 / 8 5. Apparirà la seguente schermata: Tale schermata permette all’amministratore un semplice e veloce modo per impostare la pianificazione registrazione. Per ogni singola ora della settimana è possibile impostare una diversa modalità di registrazione a scelta tra: Allarme+Motion+Normale, Allarme+Motion, Allarme, Motion, Normal, e no Registrazione. -
Page 13: Backup
Guida rapida DVR VENEZIA 4 / 8 1. Premere il tasto “SEARCH” per accedere al menu di ricerca; 2. Muovere il cursore sulla voce “RICERCA PER DATA” e confermare con il tasto “ENTER”; 3. Muovere il cursore sulle voci “ANNO”, “MESE”, “GIORNO”, “ORA” e “MINUTO” per selezionare la data di inizio della ricerca utilizzando i tasti “+/-”;... -
Page 14: Visualizzazione Delle Immagini
Guida rapida DVR VENEZIA 4 / 8 ATTENZIONE: Non rimuovere il DVD finchè il processo di backup non è completamente terminato per evitare di danneggiare l’unità ottica. ATTENZIONE: Non rimuovere la periferica USB finchè il processo di backup non è completamente terminato. - Page 15 Guida rapida DVR VENEZIA 4 / 8 Istruzioni Figure Prima di tutto accedere ad un Pc connesso nella stessa rete del DVR, accedere a avvio/esegui, digitare “cmd” e premere Invio. Apparirà il promt dei comandi di MS-DOS. Nella videata digitare “ipconfig /all” e premere “Invio”, apparirà...
- Page 16 Guida rapida DVR VENEZIA 4 / 8 Ora sarà possibile accedere all’interfaccia web del DVR. Fare riferimento al manuale utente per conoscere il significato di tutte le funzioni disponibili. Utilizzando uno smartphone, PDA o un qualsiasi browser web diverso da Internet Explorer sarà possible accedere all’interfaccia wap del DVR.
- Page 17 Guida rapida DVR VENEZIA 4 / 8 Scegliere un nuovo Hostname per il DVR, cliccare su “Use auto detect IP Address” e confermare tutte le richieste successive per attivare il nuovo Host. Utilizzando il browser web Internet Explorer inserire l’indirizzo IP del router (Gateway) e confermare con il tasto “Invio”.
-
Page 18: Connessione Con Dispositivo Mobile
Guida rapida DVR VENEZIA 4 / 8 7.3 Connessione con dispositivo mobile: Le immagini del DVR possono essere visualizzate su dispositivi mobili quali: smartphone, PDA o cellulari connessi alla rete internet. Seguire fedelmente i passi riportati di seguito per instaurare la connessione:... - Page 19 Guida rapida DVR VENEZIA 4 / 8 Connettere il BUS RS-485 della telecamera al pannello posteriore del DVR come indicato in figura. Premere “MENU” quindi “IMPOSTAZIONI” e “RS- RS-232/ 422 /485 Setup 232/422/485 Setup” sul DVR per accedere alle COM Port...
- Page 20 Quick Reference DVR VENEZIA 4 / 8 ATTENTION: This user manual is a quick guide for the first installation of the DVR please refer to the user manual to know the complete information of all the single functions. Table of contents: 1- Safety warnings ........................
-
Page 21: 1- Safety Warnings
1. Safety warnings: The installation of the product must be performed by qualified personnel in accordance with local laws and regulations on safety. The product is a Class II, according to EN 60950-1. Warnings for installation Use only the cable network equipment, installing the product so that the plug is easily accessible. - The product should not be exposed to drip or spray of water and must therefore be installed in a dry, inside buildings. -
Page 22: 2- Product Overview
2. Product Overview: The DVR VENEZIA 4 / 8 digital video/audio recorders are designed to realize powerful and secure surveillance systems that can be interfaced with different kind of monitors, pc and smartphones. The new type of compression and the configurable quality guarantee a long time recording on the Hard Disk and a good quality of the images during the playback. -
Page 23: Mouse
The remote controller is an optional accessory to ease the user’s operations. You can do all the operations by the remote controller instead of the buttons on the front panel. The effective distance is about 10 meters without any obstacle. Nْ... -
Page 24: Hdd Setup
4.1 HDD Setup: Please follows the steps below for a correct installation of the HDD and the DVD Writer on the DVR. Nْ Instructions Pictures Remove all the screws (4) Remove the cover like shows on the picture. Fix the hard disk on the bottom of the DVR using all the 4 screws done with the DVR. - Page 25 WARNING: In case of loss of the system password please contact your local distributor who will contact Fracarro Radioindustrie S.p.A.
- Page 26 4. Using the arrow keys move the cursor to the "DATE" and, using the keys "+/-" set the year, month and day; 5. Using the arrow keys move the cursor on "TIME" and, using the keys "+/-" set the time; 6.
-
Page 27: 5- Basic Use Of The Dvr
Faithfully follow the steps below to set the schedule: 1. Press the “MENU” button to access the configuration menu; 2. Move the cursor to "SETUP" and confirm by pressing "ENTER"; 3. Move the cursor to the heading "SCHEDULE RECORDING" and confirm by pressing "ENTER"; 4. -
Page 28: Backup
Faithfully follow the steps below to make an image search: 1. Press the "SEARCH" to enter the Search menu; 2. Move the cursor on "SEARCH BY TIME" and confirm by pressing "ENTER"; 3. Move the cursor over the heading "YEAR", "MONTH", "DATE", "HOUR" and "MINUTE" to select the start date of research using the keys "+/-";... -
Page 29: Viewing The Images
CAUTION: Do not remove the DVD until the backup process is not completely finished to prevent damage to the optical drive. CAUTION: Do not remove the USB device until the backup process is not completely finished. 5.3 Viewing the images: During the backup the DVR creates two folders on the device, one containing the backup files and the other containing the display of images (SelfPlayer). - Page 30 Fig.A Fig.B In both case please refer to the following steps to configure the connection: Instructions Picture First of all go to a pc, connected to the same network of the DVR, access to start/run then enter “cmd” and press Enter. The DOS prompt will appear.
- Page 31 Please enter the IP address of the DVR (Ex. 192.168.1.15) in the search bar of Internet Explorer and press Enter. The Browser will ask to install the ActiveX control, please confirm all the request. The connection could be interrupt by the firewall or the antivirus so please be sure that they aren’t active.
- Page 32 Instructions Picture Please access to the website www.dyndns.org and press “Create Account”. An E-mail with all the informations will be sent to the E- mail address inserted. Please follow the instructions to activate the new account. Insert the username and password of the new dyndns account.
- Page 33 Please follow the installation manual of the Router to create a rule for the 67, 68 and 80 port for the DVR IP Address and TCP protocol. NOTE: Please refer to the www.portforwarding.com website to know the correct way to configure the router Please follow the installation manual of the Router to insert the DDNS information like username, password and...
- Page 34 The DVR will ask the user to enter his User ID and Password. Please select the best image resolution for the mobile phone or PDA than press “OK”. Now it will be possible to view the image on the mobile phone or PDA, manage the output relays and know the state of the input alarm directly by the interface.
- Page 35 SPA - Garantia par Fracarro Radioindustrie S.p.A., Via Cazzaro n.3, 31033 Castelfranco Veneto (TV) Italia. PORT – Garantia por da Fracarro Radioindustrie S.p.A., Via Cazzaro n.3, 31033 Castelfranco Veneto (TV) Italia. GRE - εγγύηση Fracarro Radioindustrie S.p.A., Via Cazzaro n.3, 31033 Castelfranco Veneto (TV) Italia.
Need help?
Do you have a question about the VENEZIA 4 and is the answer not in the manual?
Questions and answers