Table of Contents
Advertisement
Advertisement
Table of Contents

Related Manuals for Orcam myeye


Summary of Contents for Orcam myeye
- Page 1 OrCam User Guide MyEye and MyReader Version 7 June 2016 ® SEE FOR YOURSELF ™...
- Page 2 © 2016 OrCam Technologies Ltd. All rights reserved. OrCam® is the trademark and brand name of OrCam Technologies Ltd. (“OrCam”) and OrCam is the sole proprietor of all the rights and all the intellectual property rights in this guide and/or any other document produced by OrCam relating thereto.
-
Page 3: Table Of Contents
Table of Contents About the OrCam Device ..............3 Assembling the OrCam Device ............7 Getting Started ..................12 Reading and Recognizing with OrCam ........14 Face and Product Learning ............. 21 OrCam System Messages ..............25 Configuration and Personalization ..........27 Instructions for Software Update using an SD Card .... -
Page 4: About The Orcam Device
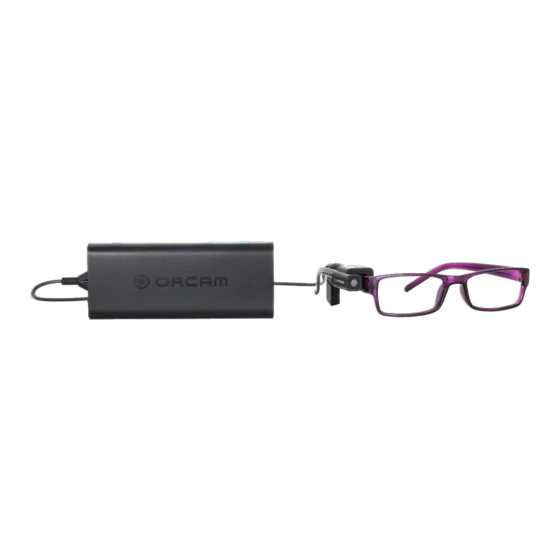
OrCam Components To help orient you with the OrCam device, for the purpose of this User Guide, the top of the device is the side with the full OrCam logo including the word ORCAM. The OrCam device consists of two main parts, the Head Unit and the Base Unit. - Page 5 The Head Unit features a camera, a microphone, and a wire that connects to the left side of the OrCam Base Unit. When you first receive the OrCam device box, you need to assemble the camera mount and connect it to your eyeglasses frame.
- Page 6 On/Off Location of Power and Volume Buttons and LED Indicator Trigger Button is the blue button (yellow for OrCam MyReader) on the opposite side of the Volume button, on the same side as the rubber flap. It has three functions. It is used to activate the camera, activate the product learning mode, and change the read-back speed.
- Page 7 When the light is flashing red, it indicates that the OrCam device is charging. When the light is green, it indicates that the OrCam device is powered on. When there is no light, it indicates that the OrCam device is suspended or powered off.
-
Page 8: Box Contents
Version 7 Assembling the OrCam Device The OrCam device is easy to assemble and once you have charged the device, it can be used regularly to assist you in reading text and identifying products. This chapter details how you connect the device to your glasses. Because OrCam is light and small, you can leave it attached to your glasses so that it is always ready for use. - Page 9 Unit, it is possible to remove it with a small screwdriver. Attaching the Mount to Eyeglasses The Head Unit of the OrCam device is designed to be mounted on the right side of your eyeglasses. Therefore, the mount must be placed on the right side of the frame.
- Page 10 OrCam User Guide Version 7 To attach the mount to the eyeglasses: Check the mount. On the inside, opposite the keyhole, is a small rubber piece that you can feel with your finger. Occasionally, this piece may fall out in the box. If you feel a hole instead of a bump, locate the missing piece in the box and replace it.
- Page 11 If you hear a high-pitched, double-beep, the camera is adjusted correctly. Note: If the camera is angled too high or too low, the OrCam camera may not be accurately triggered, and may not perform correctly.
- Page 12 Ensure that you can move freely and that there is no tension on the cord between the Base and Head Units. Cleaning the OrCam Device Base Unit Clean the Base Unit immediately if it comes in contact with anything that may be sticky or cause stains.
-
Page 13: Getting Started
Getting Started Initial Charging of the OrCam Device Before you begin using the OrCam device, you must initially charge it for a period of eight hours. An OrCam charger is included in the OrCam box. To charge the OrCam device: Attach the charger to the power socket under the rubber flap on the OrCam Base Unit. - Page 14 Version 7 Turning the OrCam Device On or Off and Suspending Before you turn the OrCam device on or off it is recommended that you wear your glasses with the OrCam head unit mounted. This enables you to hear the device messages.
-
Page 15: Reading And Recognizing With Orcam
Version 7 Reading and Recognizing with OrCam The OrCam device is capable of reading, and is programmed to read to you when triggered. The OrCam MyEye device is also programmed to recognize faces and products and can recognize all entered faces and products as well as pre-loaded products, such as money notes (these features are not available with OrCam MyReader). - Page 16 OrCam User Guide Version 7 For the camera to recognize your finger, hold your finger vertically, so that the tip of your finger is pointing up. Practice by putting your finger on the tip of your nose, and extend your arm outward so that the tip of your finger remains at eye level.
- Page 17 If there is text in the same frame as a recognized face, the OrCam device will say the name of the person and then read the text. If a face is detected, but not recognized, then reading will begin after the appropriate face recognition announcement.
- Page 18 Note that reading begins from your fingertip downwards. If you would like to stop the reading before OrCam has finished, press the trigger button, point at an area without text, or use the Stop Gesture. To activate the Stop Gesture command, extend your hand from your face forward to arm’s length with...
- Page 19 Resuming Reading When the OrCam device reaches the end of a section, it plays a chime sound to signal that it has finished. In certain situations, the OrCam device tries to resume reading from where it left off if it identifies that the continuation of the section was cut off by the limits of the camera frame.
- Page 20 "Reading Settings" sub-menu in the Audio Settings Menu. Fails to Recognize Product or Text If the OrCam device does not recognize what it sees, it lets you know by making a chime sound. If you hear a chime, try again, and make sure that you are pointing at English text or a pre-entered product.
- Page 21 The viewed section of text is not visible by the camera, either above or below the frame, or on the right or left side of the frame. The OrCam device cannot read the complete section. Try to adjust the angle of your head and/or move the position of the text and try again.
-
Page 22: Face And Product Learning
Version 7 Face and Product Learning You can personalize your OrCam MyEye device by teaching it to recognize faces and products that you frequently use. This can assist you when you need to identify people and products at home, while shopping, and more. These features are not available on the OrCam MyReader. - Page 23 Not enough light for learning. The current lighting in the room is not sufficient to allow the OrCam device to learn a new face. Please try again in an area with brighter lighting.
- Page 24 OrCam User Guide Version 7 Product Learning When the OrCam device identifies that you are looking at a product, you will hear the announcement: Start new product learning. Please point at the product three times at different positions. Point at the center of the product three times, each time changing the picture the camera is taking by holding it first at arm’s length, then point again holding it...
- Page 25 Did not learn this side. The OrCam device did not recognize the additional side of the product. If no additional product sides are needed, proceed in recording the product name. Done with this side. You may point three times at another side of the product or stop now.
-
Page 26: Orcam System Messages
OrCam User Guide Version 7 OrCam System Messages Following is a list of some of the OrCam system messages that you are likely to hear during normal operation. OrCam Version 7 is ready. Battery is [this many] percent charged. Initial greeting. OrCam is now ready to begin operation. - Page 27 OrCam needs to cool down before you can use it; shutting down, please wait. The temperature of the OrCam device is too high. Please allow it to rest for a few minutes and resume normal operation. If the problem persists, contact support.
-
Page 28: Configuration And Personalization
Version 7 Configuration and Personalization This section details the settings of the OrCam device that can be changed to fit the personal preferences of the user. These settings include the reading speed (rate), voice, gestures, outputs, automated face recognition, tap, touch reading, and more. - Page 29 The following sections contain explanations about the individual settings that can be changed using the Audio Settings Menu or the OrCam Please commands. Audio Settings Menu Options Reading Rate (words per minute): set between 100 (very slow) and 240 (very fast).
- Page 30 7.1. Set Time: set the hour, minute, year, month, and day. 7.2. Change Voice: choose between Kendra (female American voice) and Brian (male English voice). The OrCam device enables you to switch between these two available voices. 7.3. OrCam Contact Information: announces OrCam’s contact information.
- Page 31 (thus triggering the device) at the “OrCam Please” phrases that appear in this guide and on the OrCam website, it is possible to adjust the settings of the OrCam device according to the specified command text. When the command has been received successfully, the device will play a distinct tone.
- Page 32 The OrCam device will announce the current time. If you keep your hand in place for more than 2 seconds, the OrCam device will announce the current time, day of the week and the date.
-
Page 33: Instructions For Software Update Using An Sd Card
Remove the old SD memory card Before you can insert the new SD card you received from OrCam, you must first remove the SD card currently in the device. Open the rear cover of the device by pushing a paper clip (or something similar) into the notched opening. - Page 34 Note: If requested to do so, please mail the recently removed SD card back to OrCam at the address listed at the beginning of this User Guide. Your SD Card Update Kit may include a pre-addressed and pre-paid envelope for this purpose.
- Page 35 Once the update is completed, the device announces "Welcome to version 7 of OrCam. Your OrCam can now tell you the time and date when you raise your wrist. All aspects of the device were improved as well.
-
Page 36: Troubleshooting
Lighting and Other Considerations Just as we need a certain level of lighting to enable us to read, the OrCam device is sensitive to light too. It operates best in a brightly lit area. When using the OrCam device, consider the following: Avoid shining strong light into the camera. - Page 37 The battery is too low to enable operation. Connect the charger to the device. When sufficiently recharged, power on the device. If the OrCam device has been unused for five days or longer, the battery level messages may become inaccurate. In the event that the device does not hold a charge, plug it in and charge it for eight hours without interruption.
- Page 38 Memory is full. Cannot learn additional products / faces. The OrCam device can remember up to 150 products and 100 faces. If you have added that many products or faces, you may have to delete some before you can add any more.
- Page 39 OrCam support immediately. Update process doesn't start If after inserting the new SD card and plugging the power cord into the OrCam device you do not hear any message within five minutes, please verify: That the SD card is inserted correctly.
- Page 40 Version 7 Reset Device It is possible to remove information stored in the OrCam device’s internal database. The following commands will remove all faces or products from the device’s memory, or reset the device back to its default factory settings and also remove both faces and products from memory.
-
Page 41: End-User Terms And Conditions
Product or other IP Rights solely as part of the OrCam device and for personal (not commercial) use. Customer does not acquire any ownership or intellectual property rights in the software. - Page 42 Customer. LIMITATION OF LIABILITY OrCam will not be liable to Customer or any other third parties (whether under the laws of contract, torts or otherwise) with respect to the use of, or otherwise in connection with the Product: for any loss or damages, whether direct, indirect, special, punitive, exemplary or consequential;...
- Page 43 OrCam User Guide Version 7 FORCE MAJEURE Neither Party shall be liable for any loss or damage of any nature incurred as a result of any failures or delays in performance (other than payment obligations) due to any cause or circumstances beyond its reasonable control and without the negligence of the non- performing Party.
- Page 44 This Limited Warranty is the sole and exclusive warranty applicable to OrCam products. No third party has the authority to make any representation, warranty, or agreement on behalf of OrCam with respect to OrCam products. No warranty of any kind or nature is made by OrCam beyond those expressly stated herein.
- Page 45 30 days of receipt, provided that it has not been damaged through misuse or negligence. OrCam will refund the payment for the device less a five percent (5%) re-stocking fee as well as a non-refundable training fee ($250 in the US and Canada or £160 in the UK).
- Page 46 OrCam User Guide Version 7 FCC Compliance This equipment has been tested and found to comply with the limits for a Class B digital device, pursuant to Part 15 of the FCC rules. These limits are designed to provide reasonable protection against harmful interference in a residential installation. This...
- Page 47 Base Unit is covered and protected. Do not use the OrCam device in heavy rain, when at the beach or swimming pool, or in or near a bathtub or shower. Do not submerge the OrCam device in any type of liquid.
- Page 48 Welcome to OrCam! We are pleased to present you with your new OrCam device. OrCam is very intuitive. All you have to do is point. See for yourself.
Need help?
Do you have a question about the myeye and is the answer not in the manual?
Questions and answers