
Related Manuals for Wisper 905se City


Summary of Contents for Wisper 905se City
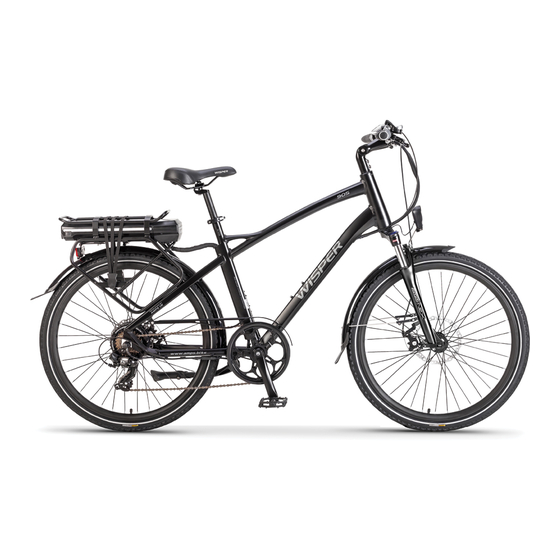
- Page 1 Owner’s Manual Operation and Maintenance Instructions Wisper 905se City January 2009 1 edition We strongly recommend that you read this entire manual before using your Wisper bike Wisper Limited - 1 -...
-
Page 2: Table Of Contents
905se City User Guide Introduction Page 3 Part 1 Caring for your Wisper bike and pre use checks Before you set off for the first time Page 4 Before each use Page 5 Battery care Page 5 Recharging your battery... -
Page 3: Introduction
We strongly advise you to always wear a cycle helmet when using your bicycle and if you are unfamiliar with cycling to attend a cycle proficiency course prior to using it. Your Wisper Works 905Se City is not a toy and should be considered a serious mode of transport. -
Page 4: Before You Set Off For The First Time
Please read this manual carefully. Only on full understanding of all the functions of this electric bicycle should you attempt to use it. Your Wisper bike has been transported in a strong twin walled carton, to save space it has been delivered with the front wheel, handlebars, seat post and seat, rear rack* and pedals ready for assembly with the tool kit provided**. -
Page 5: Before Each Use
To avoid dangerous unplanned acceleration, always make sure that the electrical system is turned off and the power indicator lamps are not illuminated when mounting, dismounting or leaving the bike unattended. For your safety, please turn off the power key on the battery when stopped or walking the bike. -
Page 6: Recharging Your Battery
When leaving your bicycle during hot weather always leave in a shaded well ventilated area For best results always recharge the battery at room temperature Before unloading the battery make sure it is turned off at the key, then raise the saddle and unload the battery using its handle If your battery is damaged or appears to be overheating for any reason immediately return it to your retailer for advice and a safety check... - Page 7 Torque recommendations Front axle nuts 46N.m Back axle nuts 70N.m Handlebar clamp Refer to illustration 15.1 Bolt 1 16N.m Bolt 2 10N.m Handlebar stem expander bolt 18-20N.m Seat pillar clamp nut/bolt 5-8N.m Brake cable anchor bolt 5N.m Brake centre bolt M6: 11N.m Seat clamp nuts 24N.m...
-
Page 8: Technical Specifications And Performance
T25 Torque wrench No. 1 Phillips head screwdriver Bicycle tube patch kit Tyre pump Technical specifications & performance Type Wisper Works 905se City Performance (with 75kg 165lb rider) Assisted range 8A up to 65km (39 miles) 14A up to 110km (66 miles) -
Page 9: Simple Trouble Shooting
Battery on off and battery lock Your Wisper bike has 1 set of 2 keys. The key for turns the battery on/off and locks the battery in the bike. Please keep a careful note of the key numbers as we cannot replace them without these numbers should they become mislaid. -
Page 10: The Red Button
When the battery key has been turned to the on position the bike is ready for use. The red button on the handle bar isolates the power from the bike, when the bike is “on” you will see the battery power lights illuminate above the red button. -
Page 11: Pedelec Mode And High Low Button
Pedelec mode and High Low box 12.1 When you first ride your Wisper bike you will notice that after one turn of the pedals the motor will start working assisting you to ride the bike by adding power through the rear wheel. This is the standard or pedelec mode, to continue using the pedelec mode you must keep turning the pedals, if you stop the motor will stop and the bike will slow to a halt. -
Page 12: Brakes
Front: V brake Rear: V brake 14.2 The brakes on your Wisper bike are fitted with cut outs which are required by law. This means that when you pull on either the back or front brake lever the motor immediately stops working. -
Page 13: Steering Stem And Handle Bar Clamp
Stem handle bar clamp 15.1 Your bike has been fitted with a quick release handlebar clamp that allows you to change the position of the bars quickly and easily to find the most comfortable riding position. 15.2 The stem and handle bars need to be fitted before you use the bike. 15.3 To fit, insert the stem into the front tube at least to the position of the “Minimum insertion”... -
Page 14: Quick Release Saddle Height Adjustment
Quick release saddle height adjustment 17.1 Your Wisper bike has been fitted with a quick release saddle post collar to facilitate the movement of the saddle to remove the battery or to change the riding position. 17.2 It is important that the nut on the collar is tightened so the post will move in the bike tube firmly. - Page 15 21.2 Rear Derailleur 21.3 How derailleur work Almost all modern derailleur function the same basic way. They are designed to move (or derail) the chain from one sprocket to the next. The upper guide pulley (or jockey pulley) moves the chain in both directions. For instance, when you want to climb a hill, you shift down to a lower gear.
- Page 16 21.6 High Gear Limit Stop The H-Limit screw high gear limit stop prevents the guide pulley from shifting any further past the highest gear and into the axle. In order to adjust it properly there must be no tension on the lower inner cable. If you feel tension, loosen the cable adjuster until there is none.
-
Page 17: Warranty
Warranty Repair or replacement of components IMPORTANT To validate this Warranty the retail customer must register the bike at www.wisperbikes/mywarranty within 14 days of purchase. Only use this product in accordance with this user manual. We offer a limited warranty of on the following items. -
Page 18: Getting The Best Possible Range From Your Wisper Bike
Getting the best range from your electric bike. The range you can achieve from your Wisper electric bike can be reduced dramatically for some very simple reasons. Im good conditions you should be able to achieve the following ranges from your bike when using pedal assist.
Need help?
Do you have a question about the 905se City and is the answer not in the manual?
Questions and answers