Table of Contents
Advertisement
Advertisement
Table of Contents

Related Manuals for Mitsubishi 290p106010


Summary of Contents for Mitsubishi 290p106010
- Page 1 290P106010 Remote Control Operating Manual...
-
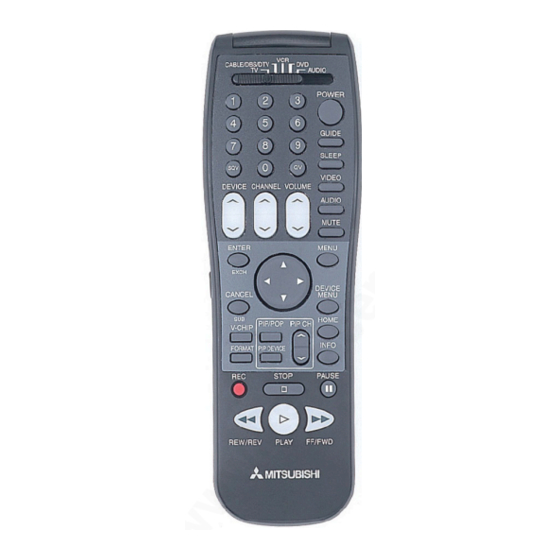
Page 2: Remote Control Functions: Overview
Part IV: Operation Remote Control Functions: Overview CANCEL/SUB: C lear S Q V and some Overview menu entries. Add separator between (Following page, g ur e 1) major and minor Ant-DT V channels. Slide Switch: S ele ct A /V product to be DEVICE MENU: D isplay menus for controlle d by the rem ote control. -
Page 3: Channel Selection
Part IV: Operation Remote Control Functions: Channel Selection and Sleep Timer Channel Selection Sleep Timer For Ant-A or Ant-B Channels: Setting the Sleep Timer: Ente r three numbe rs (for channel 2, press 0 02 ). P ress S LEEP on the remote control. A message indicating the length of time P ress the channel numbe r and EN TER the sleep timer is to be set for is dis-... - Page 4 Part IV: Operation Programming the Remote Control to Control NetCommand ™ A/V Products To Program the Remote to Control NetCommand A/V Products: (See NetCommand Supported Devices, page 16, for the list of A/V products supported by the NetCom- mand System.) M ove the slide switch at the top of the remote to the T V laye r.
- Page 5 Part IV: Operation Programming the Remote Control to Control Non-NetCommand ™ A/V Products To Program the Remote to Control Other Brands of Audio and Video Products: (F igure s 1-5 ) M ove the slide switch at the top of the rem ote to the product you want to control.
- Page 6 Part IV: Operation Programming the Remote Control to Control Non-NetCommand ™ A/V Products Afte r entering the corre ct codes in each posi- tion of the remote control, use the slide switch to sele ct which product will respond when an ope rational button is pressed. If the T V position has not been programmed to control N etC ommand ™...
- Page 7 POWER VOLUME MUTE Mitsubishi A/V Receivers Direct Input Selection Buttons - use number buttons, SQV, and QV (on some models) Mitsubishi CD Players (not all functions for all models) PLAY FF/FWD REW/REV PAUSE STOP DVD and Laser Disc Players (not all functions for all models)
-
Page 8: Dvd Players
Appendix C: Remote Control Programming Codes A/V Receivers Cable Box VCRs M itsubishi ..010, 011, 012, 013, 014, ABC ... . 124 M itsubishi ..0 01, 0 02, 0 6 0, 0 67, 0 6 8 , 0 61, . - Page 9 Part III: Setup V-Chip Lock Menu: Passcode Entry (F igure s 1) T he rst tim e y ou s el e c t V - C h i p Loc k f rom the M AIN menu, or afte r you have cancele d your passcode you will see the screen Figure 1.
- Page 10 Part III: Setup V-Chip Menu: Lock By Time and Front Button Lock Lock By Time (F igure 1) LO C K BY T IM E will allow you to lock the entire T V during spe ci c hour s. U se AD JU S T to sele ct O N or O FF then use AD JU S T...
-
Page 11: Bypassing The V-Chip Lock
Cut along the dotted line and le b ypass instructions in a safe place for future reference. When changing or deleting your passcode, you must use the remote control included with this TV. You cannot use a Mitsubishi remote control from another component or a “universal” remote.
Need help?
Do you have a question about the 290p106010 and is the answer not in the manual?
Questions and answers