Table of Contents
Advertisement
Quick Links
Download this manual
See also:
User Manual
Advertisement
Table of Contents

Related Manuals for abem Terrameter LS


Summary of Contents for abem Terrameter LS
- Page 1 Instruction Manual Terrameter LS ABEM Product Number 33 3000 95 ABEM 20120109, based on release 1.9...
- Page 2 ABEM Terrameter LS...
- Page 3 ABEM will be pleased to receive occasional reports from you concerning the use and experience of the equipment. We also welcome your comments on the contents and usefulness of this manual. In all communication with ABEM be sure to include the instrument types and serial numbers. Contact details: Address: ABEM Instrument AB, Löfströms Allé...
- Page 4 Bill of Lading or other delivery document issued to the original purchaser, provided that the instrument is returned carriage paid to ABEM, and is shown to ABEM's satisfaction to be defective. If misuse or abnormal conditions have caused the fault, repairs will be invoiced at cost.
- Page 5 ABEM Terrameter LS WARNING! The ABEM Terrameter LS delivers high voltages and currents. Always consider all cables and electrodes connected directly or indirectly to the Terrameter to carry current. Stay away from cables and electrodes while the system is operating. Wear electrically insulating boots and gloves during fieldwork.
-
Page 6: Table Of Contents
ABEM Terrameter LS Table of Contents Section Page About This Manual .....................iv Get ready - Unpacking your new instrument............1 A Short Introduction of the Instrument............1 The Delivered Instrument ................2 Inspection.......................2 Shipping Damage Claims ................3 Shipping/Repacking instructions ..............3 Registration ....................3 Compliance ....................3 Overview of the Instrument ................4... - Page 7 Measurement Errors..................64 Measurement Post-Production .................67 Repack the LS system ..................67 Export Measurement Data ................67 Delete a Project ....................71 Terrameter LS Utility Software ...............72 Instrument Network Address ...............72 Spread and Protocol Handling ..............73 Data Transfer ....................77 View and Export Data..................79 Update Terrameter LS Instrument Software..........83 Erigraph......................84...
- Page 8 ABEM Terrameter LS 10.4 Transmitter....................90 10.5 Relay Switch ....................90 10.6 Software & Communication ................90 Appendix B. Measurement Modes ...............91 11.1 Self Potential (SP)..................91 11.2 Resistivity (RES) ..................91 11.3 Induced Polarisation (IP) ................93 Appendix C. Spread and Measuring Sequence Files ........94 12.1...
-
Page 9: About This Manual
ABEM Terrameter LS About This Manual The conventions and formats of this manual are described in the following paragraphs: • Typographical conventions used in this manual: Italic Names of objects, figure descriptions In-line minor headers, emphasis Bold Blue Italic URL links •... - Page 10 ABEM Terrameter LS...
-
Page 11: Get Ready - Unpacking Your New Instrument
The built-in GPS automatically logs the instrument position during data acquisition; provided there is adequate GPS signal reception. Terrameter LS is fully compatible with existing parts of the ABEM Lund Imaging System like electrode cables, cable joints, cable jumpers, electrodes and electrode selectors for expansion. -
Page 12: The Delivered Instrument
The Delivered Instrument Use great care when unpacking the instrument. Check the contents of the box or crate against the packing list. Figure 2 shows the parts that are shipped with a Terrameter LS for basic imaging. Transport Crate Terrameter LS... -
Page 13: Shipping Damage Claims
File any claim for shipping damage with the carrier immediately after discovery of the damage and before the equipment is put into use. Forward a full report to ABEM, making certain to include the ABEM delivery number, instrument type(s) and serial number(s). -
Page 14: Overview Of The Instrument
P1, P2: Channel 1 Potential electrodes External Equipment Linking of other Terrameter LS units (not VES) Figure 3. The Connector panel of Terrameter LS The connectors: Label Function Connection of USB memory sticks, keyboard, external GPS etc. Electrode 1-32 32-pole connector for electrode cables (1/2) -
Page 15: The Power Panel
ABEM Terrameter LS The Power Panel The power panel of the Terrameter LS is shown in Figure 4. Serial number and type plate Emergency Stop Button Transmitter cooling area Internal Battery External Power Compartment Supply connector Figure 4. The Power panel of Terrameter LS The Emergency Stop Button has two possible positions. -
Page 16: The Built-In Gps Receiver
Figure 5. The GPS antenna is integrated in the left side of the handle The User Interface Panel All interaction with the Terrameter LS is done through the user interface panel. Figure 6 points out the parts of the user interface panel. -
Page 17: The Power Supply
If the protective liner that keeps the cells together is found defective during inspection, please contact ABEM support for further information. It is possible to fully run the Terrameter LS without the internal battery but for your convenience you should always charge the battery before starting measurement activities. -
Page 18: Operating In High Temperature Situations
Operating in High Temperature Situations Every individual Terrameter LS is operated for at least one hour in a heat chamber during the delivery test. During normal operating condition a thermal fuse will turn off the instrument if overheating occurs. This is to prevent damage and it will of course halt the measuring process. -
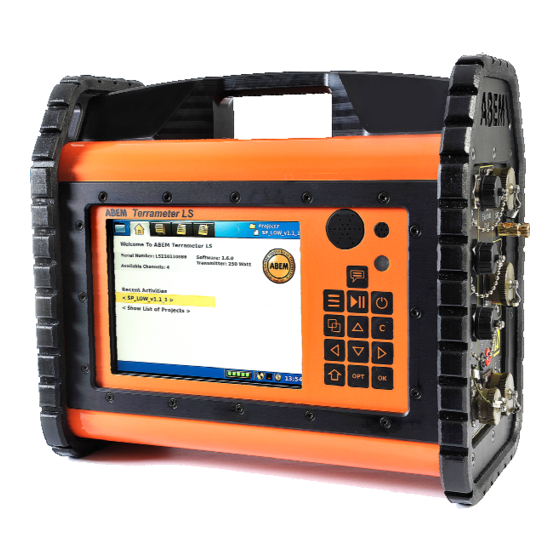
Page 19: The User Interface
ABEM Terrameter LS The User Interface The user interacts with the instrument through the User Interface Panel. This chapter explains the basics of this interaction. The Display The information shown on the display is called a Screen. Figure 7 shows the layout of the Screen. -
Page 20: The Keyboard
ABEM Terrameter LS The Keyboard Commands from the user are entered through a keyboard. There is a built-in keyboard but an external keyboard can also be used. 3.2.1 The Built-in Keyboard Table 2 lists the names of the buttons as referenced in this document. - Page 21 ABEM Terrameter LS 3.2.2 The External Keyboard A standard USB computer keyboard can be connected to the Terrameter LS and used instead of the built-in keyboard. The mapping between the built-in buttons and the computer keyboard is listed in Table 4.
-
Page 22: Navigation
ABEM Terrameter LS Navigation The viewable information of the instrument (called a View, see chapter 3.1) is divided into a number of pages. These pages are arranged in a menu tree with two levels. The top level has four Menu Items, each with a number of Sub Items. - Page 23 3.3.1 The Start View When starting the Terrameter LS the “Projects/Welcome” View (Figure 10) will appear. Here the serial number of the instrument, the number of measuring channels, the transmitter power and the software version are displayed. Furthermore the name of...
- Page 24 ABEM Terrameter LS Figure 10. The Start View In the middle of the View there are two rows with shortcuts to other Views. • Using the shortcuts ― Press <Up> or <Down> to highlight one of the two rows View ―...
-
Page 25: The Option Menus
ABEM Terrameter LS The Option Menus Figure 11 shows an example of an option menu. Option menus are available in four Views: “Projects/Project List” “Projects/Task List” “Projects/Task Templates” “Measure/Progress” Figure 11. Option menu example • Opening and using an option menu ―... - Page 26 ABEM Terrameter LS Figure 13. Example of a fixed choice value • Changing a fixed choice value ― Press <Left> and/or <Right> 3.5.2 The Keyboard Emulators Two different keyboard emulators are used when the built-in keyboard is to be used to enter text and data values.
- Page 27 ABEM Terrameter LS ― Press <Ok> If the edit text is numeric then the numerical keypad emulator (Figure 15) is shown otherwise the alphanumerical keyboard emulator is shown (Figure 14) • Navigating the emulators ― Press the arrow buttons (<Left> <Right> <Up> <Down>) to either move the cursor within the edit text or to select an input key •...
-
Page 28: Data Concepts
ABEM Terrameter LS Note! This is only possible when the keyboard emulator has been opened from a dialog where there is a Cancel button. An example of this is the Project Name dialog (Figure 20) ― Navigate to the input key at the bottom right (“Done!” or “OK”) ―... - Page 29 ABEM Terrameter LS ― Press <Ok> Alternatively the “<Create New Project>” item of the Project option menu can be used to create a new Project, see below • Opening the Project option menu ― Move the highlight to the wanted Project ―...
- Page 30 ABEM Terrameter LS ― Open the Project option menu ― Move the highlight to <Rename> (Figure 19) ― Press <Ok> and the Rename form will be shown (Figure 20) ― Keep the cursor in the name box and press <Ok> to bring up the keyboard emulator (chapter 3.5.2)
- Page 31 ABEM Terrameter LS 3.6.2 Task A Task is a set of measurements as defined by a measurement protocol. A Task can, for instance, be a 2D resistivity imaging line, including one or many roll-along steps. Tasks are managed in the “Projects/ Task List” View (Figure 21). Here Tasks can be created, deleted and renamed, among other things.
- Page 32 ABEM Terrameter LS ― Press <Ok> Warning! If the task to be created does not use a parallel line then it is highly recommended to set the Minimum Electrode Spacing Y value to 1. Not doing so might result in calculation errors.
- Page 33 ABEM Terrameter LS Figure 23 Task option menu with the Create New Task item highlighted The Menu Items of the Task option menu: Open: The Task is made active and the “Settings/Receiver” View is shown Rename: see below Save As Template: see chapter 3.6.3 Template...
- Page 34 ABEM Terrameter LS ― Open the Task option menu ― Move the highlight to <Rename> (Figure 25) ― Press <Ok> and the Rename form will be shown. This is similar to the rename form of the Project (Figure 20) ― Keep the cursor in the name box and press <Ok> to bring up the keyboard emulator (chapter 3.5.2)
- Page 35 ABEM Terrameter LS Templates are managed in the “Projects/Task Templates” View (Figure 26). Figure 26 Task Templates View Templates can only be created in the “Projects/Task List” View. • Create a Template, that is save the settings from a Task as a Template ―...
- Page 36 ABEM Terrameter LS Figure 27. Task Option menu with the Save As Template item highlighted • Opening the Template option menu ― Move the highlight to the wanted Template ― Press <Options> and the option menu of Figure 28 will be shown Figure 28.
- Page 37 ABEM Terrameter LS Figure 29. Confirm Template Delete dialog • Renaming a Template. A new Template will automatically be named after the Task it was created from. This name can be edited. ― Open the Template option menu ― Move the highlight to <Rename>...
-
Page 38: The Instrument
ABEM Terrameter LS The Instrument Settings and information that is specific to the instrument are handled in the Instrument Menu Item of the Navigation Menu (Figure 30). Each Sub Item is explained below. Figure 30 Navigation menu: Instrument Menu Item: Storage Sub Item marked... -
Page 39: The Data Storage
The first is assigned for use in the local network. The local network address is labelled “eth0:” and is needed for establishing communication to the instrument via a network connection using the Terrameter LS Utility Software (see chapter 8). The second is only displayed if a connection can be established with ABEM’s remote technical... - Page 40 The DHCP server in the Terrameter LS must be activated from the “Instrument/Network” View. For this to succeed the sequence is critical and the following procedure is to be...
-
Page 41: The Gps Receiver
Warning! Before connecting to an office network be absolute certain that the DHCP server is set to OFF on the Terrameter LS. If an instrument with the DHCP server activated is connected to a network with another DHCP server active it can create chaos in the network and seriously affect other users in the network. -
Page 42: Calibration
ABEM Terrameter LS Calibration Calibration of the instrument is done at the factory before delivery. Users has no need to access this page. An unlock key must be typed in to access the View (Figure 35), and a complete calibration requires special equipment. - Page 43 ABEM Terrameter LS transmission electrode pair. The instrument software optimises the use of measuring channels so that as many measurements as possible are taken simultaneously for each measuring cycle, given the capability and limitations of the relay switch. The maximum efficiency is achieved if the electrodes of the receiver channels are distributed between the relay cards rather than all being concentrated to one relay card.
-
Page 44: The Power Source
The ES10-64 should be connected at the AUX connector via a multifunction cable (ABEM part no 33 0020 11). The distance between the Terrameter LS and the first ES10-64 is limited by the length of the multifunction cable (33 0020 11). In case it is not long enough, an ”ES10-64 Communication Adapter”... -
Page 45: Measurement Preparation
ABEM Terrameter LS Measurement Preparation Save Field Time by Doing the Right Preparations Look through archive material for the area (topographical maps, geological maps, aerial photographs, reports etc.), and consider whether resistivity surveying is a suitable method for the current problem. If so, select possible profile lines. - Page 46 ABEM Terrameter LS Figure 38 Navigation menu: Settings Menu Item: Receiver Sub Item marked Figure 39. Receiver settings view...
- Page 47 ABEM Terrameter LS The available settings on the Receiver View (Figure 39): Measuring mode options include SP, resistivity (RES), IP, and a Measure mode combination of RES and IP The number of stackings needed depend on site conditions, Minimum # of electrode spread size and the type of electrode array used.
- Page 48 ABEM Terrameter LS Figure 40. Transmitter settings view The available settings on the Transmitter View (Figure 40): Minimum Minimum and maximum current should be selected according Current to site conditions (electrode grounding conditions, noise levels Maximum etc), electrode spread size and type of electrode array, to Current achieve good signal-to-noise ratio and productivity.
- Page 49 ABEM Terrameter LS Figure 41. IP settings view The timing setup for the off-time measurements in IP-mode is defined in the "IP Window Settings" View (Figure 41). The current-off time will be equivalent to "IP Minimum Off Time" except if the total sum of IP delay times and the sum of integration time for IP windows are larger.
- Page 50 ABEM Terrameter LS 5.2.3 Create New Station Before taking measurements on a new Task it is necessary to create a new measuring station (Figure 42), which, in this case, will be the first station. Navigate to the “Measure/Progress” View and press <Ok> when the <Create New Station (Roll Along)>...
- Page 51 The value entered should thus be the number of electrode spacings from the first electrode to the Terrameter LS. For the first station with the first cable excluded the value should therefore be at -20 to get the start position of the pseudo section right.
-
Page 52: Measurement Procedures
Essential Equipment The following equipment is mandatory for data acquisition using the ABEM Terrameter LS System. • To ensure proper function during geoelectrical imaging with medium to high power the Terrameter should be powered from an external battery, for instance a gelled lead-acid battery or a car battery (25 –... -
Page 53: Recommended Additional Equipment
It is recommended to twist or slide the connector up and down while connecting, to remove dirt or oxide on the contact surfaces. Connect the electrode cables to Terrameter LS, making sure to connect them in the right order in relation to the cable layout used. Please see chapter 6 Measurement... -
Page 54: Electrical Imaging
ABEM Terrameter LS Connect external power supply if needed, the built-in battery pack may only be sufficient for small low power surveys. Switch on the instrument by pressing the power button. The “Stop” button must be released before measuring can start in order to allow current transmission. - Page 55 Link together inner and outer electrode cables using the white cable joints. Connect the Terrameter LS at the centre of the cable spread, that is between cable #2 and cable #3. Turn on the instrument and follow the steps described in Section 3 “Instrument and Data Acquisition Setup”...
-
Page 56: Imaging By Means Of A Number Of 2D Layouts
3. Select (a) suitable protocol file(s) in accordance with the previous point. 4. Roll out the electrode cable(s) along the first investigation line and connect the electrodes. Connect the electrode cable(s) to the Terrameter LS and start measuring to a “New” data file using the selected protocol file(s). -
Page 57: Imaging By Electrode Grid Layouts
Since the built-in relay switch of a single Terrameter LS can switch 64 electrodes the maximum layout size is 8 x 8 electrodes. For larger electrode layouts external relay switches can be connected to Terrameter LS. -
Page 58: Performing Data Acquisition
ABEM Terrameter LS Performing Data Acquisition Data acquisition is controlled within the “Measure” Menu Item, under which there are four Views: “Progress”, “Resistivity Results”, “Pseudo Section” and “Electrodes”. Figure 51 Navigation menu: Measure Menu Item: Progress Sub Item marked 6.9.1 Starting the Measurement •... - Page 59 ABEM Terrameter LS Figure 52. Start measuring command on measuring progress view If the measurement setup involves transmitting current, that is if the measurement mode is resistivity or IP, a warning message is issued. Warning! Read the warning text (Figure 53) carefully before...
- Page 60 ABEM Terrameter LS 6.9.2 Electrode Contact Test The first step in the data acquisition is the electrode contact test. If any electrodes have too high contact resistance or are not connected properly an error message will be issued, and the operator prompted to check and improve the contact before the electrodes are re-checked.
- Page 61 ABEM Terrameter LS 6.9.3 Progress and Data Viewing Options The measuring progress is shown on the “Measure/Progress” View (Figure 55). Figure 55. Progress view The top of the “Measure/Progress” View shows the coordinate location of the cable spread, and which of the cables that still remain to be used by the protocol on the present measurement station (Figure 52 and Figure 55).
- Page 62 ABEM Terrameter LS Figure 56. Measurement ready example The data can be viewed on-line in the form of a table on the “Measure/Resistivity Results” View (Figure 57). Figure 57. Resistivity results view...
- Page 63 ABEM Terrameter LS In this View the number of the measurement and key values for the transmitted signal are displayed immediately below the header. Note! The measurement number is not reset when creating a new Task or switching between Tasks, it is incremented continuously within a Project.
- Page 64 ABEM Terrameter LS ― Press <Play-Stop> It might take a few seconds, before the measuring pause dialog is shown (Figure 59). Here it is possible to resume or stop the data acquisition process. ― Move the highlight to the appropriate row ―...
- Page 65 ABEM Terrameter LS Figure 61. Example of deleted data points • Undeleting data ― Stop an ongoing measurement (6.9.4 Pausing / Stopping the Data Acquisition) ― Highlight the “Deleted ‘Measurements…” row in the progress list that represents the point from which data should be undeleted ―...
- Page 66 ABEM Terrameter LS The command will also create a new entry, this time called “Undeleted ‘Measurement Mxxx,…,Mxxx n=xxx’”, with the same numbers as the Deleted entry (Figure 63). Figure 63. Example of undeleted data points A new measurement can be started when data points have been deleted or undeleted.
-
Page 67: Vertical Electrical Sounding
ABEM Terrameter LS 6.10 Vertical Electrical Sounding Vertical Electrical Sounding, VES, can be carried out using a set of standard VES cables and by moving the electrodes manually. Four electrodes are connected via cables to the C1, C2, P1 and P2 connectors on the contact panel. The “Measure/Electrodes”... - Page 68 ABEM Terrameter LS 6.10.1 Managing Electrode Positions Electrode positions for a VES Task are handled as “MN/2 and AB/2” numbers. These numbers will be multiplied with the minimum electrode spacing selected. The electrode position to be measured, the active position, can be changed. It is in this way possible to step through all the electrode positions that are pre-defined in the protocol file.
- Page 69 ABEM Terrameter LS Figure 66. The Electrode Positions view in VES mode. Highlight on the second row and active electrode position marker on the fourth row The Electrode Positions View (Figure 66) lists all the electrode positions from the protocol file. The dark yellow arrow is placed on the line that corresponds to the active electrode position.
- Page 70 ABEM Terrameter LS • Creating a new electrode position ― Navigate to the “Measure/Electrode Positions” View (Figure 66) ― Highlight the first row <Create ‘Electrode Position’> ― Press <Ok>, the Create Electrode Position dialog will be shown (Figure 67) ― Enter the positions for the current electrodes (A and B) and potential electrodes (M and N).
- Page 71 ABEM Terrameter LS Figure 68. Result of Create Electrode Position 6.10.2 Performing a VES Measurement • Starting a VES measurement ― Set the active electrode position as described above ― Make certain that the electrodes have actually been moved to the desired...
- Page 72 ABEM Terrameter LS Figure 69 shows the Progress View during a VES measurement. The measurement can be paused, stopped and resumed as described in chapter 6.9.4 Pausing / Stopping the Data Acquisition. Note! In case any person or animal approaches the electrode...
- Page 73 ABEM Terrameter LS ― Press <Up> ― Press <Ok> 6.10.3 VES Sounding Curve In VES mode a sounding curve will be shown in a double logarithmic diagram on the VES Curve View (Figure 71). Focus depth (median depth penetration) will be on the vertical axis and apparent resistivity on the horizontal axis.
-
Page 74: Full Waveform Data
ABEM Terrameter LS 6.11 Full Waveform Data Internally the instrument records data with 1 millisecond resolution. This data is filtered and averaged in order to provide the measured voltages, resistances, and chargeability’s that are displayed and saved. By default the full waveform data with millisecond resolution is not saved, but it is possible to do so in order to make it possible to analyse the received signals in detail afterwards. - Page 75 ABEM Terrameter LS The event information starts with an error message over one or more lines describing the problem and sometimes giving problem-solving examples. Then, normally, four values are given: ― Tx: lists the electrodes involved in current transmitting ― Estimated load: the load as measured by the current transmitter ―...
- Page 76 ABEM Terrameter LS Here are some examples of the text area information for different measurement errors:...
-
Page 77: Measurement Post-Production
There are two ways to do this, either by exporting directly to a USB memory stick connected to the LS, which is described in the following subchapters, or by using the Utility Software (see chapter 8 Terrameter LS Utility Software). Note! It is strongly recommended for users to always transfer the Project database and store it for future use. - Page 78 ABEM Terrameter LS Figure 73. Task options menu Confirm that you want to export to the USB memory device (Figure 74). Figure 74. Export task to DAT confirmation dialog 7.2.2 Export a Task as a TXT (Text) File • Export as a TXT file ―...
- Page 79 ABEM Terrameter LS Figure 75. Task options menu Confirm that you want to export to the USB memory device (Figure 76). Figure 76. Export task to TXT confirmation dialog 7.2.3 Export a Task as a USF File • Export as a USF file ―...
- Page 80 Projects, and it is often a better option to copy the data via the utility software and an Ethernet connection instead (see chapter 8 Terrameter LS Utility Software). • Export a Project ― Navigate to the “Projects/Project List” View ―...
-
Page 81: Delete A Project
ABEM Terrameter LS Confirm that you want to export to the USB memory device (Figure 80). Figure 80. Export Project confirmation dialog Figure 79. Project options menu Delete a Project • Deleting a Project ― Navigate to the “Projects/Project List” View ―... -
Page 82: Terrameter Ls Utility Software
ABEM Terrameter LS Terrameter LS Utility Software The Terrameter LS Utility Software is a tool that can be used for various functions. These include: • Handling spreads and protocols: including copying between PC and instrument and converting from older ADR... -
Page 83: Spread And Protocol Handling
LS. Administration of the files on the instrument is done with the “Protocol Handling” dialog. It is also possible to convert older files to Terrameter LS compatible files. Select the “Protocols/Transfer Spread and Protocol Files” menu item to open the “Terrameter LS Protocol Handling”... - Page 84 By clicking on a spread or a protocol in one of the lists that file will be made available for the three command buttons in the Terrameter LS frame of the dialog. The following functions are now available: “Copy file from Terrameter”...
- Page 85 Conversion of address and protocol files in the style used by Terrameter SAS1000/SAS4000 into the XML format used by Terrameter LS can be done via the utility software. Select the “Protocols/Convert ADR to XML Spread File” (Figure 88) or “Protocols/Convert ORG to XML Protocol File”...
- Page 86 ABEM Terrameter LS Figure 88. Conversion of ADR file to spread file in XML format Figure 89. Conversion of ORG file to protocol file in XML format...
-
Page 87: Data Transfer
Project database file as it contains essential information for instrument diagnostics. Select the “File/Import/Import data from Terrameter LS” menu item to open the “Data Transfer Terrameter LS” dialog, from which data can be copied from the instrument to the computer (Figure 92). - Page 88 ABEM Terrameter LS have a fast network connection between Terrameter LS and the computer before attempting to do so. The user will also be made aware of this fact: Figure 91. Information about possible long copying duration Finally click the “Get Project(s)” button to start the data transfer.
-
Page 89: View And Export Data
ABEM Terrameter LS View and Export Data Select the “File/Open Project” menu item to open a Project database in the project data dialog (Figure 93). From this dialog it is possible to view the contents and export data in different formats. - Page 90 ABEM Terrameter LS Or selecting a menu item from the “File/Export” or “View” main menus of the dialog: Figure 95. File/Export and View menus The various menu items do the following: Export: The Task data can be exported to DAT, text or USF formats. For export to DAT format there are options for exporting all individual IP windows or to integrate several or all into one IP value.
- Page 91 ABEM Terrameter LS Figure 97. Full waveform plot dialog Electrode Test: Provided electrode test has been done for the selected Task this data will be displayed. Figure 98. Electrode test dialog Table: Opens a table view dialog where the data of a Task can be viewed (Figure 99).
- Page 92 ABEM Terrameter LS Figure 99. Table view dialog; Settings panel to the right Different tailor made sets of column choices can be saved as templates. The list box and three buttons just below the column name list are used for this.
-
Page 93: Update Terrameter Ls Instrument Software
6. Click "Update" and select the downloaded update package (for instance terrameter-1.4.0.tar). 7. Wait for the Terrameter LS to be updated. The updated version of the instrument software should start automatically. Figure 101 shows the instrument software update page after a successful update... -
Page 94: Erigraph
Figure 102.Dialog window shown after update procedure is finished Erigraph Erigraph, which is available via ABEM’s web page, can be used for viewing the DAT files as pseudo sections. Please download and install the software on your PC, and refer to the enclosed user guide for usage instructions. -
Page 95: Testing, Diagnostics And Error Search
ABEM Terrameter LS Testing, Diagnostics and Error Search Terrameter LS has built-in self-test and calibration of the major functions, including input boards, transmitter and relay switch. Test results are automatically logged for quality assurance purposes, and any malfunction reported to the operator. -
Page 96: Cable Isolation Test
ABEM Terrameter LS • Navigate to the “Settings/Transmitter” View and make sure that “Electrode Test” is set to “No” • Create a new Task and select the spread “CableTest” and the protocol “CableContinuityTest” • Start the measuring procedure. If the cable is Ok it should be possible to take all measurements of the protocol. -
Page 97: Remote Diagnostics
Figure 104.The Electrodes view showing the result for a faulty cable Remote Diagnostics The Terrameter LS can be connected to ABEM for remote diagnostics over a VPN (Virtual Private Network). To connect the instrument to a VPN you need a standard Ethernet based TCP/IP LAN (Local Area Network) that is connected to the Internet. -
Page 98: In Case Of Malfunction
Should a fault occur that is not correctable on site, please send full details to ABEM. It is essential that instrument type and serial number is included and, if possible, the original ABEM delivery number. -
Page 99: 10 Appendix A. Technical Specification
ABEM Terrameter LS 10 Appendix A. Technical Specification 10.1 General Casing Rugged Aluminium case meets IEC IP 66 Computer Embedded ARM 9, 200 MHz 20 channels SirFstarIII chip Display 8,4” Active TFT LCD, full colour, Daylight visible I / O ports... -
Page 100: Transmitter
YES, Focus One 10.6 Software & Communication Terrameter LS is controlled using the incorporated Firmware. It supports Multi- Electrode Survey Systems for 2D & 3D for Resistivity, IP & SP Imaging & Monitoring. It has a Graphical User Interface that is easy to follow in all its aspects. Clear and instructive graphics assists the user in the operation of the instrument. -
Page 101: 11 Appendix B. Measurement Modes
In SP, resistivity and IP data acquisition it is essential to suppress various types of noise, from sources such as electrode polarisation, telluric currents, power grid. The Terrameter LS is equipped with sigma-delta AD-converters. These have built-in low pass filtering and excellent noise suppression. Low pass filtering cannot, however, be used in standard mode for IP measurements, since it would colour early time IP data strongly. - Page 102 ABEM Terrameter LS Current Integration Delay transmitted time time Time Voltage measured Time Figure 106 Resistivity measuring cycle timing definitions (after Krill 1977)
-
Page 103: Induced Polarisation (Ip)
ABEM Terrameter LS 11.3 Induced Polarisation (IP) In the case of time domain IP measuring one positive and one negative current pulse is usually employed. It is then necessary to measure the background levels before and after the measuring cycle, and use that for removing drift during the measuring cycle. -
Page 104: Appendix C. Spread And Measuring Sequence Files
.DWN), but that is not needed for Terrameter LS. Utility software that converts from the old to the new system is available in the Terrameter LS utility software (“Protocols / Convert ADR to XML Spread File” and “Protocols / Convert ORG to XML Protocol File”... - Page 105 ABEM Terrameter LS • <SwitchAddress> defines how the electrode is connected to the relay switch. • <SwitchId> specifies which relay switch is used (default = 0 is equal to internal relay switch). The initial part of spread description file is shown below as example.
-
Page 106: Protocol Files In Xml-Format
This must be specified for each relay address that is not in the internal switch. It is automatically taken care of for switch addresses above 64 if a spread description in ADR-format is converted using the Terrameter LS Utility Software (version 0.1.3 or higher). - Page 107 ABEM Terrameter LS 7 13 <Focus> <X> 10 </X> <Z> 3.192 </Z> </Focus> </Rx> <Rx> 19 25 <Focus> <X> 22 </X> <Z> 8.971 </Z> </Focus> </Rx> <Rx> 31 37 <Focus> <X> 34 </X> <Z> 11.09 </Z> </Focus> </Rx> <Rx> 43 49 <Focus>...
-
Page 108: Spread Files For Pole-Dipole
ABEM Terrameter LS <Focus> <X> 52 </X> <Z> 3.192 </Z> </Focus> </Rx> </Measure> Note that the number of channels in an instrument does not restrict the number of potential measurements for a current electrode pair, and that the same measurement sequence file can be used for an instrument with 4, 8 or 12 channels 12.4... -
Page 109: Spread Files For Pole-Pole
ABEM Terrameter LS The software will look for the electrode with switchid=0 and switchaddress=2. The id of the remote electrode (for instance102) must be unique within the spread and not 0. 12.6 Spread Files for Pole-pole Two remote electrodes must be specified in the spread file. -
Page 110: Optimising The Use Of Channels For Pole-Pole
12.8 Optimising the Use of Channels for Pole-pole While it is possible to make pole-pole measurements with the Terrameter LS without any special accessories, using a special device can optimise the use of measuring channels. The interconnections of all channels “P2” to the remote potential electrode can be done via an adapter connected to the external connector AUX or the connector Interconnect. -
Page 111: 12.10 Cable Description Files In Adr-Format
All parameters are integers. Since one way of creating a spread file for Terrameter LS is to convert from and ADR-file the format is given as reference here. -
Page 112: 12.11 Protocol Files In Org-Format
Terrameter / Electrode Selector via the cable joints. 12.11 Protocol Files in ORG-format The format of protocol files in the system used by older versions of the ABEM Lund Imaging System is presented here for reference since one way of creating an XML- format protocol file is to convert from this format. -
Page 113: 12.12 Geometry Files
3,n3 12.13 Standard Spread Files A number of standard spread files are supplied with Terrameter LS. It should be noted that new files can be added and that the list may thus not be complete. The following spreads are included with a standard firmware installation. -
Page 114: 12.14 Standard Measuring Sequence Files
A number of standard measuring sequence (protocol) files are supplied with all Terrameter LS spread files, as listed below. It should be noted that new files can be added without notice and that this list may thus not be complete.
Need help?
Do you have a question about the Terrameter LS and is the answer not in the manual?
Questions and answers