Table of Contents
Advertisement
Quick Links
Download this manual
See also:
User Manual
Advertisement
Table of Contents

Related Manuals for Geemarc LOOPHEAR 10


Summary of Contents for Geemarc LOOPHEAR 10
- Page 1 LH10 Amplified Hearing Assistant...
-
Page 3: Table Of Contents
CONTENTS Please refer to our website: www.teltex.com for an up to date user guide, as there may be important updates and changes you need to be aware of. CONTENTS .............. 2 INTRODUCTION ............3 Unpacking the LH10 ..........4 DESCRIPTION ............5 General Description .......... -
Page 4: Introduction
‘T’ setting. It is important that you read the instructions below in order to use your Geemarc LH10 to their full potential. Keep this user guide in a safe place for future reference. -
Page 5: Unpacking The Lh10
INTRODUCTION Unpacking the LH10 When unpacking the LH10, you should find the following in the box: • 1 LH10 • 1 Pair of Earbuds with rubber ear cushions • 1 Rechargeable Battery (3.7V Li-po) • 1 Micro USB to USB Cable for recharging •... -
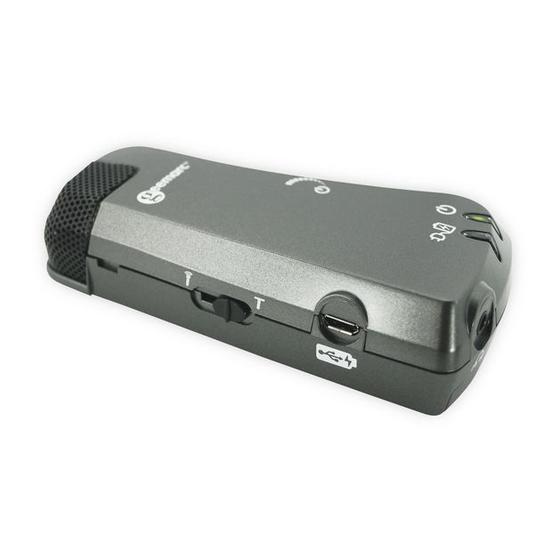
Page 6: Description
DESCRIPTION General Description Internal Microphone Microphone Port LH10 Conversation Piece Mode Switch On/Off (MIC or T) Volume control wheel. Charging Port Micro USB (5.0 V DC) Charge and On LED Earbuds port... - Page 7 DESCRIPTION Belt Clip Battery Compartment Cover...
- Page 8 DESCRIPTION Space for Tone & battery pack Balance or batteries Setting Clip for lanyard (option) Plug for the Battery Pack...
-
Page 9: Installation
INSTALLATION Setting Up Open the battery compartment and connect the rechargeable battery pack (3.7V) to the Plug for the Battery Pack located inside the battery compartment. Or insert 2 single batteries (1.5V AAA Alkaline) instead of the battery pack. When using AAA batteries, if the 'On' LED turns red when in use, the LH10 needs to have new batteries (No Red LED indication when using the rechargeable battery). -
Page 10: Using The Lh10
USING THE LH10 Turning the LH10 On and Off Ensure the mode switch is set to (MIC). Roll the On/Off Volume control wheel upwards. The (On) LED will display Green. Adjust the Volume to a comfortable level by rolling the On/Off Volume control wheel. -
Page 11: Tone And Balance Setting
USING THE LH10 An external microphone (option) can be connected in the socket "Mic", then set the switch to "Mic" position, in this case the "built in T coil" is disabled. Microphone The LH10 is built with an internal microphone which enables you to hear all the surrounding sounds. -
Page 12: Troubleshooting
TROUBLESHOOTING The 'On' LED is Red • Charge the battery if the battery pack is used or replace with new batteries if standard AAA batteries are installed. The LH10 appears not to be working • Make sure that the earbuds are securely plugged in. •... -
Page 13: Safety Information
SAFETY INFORMATION General Do not open the unit. Contact the helpline for all repairs. Cleaning Clean the LH10 with a soft cloth. Never use polishes or cleaning agents - they could damage the finish or the electrics inside. Environmental Do not expose to direct sunlight. Always ensure there is a free flow of air over the surfaces of the LH10. -
Page 14: Guarantee
GUARANTEE From the moment your Geemarc product is purchased, Geemarc guarantee it for the period of 2 years. During this time, all repairs or replacements (at our discretion) are free of charge. Should you experience a problem then contact our help line or visit our website at www.geemarc.com. -
Page 15: Fcc Statement
FCC STATEMENT FCC CLASS B NOTE: This equipment has been tested and found to comply with the limits for a Class B digital device, pursuant to Part 15 of FCC Rules. These limits are designed to provide reasonable protection against harmful interference in a residential installation. -
Page 16: Recycling Directives
RECYCLING DIRECTIVES The WEEE (Waste Electrical and Electronic Equipment) has been put in place for the products at the end of their useful life are recycled in the best way. When this product is finished with, please do not put it in your domestic waste bin. - Page 17 UGLoopHEAR10_EnFrGeSp_V1.2...
Need help?
Do you have a question about the LOOPHEAR 10 and is the answer not in the manual?
Questions and answers