Advertisement
Table of Contents
- 1 Parts Included
- 2 Tools Required
- 3 Carrier Installation
- 4 Front Hardware
- 5 Rear Hardware
- 6 Lock Plug Installation
- 7 Locking Features: Bike to Carrier
- 8 Locking Features: Carrier to Vehicle
- 9 Loading Bicycle
- 10 Loading Bike
- 11 Secure Rear Tire
- 12 Driverside Installation
- 13 Load Bars
- 14 Vehicle Make, Model and Year
- Download this manual
E
C
B
Z
A
M
F
L
G
part
A
wheel tray 56" silver
B
screw phillips 10-32 x 1.5
C
10-32 nylon insert locknut
D
locking ratchet arm assembly
E
hook assembly
F
tube cap
G
base plate
H
M8 x 1.25 x 25mm
I
allen bolt M6 x 12
J
square nut
K
washer 6mm ID /
L
rql arm bearing half
M
bearing clamp
N
wheel strap assembly
O
lock cover 594
P
metal bracket
Q
knob 3 wing high M6 x 1 nut
R
carriage bolt 6 x 55
S
plate square for wheel tray
T
lock cover plug
U
tray end cap with logo
V
lock plug
W
hex key M5
X
wheel loop coated 594
Y
M8 x 1.25 x 20mm zinc II black
Z
washer 8mm id 16mm od
AA
lock nut M8
BB
flat nylon washer M8
CC
carriage bolt 6 x 65
DD
knob 3-wing low M6x1 nut
EE
plastic spacer mount
FF
rubber leveling gasket
GG
carriage bolt 6 x 80
HH
road bike adapter
SIDEARM
™
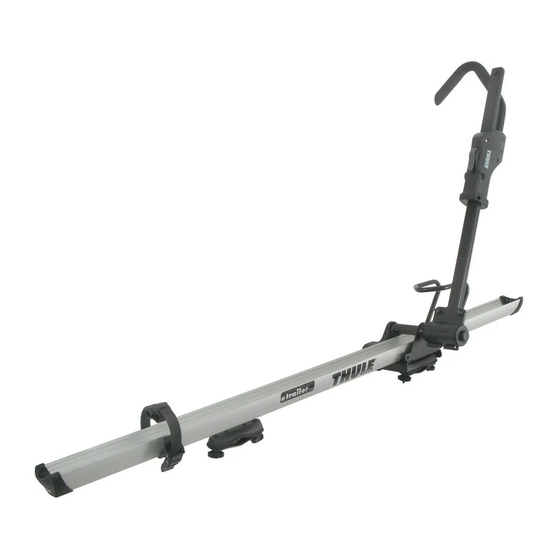
PARTS INCLUDED
N
O
H
K
X
BB
AA
Y
description
594XT
U
P
V
R
I
GG
CC
W
T
EE
J
FF
Q
DD
S
HH
part number
qty.
85370205602
1
8535972
2
8535973
2
7533579
1
7533710
1
853147704
2
7533704
1
8535976
2
919061211
2
8537557
2
951061211
2
8535960
2
7533591
1
8537006
1
8537026
1
8535513
3
7530745
2
915065554
6
8530333
2
8536395
1
7533236
2
8533160
2
8530930
1
8537024
1
853597602
2
951081611
2
938080011
2
8537021
4
915066554
6
7530783
4
8537441
3
8537442
4
915068054
6
8535426
1
Advertisement
Table of Contents

Related Manuals for Thule Sidearm 594XT


Summary of Contents for Thule Sidearm 594XT
- Page 1 SIDEARM ™ 594XT PARTS INCLUDED part description part number qty. wheel tray 56" silver 85370205602 screw phillips 10-32 x 1.5 8535972 10-32 nylon insert locknut 8535973 locking ratchet arm assembly 7533579 hook assembly 7533710 tube cap 853147704 base plate 7533704 M8 x 1.25 x 25mm 8535976 allen bolt M6 x 12...
- Page 2 TOOLS REQUIRED • 13mm wrench or adjustable wrench. • #2 phillips screw driver. • 1 - Tape measure Please refer to the fit guide at the back of these instructions to determine if your vehicle requires the 55mm, 65mm or 80mm carriage bolts for fitting the carrier to your vehicle’s factory rack. CARRIER INSTALLATION / •...
- Page 3 CARRIER INSTALLATION 16" • Slide tray onto base plate. The edge of the base plate should be 16" from the • Turn carrier over and tighten bolts with 5mm hex wrench provided. front edge of the wheel tray. CARRIER INSTALLATION / •...
- Page 4 • Attach rubber leveling gasket to bottom of rubber risers as shown. If you’re attaching to a factory rack and it slopes, you should add a second rubber leveling gasket underneath the first one on side closest to the vehicle door to level the bike carrier. FRONT HARDWARE •...
- Page 5 LOCK PLUG INSTALLATION NOTE: If not installing lock cylinders, please insert plastic lock plugs into lock cylinder holes as shown. LOCKING FEATURES: BIKE TO CARRIER (LOCKS SOLD SEPARATELY) • Insert change key into lock cylinder. • Remove change key, insert key to lock and unlock. •...
- Page 6 LOCKING FEATURE: CARRIER TO VEHICLE (LOCKS SOLD SEPARATELY) • Follow Lock core installation procedure above for lock cover. • Snap cover onto base plate. Turn key to lock. NOTE: To secure cover with out lock core, use lock plug (853-6395) LOADING BICYCLE Position Ratcheting Arm in forward position.
- Page 7 LOADING BIKE • While holding the bike with one hand rotate the support arm, until it sits within 1" of the bicycle brake or fork crown. • Ratchet the arm tightly against the wheel. You should hear a minimum of 2 clicks past initial contact with the tire.
- Page 8 DRIVERSIDE INSTALLATION • Follow step 1 for Installation. • Remove wheel loop using 13mm wrench and 5mm hex wrench. DRIVERSIDE INSTALLATION • Position wheel loop on opposite side of base plate. • Install bolts, washers and lock nut and tighten firmly. DRIVERSIDE INSTALLATION •...
- Page 9 DRIVERSIDE INSTALLATION DRIVERSIDE INSTALLATION • Remove bearing halves from pivot tube. • Loosen and remove both screws on hook-grip assembly. • Rotate both bearing halves on pivot tube. • Rotate hook 180° • Re-install screws and nuts and tighten firmly. •...
- Page 10 527 and Sidearm 594XT ™ ™ ™ NOTE: If your vehicle is not listed below, it may be a no fit. Please refer to www.thule.com for the most up-to-date fit information. RECOMMENDED RECOMMENDED LOAD BARS VEHICLE MAKE, MODEL, AND YEAR...
- Page 11 2014 ACCESSORY TO FACTORY RACK FIT GUIDE Circuit 526, Paceline 527 and Sidearm 594XT ™ ™ ™ RECOMMENDED RECOMMENDED VEHICLE MAKE, MODEL, AND YEAR BOLT SIZE (mm) VEHICLE MAKE, MODEL, AND YEAR BOLT SIZE (mm) HUMMER LINCOLN '05-10 ü Aviator '03-05 ü...
- Page 12 2014 ACCESSORY TO FACTORY RACK FIT GUIDE Circuit 526, Paceline 527 and Sidearm 594XT ™ ™ ™ RECOMMENDED VEHICLE MAKE, MODEL, AND YEAR BOLT SIZE (mm) SUBARU Baja 4DR '03-07 ü Forester '98-14 ü Impreza 5DR '12-14 ü Impreza WRX / WRX STI 4DR '02-14 ü...
Need help?
Do you have a question about the Sidearm 594XT and is the answer not in the manual?
Questions and answers