Table of Contents
Advertisement
Advertisement
Table of Contents

Related Manuals for Hootoo ht-tm04 tripmate elite

Summary of Contents for Hootoo ht-tm04 tripmate elite
- Page 1 HooToo® User Guide HT-TM04 TripMate Elite V 1.0...
-
Page 2: Table Of Contents
Contents Chapter 1 Introduction ............................4 Preview ..............................4 Features ..............................4 1.2.1 Personal Cloud ..........................4 1.2.2 Travel Router ..........................4 1.2.3 External Battery Pack ........................4 Diagram ..............................5 Chapter 2 Configure the TripMate Elite ......................6 Connect the TripMate Elite ........................6 2.1.1 Connect the TripMate Elite wirelessly .................. - Page 3 3.5.2 Firmware ............................. 34 3.5.3 Factory Default ........................... 38 Wizard ..............................39 Explorer .............................. 40 Chapter 4 Battery Backup ..........................41 Charge TripMate Elite ........................41 Charge Devices ........................... 41 Chapter 5 Warranty and Support ........................42 Appendix A: Specification ..........................43...
-
Page 4: Chapter 1 Introduction
Chapter 1 Introduction 1.1 Preview TripMate is a versatile device that creates a personal hotspot for sharing your existing USB storage device, a travel router that provides wireless access to a wired connection, a dual USB charger, and an external battery pack charger to charge your devices on the go. 1.2 Features 1.2.1 Personal Cloud Creating your own wireless network to transfer and share media with Wi-Fi enabled devices. -
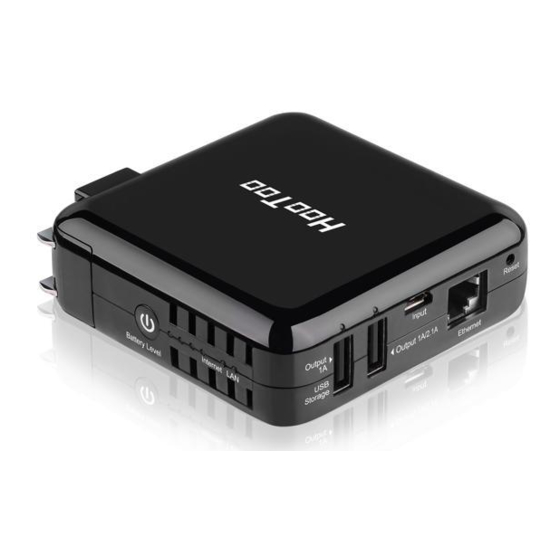
Page 5: Diagram
1.3 Diagram... -
Page 6: Chapter 2 Configure The Tripmate Elite
Chapter 2 Configure the TripMate Elite 2.1 Connect the TripMate Elite 2.1.1 Connect the TripMate Elite wirelessly TripMate Elite can create a limited local wireless network (no full internet access), where the central functions are performed through the local network. To connect the TripMate wirelessly, please follow the steps below: Example: Android 1. - Page 7 3. Click WLAN 4. Open Wi-Fi, select TripMateElite-XXXX...
-
Page 8: Access The Configuration Page
5. Enter the default password: 11111111 (8 x 1’s), click Connect 2.1.2 Access the Configuration Page 1. Connect phone to TripMate wirelessly 2. When it shows the status “Connected”, open browser, enter 10.10.10.254 in the url box... -
Page 9: Personal Cloud
3. Log in with default user name: admin, password: (leave it empty) 2.2 Personal Cloud You can create your own wireless personal media sharing cloud. ▲Note: Download the "HooToo TripMate" app from App Store or Google Play first... - Page 10 1. Insert a USB thumb drive, a card reader (up to 64GB), or a USB HHD (supported format: NTFS/FAT16/FAT32, up to 4TB) into the USB port of the TripMate, then power up the TripMate. 2. Download the app HooToo TripMate from Google Play 3. Connect phone to the TripMate Elite wirelessly...
- Page 11 5. Tap on My TripMate. All of the contents will be under the main folder "USBDisk1_Volume1” 6. Tap on My Device. All of the contents on the phone can be read. ▲Note: If you need specific instructions for the HooToo TripMate app, please refer to the instructions listed on the HooToo website...
-
Page 12: Travel Router
2.3 Travel Router ▲Note: Similar settings can also be performed on any Mac computer, or mobile devices such as phone, tablet, etc. 2.3.1 Access Point Mode Definition: TripMate Elite is connected to a wired network and transforms the wired Internet access into a wireless one so that multiple devices can share the Internet. -
Page 13: Router Mode
2.3.2 Router Mode TripMate connects to a DSL or cable modem and turns it into a regular wireless router. Configuration: 1. Power on TripMate Elite 2. Plug an Ethernet cable from a well-established modem to TripMate Elite 3. Connect phone to TripMate wirelessly 4. - Page 14 6. Select Internet, choose Wired Access. ▲Note: TripMate provides Dynamic IP, Static IP and PPPoE for router setup. Please consult with the network administrator or refer to the wired network user documentation for best selection. If using a DSL Internet, please enter the PPPoE username and password. Click Save. Example:...
- Page 15 TripMate is now connected to the internet If a static IP address is issued by the network provider (please request network provider), the given static IP fields (including network mask and gateway) must also be set to the router. Click Save...
- Page 16 TripMate is now connected to the internet ▲Tips: When connecting devices with network cables, please make sure the cable is connected securely. Loose cables are one of the most common sources of network setup problems. If a wired network type cannot be chosen, an alternative method is available to set up the router mode 1.
- Page 17 4. Connect TripMate to the wired connection with an Ethernet cable 5. Login 10.10.10.254 6. Click Network 7. Select Internet , then choose Wired Access, choose Static IP in the drop-down list 8. Enter into the IP field the same IP information assigned by the wired network. Click Save...
-
Page 18: Bridge Mode
TripMate is now connected to the internet 2.3.3 Bridge Mode Definition: The router borrows existing wireless Internet and broadcasts it using a different network name (SSID) and password. This application can create two individual networks for two groups of users sharing one Internet connection. Application: Small restaurant, shop, bar, home, office and others where Internet service needs to be provided for guests without revealing the password of the existing network for hosts. - Page 19 2. Wi-Fi is open, but has an authorization page. Configuration #1: Example: Android 1. Power on TripMate Elite 2. Connect your phone to TripMate Elite wirelessly 3. Open browser and log in 10.10.10.254 4. Network → Internet, choose Wireless Access 5.
- Page 20 TripMate is now connected to the internet Configuration #2: 1. Get the user name and password of the Wi-Fi, which is needed to click through the login/authentication page 2. Connect phone to TripMate wirelessly; log in 10.10.10.254 3. Network → Internet, choose Wireless Access, click Scan to select the Wi-Fi, then leave the password empty, click Save...
- Page 21 & password ▲ Note: If the authorization page doesn’t pop up, please update the firmware. Please download the firmware from the HooToo website: HT-TM04: http://www.hootoo.com/media/downloads/fw-hotel-HooToo-TM04-2.000.006.zip ▲ For instructions on how to upgrade the firmware, please refer to page 33.
-
Page 22: Chapter 3 System Tools
Chapter 3 System Tools 3.1 User Setting The admin login password can be changed here. 1. Login 10.10.10.254, select User 2. Enter your new password and confirm, click Save... -
Page 23: Disk Information
3.2 Disk Information The basic information for the USB storage is displayed here. Log in 10.10.10.254, select Disk... -
Page 24: Network Setting
3.3 Network Setting Login 10.10.10.254, click Network. 3.3.1 Host Name TripMate Elite host name can be changed here: Select Host Name, enter the new host name, click Save... - Page 25 Now the host name has changed.
-
Page 26: Ssid Setting
3.3.2 SSID Setting To change the SSID name and password of the TripMate Elite, please follow the steps below: Select Wi-Fi & LAN Enter the new SSID name and password. Click Save... - Page 27 Then reconnect phone to TripMate Elite ▲ Note: On this page the Wi-Fi Channel can also be changed:...
-
Page 28: Hide Ssid
And change the Security type: 3.3.3 Hide SSID ▲Note: If you would like to hide your SSID, please make sure you have set up the network setting (wired/wireless) previously, otherwise you will lose the connection to TripMate and will need to reset the TripMate to restore the original settings. -
Page 29: Dhcp Settings
3.3.4 DHCP Settings Select DHCP Server, you can disable the DHCP server. Click Disabled → Save ▲Note: If you turn off the DHCP server, TripMate will NOT assign an IP address to your wireless device therefore making them unable to connect to the TripMate. The IP address from your wireless device needs to be inputted manually. -
Page 30: Dlna Service
3.4.2 DLNA Service TripMate also supports DLNA service: How to use DLNA: Example: Windows Phone 1. Download an app which supports DLNA service (e.g. My Media Hub) from the Windows app store 2. Plug a USB drive into the TripMate Elite 3. - Page 31 the Directory (select the folder which needs access). Click Save...
- Page 32 5. Open the app My Media Hub, the server named ‘test’ refers to the TripMate. 6. Entering “test”, the contents of the selected folder of USB storage can be read under the folder Browse Folders...
-
Page 33: System Settings
▲ Note: A wireless device which supports DLNA service is needed 3.5 System Settings Login 10.10.10.254, click System 3.5.1 Backup & Restore Select Backup Settings. Here you can save the current configuration of the TripMate Elite as a backup file or restore the configuration via a backup file. -
Page 34: Firmware
Click Restore to locate the backup file for the TripMate 3.5.2 Firmware On the bottom of the interface, you can view the current firmware version. To upgrade the firmware, please follow the steps below: 1. Download the latest firmware from the Hootoo website: www.hootoo.com 2. Unzip it... - Page 35 3. Insert a USB storage device into your TripMate (i.e. an external hard drive or a USB flash drive) 4. Connect to TripMate wirelessly 5. Open a browser and enter 10.10.10.254 Login to the page, default user name: admin; password: “leave the password blank field empty” 6.
- Page 36 7. Click Firmware Upgrade on the left-side tab, Click Upgrade 8. Browse and select the exact file from step 3...
- Page 37 Click Save.
-
Page 38: Factory Default
You will be prompted to wait 5 minutes while the system updates. After the system updates, you will have successfully updated the firmware. 3.5.3 Factory Default There are two ways to reset TripMate Elite: 1. Hard Reset: Use a needle-like object to press the reset button found next to the USB port; hold for 10 seconds until the Wi-Fi indicator LED blinks, release it and wait for it to reboot. -
Page 39: Wizard
▲ Note: This will reset all configuration settings to their default values. The default SSID Name: TripMateElite-XXXX The default SSID Password: 11111111(8 x 1’s) The default User Name: admin The default Password: blank (leave it empty) All changed settings will be restored to their factory default settings 3.6 Wizard Click Wizard, you will be directed to step-by-step basic configuration guide. -
Page 40: Explorer
3.7 Explorer Login 10.10.10.254→Explorer, here you can overview the contents of your USB storage when plugged into the TripMate as well as perform some basic operations (the Hootoo TripMate app is needed for complete operation of the USB storage). Refresh Button – To refresh the display Upload Button –... -
Page 41: Chapter 4 Battery Backup
Chapter 4 Battery Backup TripMate has an internal 6,000mAh battery, so you can use it charge your devices on the go 4.1 Charge TripMate Elite Start charging the TripMate Elite when the remaining power is below 25%. This will make sure your external charger is always ready for emergency situations. -
Page 42: Chapter 5 Warranty And Support
Chapter 5 Warranty and Support The HooToo HT-TM04 Tripmate Elite is covered with the HooToo 12 month warranty from the date of its original purchase. If the HooToo HT-TM04 Tripmate Elite becomes defective during its warranty period, please contact HooToo or your seller for warranty cover. The following are not covered by our warranty: ... -
Page 43: Appendix A: Specification
Appendix A: Specification Project name TripMate Elite Model Name HT-TM04 Model Ralink RT5350 Frequency MIPS24KEc 360MHZ Flash Model EN25Q64-104WIP Capacity 8MByte SPI flash SDRAM Model M12L2561616A-6TG(SDRAM) Capacity 32MB (256Mbit) WiFi standard 802.11 b/g/n Frequency 2.4GHz Speed 72Mbps for 20MHz 150Mbps for 40MHz WAN port Protocol Ethernet... - Page 44 can connect USB storage for WiFi accessing USB host 2 can charge your tablet/phone with max 1A output. In power on &off mode, USB host 1&2 can charge your phone/tablet, total up to 2.1A current. USB host LED x2(Green) It is off when no device is connected;...
Need help?
Do you have a question about the ht-tm04 tripmate elite and is the answer not in the manual?
Questions and answers