Table of Contents
Advertisement
M M M M 2 2 3 3 0 0 5 5 2 2
EXTERNAL SIREN
P P l l e e a a s s e e n n o o t t e e : : B B e e f f o o r r e e y y o o u u s s t t a a r r t t t t o o i i n n s s t t a a l l l l t t h h i i s s M M i i c c r r o o m m a a r r k k A A l l a a r r m m , , w w e e a a d d v v i i s s e e t t h h a a t t y y o o u u s s h h o o u u l l d d t t a a k k e e a a d d e e q q u u a a t t e e s s a a f f e e t t y y p p r r e e c c a a u u t t i i o o n n s s
w w h h e e n n u u s s i i n n g g p p o o w w e e r r t t o o o o l l s s a a n n d d l l a a d d d d e e r r s s . . P P r r o o t t e e c c t t y y o o u u r r e e y y e e s s w w h h e e n n d d r r i i l l l l i i n n g g a a n n d d n n e e v v e e r r u u s s e e a a p p p p l l i i a a n n c c e e s s i i n n d d a a m m p p o o r r w w e e t t c c o o n n d d i i t t i i o o n n s s . .
This alarm system can provide valuable protection for your home and property if used properly. However, the system
cannot guarantee complete protection against burglary or robbery. Therefore, the manufacturer, distributor or supplier will
not be held responsible for any loss or damage which may occur.
Please note that this equipment and its components have NO user serviceable parts.
If you experience any difficulties call our Helpline.
M M I I C C R R O O M M A A R R K K H H E E L L P P L L I I N N E E T T E E L L : : 0 0 8 8 7 7 0 0 2 2 4 4 1 1 3 3 0 0 2 2 9 9
2-ZONE EASYFIT INTRUDER ALARM
I I M M P P O O R R T T A A N N T T : : P P L L E E A A S S E E R R E E A A D D T T H H E E S S E E I I N N S S T T R R U U C C T T I I O O N N S S C C A A R R E E F F U U L L L L Y Y B B E E F F O O R R E E A A T T T T E E M M P P T T I I N N G G T T O O I I N N S S T T A A L L L L T T H H I I S S A A L L A A R R M M S S Y Y S S T T E E M M . .
I I F F T T H H E E S S Y Y S S T T E E M M I I S S B B E E I I N N G G I I N N S S T T A A L L L L E E D D B B Y Y A A S S E E C C U U R R I I T T Y Y I I N N S S T T A A L L L L E E R R O O R R E E L L E E C C T T R R I I C C A A L L E E N N G G I I N N E E E E R R , , P P L L E E A A S S E E E E N N S S U U R R E E T T H H A A T T A A
C C O O P P Y Y O O F F T T H H E E S S E E I I N N S S T T R R U U C C T T I I O O N N S S I I S S G G I I V V E E N N T T O O T T H H E E C C U U S S T T O O M M E E R R F F O O R R R R E E T T E E N N T T I I O O N N A A N N D D F F U U T T U U R R E E R R E E F F E E R R E E N N C C E E . .
PIR SENSOR
MAINS ADAPTOR
Monday to Friday (8.30am to 5pm)
www.micromark.co.uk
ukpanels.com
INSTALLATION & OPERATING INSTRUCTIONS
CONTROL PANEL
ALARM CABLE
C C O O N N T T E E N N T T S S
Planning your system . . . . . . . . . . . . . . . . . . . . . . . . . . . . . . . . . .2
Accessories . . . . . . . . . . . . . . . . . . . . . . . . . . . . . . . . . . . . . . . . . . .2
Wiring diagrams . . . . . . . . . . . . . . . . . . . . . . . . . . . . . . . . . . . . . .3
Start with installing the control panel and siren . . . . . . . . . . . . .4
Fitting the PIRs and door contacts . . . . . . . . . . . . . . . . . . . . . . . .6
Wiring the control panel . . . . . . . . . . . . . . . . . . . . . . . . . . . . . . . .7
Checking the system - Walk test . . . . . . . . . . . . . . . . . . . . . . . . .8
Total immobilisation of system . . . . . . . . . . . . . . . . . . . . . . . . . . .8
Checking the system - Bell test mode . . . . . . . . . . . . . . . . . . . . .8
System entry time . . . . . . . . . . . . . . . . . . . . . . . . . . . . . . . . . . . . . .9
System exit time . . . . . . . . . . . . . . . . . . . . . . . . . . . . . . . . . . . . . . .9
Bell reset . . . . . . . . . . . . . . . . . . . . . . . . . . . . . . . . . . . . . . . . . . . .10
To change password . . . . . . . . . . . . . . . . . . . . . . . . . . . . . . . . . .10
To arm the system . . . . . . . . . . . . . . . . . . . . . . . . . . . . . . . . . . . . .11
To disarm the system . . . . . . . . . . . . . . . . . . . . . . . . . . . . . . . . . .11
Chime zone . . . . . . . . . . . . . . . . . . . . . . . . . . . . . . . . . . . . . . . . . .11
Troubleshooting . . . . . . . . . . . . . . . . . . . . . . . . . . . . . . .back cover
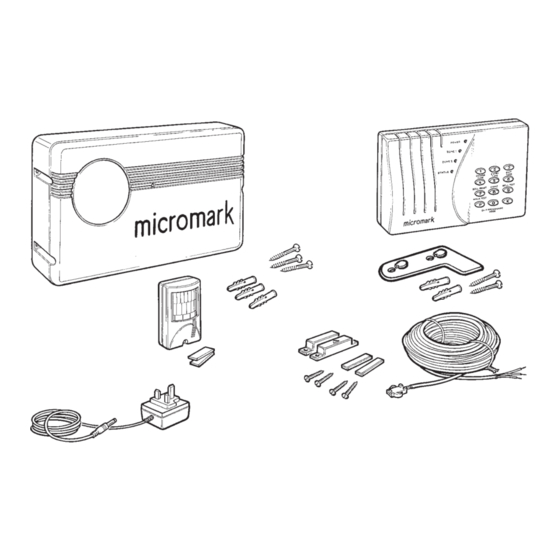
K K I I T T C C O O N N T T E E N N T T S S
Check the contents of the
• 4 sticky pads
• Fixing screws
packaging:
• Cable clips
• 2-zone control panel
• Wall plugs
• External siren
• 30m of multi-core alarm
• Mains adaptor
cable
• 1 PIR sensor
• Fixing bracket
• 1 set of hardwired door
contacts
IMPORTANT
In certain areas of the country you are required by law to
notify the Police and Local Authority when you install an
Alarm System. Since the requirements of each Authority
differ, we suggest that you contact the Environmental Officer
of your local Borough for full information about your local
area's by-laws.
Advertisement
Table of Contents

Related Manuals for Micromark MM23052


Summary of Contents for Micromark MM23052
-
Page 1: Table Of Contents
M M I I C C R R O O M M A A R R K K H H E E L L P P L L I I N N E E T T E E L L : : 0 0 8 8 7 7 0 0 2 2 4 4 1 1 3 3 0 0 2 2 9 9 differ, we suggest that you contact the Environmental Officer of your local Borough for full information about your local Monday to Friday (8.30am to 5pm) area‘s by-laws. www.micromark.co.uk... -
Page 2: Planning Your System
ukpanels.com PLANNING YOUR SYSTEM ACCESSORIES M M M M 9 9 4 4 5 5 2 2 W W H H A A T T I I S S A A Z Z O O N N E E ? ? S S u u r r f f a a c c e e m m a a g g n n e e t t i i c c d d o o o o r r Throughout these instructions the term ZONE is used, meaning a defined area of protection. -
Page 3: Wiring Diagrams
ukpanels.com WIRING DIAGRAMS TYPICAL WIRING DIAGRAM SHOWING PIR IN ZONE 2 AND DOOR CONTACTS IN ZONE 1 (THE ENTRY/EXIT ZONE) WIRING DIAGRAM SHOWING PIR AND DOOR CONTACTS WIRED ON ONE CABLE RUN TO CONTROL PANEL IN THE ANTI-TAMPER SWITCH CONTROL PANEL SAME ZONE FROM CONTROL PANEL... -
Page 4: Start With Installing The Control Panel And Siren
ukpanels.com START WITH INSTALLING THE CONTROL PANEL AND SIREN Position the control panel near a mains socket and Before drilling holes, ensure that they are not near When planning the wiring, avoid awkward cable runs within easy reach of the entry/exit door. hidden mains wiring and pipework. - Page 5 ukpanels.com F F o o l l l l o o w w s s a a f f e e t t y y p p r r e e c c a a u u t t i i o o n n s s w w h h e e n n u u s s i i n n g g l l a a d d d d e e r r s s .
-
Page 6: Fitting The Pirs And Door Contacts
ukpanels.com FITTING THE PIRs AND DOOR CONTACTS Allow enough cable to reach the control panel. Thread the stripped cable through and connect the Replace the cover and screw. Unscrew the fixing screw at the base of the PIR and wires to the terminal block observing the colours. Use a sticky pad and secure the PIR to the mounting remove the front cover. -
Page 7: Wiring The Control Panel
ukpanels.com WIRING THE CONTROL PANEL Ensure that the mains adaptor from the control panel Plug the mains adaptor jack plug into the socket on Take the labelled wires and connect them into their is unplugged. During all wiring, panel must be the back of the control panel. -
Page 8: Checking The System - Walk Test
CHECKING THE SYSTEM – BELL TEST MODE If you are unable to get the system to reset, contact the Micromark Helpline. CONTROL PANEL STATUS T T h h e e s s t t a a t t u u s s o o f f t t h h e e r r e e d d P P O O W W E E R R L L E E D D o o n n t t h h e e... -
Page 9: Fixing Bracket System Entry Time
ukpanels.com SYSTEM ENTRY TIME Example: Entry time is the period To choose other entry times: of time allowed for you 1 1 E E 10 seconds to enter and disarm the 0 0 E E 15 seconds system with the 2 2 E E 20 seconds password (factory set to... -
Page 10: Bell Reset
ukpanels.com BELL RESET TO CHANGE PASSWORD The panel comes factory set to a standard 4-digit password 1 1 1 1 2 2 2 2 . This password code is the signal by The bell reset time is set by the factory to which the panel recognises a legitimate user, we recommend that you change this code to a 4-digit Choices are: 10 minutes but this can be changed from... -
Page 11: To Arm The System
ukpanels.com TO ARM THE SYSTEM Full Guard means that you have placed all of the zones covered by sensors into the armed mode. Should you or an intruder enter a zone covered by these T T h h e e s s y y s s t t e e m m i i s s n n o o t t d d e e s s i i g g n n e e d d t t o o a a r r m m i i f f : : sensors the sirens will sound. -
Page 12: Door Contacts
D D e e v v o o n n s s h h i i r r e e H H o o u u s s e e , , 5 5 5 5 0 0 W W h h i i t t e e H H a a r r t t L L a a n n e e , , L L o o n n d d o o n n N N 1 1 7 7 7 7 R R Q Q Micromark continuously tries to improve its products for the benefit of its customers. For this reason we reserve the right to make changes to any product at any time, without notice.
Need help?
Do you have a question about the MM23052 and is the answer not in the manual?
Questions and answers