Table of Contents
Advertisement
Advertisement
Table of Contents

Related Manuals for MAGINON WK3


Summary of Contents for MAGINON WK3
-
Page 3: Contents Of Box
Dear customer, Congratulations on purchasing a high quality MAGINON product. You have purchased a modern Wildlife Camera with excellent technical features and respective accessory that is particularly easy to operate. Please study all notices carefully and diligently. Please study this information in detail observing, in particular, the safety instructions. -
Page 4: Table Of Contents
2. Contents CONTENTS OF BOX CONTENTS HAZARD, SAFETY AND WARNING NOTICES INTRODUCTION YOUR CAMERA 5.1. Front view 5.2. Inside views PREPARING THE CAMERA 6.1. Opening and closing the camera 6.2. Inserting the batteries 6.3. Inserting the memory card 6.4. External power supply 6.5. - Page 5 10. SYSTEM INFORMATION, MAINTENANCE AND DISPOSAL 10.1. Care 10.2. Storage 10.3. Disposal 11. POTENTIAL LEGAL INFRINGEMENTS 12. WARRANTY AND SERVICE 13. CONFORMITY 14. INDEX...
-
Page 6: Hazard, Safety And Warning Notices
3. Hazard, safety and warning notices Incorrect use of the camera and accessories can be dangerous for you and others and can damage or destroy the camera. We therefore ask you to read and strictly observe the following Hazard, safety and warning notices. - Page 7 „ Do not wrap up camera or place on textiles. This could produce a build up of heat in the camera that can cause deformation of the housing and may represent a fire hazard. Hazards of using batteries „ Remove the batteries from the camera if the camera is not used for some time. „...
- Page 8 „ Ensure adequate ventilation and do not cover the mains adaptor (not supplied) to avoid overhea- ting. „ Do not place any open ignition sources, such as lit candles onto or close to the device. „ Do not subject the LCD monitor to impact or pressure. This could damage the glass of the monitor or the liquid could leak from the inside.
-
Page 9: Introduction
4. Introduction The MAGINON WK 3 HD is a wildlife and surveillance camera with a 3 zone infrared sensor. The sensor can detect sudden changes to the ambient temperature within an evaluation area. The signals of the highly sensitive infrared sensor (PIR, passive infrared sensor) switch on the camera, activating picture or video mode. -
Page 10: Your Camera
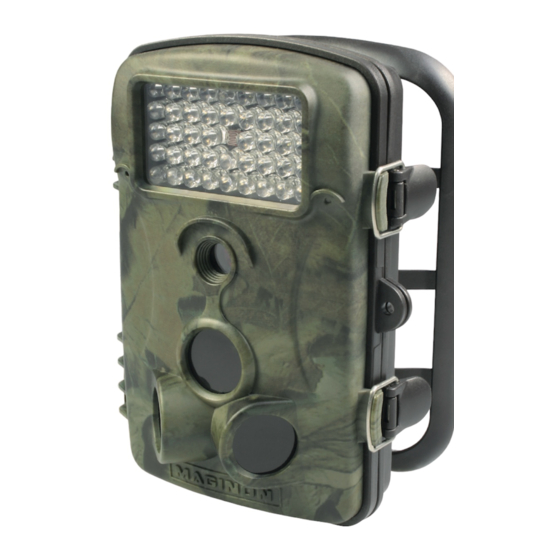
5. Your camera 5.1. Front view Light sensor LED infrared Locking bracket light Motion indicator, blue and red LEDs Microphone Lens Locking hole Central for lock sensor zone Locking bracket Side sensor zones (Passive infrared sensors, PIR) -
Page 11: Inside Views
5.2. Inside views Monitor Locking hole for lock Operating buttons Speaker Mode switch (OFF/ Memory card Test/ON) compartment Mini-USB /TV connection „ The monitor is only switched on in the Test mode for changing menu settings or viewing existing photos. „... - Page 12 Battery compartment Locking bracket Locking hole for lock Locking bracket 6V DC connection Tripod thread „ Battery compartment: Insert 4 or 8 type LR6 (AA) batteries as shown. When using 4 batteries, these can either all be inserted in the top or in the bottom part of the compartment. Other combinations are not possible.
-
Page 13: Preparing The Camera
6. Preparing the camera 6.1. Opening and closing the camera Operating buttons, connections and batteries are located inside the wildlife and surveillance camera. Fig. 1. Fig. 2. To open the camera undo the two lateral locking brackets as shown in Fig. 1. To lock the camera again, engage metal hoops of locking brackets into mount and press down plastic tab of bracket (Fig.2). -
Page 14: Inserting The Memory Card
When using 4 batteries, these can either all be inserted in the top or in the bottom part of the compartment. Other combinations are not possible. Close the battery compartment again with the protective cover. Note: • Instead of type LR6 (AA) batteries, rechargeable batteries with the same specification (with 2000 mAh or higher) may be used. -
Page 15: External Power Supply
Prior to inserting the memory card ensure that the lateral write-protection on the memory card has not been activated (see figure). If the camera displays ”Card protected“, remove the memory card and change the position of Write Protection Write Protection unlocked locked the memory protection. -
Page 16: Assembly With Strap
6.5. Assembly with strap Use the securing strap supplied to attach the wildlife camera to a tree or another object. The illustrations below demonstrate how to fasten the securing strap. Position the wildlife camera as desired and pull the loose end of the securing strap tight until the camera is firmly secured. - Page 17 Note: • Prior to drilling check that no supply pipes are concealed in the wall! First mark the holes to be drilled (A), by holding the base of the wall fixing against the desired place of installation. When installing on stone or concrete surfaces use a 6 mm masonry drill. After drilling the holes insert the supplied wall plugs into the holes so that they are flush with the surface.
-
Page 18: Using The Camera
7. Using the camera Prior to setting up the camera for surveillance, it must be set up for the respective purpose. For this purpose, the so-called test mode is available. In addition to changing settings, photos and videos can be taken and existing photos can be viewed in this mode. 7.1. - Page 19 Functions of operating buttons in recording mode Below, the operating buttons are described in the recording mode with non activated menu. „ MENU: Open the Settings menu using the MENU button. „ REPLAY: Press this button to start the replay mode. : Change to the manual recording mode for video recordings „...
-
Page 20: Settings
„ SHOT, REPLAY: No function (in Replay mode). 7.3. Settings Prior to using the MAGINON WK 3 HD, change the settings as required. Slide the mode switch of the wildlife camera to the TEST positi- on to start the test mode. In the Photo or Video mode press the MENU button to call up the menu. - Page 21 • Length of video: 10 sec(onds), optional 1 - 60 seconds and 3, 5 and 10 minutes Specify the duration of a video recording when the camera is triggered automatically. The recording period for videos is not limited in the Test mode. • Interval: 1 min(ute), optional from 0 seconds to 60 minutes Select the shortest period for the camera to wait before it reacts to the successive triggering of the main sensor after an animal has first been detected..
- Page 22 • Time lapse: Off/On When “On” has been selected, the camera automatically takes photos or videos in the selected time interval, irrespective of whether or not the PIR sensor has detected a motion or not. This is useful for observing cold blooded animals e.g. snakes or plants opening up, etc. As soon as the “On”...
- Page 23 • Auto switch-off: 3 min/5 min/10 min/Off With this function you can determine whether the camera should be automatically switched off when not used for some time in the test mode. Set the time after which the camera should be switched off in the test mode or deactivate automatic switch-off by selecting “Off“.
-
Page 24: Night Recording
Please note that night recording using IR LEDs produces black and white images. 7.5. Setting up the live mode The standard application of the MAGINON WK 3 HD is the so-called Live mode. When in this mode, photos are either triggered by movement sensors or at intervals according to the respective setting. -
Page 25: Aligning The Camera
Where wild animals do, however, move past the camera swiftly, it is possible that the photo only shows the rear part of the body or possibly nothing at all. The MAGINON WK 3 HD solves this problem due to the unique design of the lateral PIR sensor zone. The combination of the two lateral sensor zones and central sensor zone produces a 100°-120°... -
Page 26: File Format
Note: • MAGINON WK 3 HD corresponds to protection class IP 54. The camera is protected against dust and spray water and can thus be used in any weather condition. 7.7. File format The wildlife camera stores photos and videos on the memory card in the folder “\DCIM\100MEDIA“. -
Page 27: Connecting To Computer And Tv
8. Connecting to computer and TV The wildlife camera can be connected to a computer or your TV using the supplied USB and video cables to view existing photos/videos. 8.1. Connection to computer System requirements Windows® Macintosh „ Pentium® III or higher „... -
Page 28: Connection To Tv
8.2. Connection to TV 1. Switch on the wildlife camera in Test mode. 2. Connect the video cable to the camera. 3. Plug the other end of the video cable into the TV. „ Connect the yellow connector to the video input and the white connector to one of the audio inputs of the TV. -
Page 29: Technical Specification
9. Technical specification Element Description Image sensor 5.0 mega pixels, 1/2.5“ CMOS sensor 12M: 4000 x 3000 (interpolated); 8M: 3264 x 2448 (interpolated); Photo resolution 5M: 2592 x 1944 Screen 6.1 cm (2.4") colour TFT-LCD; 480 x 234 pixels Recording medium Supports SD/SDHC-memory cards up to 32 GB (optional) 1920 x 1080 (15 fps), 1280 x 720 (30 fps), Video resolutions... -
Page 30: System Information, Maintenance And Disposal
10. System information, Maintenance and Disposal Trademark information „ Microsoft® and Windows® are trademarks of Microsoft Corporation registered in the US. „ Pentium® is a registered trademark of Intel Corporation. „ Macintosh is a trademark of Apple Computer Inc. „ SD™ is a trademark. Other names and products can be trademarks or registered trademarks of the respective owners. -
Page 31: Potential Legal Infringements
11. Potential legal infringements Using the Wildlife Camera you should note the following: Copyright Generally every person owns his/her own image. According to the copyright law, images may only be published without the consent of the respective person if the person appears only as a person embellishment to a landscape image, or a location as a public place. -
Page 32: Warranty And Service
Warranty Card for details. Please contact our hotline prior to returning a defective device. Service address: Manufacturer's address: supra Sertronics LTD MAGINON Service Foto-Elektronik-Vertriebs-GmbH 45 Regal Drive, Walsall Enterprise Park Denisstr. 28A Walsall, WS2 9HQ 67663 Kaiserslautern United Kingdom... -
Page 33: Index
14. Index Firmware Update 21 Accessories 1 Version 21 Aligning the camera 23 Front view 8 Areas of application 7 Automatic switch-off 21 Hazard information 4 Batteries Insert 11 Image size 18, 27 Battery Inside view 9 Type 12 Interval 19 Battery compartment 10 Language 20 Care 28... - Page 34 Time stamp 19 Trademarks 28 Night recording 22 Tripod thread 9 Number of photos 18 TV connection 9 Opening the camera 11 USB cable 25 Operating buttons 9, 16, 17 Video cable 26 Password 19 Video length 19 Periodic recording 20 Video size 18, 27 PIR sensors 23 Volume 21...
- Page 36 supra Foto-Elektronik-Vertriebs-GmbH 91631 Denisstr. 28A 06/2014 67663 Kaiserslautern 2001 6104 Germany...
Need help?
Do you have a question about the WK3 and is the answer not in the manual?
Questions and answers