
Related Manuals for Empisal Dress Maker 120A


Summary of Contents for Empisal Dress Maker 120A
-
Page 1: Instruction Manual
INSTRUCTION MANUAL your creative assistant Dress Maker 120A FREE ARM SEWING MACHINE... -
Page 2: Important Safety Instructions
IMPORTANT SAFETY INSTRUCTIONS When using an electrical appliance, basic safety precautions should always be followed, including the following: Read all instructions before using your household sewing machine. DANGER-To reduce the risk of electric shock: Your household sewing machine should never be left unattended when plugged in. - Page 3 - Always use the proper needle plate. The wrong plate can cause the needle to break. - Do not use bent needles. - Do not pull or push fabric while stitching. It may deflect the needle. - Switch the machine off when making any adjustments in the needle area, such as threading needle, changing needle or changing presser foot and the like.
-
Page 4: Table Of Contents
CONTENTS Name of parts .................... 4-5 Accessories ....................6 Before sewing (Power supply and sewing lamp) .......... 7 Removing extension table ................8 Free-arm sewing ................... 8 Winding the bobbin ..................9 Removing bobbin case and bobbin ............. 10 Inserting bobbin into bobbin case ............... 10 Inserting bobbin case into shuttle race ............ -
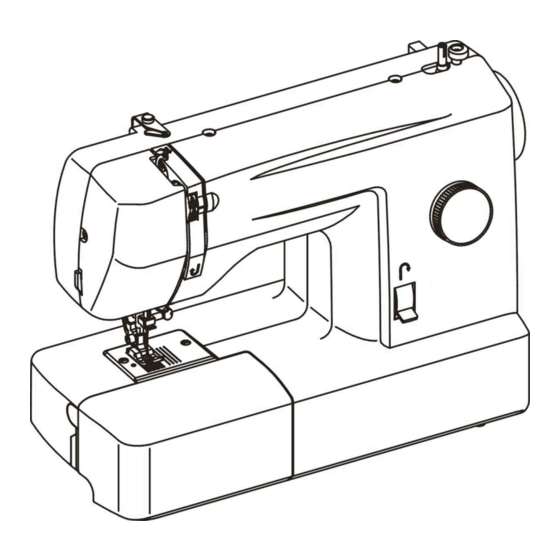
Page 5: Name Of Parts
NAME OF PARTS (FRONT VIEW) 1. Thread tension dial 2. Pattern selector dial 3. Bobbin winder stopper 4. Reverse button 5. Thread guide and needle clamp 6. Shuttle cover 7. Extension table 8. Presser foot 9. Thread cutter 10. Face cover 11. - Page 6 NAME OF PARTS (REAR VIEW) 1. Thumb screw 2. Needle plate 3. Presser foot lever 4. Spool pin (B) (Optional) 5. Clutch button 6. Hand wheel 7. Spool pin (A) 8. Bobbin winder spindle...
-
Page 7: Accessories
ACCESSORIES Zigzag foot Bobbin Felt Buttonhole foot (on machine) Needle plate Spool pin (A) Zipper foot Screw driver screw driver Darning plate Needle Buttonhole cutter... -
Page 8: Before Sewing (Power Supply And Sewing Lamp)
BEFORE SEWING Power supply / Power supply plug Power supply 1. Fit plug into the machine. 2. Insert plug into the main socket. 3. Sewing speed can be varied by the foot control. Plug receptacle machine plug Speed Controller Warning: Please always unplug the power plug before you change the bulb or perform maintenance work to the machine so that you prevent deadly peril and electric shock. -
Page 9: Removing Extension Table
REMOVING EXTENSION TABLE Hold the left end of the table and pull it out in direction of the arrow. FREE-ARM SEWING 1. This sewing machine can be used as a flat bed machine but easily converts to a free arm machine by removing the extension table. -
Page 10: Winding The Bobbin
WINDING THE BOBBIN 1. Release by pushing clutch button to bobbin and lock by pushing it to needle. 2. Push bobbin winder from left to right, then it starts winding. 3. Push bobbin winder from right to left and move clutch button to needle sign, then it starts sewing. -
Page 11: Removing Bobbin Case And Bobbin
REMOVING BOBBIN CASE AND BOBBIN Hinged latch 1. Raise the needle to its highest 2. Open the hinged latch of the bobbin position and open shuttle race cover. case and pull the bobbin case out of the machine. 3. Release the latch and the bobbin will fall out easily. -
Page 12: Inserting Bobbin Case Into Shuttle Race
INSERTING BOBBIN CASE INTO SHUTTLE RACE Finger Hinged latch 1. Raise the needle to its highest position. Pull the thread to the front, open the latch of the bobbin case and hold it. Insert 2. Holding the latch open, place bobbin case onto the center pin in the shuttle and release latch. -
Page 13: Threading Upper Thread & Twin Needle Threading
THREADING UPPER THREAD Warning: Before contriving please adjust main control switch to (O). Pass the thread from A to as shown. Twin needle threading. Pass the thread from front to rear through needle and pull approx. 10 cm of thread through eye of needle. -
Page 14: Drawing Up The Bobbin Thread
DRAWING UP THE BOBBIN THREAD 1. Hold the upper thread with left hand, turn the hand wheel slowly towards you until the needle goes down and comes up. Then stop the hand wheel when the take up lever is at its highest position. - Page 15 Down...
-
Page 16: Adjusting Thread Tension
ADJUSTING THREAD TENSION Normal upper thread tension: 3– 5 Correct Upper thread Fabric Upper thread tension may be adjusted Bobbin thread by turning the thread tension dial. Incorrect Inside of fabric Upper thread Lower thread tension can be increased by turning the screw of the bobbin case slightly to the right (clockwise). -
Page 17: Changing Needle
CHANGING NEEDLE Warning: Before changing the pin please adjust main control switch to (O). Needle clamp screw Tighten Loosen Face flat side away from you 1. Raise the needle bar to its highest position. 2. Loosen needle clamp screw and remove the old needle. 3. -
Page 18: Fabric-Thread-Needle-Table
FABRIC-THREAD-NEEDLE-TABLE Please pay attention to the following list as a guide for sewing different types of fabric. Indication of Fabric Thread Needle Upper Tension Nylon 80 Cotton Light Tricot 60 S Fiber silk 70 (10) Silk 50 Silk 80 (12) Wool silk 50 S Fiber silk 80-90... -
Page 19: Sewing (Pattern Selector) And Operation Table
SEWING (PATTERN SELECTOR) AND OPERATION TABLE Stitch patterns Presser foot Darning plate Straight stitch Zigzag Buttonhole Automatic Embroidery Blind hem Automatic Embroidery Three step zigzag stitch Blind stitch Free-hand embroidery Without... -
Page 20: To Start Sewing
TO START SEWING Important hints: 1. Raise the take-up lever to its highest position before starting and after stopping sewing. 2. Hold both threads about 10 cms to the rear of the machine for the first two or three stitches. 3. -
Page 21: How To Finish Stitches
HOW TO FINISH STITCHES 1. Sew to the edge of seam. 2. Push the reverse button and sew in reverse for about 3-4 cms. 3. Raise needle to its highest position. 4. Lift the presser foot and pull the fabric out of the back of the machine. Thread cutter 5. -
Page 22: Straight Stitch
STRAIGHT STITCH 1. This type of stitching is used most frequently. 2. The zigzag presser foot can be used for both straight and zigzag sewing. ZIGZAG SEWING Pattern selector position Satin stitching can be used for sewing initials, patterns, appliqué, etc. The zigzag stitch is a universal stitch. -
Page 23: Blind Stitch
BLIND STITCH 1. Fold fabric as shown. 2. Finish the seam as shown. - Page 24 Adjust the width to obtain the correct seam. Wrong: Needle is not piercing edge Needle pierces the edge of fold too to fold at all. much. Correct seam.
-
Page 25: Button Sewing
BUTTON SEWING Utilize the button presser foot. (Optional) Match (Use Darning plate see page 16) 1. Place the darning plate properly. 2. Place button presser foot in position and attach it firmly. 3. Place the button between presser foot and fabric and lower the presser foot. 4. -
Page 26: Zipper Sewing
ZIPPER SEW ING Utilize the zipper foot. Select straight stitch. 1. Zipper foot is designed to sew close to a raised edge, thus preventing sewing on zipper. 2. Place zipper foot in position and attach firmly. 3. Fold the fabric about 2 cm and place the fabric under foot. -
Page 27: Buttonhole Sewing
BUTTONHOLE SEW ING Utilise the foot of the buttonholes. Set the stitch length dial. Pattern selector dial Steps Setting 1. Set dial to “K“ position 2. Sew left side 3. Raise the needle 4. Set dial to “J“ position 5. Sew 5-6 stitches 6. -
Page 28: Hemming
HEMMING (Optional) 3 mm 1 mm 20 mm 1. Raise the foot and the needle to its highest position. Replace the foot with the picot foot. 2. Fold over the fabric edge by about 3 mm and place it under the foot. Secure the folded edge with a few stitches. -
Page 29: Twin Needle
TWIN NEEDLE (Optional) Please place second spoon pin (B) into the position for twin needle sewing as page 5, no. 4 pic. Put in the twin needle with the flat side backwards. Thread the machine for normal sewing, leading both threads to needle and passing their ends separately through its eye. -
Page 30: Quilter
QUILTER (Optional) 1. Slide the arm through the hole on top of the presser foot holder. 2. Move the quilter to the required stitch distance. SEAM GUIDE (Optional) 1. Use the seam guide to sew long seams of an equal distance from the edge of the fabric. 2. -
Page 31: Maintenance (Cleaning And Oiling)
MAINTENANCE Warning: Please always unplug the power plug before you change the bulb or perform maintenance work to the machine so that you prevent deadly peril and electric shock. 1. Raise needle to its highest position. 2. Take out the bobbin case. 3. -
Page 32: Checking Performance Problems-Troubleshooting
CHECKING PERFORMANCE PROBLEMS – TROUBLESHOOTING Problem Probable cause What to do Fabric does not - Feed teeth down - Raise feed teeth move - Incorrect insertion of needle - Re-insert needle - Bent needle - Replace needle Breaking needle - Fabric is being pulled - Do not pull fabric - Needle, thread and fabric do - Use correct needle and thread... - Page 33 STORING THE MACHINE • Store the machine in its box or in a clean, dry place. • Never wrap the power cord around the machine. SERVICING THE MACHINE If the unit is not operating correctly, please check the following: • You have followed the instructions correctly. •...
- Page 34 PLEASE AFFIX YOUR PROOF OF PURCHASE/RECEIPT HERE IN THE EVENT OF A CLAIM UNDER WARRANTY THIS RECEIPT MUST BE PRODUCED. W A R R A N T Y 1. Home of Living Brands (Pty) Ltd (“Home of Living Brands”) warrants to the original purchaser of this product (“the customer”) that this product will be free of defects in quality and workmanship which under normal personal, family or household use and purpose may manifest within a period of 1 (one) year from the date of purchase (“warranty...
- Page 35 120402001 15.03.27...
Need help?
Do you have a question about the Dress Maker 120A and is the answer not in the manual?
Questions and answers
Where can I get a fabric guide for my Empisal sewing machine
The fabric guide for the Empisal Dress Maker 120A sewing machine can be found in the manual, where it lists recommended needle sizes and thread types for various fabrics such as silk, cotton, denim, and tweed.
This answer is automatically generated
What needles must be used in the Empisal 120A
The provided context does not specify the exact needle types compatible with the Empisal Dressmaker 120A Sewing Machine. However, it mentions that the machine is twin needle capable and advises using the correct needle for the fabric and thread.
This answer is automatically generated
There's a wire that is missing
Which sewing(pattern selector) to use for stretch material
If underneath stich is loose what is the problem
Loose underneath stitches on the Empisal Dress Maker 120A are typically caused by tight upper thread tension. To fix this issue, reduce the upper thread tension.
This answer is automatically generated