Yamaha RX-V765 Owner's Manual
Hide thumbs
Also See for RX-V765:
- Owner's manual (324 pages) ,
- Service manual (156 pages) ,
- Product bulletin (2 pages)
Table of Contents
Advertisement
Quick Links
Advertisement
Chapters
Table of Contents
Troubleshooting

Related Manuals for Yamaha RX-V765


Summary of Contents for Yamaha RX-V765
- Page 1 RX-V765 AV Receiver OWNER’S MANUAL...
- Page 2 12 Only voltage specified on this unit must be used. Using this unit with a higher voltage than specified is dangerous and may cause fire, damage to this unit, and/or personal injury. Yamaha will not be held responsible for any damage resulting from use of this unit with a voltage other than specified.
-
Page 3: Table Of Contents
Connecting an external amplifier......18 DSP Parameter............50 Using REMOTE IN/OUT jacks....... 19 Memory Guard............50 Connecting a Yamaha iPod universal dock or Using multi-zone configuration ......51 Bluetooth™ wireless audio receiver....19 Connecting a camcorder or portable audio player ... 19 Connecting Zone2............ -
Page 4: Introduction
Output terminals ■ DOCK jack • Monitor output • DOCK jack to connect a Yamaha iPod universal dock [Audio/Video] HDMI x 1 (such as YDS-11, sold separately) or Bluetooth wireless [Video] Component video x 1, Composite video x 1 audio receiver (such as YBA-10, sold separately) •... -
Page 5: About This Manual
DTS logos, Symbol, DTS-HD and DTS- HD Master Audio are trademark of DTS, Inc. © 1996-2007 DTS, Inc. All Rights Reserved. “SILENT CINEMA” is a trademark of Yamaha Corporation. iPod™ “iPod” is a trademark of Apple Inc., registered in the U.S. and other countries. -
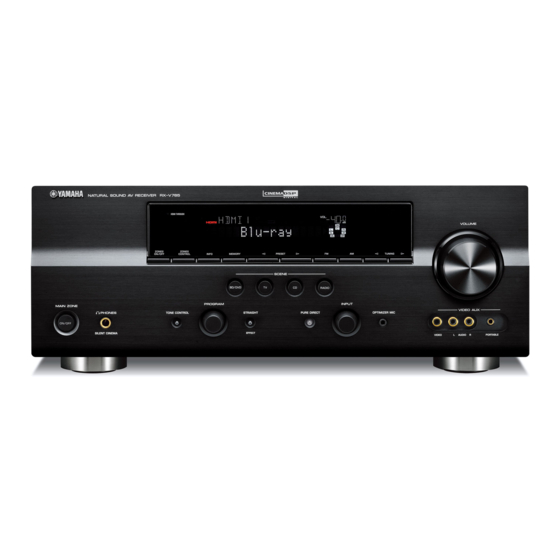
Page 6: Part Names And Functions
Part names and functions Front panel HDMI THROUGH VOLUME ZONE2 ZONE2 ON/OFF CONTROL INFO MEMORY PRESET TUNING SCENE BD/DVD RADIO PROGRAM INPUT MAIN ZONE VIDEO AUX PHONES TONE CONTROL PURE DIRECT OPTIMIZER MIC STRAIGHT ON/OFF SILENT CINEMA EFFECT VIDEO AUDIO PORTABLE MAIN ZONE ON/OFF TONE CONTROL... -
Page 7: Rear Panel
PRE OUT DOCK jack MONITOR OUT terminals For connecting a Yamaha iPod universal dock (YDS-11, sold Outputs video signals from this unit to a video monitor, such as separately) or a Bluetooth wireless audio receiver (YBA-10, a TV (see page 15). -
Page 8: Front Panel Display
Part names and functions Front panel display VOL. SLEEP ZONE STEREO MUTE TUNED SBL SB SBR HDMI indicator Lights up during normal communication when HDMI is selected as an input source. CINEMA DSP indicator Lights up when a sound field program that uses CINEMA DSP is selected. -
Page 9: Remote Control
DISPLAY Input selection keys Changes the operation mode of the iPod connected to the HDMI 1-4 Select HDMI inputs 1 through 4. Yamaha iPod universal dock (see page 33). AV 1-6 Select AV inputs 1 through 6. MUTE AUDIO 1/2 Select AUDIO inputs 1 and 2. -
Page 10: Quick Start Guide
• Connecting speakers Front right speaker Video monitor Subwoofer • This unit has a YPAO (Yamaha Parametric Room Acoustic Optimizer) that automatically optimizes this unit based on room acoustic Surround right speaker Front left speaker characteristics (audio characteristics of the speakers, speaker positions, and room acoustics, etc.). -
Page 11: Preparation
PREPARATION Preparing remote control Installing batteries in the remote Using the remote control control The remote control transmits a directional infrared ray. Be sure to aim the remote control directly at the remote control sensor on this unit during operation. Remote control sensor window within 6 m Take off the battery compartment cover. -
Page 12: Connections
The subwoofer speaker outputs bass sounds and low- frequency effect (LFE) sounds included in Dolby Digital and DTS signals. Use a subwoofer with a built-in amplifier, such as the Yamaha Active Servo Processing 60˚ Subwoofer System. Place it exterior to the front left and 80˚... -
Page 13: Connecting Speakers
Connections Connecting speakers When you connect speakers, connect them to the respective jacks as follows, according to your speaker layout. • You can connect up to two subwoofers. When two subwoofers are connected, the same sound is output from them. ■... - Page 14 Connections Presence speakers You can connect presence speakers (PL/PR) that output front effect sounds to this unit. With CINEMA DSP sound field programs (see page 27) and their CINEMA DSP 3D functions, a sound with a richer and more spacial presence can be created.
- Page 15 Connections Connecting the speaker cable Caution • A speaker cable is a pair of insulated cables running side by side in general. One of the cables is colored differently or striped to indicate a polarity. Connect one end of the colored/striped cable to the “+” (red) terminal of this unit and the other end to that of your speaker, and connect one end of the other cable to the “–”...
-
Page 16: Information On Jacks And Cable Plugs
Connections Information on jacks and cable plugs This unit has the following input and output jacks. Use jacks and cables appropriate for components that you are connecting. ■ ■ Audio jacks Video/audio jacks Jack and cables Description Jack and cables Description AUDIO jacks To transmit conventional analog... -
Page 17: Connecting A Video Monitor
Connections Connecting a video monitor Connect a video monitor such as a TV or projector to an output jack of this unit. You can select one of the following three types according to the input signal format supported by the video monitor: HDMI OUT, COMPONENT VIDEO and VIDEO (composite video). -
Page 18: Connecting Other Components
Connections Connecting other components This unit has input and output jacks for respective input and output sources. You can reproduce sound and movies from input sources selected with the front panel display or remote control. Note • Make sure that this unit and other components are unplugged from the AC wall outlets. Audio/video input Phono input (AV 1-6) - Page 19 Connections ■ Audio player Output jacks on the connected external component Input sources/jacks of this unit External components Output jacks External component with optical digital Optical digital output AV 1 (TV) OPTICAL output AV 4 OPTICAL External component with coaxial digital Coaxial digital output AV 2 COAXIAL...
-
Page 20: Connecting A Multi-Format Player Or An External Decoder
Connections Connecting a multi-format player or an Connecting an external amplifier external decoder The same channel signals are output from the jacks of the This unit has 8 sets of input jacks (FRONT L/R, PRE OUT terminals as from their corresponding CENTER, SURROUND L/R, SUR. -
Page 21: Using Remote In/Out Jacks
MSCENE (or iSCENE) to select a SCENE. • If the component connected to the REMOTE OUT jack is not a Yamaha product, set “SCENE IR” in the ADVANCED SETUP menu to “OFF”... -
Page 22: Connecting The Fm And Am Antennas
• Position the AM loop antenna away from this unit. • If you cannot get good reception, we recommend that you use an outdoor antenna. For more details, consult the nearest authorized Yamaha dealer Press AMAIN ZONE ON/OFF (or or service center. -
Page 23: Optimizing The Speaker Setting For Your Listening Room (Ypao)
Optimizing the speaker setting for your listening room (YPAO) This unit has a Yamaha Parametric Room Acoustic Optimizer (YPAO). With the YPAO, this unit automatically adjusts the output characteristics of your speakers based on speaker position, speaker performance, and the acoustic characteristics of the room. - Page 24 Optimizing the speaker setting for your listening room (YPAO) DIST To select a sound character for adjustment, Displays the speaker distance from the listening position press kCursor n to select “EQ Type” and in the following order: then press kCursor l / h. Closest speaker distance/Farthest speaker distance If this unit does not work when you press kCursor, press jSETUP once and then operate this unit.
-
Page 25: When An Error Message Is Displayed During Measurement
Optimizing the speaker setting for your listening room (YPAO) When an error message is displayed When a warning message is displayed during measurement after measurement If a problem occurs during measurement, “WARNING” is Press kCursor n once, and select “Retry” or displayed on the result display screen. -
Page 26: Basic Operation
• You can change the input source name displayed on the front panel • If a Yamaha DVD player that can receive SCENE control signals is display or on the video monitor as necessary (see page 50). connected to the REMOTE OUT jack of this unit, the DVD player... -
Page 27: Muting Audio Output Temporarily (Mute)
Playback Switching remotely controlled external Adjusting high/low frequency sound components linked to SCENE selections (tone control) You can operate an external component with the remote You can adjust the balance of the high frequency range control of this unit by setting a remote control code for the (Treble) and low frequency range (Bass) of sounds output external component for each input source. -
Page 28: Using Your Headphones
Playback Using your headphones Changing information on the front panel display Plug your headphones in the BPHONES jack on You can display information on the front panel display the front panel. such as the names of the currently selected sound field When you select a sound field program while using the program and surround decoders on the front panel display. -
Page 29: Enjoy The Sound Field Programs
Enjoy the sound field programs This unit is also equipped with a Yamaha digital sound field processing (DSP) chip. You can enjoy multi-channel sounds for almost all input sources using various sound field programs stored on the chip and a variety of surround decoders. - Page 30 Enjoy the sound field programs Program Descriptions Drama Creates a calm sound field suitable for different genres of movies, from serious dramas to musicals and comedies. Sound is produced with discreet reverberation yet with a three-dimensional feeling. Spatial sound effects and background music are reproduced with soft reverberations around the center position, which reduces fatigue from watching movies for a long time.
- Page 31 Enjoy the sound field programs The Compressed Music Enhancer (ENHNCR) Program Descriptions Straight Enhancer Dynamically reproduces sound from 2-channel or multi-channel compressed sound data with the same number of channels as its source sound. 7ch Enhancer Dynamically reproduces sound from compressed sound data in 7 channels regardless of the source sound channels. Surround decode mode (SUR.DEC) Reproduces sound from 2-channel sound sources in up to 7 channels using a surround decoder.
-
Page 32: Enjoying Unprocessed Input Sources (Straight Decoding Mode)
Enjoy the sound field programs Enjoying unprocessed input sources Enjoy sound field programs with (Straight decoding mode) headphones (SILENT CINEMA™) In straight decoding mode, sounds are reproduced without SILENT CINEMA allows you to enjoy multi-channel sound field effect. 2-channel stereo sources are output sources with your headphones. -
Page 33: Fm/Am Tuning
FM/AM tuning The FM/AM tuner of this unit provides the following two To tune in by direct frequency tuning, enter modes for tuning. the frequency of the desired station using ■ Frequency tuning mode mNumeric keys on the remote control. You can tune into a desired FM/AM station by searching Enter only integers. - Page 34 FM/AM tuning Press GMEMORY (or fMEMORY) again to • You can select the preset number at which the preset starts by pressing fPRESET k / n or kCursor k / n on the remote register. control while “READY” is displayed on the front panel display. When registration is complete, the screen returns to •...
-
Page 35: Using Ipod
• Some features may not be compatible depending on the model or the software version of your iPod. • Some features may not be available depending on the model of Yamaha iPod universal dock. The following sections describe the procedure when using the YDS-11. - Page 36 Using iPod™ Press kCursor k / n / l / h to select a Shuffle/repeat playback menu item and then kENTER to start You can use a special playback function such as shuffle playback. playback and repeat playback by setting the OPTION menu.
-
Page 37: Using Bluetooth™ Components
Using Bluetooth™ components This unit supports A2DP (Advanced Audio Distribution Profile) of the Bluetooth profile. You can connect a Yamaha Bluetooth wireless audio receiver (such as YBA-10, sold separately) to the DOCK jack of this unit and enjoy the music contents stored in your Bluetooth component (such as a portable music player) without wiring between this unit and the Bluetooth component. -
Page 38: Other Functions
Other functions Using the sleep timer Check the settings of those components and enable the HDMI control function. This unit: Set “Control (SETUP menu → Function You can set this unit to automatically return to standby after a set time has passed. Setup →... -
Page 39: Advanced Operation
ADVANCED OPERATION Setting the option menu for each input source (OPTION menu) This unit has the OPTION menu of frequently used menu items for input sources compatible with this unit. The procedure for setting the OPTION menu items is described below. Select an input source using the RINPUT OPTION menu items selector (or eInput selection keys). - Page 40 Setting the option menu for each input source (OPTION menu) ■ Decoder Mode ■ Signal Info Input source: HDMI1-4, AV1-4 Input source: HDMI1-4, AV1-4 Auto*/DTS Choices: Displays information on audio and video signals on the Selects DTS digital audio signals for reproduction. video monitor and front panel display.
-
Page 41: Outputting A Video Signal Input From Another Input Source During Reproducing A Multi-Channel Audio Signal
Setting the option menu for each input source (OPTION menu) ■ FM Mode Outputting a video signal input from Input source: TUNER another input source during Choices: Stereo*/Mono Sets FM broadcasting receiving mode. reproducing a multi-channel audio signal Stereo Receives in stereo mode. Mono Receives in monaural mode. -
Page 42: Editing Surround Decoders/Sound Field Programs
Editing surround decoders/sound field programs To end the edit, press jSETUP. Setting sound field parameters To initialize the parameters of the selected sound field Although the sound field programs would satisfy you as program, kCursor n repeatedly to select “Initialize” they are with the default parameters, you can arrange and then press, kCursor h. - Page 43 Editing surround decoders/sound field programs Dialog Lift Adjust attenuation characteristics of early-reflected sound. You can create a lively sound field (with a high 0* to 5 Choices: reverberant sound level) as you increase the value, and a Adjusts the vertical position of center sound such as dead sound field (with a low reverberant sound level) as dialogues when presence speakers are used.
- Page 44 Editing surround decoders/sound field programs Rev.Time parameter adjusts the attenuation time of the rear reverberant sound based on the time that about 1kHz Source sound reverberant sound takes for 60dB of attenuation. Early reflections Reverberant sound attenuates faster as you decrease the value.
-
Page 45: Center Width
Editing surround decoders/sound field programs Rev.Level parameter adjusts the reverberation sound level. Decoder parameters Increasing the value of Rev.Level makes the reverbration sound level higher, which allows you to create more echo. You can customize decoder effects by setting the following parameters. -
Page 46: Changing Various Settings Of This Unit (Setup Menu)
Changing various settings of this unit (SETUP menu) You can change various settings of this unit using the SETUP menu. See “Basic operation of the SETUP menu” on the next page, and other respective pages to change the settings. ■ List of SETUP menu items Menu/Submenu Function... -
Page 47: Basic Operation Of The Setup Menu
Changing various settings of this unit (SETUP menu) Example: A)Config Basic operation of the SETUP menu A)Config The SETUP menu screen appears on both video display Center SP (OSD) and front panel display. Video display (OSD) Setup Menu None >Small Large . - Page 48 Changing various settings of this unit (SETUP menu) LFE/Bass Out Center SP Choices: SWFR/Front/Both* Choices: None/Small*/Large Selects speaker(s) for outputting low-frequency Sets the size of center speaker. components of the LFE (low-frequency effect sound) None Select this when no center speaker is channel or other channels.
-
Page 49: Sound Setup
Changing various settings of this unit (SETUP menu) Crossover Freq. ■ D)Equalizer Adjusts sound quality and tone using a parametric graphic 40Hz/60Hz/80Hz*/90Hz/100Hz/110Hz/120Hz/ Choices: equalizer. 160Hz/200Hz Sets the lower limit of the low frequency component EQ Type Select output from a speaker with a size set to “Small (SMLx1/ Auto PEQ/GEQ*/Off Choices: SMLx2).”... -
Page 50: Standby Through
Changing various settings of this unit (SETUP menu) ■ 2 Lipsync ■ Standby Through Adjusts delay between video output and audio output. Choices: On/Off* Selects on or off of output of HDMI signals input from the HDMI Auto HDMI 1-4 jacks to the HDMI OUT jack when this unit is Choices: Off*/On on standby. -
Page 51: Adaptive Drc
Changing various settings of this unit (SETUP menu) ■ Aspect 3 Volume Thrgh*/16:9/Smart Choices: Sets a horizontal to vertical ratio (aspect ratio) of images You can change some parameters for volumes. reproduced by HDMI signals output from the HDMI OUT ■... -
Page 52: Dsp Parameter
Changing various settings of this unit (SETUP menu) 4 Input Rename Note • If the setting of “Max Volume” is lower than the setting of “Init. You can change input source names to be displayed on the Volume,” the setting of “Max Volume” becomes effective. For example, when you set “Max Volume”... -
Page 53: Using Multi-Zone Configuration
Compliance with minimum speaker impedance connections that best meet your requirements. • Some Yamaha models can be directly connected to the REMOTE jacks information for all channels must be maintained at all of this unit. These models may not require an infrared signal emitter. Up times. -
Page 54: Controlling Zone2
■ Operating Zone2 • Playing back music stored on your iPod stationed in a Yamaha iPod universal dock (such as YDS-11 sold Set bMAIN/ZONE2 to the ZONE2 position, and separately) connected to the DOCK jack. press one of the input selection keys to select •... -
Page 55: Controlling Other Components With The Remote Control
POWER Default Input source Category Manufacturer Turns on and off an external component. code kCursor, ENTER, RETURN [DOCK] DOCK Yamaha 5011 Operates the menus of external components. [TUNER] Tuner Yamaha 5007 tDISPLAY [MULTI CH] — —... -
Page 56: Resetting All Remote Control Codes
Controlling other components with the remote control Resetting all remote control codes You can clear all the remote control codes previously set, and reset all of them to the initial factory settings. • Each of the steps described in this section should be performed within one minute. -
Page 57: Advanced Setup
Choices: ID1*/ID2 Selects a remote control ID for this unit. When using multiple Yamaha AV receivers, you can operate them with a single remote control by setting them to have the same remote control ID. By setting the receivers to have different remote control IDs, you can operate them with their respective remote controls. - Page 58 Setting a remote control ID Two IDs are provided for the remote control of this unit. If another Yamaha amplifier is in the same room, setting a different remote control ID to this unit prevents unwanted operation of the other amplifier.
-
Page 59: Appendix
Refer to the table below when this unit does not function properly. If the problem you are experiencing is not listed below or if the instruction below does not help, turn off this unit, disconnect the power cable, and contact the nearest authorized Yamaha dealer or service center. General... - Page 60 Troubleshooting Problem Cause Remedy page No sound. Incorrect input or output cable Connect the cables properly. If the problem persists, 15-19 connections. the cables may be defective. Speaker connections are not secure. Secure the connections. The HDMI components connected to this Connect HDMI components that support the HDCP unit do not support the HDCP copy copy protection standards.
- Page 61 Troubleshooting Problem Cause Remedy page No sound is output The speaker is in malfunction. Check the Speaker indicators on the front panel 6, 10 from a specific display. If the corresponding indicator lights up, speaker. connect another speaker and check if sound is output. If sound is not output, this unit may be malfunction.
-
Page 62: Hdmi
Troubleshooting Problem Cause Remedy page No sound is heard “Extended Surround” in the OPTION Set “Extended Surround” other than “Off” or “Auto.” from the surround menu is set to “Off,” or an input signal back speakers. does not contain a surround back flag with “Extended Surround”... -
Page 63: Tuner (Fm/Am)
Troubleshooting Tuner (FM/AM) Problem Cause Remedy page FM stereo reception is You are too far from the station Check the antenna connections. noisy. transmitter or the input from the Replace the outdoor antenna with a more — antenna is weak. sensitive multi-element antenna. -
Page 64: Ipod
Connect error There is a problem with the signal path Turn off this unit and reconnect the Yamaha iPod from your iPod to this unit. universal dock to the DOCK jack of this unit. Remove your iPod in the Yamaha iPod universal dock and then place it back in the dock. -
Page 65: Bluetooth
• Warning message “W-2” or “W-3” indicates that the adjusted settings may not be optimal. • Depending on the speakers, warning message “W-1” may appears even if the speaker connections are correct. • If error message “E-10” occurs repeatedly, contact a qualified Yamaha service center. Before Auto Setup... - Page 66 Check whether the speakers are properly placed and connected. The optimizer microphone or OPTIMIZER MIC jack may be defective. Contact the nearest Yamaha dealer or service center. If a monitor such as a TV is connected to this unit —...
- Page 67 Troubleshooting Error message Cause Remedy page W-4:CHECK PRNS Presence speakers were not detected Check the presence speaker connections and perform measurement again. during measurement with “Extra SP If presence speakers are not connected, set the Assign” set to “Presence.” “Extra SP Assign” to other than “Presence.” If presence speakers are connected, set the “Extra SP Assign”...
-
Page 68: Glossary
Glossary ■ ■ Audio and video synchronization (lip sync) Dolby Digital Surround EX Lip sync, an abbreviation for lip synchronization, is a technical term Dolby Digital EX creates 6 full-bandwidth output channels from 5.1- that involves both a problem and a capability of maintaining audio and channel sources. -
Page 69: Dts Digital Surround
Glossary ■ ■ HDMI Direct Stream Digital (DSD) technology stores audio signals on HDMI (High-Definition Multimedia Interface) is the first industry- digital storage media, such as Super Audio CDs. Using DSD, signals supported, uncompressed, all-digital audio/video interface. Providing are stored as single bit values at a high-frequency sampling rate of an interface between any source (such as a set-top box or AV receiver) 2.8224 MHz, while noise shaping and oversampling are used to and an audio/video monitor (such as a digital television), HDMI... -
Page 70: Sound Field Program Information
Based on a wealth of actually measured data, Yamaha CINEMA DSP provides the audiovisual experience of a movie theater in the listening room of your own home by using the Yamaha original sound field technology combined with various digital audio systems. -
Page 71: Information On Hdmi
Information on HDMI™ ■ HDMI signal compatibility Audio signals Audio signal types Audio signal formats Compatible media 2ch Linear PCM 2ch, 32-192 kHz, 16/20/24 bit CD, DVD-Video, DVD-Audio, etc. Multi-ch Linear PCM 8ch, 32-192 kHz, 16/20/24 bit DVD-Audio, Blu-ray Disc, HD DVD, etc. 2/5.1ch, 2.8224 MHz, 1 bit SACD, etc. -
Page 72: Specifications
Specifications AUDIO SECTION • Filter Characteristics (fc=40/60/80/90/100/110/120/160/200 Hz) H.P.F. (Front, Center, Surround, Surround back: Small) • Minimum RMS Output Power for Front, Center, Surround, ..................12 dB/oct. Surround back 20 Hz - 20 kHz, 0.08% THD, 8 Ω ......... 95 W L.P.F. -
Page 73: Index
Index ■ Numerics Connecting Bluetooth wireless audio HDMI OUT/HDMI 1-4 jacks, rear panel ..5 Receiver ............ 19 HDMI THROUGH, front panel ...... 4 1 Dynamic Range, sound setup ......47 Connecting external amplifier ....... 18 HDMI, troubleshooting ......... 60 1 HDMI, function setup .........48 Connecting external decoder ...... - Page 74 Index ■ Surround back speaker ........10 Surround decoder editing .......40 Registering input source ........ 24 Surround left speaker ........10 Registering sound field program ....24 Surround right speaker ........10 Remote control ..........7 SWFR, C)Distance, speaker setup ....47 Remote control code resetting ....... 54 Remote control code setting ......
-
Page 75: List Of Remote Control Codes
List of remote control codes Ausind 0249 Clatronic 0243, 0249, 0259, Durabrand 0077, 0097, 0133, Autovox 0249, 0257, 0259, 0260, 0261, 0262, 0225 0260, 0328 0268, 0269, 0273, 0271 A.R. Systems 0274 Acme 0260 Aventura 0097 0274, 0328 Dwin 0224 Acura 0261, 0273 0327, 0328... - Page 76 Fujitsu Siemens 0425, 0426, 0427, Hinari 0261, 0262, 0266, Kaisui 0260, 0261, 0262, Magnavox 0072, 0088, 0090, 0428, 0429 0268, 0271, 0273, 0270, 0273, 0274, 0091, 0095, 0096, Funai 0033, 0034, 0035, 0274 0327, 0328 0098, 0114, 0115, 0036, 0037, 0097, Hisawa 0262, 0270, 0275 Kamosonic...
- Page 77 Neckermann 0243, 0257, 0260, 0114, 0135, 0143, 0071, 0072, 0073, SEI-Sinudyne 0257, 0263, 0265 0264, 0268, 0269, 0176, 0178, 0189, 0074, 0075, 0090, Seleco 0264, 0265, 0266 0271, 0274, 0328 0210, 0212, 0232, 0099, 0102, 0103, Sencora 0261, 0273 0268, 0271, 0274 0233, 0257, 0260, 0109, 0120, 0179, Sentra...
- Page 78 1020 1079, 1090 Tokai 0268, 0274, 0328 Xrypton 0274 CyberPower 1066 Headquarter 1019 Tokyo 0260, 0327 Yamaha 0000, 0001, 0002, Daewoo 1023, 1075, 1076, Hewlett Packard 1066 Tomashi 0270 0003, 0004, 0005, 1091, 1116, 1141 Hinari 1074, 1079, 1090, Toshiba...
- Page 79 Loewe Opta 1077, 1078 1111, 1113, 1122, Solavox 1076 XR-1000 1022, 1023 Logik 1079, 1090 1124, 1127, 1128, Sonic Blue 1041, 1068 Yamaha 1018, 1019 Lumatron 1075, 1091 1129 Sonneclair 1090 Yamishi 1079, 1090 Luxor 1090 Philips Magnavox 1030 Sonoko...
- Page 80 ATACOM 2318 Enzer 2302 2080, 2107, 2115, 2252, 2256, 2260, Audiovox 2111, 2199 Epson 2165 2116, 2141, 2188, 2268, 2282, 2332, Avious 2317 2219 2211, 2215, 2237, 2333, 2343, 2344, 2313 Finlux 2304, 2312, 2317 2239, 2285, 2293, 2345, 2367, 2371, Axion 2171 Fintec...
- Page 81 Archer 3020 3018 Sony 2005, 2006, 2007, Yamada 2097, 2313, 2315 Arcon 3048 NET Brazil 3007 2020, 2021, 2022, Yamaha 2000, 2001, 2002, AT&T 3013 Nokia 3051 2023, 2024, 2025, 2003, 2011, 2018, Axis 3048 Noos 3055 2069, 2072, 2073,...
- Page 82 Viewmaster 3045 Condor 4074, 4090, 4137 Fuba 4074, 4083, 4090, Lasat 4074, 4088, 4090, Vision 3045 Connexions 4074, 4092 4092, 4093, 4101, 4100, 4133, 4134, Visiopass 3051, 3054, 3055 Conrad 4074, 4133, 4136, 4133 4137 Vortex View 3045 4137 Galaxis 4074, 4087, 4090, Lasonic 4062...
- Page 83 4090, 4138 Zodiac 4086 Tandy 4086 Quelle 4093, 4133, 4137 Quiero 4102 Tantec 4084 4090 RadioShack 4065 Yamaha 5000, 5013 Techniland 4094 Radiola 4101, 4103 CD Recoder Radix 4092, 4119 TechniSat 4071, 4072, 4073, 4092, 4103, 4116, Rainbow 4086 Yamaha...
- Page 84 © 2009 Yamaha Corporation All rights reserved. Printed in Malaysia WQ95160...
- Page 85 NS-777/NS-555 Speaker System OWNER’S MANUAL Thank you for selecting a YAMAHA speaker system. • Do not attempt to modify or fix the speaker. Contact PRECAUTIONS qualified YAMAHA service personnel when any service is needed. The cabinet should never be opened for any Read these precautions carefully before using your reasons.
- Page 86 Procedure: ATTACHING THE STANDS 1 First, put the screw through the washer, then through When placing the speakers, be sure to use the stands to the inner hole of the stand, and screw it into the outside increase stability. hole of the speaker. Do not tighten too much at this point.
- Page 87 CONNECTIONS TO YOUR AMPLIFIER This speaker system is capable of standard connections and bi-wired connections. Before making connections, make sure that the amplifier is switched off. [Standard Connection] How to Connect: 1 Remove the insulation coating at the extremity of each Leave the short bars in place when speaker cable by twisting the coating off.
- Page 88 [Bi-Wired Connection] PLACING THE SPEAKERS Place the speakers on a sturdy, vibration-free surface, on a Tweeter Remove the short terminals well-built stand. bars before IUsing as 2ch stereo speakers connecting. Better stereo images will be obtained when the speakers are slightly angled in towards the listeners. Mid-woofer/ woofer terminals NS-777/...
- Page 89 REMOVING THE FRONT COVER SPECIFICATIONS The front cover is fastened to the enclosure at six points NS-777 and can be removed if desired. To remove the cover, hold Type ......3-way bass reflex speaker system on to both sides and slowly pull straight away from the Magnetic shielding type speaker.
- Page 90 卸下前盖 规格 前盖四周六点被扣紧, 可根据需要卸下。 卸下前盖时, NS-777 握住两边从扬声器慢慢直拉出来。如需再安装,将前 种类........ 3 声道低频反射式扬声器系统 盖里层的六个钉对准扬声器六个相应的孔,轻轻推 磁屏型 入。 驱动器......... 20 cm 圆锥低音扬声器× 2 波导喇叭 13 cm 圆锥中型 波导喇叭 2.5 cm 穹型低音扬声器 NS-777 频率响应..........30 Hz 至 35 kHz 额定阻抗..............6 欧姆 额定输入功率............100 W 最大输入功率............250 W 敏感度............89 dB/2.83 V/m 交换频率............
- Page 91 NS-C444 Speaker System OWNER’S MANUAL Thank you for selecting a YAMAHA speaker system. PRECAUTIONS PLACING THE SPEAKER Place the speaker on TV whose top is flat or on the floor Read these precautions carefully before using your under the TV or inside the TV rack so that it is stabilized.
- Page 92 Note CONNECTIONS TO YOUR AMPLIFIER Do not let the bare speaker wires touch each other to avoid Before making connections, make sure that damaging the speaker or the amplifier, or both of them. the amplifier is switched off. [Using a Banana Plug] Banana Plug Loosen Tighten...
- Page 93 SPECIFICATIONS Type....2-way acoustic suspecsion speaker system magnetic shielding type Driver........13 cm (5") cone woofer x 2 2.5 cm (1") dome tweeter Frequency response ........55 Hz – 35 kHz Nominal impedance..........6 ohms Nominal input power..........100 W Maximum input power ........... 250 W Sensitivity ..........
- Page 94 规格 种类 ........2 声道声学支撑扬声器系统 磁屏型 驱动器 .........13 cm 圆锥低音扬声器× 2 2.5 cm 穹型高频扬声器 频率响应 ..........55 Hz 至 35 kHz 额定阻抗 ..............6 欧姆 额定输入功率 ............100 W 最大输入功率 ............250 W 敏感度 .............89 dB/2.83 V/m 交换频率 ..............3 kHz 尺寸 ( 宽 × 高× 深 ).....514 mm × 190 mm × 213 mm 重量...
- Page 95 NS-333 Speaker System OWNER’S MANUAL Thank you for selecting a YAMAHA speaker system. PRECAUTIONS PLACING THE SPEAKERS Place the speakers on a sturdy, vibration-free surface, on a Read these precautions carefully before using your well-built stand. speakers. IUsing as 2ch stereo speakers •...
- Page 96 ITo mount the speaker on a wall by using Connections the attached mounting bracket • Connect the screw-type input terminals at the rear of the speaker to the speaker output terminals of the amplifier Fasten screws into a firm wall or wall support as shown in (or receiver) with the speaker cable.
- Page 97 REMOVING THE FRONT COVER SPECIFICATIONS The front cover is fastened to the enclosure at four points Type ......2-way bass reflex speaker system and can be removed if desired. To remove the cover, hold magnetic shielding type on to both sides and slowly pull straight away from the Driver ...........13 cm (5") cone woofer speaker.
- Page 98 NS-333 Système d’enceintes MODE D’EMPLOI Nous vous remercions d’avoir acheté un système d’enceintes YAMAHA. PRECAUTIONS POSITIONNEMENT DES ENCEINTES Placer les enceintes sur une surface plane, immune aux Lire ces précautions avant d’utiliser les enceintes. vibrations, ou sur un support bien conçu.
- Page 99 IInstallation de l’enceinte au mur à l’aide Connexions du support de montage fourni • Connecter les bornes à vis situées à l’arrière de l’enceinte aux bornes de sorties de l’enceinte de Visser les vis dans un mur ferme ou un support mural l’amplificateur (ou du récepteur) à...
- Page 100 RETRAIT DU COUVERCLE AVANT CARACTERISTIQUES Type ....Système d’enceintes bass reflex 2 voies Le couvercle avant est fixé au coffret en quatre points et peut être déposé, si nécessaire. Pour retirer le couvercle, Type à blindage magnétique tenir les deux côtés et tirer légèrement en ligne droite vers Driver .........
- Page 101 卸下前盖 规格 前盖四周四点被扣紧 , 可根据需要卸下。 卸下前盖时 , 种类........2 声道反射式扬声器系统 握住两边从扬声器慢慢直拉出来。 如需再安装 , 将前盖 磁屏型 里层的四个钉对准扬声器四个相应的孔 , 轻轻地推入。 驱动器........13 cm 圆锥低音扬声器 2.5 cm 穹型高频扬声器 频率响应..........60 Hz 至 35 kHz 额定阻抗..............6 欧姆 额定输入功率............60 W 最大输入功率............150 W 敏感度............87 dB/2.83 V/m 交换频率..............3 kHz 尺寸...
- Page 102 YST-RSW300 SUBWOOFER SYSTEM OWNER’S MANUAL...
-
Page 103: Important Safety Instructions
IMPORTANT SAFETY INSTRUCTIONS Read these instructions. Keep these instructions. Heed all warnings. Follow all instructions. Do not use this apparatus near water. Clean only with dry cloth. Do not block any ventilation openings. Install in accordance with the manufacturer’s instructions. Explanation of Graphical Symbols Do not install near any heat sources such as radiators, heat registers, stoves, or other apparatus (including... - Page 104 If you can not locate the appropriate retailer, please contact Yamaha Electronics Corp., U.S.A. 6660 Orangethorpe Ave, Buena Park, CA 90620. The above statements apply ONLY to those products distributed by Yamaha Corporation of America or its subsidiaries.
- Page 105 Please read the following operating precautions before use. • When using a humidifier, be sure to avoid condensation inside Yamaha will not be held responsible for any damage and/or injury this unit by allowing enough spaces around this unit or avoiding caused by not following the cautions below.
- Page 106 Connecting to the INPUT1/OUTPUT terminals of the subwoofer ................10 Plug in the subwoofer to the AC outlet ........................11 ADJUSTING THE SUBWOOFER BEFORE USE ....................12 AUTOMATIC POWER-SWITCHING FUNCTION ....................13 Changing the AUTO STANDBY setting ........................13 FREQUENCY CHARACTERISTICS .........................14 ADVANCED YAMAHA ACTIVE SERVO TECHNOLOGY II ................15 TROUBLESHOOTING ..............................16 SPECIFICATIONS ................................17...
-
Page 107: Supplied Accessories
Active Servo Technology II, which Yamaha has contained. developed for reproducing higher quality super-bass sound (refer to page 15 for details on Advanced Yamaha Active Servo Technology II). This super-bass sound adds a more realistic, theater-in-the-home effect to your stereo system. -
Page 108: Placement
PLACEMENT One subwoofer will have a good effect on your audio system, however, the use of two subwoofers is recommended to obtain more effect. If using one subwoofer, it is recommended to place it on the outside of either the right or the left main speaker (see A). - Page 109 CONTROLS AND THEIR FUNCTIONS Subwoofer rear panel OUTPUT INPUT AUTO PHASE TO SPEAKERS STANDBY OUTPUT INPUT AUTO PHASE TO SPEAKERS STANDBY /MONO HIGH NORM REV INPUT 1 FROM AMPLIFIER /MONO POWER OFF LOW HIGH NORM REV (U.S.A. model) FROM AMPLIFIER INPUT 1 Subwoofer front panel SUBWOOFER SYSTEM YST-RSW300...
- Page 110 CONTROLS AND THEIR FUNCTIONS STANDBY/ON switch Press this switch to turn on the power when the POWER switch is set in the ON position (the status indicator lights up in green). Press again to set the subwoofer in the standby mode (the status indicator goes off).
-
Page 111: Connections
[1] Connecting to line output (pin jack) terminals of the amplifier • To connect with a Yamaha DSP amplifier (or AV receiver), connect the SUBWOOFER (or LOW PASS etc.) terminal on the rear of the DSP amplifier (or AV receiver) to the /MONO INPUT2 terminal of the subwoofer. - Page 112 CONNECTIONS ■ Using one subwoofer Mono pin cable (not included) Subwoofer OUTPUT INPUT TO SPEAKERS /MONO OUTPUT INPUT AUTO PHASE TO SPEAKERS STANDBY /MONO HIGH NORM REV INPUT 1 FROM AMPLIFIER FROM AMPLIFIER POWER INPUT 1 Audio pin cable (not included) Amplifier ■...
-
Page 113: Connecting To Speaker Output Terminals Of The Amplifier
CONNECTIONS [2] Connecting to speaker output terminals of the amplifier Select this method if your amplifier has no line output (pin jack) terminal. For details about the connection method of the INPUT1/OUTPUT terminals, see the “Connecting to the INPUT1/OUTPUT terminals of the subwoofer” on page 10. If your amplifier has two sets of main speaker output terminals and both terminals can output sound signals simultaneously: •... - Page 114 CONNECTIONS If your amplifier has only one set of main speaker output terminals: Connect the speaker output terminals of the amplifier to the INPUT1 terminals of the subwoofer, and connect the OUTPUT terminals of the subwoofer to the main speakers. ■...
-
Page 115: Connecting To The Input1/Output Terminals Of The Subwoofer
CONNECTIONS Connecting to the INPUT1/OUTPUT terminals of the subwoofer For connection, keep the speaker cables as short as possible. Do not bundle or roll up the excess part of the cables. If the connections are faulty, no sound will be heard from the subwoofer or the speakers, or both of them. Make sure that the + and –... -
Page 116: Plug In The Subwoofer To The Ac Outlet
CONNECTIONS ■ VOLTAGE SELECTOR switch Plug in the subwoofer to the AC outlet (For Asia and General models only) After all connections are completed, plug in the subwoofer This unit has a voltage selector switch on the rear and other audio/video components to the AC outlet. panel. -
Page 117: Adjusting The Subwoofer Before Use
ADJUSTING THE SUBWOOFER BEFORE USE Before using the subwoofer, adjust the subwoofer to obtain the optimum volume and tone balance between the subwoofer and the main speakers by following the procedures described below. Subwoofer rear panel PHASE OUTPUT INPUT AUTO PHASE TO SPEAKERS STANDBY... -
Page 118: Automatic Power-Switching Function
AUTOMATIC POWER-SWITCHING FUNCTION This function automatically switches the unit between standby and power-on modes. - The subwoofer automatically places itself in standby mode if it does not receive an input signal for 7 or 8 minutes (the status indicator lights red). - When the subwoofer detects a bass signal input of below 200 Hz, it automatically places itself in power-on mode (the status indicator lights green). -
Page 119: Frequency Characteristics
FREQUENCY CHARACTERISTICS This subwoofer’s frequency characteristics HIGH CUT 40 Hz HIGH CUT 90 Hz HIGH CUT 140 Hz 500Hz The figures below show the optimum adjustment of each control and the frequency characteristics when this subwoofer is combined with a typical main speaker system. ■... -
Page 120: Advanced Yamaha Active Servo Technology Ii
ADVANCED YAMAHA ACTIVE SERVO TECHNOLOGY II In 1988, Yamaha brought to the marketplace speaker Yamaha’s newly developed Advanced YST II adds many systems utilizing YST (Yamaha Active Servo Technology) refinements to Yamaha Active Servo Technology, to give powerful, high quality bass reproduction. This... -
Page 121: Troubleshooting
Refer to the chart below when this unit does not function properly. If the problem you are experiencing is not listed below or if the instructions given below do not help, disconnect the power cord and contact your authorized Yamaha dealer or service center. -
Page 122: Specifications
SPECIFICATIONS Type ..Advanced Yamaha Active Servo Technology II Power Supply U.S.A. and Canada models ....AC 120V, 60 Hz Driver ........25 cm (10”) cone woofer U.K. and Europe models ....AC 230V, 50 Hz Magnetic shielding type Australia model .........AC 240V, 50 Hz Asia and General models Output Power .... - Page 125 YAMAHA ELECTRONICS (UK) LTD. YAMAHA HOUSE, 200 RICKMANSWORTH ROAD WATFORD, HERTS WD18 7GQ, ENGLAND YAMAHA SCANDINAVIA A.B. J A WETTERGRENS GATA 1, BOX 30053, 400 43 VÄSTRA FRÖLUNDA, SWEDEN YAMAHA MUSIC AUSTRALIA PTY, LTD. 17-33 MARKET ST., SOUTH MELBOURNE, 3205 VIC., AUSTRALIA...
Need help?
Do you have a question about the RX-V765 and is the answer not in the manual?
Questions and answers