Table of Contents
Advertisement
Quick Links
Advertisement
Table of Contents

Related Manuals for CYP CP-302MN


Summary of Contents for CYP CP-302MN
- Page 1 CP-302MN Compact HDMI to HDMI Scaler Box Operation Manual Operation Manual...
- Page 3 DISCLAIMERS The information in this manual has been carefully checked and is believed to be accurate. Cypress Technology assumes no responsibility for any infringements of patents or other rights of third parties which may result from its use. Cypress Technology assumes no responsibility for any inaccuracies that may be contained in this document.
-
Page 4: Safety Precautions
SAFETY PRECAUTIONS Please read all instructions before attempting to unpack, install or operate this equipment and before connecting the power supply. Please keep the following in mind as you unpack and install this equipment: • Always follow basic safety precautions to reduce the risk of fire, electrical shock and injury to persons. -
Page 5: Table Of Contents
CONTENTS 1. Introduction ..........1 2. Applications ........... 1 3. Package Contents ........ 1 4. System Requirements ......1 5. Features ..........2 6. Operation Controls and Functions ..3 6.1 Top Panel ..........3 6.2 Right Panels ........4 6.3 Left Panels .........4 6.4 Side Panel .........5 6.5 OSD Menu .........5 8. -
Page 6: Introduction
1. INTRODUCTION The compact HDMI to HDMI Scaler box is designed to scale HDMI sources, either HD or PC resolution, to an alternative HDMI resolution (HD or PC). Both of maximum support input and output resolution is up to 1920 x 1200. The HDMI, HDCP and DVI are compliant which is perfect solution for the integration of sources where resolution and/or resolution type requires conversion. -
Page 7: Features
5. FEATURES • HDMI 1.3, HDCP 1.4 and DVI 1.0 compliant • Upscale the video signal from an HDMI source up to 1920x1200@60RB • Accepts a wide range of input resolutions of 480i to 1080p (HDTV) • Manual adjustments for contrast, brightness, hue and saturation are achievable •... -
Page 8: Operation Controls And Functions
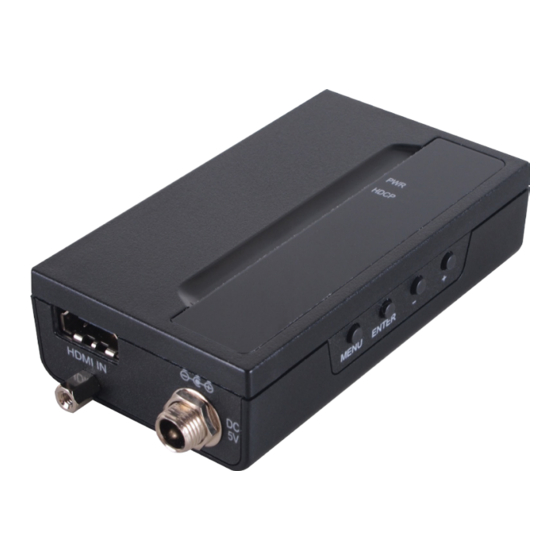
6. OPERATION CONTROLS AND FUNCTIONS 6.1 Top Panel HDCP PWR: This LED will illuminate when the scaler box connected to a power supply. When LED flashing, the scaler box goes to “standby” mode. HDCP: This LED will illuminate when detected HDCP source. -
Page 9: Right Panels
6.2 Right Panels HDMI IN HDMI IN: Connect to an HDMI source such as a PC/Laptop or DVD player with an HDMI cable. DC 5V: Plug the 5V DC power supply into the unit and connect the adaptor to an AC outlet. 6.3 Left Panels SERVICE HDMI OUT... -
Page 10: Side Panel
6.4 Side Panel MENU ENTER MENU: Press this key to enter menu, press again to return. ENTER: Press this key to confirm menu selection. Press “ENTER” key then plug the power in for factory reset. +/-: When into menu selection, press “+” or “–“ to navigate up and down, when no in OSD menu selection, press “+”... - Page 11 Main Menu Sub Menu Description Default Aspect Full Set picture aspect Full ratio. 16:9 TV 4:3 TV 16:10 TV Keep Ratio Overscan Enable To enable or disable over scan(Yes/No). H Size% Horizontal percentages adjust(0~50%). V Size% Vertical perventages adjust(0~50%). Input EDID Pref.
- Page 12 Main Menu Sub Menu Description Default Pref. Audio Set Input EDID Follow TV audio data block. ( LPCM 2CH, LPCM 6CH, LPCM 8CH, Bitstream, HD, Follow TV**) Output 480p, 576p, Set output 720p59 Resolution 720p50,720p59, resolution. 720p60, 1080p23, 1080p24, 1080p25, 1080p29,1080p30, 1080i50, 1080p50, 1080i59, 1080i60,...
- Page 13 Main Menu Sub Menu Description Default HDCP Input Set input HDCP Auto status. Set to On for HDCP supported; Off for HDCP non- supported, Auto for follow TV setting. Output Set output HDCP Auto status. Set to Follow Source for follow source setting;...
- Page 14 Main Menu Sub Menu Description Default Background Set background Grey color Grey, Cyan, Magenta or Yellow. Others Standby(Min.) Set stand by time to Off, 3sec, 5sec, 10sec, 20sec, 30sec, 1min, 2min, 3min, 4min, 5min, 10min, 15min, 20min, 25min, 30min Mirror-V Set mirror to On/Off Off Still Options***** Set still to Video,...
- Page 15 native timing cannot be supported, then will set to 720p59. **** When H POSITION set to 95 or ab more, INFO. will be at right of MENU. When V POSITION set to 95 or more, INFO. will be at bottom of MENU.
-
Page 16: Connection Diagram
7. CONNECTION DIAGRAM DVD Player HDMI Input Power Supply HDMI IN SERVICE HDMI OUT HDMI Output HD TV/Monitor... -
Page 17: Specifications
8. SPECIFICATIONS Maximum Pixel Rate 165 MHz (output) / 225MHz (input) Input Ports 1×HDMI 1×Mini USB(Service only) Output Ports 1×HDMI LED on top plates 1 x Power LED 1 x LED for HDCP status Audio Sampling Rate 44.1, 48, 96,192 kHz HDMI Cable In 10 m/1080p@12-bit HDMI Cable Out... -
Page 18: Timing
9. TIMING DVI AND HDMI SUPPORTED RESOLUTIONS INPUT OUTPUT 480i@59 480p@59 480p@60 576i@50 576p@50 720p@24/25/30/50/60 720p@50/59/60 1080i@50/60 1080i@59 1080p@24/25/30/50/60 1080p@23/29/59 640x480@60 ... - Page 19 DVI AND HDMI SUPPORTED RESOLUTIONS INPUT OUTPUT 1366x768@60 1366x768@60RB/60 1400x1050@60RB/60 1400x1050@60 1440x900@60RB/60/75 1440x900@60 1600x900@60RB 1600x1200@60 1680x1050@60RB 1680x1050@60 1920x1200@60RB NATIVE ...
- Page 20 CYPRESS TECHNOLOGY CO., LTD Home page: http://www.cypress.com.tw MPM-CP302MN...
Need help?
Do you have a question about the CP-302MN and is the answer not in the manual?
Questions and answers